Page is loading ...

September
1975
FORM:OM-1513
Effective
with
serial
No.
HE764062
MODEL
Dual
4850-2
4850-3
5290-2
5290-3
STOCK
NO.
Swingarc
078
078
126
124
078
130
078
128
ADDITIONAL
COPY
PRICE
70
CENTS
MODEL/STOCK
NO.
SERIAL/STYLE
NO.
DATE
PURCI-IASED
OWNERS
MANUAL
MILLER
ELECTRIC
MFG.
CO.
APPLETON,
WISCONSIN,
USA
54911
El
NWSA
CODE
NO.
4579
U.
S.
S.


SECTION
1
-
INTRODUCTION
Model
12
Foot
Boom
I
16
Foot
Boom
Motor
1/4
Horsepower,
D.C.
10.000
RPM
Control
Solid
State
With
Relays
Solid
State
With
Relays
Speed
Range
No.
2
gear
70
to
500
1P.M.
No.
3
gear
100
to
750
1P.M.
Boom
Turning
Radius
)Standard)
lift.
16
ft.
Boom
Turning
Radius
(Minimum)
5
ft.
10
ft.
Boom
Turning
Radius
(Maximum)
lift.
16
ft.
Swing
360
On
P0
st
Mounting
Vertical
Lift
Horizontal
To
+70
Above
Maximum
Height
(With
4
Ft.
Post)
To
Top
Of
Boom
At
Tip
(+70
Position)
15
ft
.
20
ft
.
Wire
Reels
12
ID.
Coil
60
Pounds
12
O.D.
Spool
25
Pounds
Counterbalance
(Patented)
Compression
spring
designed
to
fold
boom
at
any
angle
adjustable
pressure
(a
broken
spring
would
drop
weld
head
only
6
inches)
Adjustable
Burnback
Timer
3/8
to
3/4
sec.
(one
side
only)
3/8
to
3/4
sec.
(one
side
only)
Weight
(Pounds)
Net
190
Ship
255
Net
215
Ship
285
Figure
1-1.
Specifications
1-1.
GENERAL
This
manual
has
been
prepared
especially
for
use
in
familiar
izing
personnel
with
the
design,
installation,
operation,
main
tenance,
and
troubleshooting
of
this
equipment.
All
informa
tion
presented
herein
should
be
given
careful
consideration
to
assure
optimum
performance
of
this
equipment.
1-2.
RECEIVING-HANDLING
Prior
to
installing
this
equipment,
clean
all
packing
material
from
around
the
unit
and
carefully
inspect
for
any
damage
that
may
have
occurred
during
shipment.
Any
claims
for
loss
or
damage
that
may
have
occurred
in
transit
must
be
filed
by
the
purchaser
with
the
carrier.
A
copy
of
the
bill
of
lading
and
freight
bill
will
be
furnished
by
the
carrier
on
request
if
occasion
to
file
claim
arises.
When
requesting
information
concerning
this
equipment,
it
is
essential
that
Model
Description
and/or
Stock
Number
and
Serial
(or
Style)
Numbers
of
the
equipment
be
supplied.
1-4.
SAFETY
The
following
definitions
apply
to
CAUTION,
IMPORTANT,
and
NOTE
blocks
found
throughout
this
manual:
~i~iuiii.~i..uJ
Under
this
heading,
installation,
operating,
and
main
tenance
procedures
or
practices
will
be
found
that
if
not
carefully
followed
may
create
a
safety
hazard
to
personnel.
:
Under
this
heading,
installation,
operating,
and
main
tenance
procedures
or
practices
will
be
found
that
if
not
carefully
followed
may
result
in
damage
to
equip.
ment.
This
control/feeder
is
of
the
constant
wire
feed
speed
type
and
is
designed
to
be
used
in
conjunction
with
a
constant
potential
welding
power
source.
The
control/feeder
is
a
heavy
duty
dual
wire
feeding
unit
which
combines
both
the
wire
feeders
and
the
control.
It
contains
all
the
controls
and
equipment
needed
to
supply
welding
wire
and
shielding
gas
to
two
welding
guns.
I
I
II
Under
this
heading,
explanatory
statements
will
be
found
that
need
special
emphasis
to
obtain
the
most
efficient
operation
of
the
equipment.
I
I
SECTION
2
-
INSTALLATION
2-1.
LOCATION
The
control/feeder
with
a
12
foot
boom
is
equipped
with
a
6
foot
long
by
2-1/2
inch
diameter
post
for
mounting
purposes.
The
control/feeder
with
a
16foot
boom
is
equipped
with
a
6
foot
long
by
4
inch
diameter
post
for
mounting
purposes.
Ensure
that
the
item
to
which
the
unit
is
being
installed
is
of
sufficient
construction
to
permit
the
boom
to
be
pulled
com
pletely
down
without
having
the
control/feeder
tip.
Also,
ensure
that
enough
space
is
available
to
permit
the
boom
to
swing
in
a
complete
circle.
A.
Assembly
1.
Uncrate
and
remove
all
packing
material
from
the
con
trol/feeder.
2.
Remove
pin
(item
1,
Figure
2-1),
nut
(7),
washers
(6
&
12),
and
bolt
(13)
from
the
boom.
Do
not
remove
safety
collar
(5)
until
instructed
to
do
so.
3.
Place
the
boom
base
plate
(14)
in
between
the
two
swivel
plates.
4.
Slide
washer
(12)
onto
bolt
(13)
and
insert
bolt
(13)
through
hole
(11).
Slide
washer
(6)
onto
bolt
(13)
and
install
nut
(7)
onto
bolt
(13).
Tighten
nut
(7)
then
back
off
1/2
turn.
5.
Insert
pin
(1)
through
yoke
(4),
hole
(2).
and
install
ii
cotter
pin
(3)
through
pin
(1).
I
1
-
3.
DESCRIPTION
I
.
I
NOTE
I
I
If
an
optional
mounting
pedestal
was
purchased
with
the
control/feeder,
mounting
holes
are
provided
in
the
pedestal
for
attaching
the
control/feeder.
OM-l
513
Page
1

6.
Mount
pipe
post
(10)
to
the
desired
fixture.
7.
Place
bearing
(9)
on
top
of
post
(10)
and
insert
swivel
181
into
post
(10).
8.
Connect
the
welding
guns
to
the
drive
assembly
as
instructed
in
Section
2
of
this
manual.
9.
Grasp
bar
114)
and
pull
boom
down
slightly.
The
boom
should
be
pulled
down
only
far
enough
to
remove
the
pressure
which
is
applied
to
the
safety
collar
(51.
10.
Remove
the
safety
collar
151.
11.
The
boom
should
now
balance
in
any
position
from
horizontal
to
70
degrees
above
horizontal.
If
the
boom
does
not
balance
properly,
proceed
to
item
2-13.
2-2.
INSTALLATION
OF
ELECTRODE
WIRE
GUN
CONNECTORS
(Figure
2-2)
Proceed
as
follows
to
install
the
Electrode
Wire
Gun
Connec
tors
into
the
drive
assembly
on
the
control/feeder:
1.
Loosen
the
gun
connector
securing
screw.
See
Figure
2-2
for
the
location
of
the
securing
screw.
2.
Insert
the
Electrode
Wire
Gun
Connector
fully
into
the
outlet
hole
with
the
flat
side
of
the
connector
facing
the
gun
connector
securing
screw.
3.
Rotate
the
Electrode
Wire
Gun
Connector
90
degrees
in
a
clockwise
direction.
4.
Tighten
the
gun
connector
securing
screw.
Figure
2-2.
Pressure
and
Feed
Roll
and
Wire
Guide
Installation
TB-039
385
TC-003
300
2
.4
5
~10
7
Figure
2-1.
Control/Feeder
Assembly
6
5
12~~
H
4
Gun
Connector
Securing
12
7
Page
2

2-3.
ELECTRODE
WIRE
INLET
&
OUTLET
GUIDE
INSTALLATION
(Figure
2-2)
1.
Loosen
the
outlet
guide
securing
screw
(item
11,
Figure
2-21.
2.
Install
the
Electrode
Wire
Gun
Connector
into
the
drive
assembly
as
instructed
in
heading
2-2.
3.
Insert
the
outlet
guide
(12)
flat
end
first
into
the
back
side
of
the
outlet
guide
hole
in
the
drive
assembly.
4.
Push
the
outlet
guide
(12)
into
the
outlet
guide
hole
until
the
outlet
guide
seats
against
the
Electrode
Wire
Gun
Con
nector
or
if
the
outlet
guide
is
equipped
with
a
flange,
until
the
flange
seats
against
the
drive
assembly.
5.
Tighten
the
outlet
guide
securing
screw
(11).
6.
Loosen
the
inlet
guide
securing
screw
(2).
7.
Insert
the
inlet
guide
(1)
point
first
into
the
inlet
guide
hole
until
the
flange
on
the
inlet
guide
(1)
seats
against
the
drive
assembly.
8.
Tighten
the
inlet
guide
securing
screw
(2).
2-
4.
PRESSURE
&
FEED
ROLL
INSTALLATION
(Fig
ure
2-2)
1.
Loosen
the
pressure
adjustment
collar
and
pivot
the
pres
sure
adjustment
assembly
off
of
the
pressure
roll
mount
ing
bracket.
Swing
the
pressure
roll
mounting
bracket
up.
2.
Remove
nut
(item
6,
Figure
2-2),
split-lock
washer
(5),
and
flat
washer
(4)
from
the
feed
roll
shaft.
NOTE
j
Prior
to
installing
the
feed
roll,
ensure
that
the
supplied
key
is
in
the
groove
in
the
feed
roll
shaft.
3.
Slide
the
keyed
feed
roll
(3)
onto
the
feed
roll
shaft.
4.
Insert
a
split-lock
washer
(5)
and
flat
washer
(4)
onto
the
feed
roll
shaft
and
install
nut
(6)
onto
the
feed
roll
shaft.
5.
Remove
bolt
(7),
split-lock
washer
(8),
flat
washer
(9),
and
pressure
roll
(10)
from
the
pressure
roll
mounting
bracket.
6.
Slide
pressure
roIl
(10)
onto
the
shaft
on
the
pressure
roll
mounting
bracket.
7.
Slide
split-lock
washer
(8)
and
flat
washer
(9)
onto
bolt
(7)
and
install
bolt
(7)
into
the
shaft
on
the
pressure
roll
mounting
bracket.
8.
Lower
the
pressure
roll
mounting
bracket
until
the
teeth
in
the
upper
and
lower
drive
rolls
mesh
together.
9.
Pivot
the
pressure
adjustment
assembly
upward
until
it is
on
top
of
the
pressure
roll
cover
and
then
tighten
the
collar
to
the
desired
amount
of
pressure.
NOTE
The
pressure
adjustment
collar
will
have
to
be
adjusted
for
proper
tension
prior
to
operation
of
the
control/
feeder.
The
amount
of
pressure
will
vary
from
one
given
set
of
welding
conditions
to
another
and
should
be
just
tight
enough
to
prevent
pressure
and
feed
roll
slippage
on
the
wire.
The
pressure
roll
mounting
bracket,
which
holds
the
pressure
roll,
can
be
moved
on
a
horizontal
plane
in
order
to
facilitate
alignment
of
the
groove
in
the
pressure
roll
with
respect
to
the
groove
in
the
feed
roll.
The
pressure
roll
should
be
checked
for
proper
alignment
whenever
erratic
wire
feed
is
noted
or
whenever
the
pressure
and
feed
rolls
are
changed.
To
check
for
proper
alignment
of
the
pressure
roll,
remove
she
outlet
guide
and
look
into
the
outlet
guide
hole
in
the
drive
assembly.
Upon
viewing
the
groove
between
the
pres.
sure
and
feed
rolls
it
should
be
noted
that
the
outer
edges
of
the
grooves
on
the
pressure
and
feed
rolls
should
be
precisely
aligned.
Figure
2-3
shows
examples
of
proper
and
improper
alignment.
If
the
pressure
and
feed
rolls
are
not
in
alignment,
proceed
as
follows
to
adjust
the
pressure
roll:
1.
Loosen
the
pressure
adjustment
collar
and
pivot
it
off
of
the
pressure
roll
mounting
bracket.
2.
Using
a
9/16
wrench,
loosen
the
outer
securing
bolt.
3.
Using
a
5/8
wrench,
rotate
the
adjustment
nut
as
re
quired.
Rotating
the
adjustment
nut
clockwise
will
move
the
pressure
roll
outward
and
counterclockwise
rotation
will
move
the
pressure
roll
inward.
4.
When
proper
alignment
is
achieved,
tighten
the
outer
securing
bolt
to
lock
the
pressure
roll
in
position.
5.
Pivot
the
pressure
adjustment
assembly
upward
until
it
is
on
top
of
the
pressure
roll
mounting
bracket
and
then
tighten
the
collar
to
the
desired
amount
of
pressure.
Figure
2-3.
Pressure
Roll
Alignment
2-6.
INSTALLATION
OF
OPTIONAL
WIRE
BAIL
REEL
1.
Remove
the
four
wing
nuts
from
the
reel.
2.
Pull
the
four
retaining
arms
out
until
the
retaining
arms
can
be
rotated
inward
toward
the
center
of
the
reel.
3.
Install
the
wire
bail
onto
the
reel
over
the
four
retaining
arms
in
the
manner
which
will
permit
the
wire
to
feed
from
the
top
of
the
bail.
4.
Rotate
the
retaining
arms
up
and
push
the
base
of
the
retaining
arm
through
the
retaining
ring
on
the
reel.
Install
the
four
wing
nuts
on
the
retaining
arms.
OM-1
513
Page
3
bou~
Outer
Securing
Bolt
43
a
Outlet
Counter-
Proper
clockwise
Alignment
Rotation
of
Adjustment
Nut
Required
Clockwise
Rotation
ot
Adjustment
Nut
Required
2
-
5.
PRESSURE
ROLL
ALIGNMENT
(Figure
2-3)
TC-003
301

2
-
7.
INSTALLATION
OF
OPTIONAL
WIRE
SPOOL
1.
Remove
the
retaining
ring
from
the
spindle
by
rotating
the
retaining
ring
in
a
counterclockwise
direction.
2.
Slide
the
spool
of
wire
onto
the
spindle
so
that
the
wire
will
pay
off
from
the
top
of
the
spool.
3.
Rotate
the
spool
until
the
hole
in
the
spool
hub
aligns
with
the
protruding
pin
in
the
flange
of
the
spindle.
En
sure
that
the
spool
is
seated
against
the
flange
of
the
spindle.
4.
Rotate
the
retaining
ring
onto
the
spindle
in
a
clockwise
direction
until
the
retaining
ring
is
seated
against
the
spool.
2
-
8.
SHIELDING
GAS
CONNECTIONS
A
12-1/2
foot
hose
is
supplied
for
making
connections
from
the
shielding
gas
source
to
the
control/feeder.
The
shielding
gas
which
is
fed
into
the
supplied
hose
will
be
supplied
to
both
the
left
and
right
shielding
gas
valves.
If
it is
desired
to
feed
a
different
type
of
shielding
gas
to
each
shielding
gas
valve,
it
is
necessary
to
remove
the
jumper
hose
which
is
connected
between
the
input
of
the
two
valves.
It
is
also
necessary
to
remove
the
tee
fitting
from
the
right
shield
ing
gas
valve
input
fitting
and
to
install
the
supplied
shielding
gas
hose
directly
into
the
right
shielding
gas
valve
input
fit
ting.
A
hose
will
have
to
be
supplied
for
connection
to
the
left
shielding
gas
valve
input.
The
shielding
gas
hoses
which
come
from
the
guns
are
to
be
connected
to
the
LEFT
GAS
and
RIGHT
GAS
hoses
which
protrude
from
the
motor
end
of
the
boom.
2
-
9.
WELD
CABLE
CONNECTION
A
ten
foot,
2/0
weld
cable
extends
out
of
the
back
end
of
the
boom
for
making
secondary
connections
to
the
welding
power
source.
This
end
of
the
weld
cable
is
equipped
with
a
1/2
inch
lug.
The
opposite
end
of
this
weld
cable
is
connected
to
a
bolt
on
the
drive
assembly.
The
bolt
on
the
drive
assembly
serves
as
a
junction
point
for
joining
together
the
weld
cable
from
the
welding
power
source
and
the
weld
cable
from
the
guns.
NOTE
If
two
welding
power
sources
are
to
be
used,
a
jumper
cable
will
have
to
be
connected
from
the
welding
power
source
secondary
terminal
which
has
the
weld
cable
from
the
control/feeder
connected
to
it
to
the
secondary
terminal
of
the
same
polarity
on
the
second
~
welding
power
source.
2-10.
CONTACTOR
CONTROL
CONNECTIONS
Two
15
foot
contactor
control
cables
are
provided
from
the
control
unit
for
making
connections
to
the
contactor
control
circuitry
in
the
welding
power
sourcas.
Through
minor
modi
fication
the
contactor
control
circuitry
in
this
control/feeder
can
be
adapted
to
operate
just
one
welding
power
source
from
both
guns.
The
control/feeder
is
shipped
connected
to
operate
two
welding
power
sources,
that
is,
the
left
gun
governing
contactor
control
to
one
welding
power
source
and
the
right
gun
governing
contactor
control
to
the
other.
If
two
welding
power
sources
are
to
be
used,
connect
the
two
leads
from
the
RIGHT
contactor
control
cable
to
the
contactor
control
circuitry
in
one
of
the
welding
power
sources
and
connect
the
two
leads
from
the
LEFT
contactor
control
cable
to
the
contactor
control
circuitry
in
the
second
welding
power
source.
tactor
co
niliriih
at
is
to
be
u
sed
in
conjunction
with
this
control/feeder
must
be
of
the
type
that
operates
on
115
volts
60
Hertz
power.
This
is
necessary
because
the
control/feeder
will
supply
115
volts
ac
through
the
contactor
control
cable
whenever
the
gun
switch
is
closed.
If
only
one
welding
power
source
is
to
be
used
to
supply
weld
currant
to
both
guns
it
will
be
necessary
to
perform
the
following
wiring
change
in
the
control
unit
contactor
control
circuitry.
To
make
the
necessary
wiring
change,
refer
to
Fig
ure
2-4
and
proceed
as
follows:
1.
Loosen
the
control
unit
cover
securing
screw
and
pivot
the
cover
and
front
panel
to
the
open
position.
2.
Disconnect
the
RIGHT
contactor
control
cable
black
lead
from
terminal
No.
3
on
terminal
strip
1
T.
3.
Connect
the
black
lead
to
terminal
No.
Son
terminal
strip
1
T.
4.
Pivot
the
cover
and
front
panel
to
the
close
position
and
secure
in
place
with
the
control
unit
cover
securing
screw.
5.
Separately
insulate
the
two
LEFT
contactor
control
cable
leads.
The
LEFT
contactor
control
cable
may
now
be
placed
out
of
the
way
as
it
will
not
be
required.
6.
Connect
the
RIGHT
contactor
control
cable
to
the
con
tactor
control
circuitry
in
the
welding
power
source.
TC-003
299
Figure
2-4.
Contactor
Control
Wiring
Change
2-11.
GUN
SWITCH
RECEPTACLES
Two
four-prong
male
receptacles
protrude
out
of
the
motor
end
of
the
boom
for
connecting
the
gun
plugs
to
the
con
trol/feeder.
Connect
the
left
gun
to
the
gun
switch
receptacle
labeled
LEFT
and
the
right
gun
to
the
RIGHT
receptacle.
2-12.
115
VOLTS
AC
INPUT
CONNECTION
The
115
volts
ac
input
cable
must
be
connected
to
an
outlet
which
is
capable
of
supplying
115
volts
60
Hertz
electrical
power.
CAUTION
The
control/feeder
will
be
electrically
hot
internally
and
ready
to
operate
as
soon
as
the
115
volts
ac
plug
is
connected
to
the
115
volts
ac
source.
Disconnect
right
contactor
control
black
lead
from
terminal
3
and
connect
black
lead
to
terminal
5
when
using
one
weld
ing
power
source.
Separate
and
insulate
the
left
contactor
control
leads
when
using
one
welding
power
source.
Page
4

2-13.
BOOM
ADJUSTMENTS
(Figure
2-5)
A.
Weight
Lift
Adjustment
The
amount
of
weight
which
the
boom
can
retract
into
the
upright
potition
when
released
can
be
varied
by
adjustment
of
the
jam
nut
and
adjustment
rod
located
at
the
base
of
the
boom.
If
a
heavier
gun
is
installed
on
the
end
of
the
boom
thereby
making
it
necessary
to
increase
the
amount
of
weight
that
the
boom
can
lift,
loosen
the
jam
nut
and
rotate
the
adjustment
rod
so
that
the
adjustment
rod
threads
into
the
yoke.
When
the
proper
adjustment
is
attained,
tighten
the
jam
nut
against
the
base
of
the
yoke.
If
a
lighter
gun
is
installed
on
the
control/feeder,
rotate
the
adjustment
rod
so
that
the
adjustment
rod
threads
out
of
the
yoke.
B.
Locking
Knob
By
rotating
the
Locking
Knob
in
a
clockwise
direction,
the
boom
may
be
held
in
any
desired
position.
Rotating
the
Locking
Knob
in
a
counterclockwise
direction
will
permit
the
boom
to
free
travel.
SECTION
3-FUNCTION
OF
CONTROLS
Figure
3-1.
Control
Location
3-
1.
WIRE
SPEED
CONTROLS
(Figure
3-1)
The
Wire
Speed
Controls
provide
a
means
of
determining
the
rate
at
which
welding
wire
will
be
fed
into
the
weld.
Rotating
the
Wire
Speed
Controls
in
a
clockwise
direction
will
increase
the
rate
of
wire
feed.
When
the
Wire
Speed
Controls
are
set
at
0,
wire
will
feed
at
the
minimum
1PM;
when
set
at
10,
the
wire
will
feed
at
the
maximum
1PM.
3-2.
CIRCUIT
BREAKER
(Figure
3-1)
A
circuit
breaker,
located
on
the
rear
panel
of
the
control/
feeder,
provides
protection
to
the
control/feeder
circuitry.
In
the
event
the
motor
should
be
placed
in
an
overload
condi
tion,
the
breaker
would
trip
and
suspend
all
output.
Should
this
breaker
trip,
it
would
have
to
be
manually
depressed
to
reset.
3-
3.
PURGE
SWITCHES
(Figure
3-1)
The
PURGE
Switches,
located
on
the
front
panel
of
the
con
trol/feeder.
are
both
momentary
contact
switches.
These
switches
will
energize
the
corresponding
shielding
gas
solenoid
and
purge
the
shielding
gas
line
of
the
associated
gun.
It
also
allows
the
shielding
gas
regulator
to
be
adjusted
without
energizing
the
welding
circuit.
3-4.
ADVANCE
SWITCHES
(Figure
3-1)
The
ADVANCE
Switches,
located
on
the
front
panel
of
the
control/feeder
are
spring
actuated
toggle
switches.
When
actuated
it
completes
the
circuit
to
the
motor
without
having
to
depress
the
gun
switch.
This
switch
will
permit
inching
or
threading
of
the
wire
at
whatever
setting
the
corresponding
Wire
Speed
Control
is
at,
without
energizing
the
welding
power
source
contactor
or
the
corresponding
gas
valve.
3-5.
BURNBACK
CONTROL
(Figure
3-1)
The
burnback
circuitry
in
this
control/feeder
provides
a
means
of
keeping
the
right
welding
wire
from
sticking
to
the
workpiece
or
the
contact
tube
in
the
right
gun
after
the
gun
switch
is
released.
The
burnback
capability
in
this
control/
feeder
will,
depending
upon
the
setting
of
the
Burnback
Con
trol,
keep
weld
current
present
on
the
right
welding
wire
from
1/4
to
3/4
of
a
second
after
the
wire
has
stopped
feeding.
This
delay
action
will
permit
the
right
welding
wire
to
burn
back
to
a
point
where
it
will
neither
stick
to
the
workpiece
or
the
contact
tube.
If
the
right
welding
wire
sticks
to
the
contact
tube
in
the
gun
after
the
gun
switch
is
released,
rotate
the
Burnback
Control
to
a
more
counter
clockwise
position.
If
the
right
welding
wire
sticks
to
the
workpiece
after
the
gun
switch
is
released,
rotate
the
Burn-
back
Control
to
a
more
clockwise
position.
NOTE
The
Burnback
Control
is
located
directly
behind
the
control
unit
front
panel.
It
is
necessary
to
raise
the
control
unit
cover
in
order
to
gain
access
to
the
Burn
back
Control.
SECTION
4
-
SEQUENCE
OF
OPERATION
4-
1.
WELDING
WIRE
THREADING
1.
If
used,
install
the
wire
spool
or
bail
onto
the
optional
wire
spool
spindle
or
wire
bail
reel
as
instructed
in
item
2-6.
2.
Cut
off
any
portion
of
the
free
end
of
she
welding
wire
which
is
not
straight.
3.
Route
the
welding
wire
through
the
wire
guide
tubes
on
the
side
of
the
boom
up
to
the
drive
assembly.
4.
Lift
up
the
pressure
roll
cover.
5.
Install
the
Electrode
Wire
Gun
Connector
as
instructed
in
item
2-2.
6.
Check
she
pressure
roll
for
proper
alignment
as
instructed
in
item
2-5.
7.
Feed
the
wire
through
the
inlet
guide
and
on
into
the
outlet
guide.
Feed
approximately
4
inches
of
wire
into
the
outlet
guide.
S
Yoke
Jam
Nut
Adjustment
Rod
Locking
Left
wire
Speed
Control
Switch
Figure
2-5.
Boom
Adjustments
TB-003
298
Left
Pui
Switch
Right
Wire
Speed
control
Right
Purge
Switch
Gas
Valve
Right
Advance
Switch
TA-003
275
OM-1
513
Page
5

4.
Energize
the
control/feeder.
5.
Turn
on
the
shielding
gas
supply
and
press
the
PURGE
Switch
for
10
seconds.
6.
Depress
she
trigger
on
the
desired
gun.
Gas
will
start
to
flow
and
wire
will
start
so
feed
if
drive
roll
pressure
is
properly
adjusted
to
prevent
slippage.
If
wire
slippage
is
noticed,
tighten
the
pressure
adjustment
collar
1/2
turn
clockwise.
Repeat
until
slippage
stops.
Do
not
tighten
pressure
adjustment
collar
too
much.
TI
us
fl.i
~IIJ
The
welding
wire
and
all
metal
parts
in
contact
with
it
are
energized
while
welding.
Do
not
touch
the
welding
wire
or
any
metal
part
making
contact
with
it.
CAUTION
I
If
welding
is
performed
in
a
confined
area,
failure
to
turn
off
the
shielding
gas
supply
could
result
in
a
build-up
of
shielding
gas
fumes,
thereby
endangering
personnel
re-entering
the
welding
area.
TROUBLE
PROBABLE
CAUSE
REMEDY
Depressing
gun
switch
will
not
energize
control/feeder.
Electrode
wire
is
not
energized
and
shielding
gas
does
not
flow.
Circuit
breaker
tripped.
Manually
reset
circuit
breaker
by
depressing.
Plug
from
gun
twitch
is
not
secure
in
Gun
Switch
Receptacle
on
control/feeder.
Insert
plug
fully
into
Gun
Switch
Receptacle
and
tighten.
11
5
volt
ac
input
plug
is
not
secure
in
receptacle.
Insert
plug
fully
into
115
vac
receptacle.
Wire
feeds,
shielding
gas
flows,
but
electrode
wire
is
not
energized.
Contactor
Control
cable
leads
not
secure
on
contactor
plug
terminals.
Secure
leads
to
plug
terminals.
Defect
in
welding
power
source.
See
troubleshooting
section
in
welding
power
source
instruction
manual.
Wire
feeds
erratically.
Pressure
on
pressure
and
feed
rolls
is
insuf-
ficient.
Rotate
pressure
adjustment
collar
clockwise
in
1/4
turn
increments
until
wire
slippage
ttops.
Pressure
and
feed
rolls
are
too
large
for
wire
size
being
used.
Change
to
proper
size
pressure
and
feed
rolls.
Worn
pressure
and
feed
rolls.
Replace
pressure
and
feed
rolls.
See
section
2-4.
Dirt
in
pressure
and
feed
roll
grooves.
Clean
feed
rollt.
Motor
is
inoperative.
Worn
brushes.
Replace
motor
brushes.
Motor
plug
not
secure
in
receptacle.
Tighten
motor
plug.
8.
Secure
the
pressure
roll
cover.
9.
Tighten
the
pressure
adjustment
collar
for
the
approxi
mate
amount
of
pressure
desired
on
the
pressure
and
feed
rolls.
Precise
adjuttment
of
the
pressure
adjust
ment
assembly
will
have
to
be
made
when
welding
commences.
10.
Connect
the
115
Volts
AC
plug
from
the
control/
feeder
into
a
115
Volts
60
Hertz
source.
11.
Connect
the
Switch
Control
Plug
from
the
gun
into
the
Gun
Switch
Receptacle
on
the
boom.
12.
Lay
the
gun
cable
out
straight.
13.
Depress
the
appropriate
ADVANCE
Switch
until
the
electrode
wire
extends
approximately
one
inch
out
of
the
corresponding
gun
tip.
4-2.
GAS
METAL-ARC
WELDING
1.
Make
all
necessary
connections
as
instructed
in
Section
2
of
this
manual.
2.
Rotate
the
WIRE
SPEED
Controls
to
the
desired
setting.
3.
Rotate
the
BURN
BACK
Control
to
the
desired
setting.
rt~hf~~IJ
Prior
to
welding,
it is
imperative
that
proper
protective
clothing
(welding
coat
and
gloves)
and
eye
protection
(glasses
and/or
welding
helmet)
be
put
on.
Failure
to
comply
may
result
in
serious
or
permanent
bodily
damage.
4-3.
SHUTTING
DOWN
1.
Turn
off
the
shielding
gas
at
the
source
or
sources.
2.
Remove
the
115
Volts
AC
plug
from
the
source.
3.
Turn
off
all
associated
equipment.
SECTION
5
-
TROUBLESHOOTING
The
data
collected
here,
discusses
some
of
the
common
problems
which
may
occur
in
this
control/feeder.
The
atsumption
of
this
data
it
that
a
proper
welding
condition
has
been
achieved
and
has
been
used
until
trouble
developed.
In
all
cases
of
equipment
malfunction,
the
manufacturers
recommendations
should
be
strictly
adhered
to
and
followed.
If
after
performing
the
following
procedures
the
trouble
is
still
not
remedied,
it
is
recommended
that
a
serviceman
be
called.
It
is
recommended
that
the
circuit
diagram
be
used
for
reference
during
troubleshooting.
Page
6

TO
TRIGGER
GUN
2
TO
TRIGGER
GUN
1
I
075
274
I
CONTROL
MODULE
Circuit
Diagram
No.
B-003
599
Figure
5-1.
Circuit
Diagram
-u
0,
CD
-4

PLI
Y

September
1975
FORM:
OM-1513
Effective
with
serial
No.
HE764062
MODEL
STOCK
NO.
Dual
Swingarc
4850-2
078
126
4850-3
078
124
5290-2
078
130
5290-3
078
128
MODEL/STOCK
NO.
SERIAL/STYLE
NO.
DATE
PURCHASED
PARTS
LIST
MILLER
ELECTRIC
MFG.
CO.
APPLETON,
WISCONSIN,
USA
54911
NWSA
CODE
1~O.
4579

Item
No.
Factory
Part
No.
Figure
A
Main
Assembly
Description
Quantity
Model
Dual
Dual
l2Ft.
l6Ft.
1
074
981
CABLE,
motor
(consisting
of)
1
074
982
CABLE,
motor
(consisting
of)
2
PLG4
073
295
.
PLUG,
4
pin-Amphenol
97-3106A-20-4P-639
3
073.296
.
CLAMP,
cable-Amphenol
97-3057-12-6
4
RC5
073
511
.
RECEPTACLE,
4
socket
-
Amphenol
97-31
01
A-20-4S
5
600
342
077
650
.
CORD,
portable
No.
16/4
conductor
(order
by
foot)
.
TUBING,
vinyl
No.
7
(3/4
inch
Ig)
6
079
203
HOSE,
gas
(consisting
of)
6
079
204
HOSE,
gas
(consisting
of)
7
010
604
.
ADAPTER,
gas
-
brass
1/4-18
NPT
5/8-18
female
8
079
196
-
COUPLING,
brass
-
female
3/16
ID
hose
1/4
NPT
9
073
839
-
FERRULE,
brass
10
604 550
.
HOSE,
whippet
3/16
x
1
(order
by
foot)
11
010606
.
NUT,
brass-swivel
5/8-18
right
hand
12
056851
.
NIPPLE,
brass-hose
3/16
inch
13
000
160
HOSE,
gas
-
left
hand
(consisting
of)
13
003
159
HOSE,
gas
-
left
hand
(consisting
of)
7
010
604
-
ADAPTER,
gas
-
brass
1/4-18
NPT
5/8-18
female
1
2
14
ft.
8
2
15
ft.
1
1
1
1
1
2
18
ft.
8
1
1
2
19
ft.
1
1
Fig
E
6
7
25
Fig
C
I
30
TD-039
187
Figure
A
Main
Assembly
OM-1513
Page
1

Quantity
Model
Dual
Dual
l2Ft. l6Ft.
I
tern
No.
Factory
Part
No.
Figure
A
Main
Assembly
(Contd)
Description
8
079
196
.
COUPLING,
brass
.
female
3/16
ID
hose
1/4
NPT
1
1
9
073
839
.
FERRULE,
brass
2
2
10
604
550
.
HOSE,
whippet
3/16
x
1
(order
byfoot)
15
ft.
19
ft.
11
010
606
.
NUT,
brass
.
swivel
5/8-18
right
hand
1
1
12
056
851
.
NIPPLE,
brass
-
hose
3/16
inch
1 1
074
465
.
LABEL,
gas
2 2
074
481
.
LABEL,
left
2 2
14
075 304
CONTROL
BOX
(See
Fig.
E
Page
10)
1 1
15
079 300
CABLE,
trigger
-
left
hand
(consisting
of)
1
15
079 299
CABLE,
trigger
-
left
hand
(consisting
of)
1
16
RC6
073
441
.
RECEPTACLE,
4
socket
-
Amphenol
MS-3101A-18-4S
1
1
17
073
331
.
CLAMP,
cable
-
Amphenol
97-3057-10-6
2
2
18
600
340
.
CORD,
portable
No.
16/2
conductor
(order
by
foot)
14
ft.
20
ft.
19
PLG3
073
329
.
PLUG,
4
pin
-
Amphenol
97-3106A-18-4P
1 1
077
650
.
TUBING,
vinyl
No.
7
(3/4
inch
Ig)
4 4
074
481
.
LABEL,
left
2 2
079
198
.
LABEL,
trigger
2
2
20
074
975
CABLE,
trigger
(consisting
of)
1
20
074
977
CABLE,
trigger
(consisting
of)
1
21
600
340
.
CORD,
portable
No.
16/2
conductor
(order
by
foot)
14
ft.
20
ft.
22
073
331
.
CLAMP,
cable-
Amphenol
97-3057-10-6
2
2
23
PLG2
073
329
.
PLUG,
4
pin
-
Amphenol
97-3106A-18-4P
1
1
24
RC7
073
441
.
RECEPTACLE,
4
socket
Amphenol
MS-3101A-18-4S
1
1
077
650
.
TUBING,
vinyl
No.
7
(3/4
inch
Ig)
4
4
25
078
992
CORD,
power
No.
2
gear
or
25
074
983
CORD,
power
No.
3
gear
(consisting
of)
1
25
078
993
CORD,
power
No.
2
gear
or
25
074
986
CORD,
power
No.
3
gear
(consisting
of)
1
26
077
455
.
TERMINAL,
ring
tongue
1/2
stud
3/0
wire
(No.
2
gear)
or
26
600
734
27
600
323
.
TERMINAL,
ring
tongue
1/2
stud
2/0
wire
(No.
3
gear)
.
CABLE,
weld
-
copper
stranded
3/0
(No.
2
gear)
or
1
1
27
600
322
.
CABLE,
weld
-
copper
stranded
2/0
(No.
3
gear)
(order
by
foot)
27
ft.
30
ft.
28
077
454
28
600
732
.
TERMINAL,
ring
tongue
3/8
stud
3/0
wire
(No.
2
gear)
or
.
TERMINAL,
ring
tongue
3/8
stud
2/0
wire
(No.
3
gear)
1
1
29
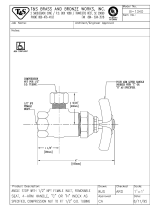
Figure
C
BOOM
(See
Page
5)
1
1
30
t079
214
BASE,
support
-
boom
(18
inch
base)
1
30
t079
216
BASE,
support-
boom
(24
inch
base)
1
31
602
207
WASHER,
lock
.
steel
split
1/4
4
4
32
601
865
NUT,
steel
-
hex
full
1/4-20
4 4
079
023
SCREW,
machine-steel
round
hd
1/4-20x
5/8
(attaching
control
box)
4
4
33
604
107
SCREW,
cap
-
steel
hex
hd
3/8-16
x
3
3
3
34
602
224
WASHER,
lock
-
steel
split
3/8
3 3
35
010
910
WASHER,
flat-
steel
SAE
3/8
3
3
.-
36
075
150
WASHER,
nylon
-
shoulder
.622
x
1
x
3/8
3
3
37
074
772
INSULATOR
1
1
1
38
075
009
39
078
145
BLOCK,
spacer
MOTOR
&
DRIVE
ASSEMBLY,
No.
2
gear
or
1
1
39
078
146
MOTOR
&
DRIVE
ASSEMBLY,
No.
3
gear
(See
Fig.
B
Page
3)
1 1
tOptional
Equipment
BE
SURE
TO
PROVIDE
STOCK,
MODEL,
AND
SERIAL
NUMBERS
WHEN
ORDERING
REPLACEMENT
PARTS.
t
OM-1513
Page
2

Figure
B
Motor
&
Drive
Assembly
Item
No.
Factory
Part
No.
Figure
B
Description
Motor
&
Drive
Assembly
(See
Fig.
A
Page
2
Item
39)
Quantity
Model
No.2
No.3
Gear
Gear
LU
2
N
N
0
0
52
601 881
NUT,
steel
-
hex
jarn1772a
53
602
216
WASHER,
lock
-
steel
split
1/2
54
602
247
WASHER,
flat~
steel
SAE
1/2
55
605 209
SCREW,
capS
steel
hex
hd
3/8-16x
2-1/2
56
602
221
WASHER,
lock
-
steel
internal
tooth
3/8
57
074811
BUSHING,
9/16-18
x
1-13/32
with
3/8
hole
58
601
948
SCREW,
cap
-
steel
hex
hd
5/16-18
x
1
59
602
211
WASHER,
lock
-
steel
split
5/16
60
604
538
WASHER,flat-
steel
SAE
5/16
61
074
902
LEVER,
mounting
-
drive
gear
62
010
910
WASHER,
flat-steel
SAE
3/8
63
073 703
GASKET,
motor
2 2
2
2
2 2
3 3
4 4
2
2
2
2
2
2
3
3
2
2
10
10
1
1
52
5354
55
5657
85
6284
83
TD-075
373
Page
3

Quantity
Model
Item
Factory
No.
2
No.
3
No.
Part
No.
Description
Gear
Gear
Figure
B
Motor
&
Drive
Assembly
(See
Fig.
A
Page
2 Item
41)
(Contd)
64
PLG5
075
167
MOTOR,
1/4hp
ll5voltsdc(consistingof)
1 1
65
073308
.BEARING,ball
1
1
66
074
780
.
SHAFT,
idler
gear
1
1
67
073
307
.
RING,
retaining
-
external
2
2
68
074
771
.
GEAR,
spur
-
steel
40
pitch
43
tooth
1 1
69
073597
.BEARING,ball
1 1
70
074
781
.STUD,
steel
12-28x
1-3/4
3
3
71
073580
.FIELDASSEMBLY
1
1
72
073
583
.
ARMATURE
1
1
73
073
598
.
SPRING,
brushholder
2
2
74
077
214
.
HOLDER,
brush
2 2
75
073
595
.
CAP,
brush
holder
2
2
76
*073
591
.
BRUSH,
contact
2 2
77
073596
.BEARING,balI
1
1
78
073
593
.
WASHER,
spring
1
1
79
073
296
.
CLAMP,
cable
.
Amphenol
97-3057-12-6
1
1
80
073
295
.
PLUG,
Amphenol
4
pin
97-3106A-20-4P.639
1
1
81
079
375
HOUSING,
adapter
2 2
82
602
177
SCREW,
set
-
steel
socket
hd
1/4-20
x
1/4
4
4
83
601
967
SCREW,
cap
-
steel
hex
hd
3/8-16
x
1-1/2
4 4
84
602
224
WASHER,
lock
-
steel
split
3/8
5
5
85
078
880
SCREW,
cap
-
steel
socket
hd
5/16-18
x
1-1/2
1
1
86
073268
BEARING,baII
4 4
079
349
SHIM,
.010
x
7/8
OD
x
5/8
ID
(used
to
line
up
drive
roll
gear)
As
Reqd.
079
348
SHIM,
.020
x
7/8
OD
x
5/8
ID
(used
to
line
up
drive
roll
gear)
As
Reqd.
87
073
240
RING,
retaining
-
external
4
4
88
073
309
SEAL,
oil
-
drive
shaft
2
2
89
074
968
SHAFT,
drive
roll
1
1
90
078
881
SCREW,
cap
-
brass-
hex
hd
3/8-16
x
2-1/2
1
1
91
078
882
WASHER,
lock
-
brass
split
3/8
1 1
92
078
751
WASHER,
flat-
brass
1/2
1
1
93
056068
KEY,steel
1/8x
1/8x
1/2
2 2
94
074
768
GEAR/SHAFT,
drive
1
1
95
075
233
HOUSING,
drive
(consisting
of)
1 1
96
073334
.HELICOIL,3/8-16x9/16
2
2
97
074
786
ARM
ADJUSTMENT,
pressure
roll
(consisting
of)
1
1
98
010324
.
PIN,
spring
3/16x
1/2
1
1
99
076
682
.
BLOCK,
pressure
stud
1 1
100
079429
.
FASTENER,
pin
2-3/16
Ig
1
1
101
602
243
WASHER,
flat
-
steel
std
3/8
2
2
102
073
303
SPRING,
compression
1
1
103
074
911
COLLAR,
adjusting-
tension
2
2
104
078
879
SCREW,
machine
-
steel
truss
hd
phillips
10-24
x
1/2
8
8
105
074
775
COVER,
bearing
1
1
106
073
306
RING,
retaining-
internal
3
3
107
078
672
PIN,
spring
3/16
x
7/8
1
1
108
074
822
GEAR,
miter
12
pitch
double
thread
No.
2
1
108
074
823
GEAR,
miter
12
pitch
triple
thread
No.
3
1
109
078
858
NUT,
steel
-
hex
full
12-28
3
3
c
110
078
687
WASHER,
lock
-
steel
split
No.
12
3
3
111
601
959
SCREW,
cap-steel
hex
hd
5/16-18
x
1-1/2
1
1
112
076
871
PIN,
spring
3/16
x
1-1/2
1
1
t
113
074
827
GEAR,
helical
-
bronze
12
pitch
30
tooth
double
thread
No.
2
1
113
074
828
GEAR,
helical
-
bronze 12
pitch
30
tooth
triple
thread
No.
3
1
114
073
304
GASKET,
cover-
housing
1
1
115
074
777
COVER,
housing
-
drive
1
1
116
074
785
ARM
ADJUSTMENT,
pressure
stud
(consisting
of)
1
1
117
076
682
.
BLOCK,
pressure
stud
1
1
118
010
324
.
PIN,
spring
3/16
x
1/2
1
1
119
079430
.FASTENER,
pin
1-3/41g
1
1
120
073514
SPRING,compression
1
1
*
Recommended
Spare
Parts
BE
SURE
TO
PROVIDE
STOCK,
MODEL,
AND
SERIAL
NUMBERS
WHEN
ORDERING
REPLACEMENT
PARTS.
OM-1513
Page
4

131
132
133
134
135
136
137
138
139
140
141
142
143
010
909
010
910
075
048
073
673
075
051
601
865
602
207
075
440
075
437
604
537
602
211
075
427
601
871
Item
No.
Factory
Part
No.
Figure
C
Boom
(See
Fig.
A
Page
2
Item
29)
Description
Quantity
Model
Dual
Dual
l2Ft.
l6Ft.
NUT,
steel
-
self
locking
hex
3/8-16
2
2
WASHER,
flat
-
steel
SAE
3/8
2
2
TUBING,
nylatron
1/2
ID
x
3/4
OD
x
11/16
2
2
PULLEY,V
2
2
INSULATOR,
pulley
1-11/16
Ig
2
2
NUT,
steel
-
hex
full
1/4-20
4
4
WASHER,
lock
-
steel
split
1/4
4
4
BRACKET,hanger-gun
4
4
HANGER,
pipe
4
4
NUT,
steel
-
hex
full
5/16-18
7
11
WASHER,
lock
-
steel
split
5/16
6
10
BOOM,
dual
12
ft
1
NUT,
steel-
hex
jam
3/8-16
2
I
184
11
Cl
140
172
171~
131
-183
165
166
167
168
ii
Figure
C
Boom
TD-039
188
Page
5

Figure
C
Boom
(See
Fig.
A
Page
2
Item
29)
(Contd)
tOptional
Equipment
BE
SURE
TO
PROVIDE
STOCK,
MODEL,
AND
SERIAL
NUMBERS
WHEN
ORDERING
REPLACEMENT
PARTS.
Item
No.
Factory
Part
No.
Description
Quantity
Model
Dual
Dual
12
Ft.
16
Ft.
144
601
872
NUT,
steel
-
hex
full
3/8-16
2
145
075484
BOOM,dual
l6ft
1
146
079
377
SUPPORT,
boom
1
147
079383
ROD,boom-support
1
148
075
443
HANGER,
pipe
2
6
149
000
987
GUIDE,
wire
-
boom
(consisting
of)
2
150
075
053
.
PIPE,
plastic
1/2
x
10
ft
1
151
073209
.PIPE,stop
1
149
003
068
GUIDE,
wire
-
boom
(consisting
of)
2
150
075
055
.
PIPE,
plastic
1/2
x
15
ft
1
151
073209
.PIPE,stop
1
152
075
052
BUSHING,
casing
-
wire
2
2
153
601
944
SCREW,
cap
-
steel
hex
hd
5/16-18
x
3/4
4
8
154
073
665
CLEVIS
(mcludes
items
155
&
178
available
as
one
piece
only)
1
154
073
742
PIN,
yoke
3/4
dia
x
2-5/32
Ig
1
155
073
741
CLEVIS
1
156
t601
965
SCREW,
cap
-
steel
hex
hd
3/8-16
x
1
2
2
157
t602
213
WASHER,
lock
-
steel
split
3/8
2
2
158
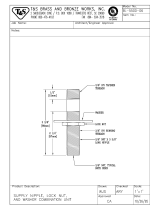
tFigure
Cl
SUPPORT,
HUB
&
REEL
(See
Page
7)
2
2
159
079
020
NUT,
steel
-
hex
elastic
stop
3/4-16
1 1
160
603
995
WASHER,
flat
-
steel
std
3/4
2 2
161
075
401
SHAFT,
boom
-
counterbalance
1
161
075 462
SHAFT,
boom
-
counterbalance
1
162
602
249
WASHER,
flat
-
steel
SAE
5/8
1
162
075
102
WASHER,
steel
-
shoulder
3
inches
square
1
163
073663
BEARING,ball
1
163
073664
BEARING,balI
1
164
075
100
NUT,
steel
5/8-18
x
1-1/4
special
1
164
075
101
NUT,
steel
3/4-16
x
1-1/4
special
1
165
602
219
WASHER,
lock
-
steel
external
tooth
5/8
1
165
079
030
WASHER,
lock
-
steel
external
tooth
3/4
1
166
601
883
NUT,
steel
-
hex
jam
5/8-18
1
166
079
029
NUT,
steel
-
hex
full
3/4-16
1
167
075390
POST,support-boom
1
167
075078
POST,support-boom
1
168
073
661
SPRING,
hi
pressure
1
ID
x
2
OD
x
12
inches
Ig
2
169
079
373
SPRING,
compression
1
ID
x
20D
x
6
inches
Ig
1
169
073
662
SPRING,
hi
pressure
3-3/4
OD
x
30
inches
Ig
1
170
075
421
SPACER,
spring
-
boom
1
171
075
403
BEARING,
thrust
-
boom
1
172
075
426
BASE,
swivel
-
boom
1
172
173
075
487
075
459
075
468
602
242
BASE,
swivel
-
boom
(consisting
of)
.
RING,
bearing
-
upper
.
RING,
bearing
-
lower
WASHER,
flat-
steel
std
5/16
1
1
1
1
1
174
602
246
WASHER,
flat-
steel
std
1/2
1 1
.
175
073
695
KNOB,
plastic
1
1
176
078
880
SCREW,
cap
-
steel
socket
hd
5/~6-18
x
1-1/2
1 1
177
073
208
BOLT,
steel
-
hex
hd
3/4-16x
2-1/8
1 1
178
079
029
NUT,
steel
-
hex
full
3/4-16
1
.
179
604
534
SCREW,
cap
-
steel
hex hd
5/16-18
x
1-1/4
2
2
.
.
~
180
181
079
023
075
438
SCREW,
machine
-
steel
round
hd
1/4-20
x
5/8
STUD,
steel
3/8-16
x
7-1/8
4
1
4
1
182
075 049
TUBING,
nylatron
1/2
ID
x
3/4
OD
x
1/8
2
2
183
075
295
GUARD,
motor
protector
1 1
184
075
402
SUPPORT,
pulley
2
2
185
079
178
PIPE,
black
3/8x
2-1/8
1 1
OM-1513
Page
6

Description
Figure
Cl
Support,
Hub
&
Reel
(See
Fig.
C
Page
6
Item
158)
BE
SURE
TO
PROVIDE
STOCK,
MODEL,
AND
SERIAL
NUMBERS
WHEN
ORDERING
REPLACEMENT
PARTS.
Item
No.
Factory
Part
No.
Quantity
196
074
932
SHAFT,
support-
hub
2
197
605
209
SCREW,
cap
-
steel
-
hex
hd
3/8-16
x
2-1/4
4
198
602
213
WASHER,
lock
-
steel
split
3/8
4
199
079 359
SUPPORT,
reel
1
200 075
243
REEL,
wire
(consisting
of)
1
201
075
245
.
FINGER,
reel
4
202
604
051
.
NUT,
steel
-
wing
1/2-13
4
203
075
244
.
REEL,
wire
1
204
075149
.BUSHING,-fiberl-1/32IDx
1-1/2ODx3-1/4
1
205 075
148
.WASHER,
fiber
1-1/2
ID
x
2
OD
x
1/4
2
206
075151
WASHER,steel-keyedl-1/l6IDx2ODxl1ga
1
207
075
510
WASHER,
lock
-
steel
split
1
inch
2
208
602
246
WASHER,
flat
-
steel
std
1/2
2
209
604
126
SCREW,
cap
-
steel
hex
hd
1/2-13
x
1
2
210
075
158
HUB,
spool
-
with
collar
(consisting
of)
1
211
074891
.COLLAR,hub
1
212
075
152
.
WASHER,
steel
-
keyed
1-1/16
ID
x
1-5/8
OD
x
11
ga
1
213
075
159
.
HUB,
spool
(consisting
of)
1
214
073478
. .
BUSHING,flange-nylon
1
lDx
1-1/8ODx
1-1/8
2
(213
2101212.
1211
207
214
206
207
208
209
202
I
TC-003
096
-
.
202
Figure
Cl
Support,
Hub
&
Reel
(Optional)
201
Page
7

Parts
For
Kit,
Drive
Roll
-
Gear
&
Guide
Tube
Wire
Diameter
&
Type
Kit
No.
Gear
Guide
Type
*Drive
Pressure
Inlet
Outlet
Fraction
Decimal
Metric
.030
hard
.031
.8MM
076
207
V-Groove
075
025
074 882
074
890
074
953
.035
hard
.035
.9MM
.045
hard
.045
1.2MM
076 208
V-Groove
075
026
076
215
074
890
074
954
.052
hard
.052
1.3MM
079
289
V-Groove
079
287
079
284
074
860
074
791
1/16
hard
.063
1.6MM
076 209
V-Groove
075
027
074
883
074
860
074
791
1/16
cored
.063
L6MM
076
210
U-Groove
075 010
074
843
074
860
074 954
5/64
cored
.079
2.0MM
076
211
U-Groove
075
011
074
844
074
860
074
791
3/32
cored
.094
2.4MM
076
212
U-Groove
075 012
074
845
074
860
074
791
7/64
cored
.110
2.8MM
076 213
U-Groove
075
013
074
846
074
860
074
791
1/8
cored
.126
3.2MM
076
214
U-Groove
075
014
074
847
074
860
074
791
*Parts
breakdown
for
drive
gear
are
shown
below
Outlet
Guide
TC-003
127
Pressure
Gear
Inlet
Guide
Drive
Gear
Inlet
Guide
Drive
Gear
Outlet
Item
No.
Factory
Part
No.
Figure
D
Kit,
Drive
Roll
-
Gear
&
Guide
Tubes
Description
V
Groove
I
U
Groove
Lfl
N
N
N
cc
N
CN
0
-
N
C)
~
Figure
D
*Gear
Drive
Roll
0
~,
N
0
0
~,
N
0
N
~
N
0
0
~,
N
0
0
~,
N-
0
0
~,
N
0
0
~,
N
0
0
~,
N
0
0
~
N
0
Quantity
Model
216
073
301
RING,
retaining
-
internal
2
2
2
2
2
2 2
2
2
217
075035
HUB,gear
1
1 1
1 1
1
1
1 1
218
075
034
SPACER,
bearing
2
2 2
2
2
2
2
2
2
219
073
625
CLUTCH
&
BEARING
1
1
1
1
-1
1
1
1 1
073
626
SHIM,
1
ID
x
1-1/4
OD
x
.004
As
Reqd.
220
075
030
GEAR,
drive
roll
V
groove
.030
&
.035
wire
1
220
075
031
GEAR,
drive
roll
V
groove
.045
wire
1
220
079
286
GEAR,
drive
roll
V
groove
.052
wire
1
220
075
032
GEAR,
drive
roll
V
groove
1/16
wire
1
220
075
019
GEAR,
drive
roll
U
groove
1/16
wire
1
220
075
020
GEAR,
drive
roll
U
groove
5/64
wire
1
220
075
021
GEAR,
drive
roll
U
groove
3/32
wire
1
220
075
022
GEAR,
drive
roll
U
groove
7/64
wire
1
220
075
023
GEAR,
drive
roll
U
groove
1/8
wire
1
BE
SURE
TO
PROVIDE
STOCK,
MODEL,
AND
SERIAL
NUMBERS
WHEN
ORDERING
REPLACEMENT
PARTS.
OM-1513
Page
8

(..J
I.
c~J
x
0
0
-I
C
0
C)
LU
U-
Page
9
/