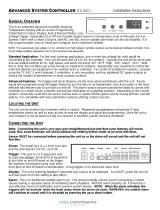
Danfoss VLT HVAC Drive FC 102 Programming Guide

Type
Programming Guide

This manual is also suitable for

Contents
1 Introduction
1-1
2 How to Program
2-1
Local Control Panel 2-1
How to operate the graphical LCP (GLCP) 2-1
Quick Menu Mode 2-10
Function Set-ups 2-13
Main Menu Mode 2-16
3 Parameter Description
3-1
Parameter Selection 3-1
Main Menu - Operation and Display - Group 0 3-1
Main Menu - Load and Motor - Group 1 3-18
Main Menu - Brakes - Group 2 3-30
Main Menu - Reference/Ramps - Group 3 3-33
Main Menu - Limits/Warnings - Group 4 3-40
Main Menu - Digital In/Out - Group 5 3-47
Main Menu - Analog In/Out - Group 6 3-80
Main Menu - Communications and Options - Group 8 3-91
Main Menu - Profibus - Group 9 3-101
Main Menu - CAN Ser. Com. Bus - Group 10 3-110
Main Menu - LonWorks - Group 11 3-117
Main Menu - Smart Logic - Group 13 3-118
Main Menu - Special Functions -Group 14 3-134
Main Menu - Adjustable Frequency Drive Information - Group 15 3-143
Main Menu - Data Readouts - Group 16 3-151
Main Menu - Data Readouts 2 - Group 18 3-162
Main Menu - Adjustable Frequency Drive Closed-loop - Group 20 3-165
Main Menu - Extended Closed-loop - FC 100 - Group 21 3-182
Main Menu - Application Functions - FC 100 - Group 22 3-196
Main Menu - Time-based Functions - FC 100 - Group 23 3-212
Main Menu - Application Functions 2 - Group 24 3-228
Main Menu - Cascade Controller - Group 25 3-235
Main Menu - Analog I/O Option MCB 109 - Group 26 3-250
4 Troubleshooting
4-1
Alarms and warnings 4-1
Alarm words 4-4
VLT
®
HVAC Drive Programming Guide Contents
MG.11.C6.22 - VLT
®
is a registered Danfoss trademark
Warning words 4-5
Extended status words 4-6
Fault messages 4-7
5 Parameter Lists
5-1
Parameter Options 5-1
Default settings
5-1
0-** Operation and Display 5-2
1-** Load / Motor 5-4
2-** Brakes 5-5
3-** Reference / Ramps 5-6
4-** Limits / Warnings 5-7
5-** Digital In / Out 5-8
6-** Analog In / Out 5-10
8-** Communication and Options 5-12
9-** Profibus 5-13
10-** CAN Fieldbus 5-14
11-** LonWorks 5-15
13-** Smart Logic Controller 5-16
14-** Special Functions 5-17
15-** FC Information 5-18
16-** Data Readouts 5-20
18-** Info & Readouts 5-22
20-** FC Closed-loop 5-23
21-** Ext. Closed-loop 5-24
22-** Application Functions 5-26
23-** Time-based Funtions 5-28
24-** Application Functions 2 5-29
25-** Cascade Controller 5-30
26-** Analog I / O Option MCB 109 5-32
6 Index
6-1
Contents VLT
®
HVAC Drive Programming Guide
MG.11.C6.22 - VLT
®
is a registered Danfoss trademark
1Introduction
VLT HVAC Drive
FC 100 Series
Software version: 2.8.x
This guide can be used with all VLT HVAC Drive adjustable frequency
drives with software version 2.8.x.
The current software version number can be read from
par.15-43
Software Version
.
VLT
®
HVAC Drive Programming Guide 1 Introduction
MG.11.C6.22 - VLT
®
is a registered Danfoss trademark
1-1
1
1 Introduction VLT
®
HVAC Drive Programming Guide
1-2
MG.11.C6.22 - VLT
®
is a registered Danfoss trademark
1
2 How to Program
2.1 Local Control Panel
2.1.1 How to operate the graphical LCP (GLCP)
The following instructions are valid for the GLCP (LCP 102).
The GLCP is divided into four functional groups:
1. Graphical display with status lines.
2. Menu keys and indicator lights (LEDs) - selecting mode, changing parameters and switching between display functions.
3. Navigation keys and indicator lights (LEDs).
4. Operation keys and indicator lights (LEDs).
Graphical display:
The LCD display is back lit with a total of 6 alpha-numeric lines. All data is displayed on the LCP which can show up to five operating variables while in
[Status] mode.
Display lines:
a. Status line: Status messages displaying icons and graphics.
b. Line 1-2: Operator data lines displaying data and variables de-
fined or chosen by the user. By pressing the [Status] key, up to
one extra line can be added.
c. Status line: Status messages displaying text.
VLT
®
HVAC Drive Programming Guide 2 How to Program
MG.11.C6.22 - VLT
®
is a registered Danfoss trademark
2-1
2
The display is divided into 3 sections:
Top section (a) shows the status when in status mode or up to 2 variables when not in status mode and in the case of an alarm/warning.
The number of the Active Set-up (selected as the Active Set-up in par.0-10
Active Set-up
) is shown. When programming in another set-up than the Active
Set-up, the number of the set-up being programmed appears to the right in brackets.
The Middle section (b) shows up to 5 variables with related unit, regardless of status. In case of an alarm/warning, the warning is shown instead of
the variables.
It is possible to toggle between three status readout displays by pressing the [Status] key.
Operating variables with different formatting are shown in each status screen - see below.
Several values or measurements can be linked to each of the displayed operating variables. The values / measurements to be displayed can be defined
via par.0-20
Display Line 1.1 Small
, par. 0-21
Display Line 1.2 Small
, par. 0-22
Display Line 1.3 Small
, par. 0-23
Display Line 2 Large
and par. 0-24
Display
Line 3 Large
, which can be accessed via [QUICK MENU], "Q3 Function Set-ups", "Q3-1 General Settings", "Q3-13 Display Settings".
Each value/measurement readout parameter selected in par.0-20
Display Line 1.1 Small
to par. 0-24
Display Line 3 Large
has its own scale and number
of digits after a possible decimal point. Larger numeric values are displayed with few digits after the decimal point.
Ex.: Current readout
5.25 A; 15.2 A 105 A.
Status display I:
This readout state is standard after start-up or initialization.
Use [INFO] to obtain information about the value/measurement linked to
the displayed operating variables (1.1, 1.2, 1.3, 2, and 3).
See the operating variables shown in the display in this illustration. 1.1,
1.2 and 1.3 are shown in small size. 2 and 3 are shown in medium size.
1
3
0
B
P
0
4
1
.
1
0
1.1
1.3
2
1.2
3
Status display II:
See the operating variables (1.1, 1.2, 1.3, and 2) shown in the display in
this illustration.
In the example, Speed, Motor current, Motor power and Frequency are
selected as variables in the first and second lines.
1.1, 1.2 and 1.3 are shown in small size. 2 is shown in large size.
1
3
0
B
P
0
6
2
.
1
0
1.1
1.3
1.2
2
2 How to Program VLT
®
HVAC Drive Programming Guide
2-2
MG.11.C6.22 - VLT
®
is a registered Danfoss trademark
2
Status display III:
This state displays the event and action of the Smart Logic Control. For
further information, see the section
Smart Logic Control
.
1
3
0
B
P
0
6
3
.
1
0
The Bottom section always shows the state of the adjustable frequency
drive in status mode.
Display Contrast Adjustment
Press [status] and [
] for darker display
Press [status] and [
] for brighter display
130BP074.10
Top section
Middle section
Bottom section
Indicator lights (LEDs):
If certain threshold values are exceeded, the alarm and/or warning LED lights up. A status and alarm text appears on the control panel.
The On LED is activated when the adjustable frequency drive receives power from AC line voltage, a DC bus terminal, or an external 24 V supply. At the
same time, the back light is on.
Green LED/On: Control section is working.
Yellow LED/Warn.: Indicates a warning.
Flashing Red LED/Alarm: Indicates an alarm.
VLT
®
HVAC Drive Programming Guide 2 How to Program
MG.11.C6.22 - VLT
®
is a registered Danfoss trademark
2-3
2
GLCP keys
Menu keys
The menu keys are divided into functions. The keys below the display and
LEDs are used for parameter set-up, including choice of display indication
during normal operation.
130BP045.10
[Status]
indicates the status of the adjustable frequency drive and/or the motor. Three different readouts can be chosen by pressing the [Status] key:
5 line readouts, 4 line readouts or Smart Logic Control.
Use
[Status]
for selecting the mode of display or for changing back to display mode from either the quick menu mode, main menu mode or alarm mode.
Also use the [Status] key to toggle single or double readout mode.
[Quick Menu]
allows quick set-up of the adjustable frequency drive. The most commonVLT HVAC Drive functions can be programmed here.
The [Quick Menu] consists of:
-My Personal Menu
- Quick Set-up
- Function Set-up
-Changes Made
- Loggings
The Function Set-up provides quick and easy access to all parameters required for the majority of VLT HVAC Drive applications including most VAV and
CAV supply and return fans, cooling tower fans, primary, secondary and condenser water pumps and other pump, fan and compressor applications.
Among other features, it also includes parameters for selecting which variables to display on the LCP, digital preset speeds, scaling of analog references,
closed-loop single zone and multi-zone applications and specific functions related to fans, pumps and compressors.
The Quick Menu parameters can be accessed immediately unless a password has been created via par.0-60
Main Menu Password
, par.0-61
Access to
Main Menu w/o Password
, par.0-65
Personal Menu Password
or par.0-66
Access to Personal Menu w/o Password
.
It is possible to switch directly between Quick Menu mode and Main Menu mode.
[Main Menu]
is used for programming all parameters. The Main Menu parameters can be accessed immediately unless a password has been created via par.0-60
Main
Menu Password
, par.0-61
Access to Main Menu w/o Password
,par.0-65
Personal Menu Password
or par.0-66
Access to Personal Menu w/o Password
. For
the majority of VLT HVAC Drive applications, it is not necessary to access the Main Menu parameters but instead the Quick Menu, Quick Set-up and
Function Set-up provide the simplest and quickest access to parameters that are typically required.
It is possible to switch directly between Main Menu mode and Quick Menu mode.
A parameter shortcut can be carried out by pressing the [Main Menu] key for 3 seconds. The parameter shortcut allows direct access to any parameter.
[Alarm Log]
displays an alarm list of the last five alarms (numbered A1-A5). To obtain additional details about an alarm, use the arrow keys to navigate to the alarm
number and press [OK]. Information is displayed about the condition of the adjustable frequency drive before it enters alarm mode.
The Alarm log button on the LCP allows access to both the alarm log and the maintenance log.
[Back]
reverts to the previous step or layer in the navigation structure.
[Cancel]
last change or command will be canceled as long as the display has not been changed.
2 How to Program VLT
®
HVAC Drive Programming Guide
2-4
MG.11.C6.22 - VLT
®
is a registered Danfoss trademark
2
[Info]
displays information about a command, parameter, or function in any display window. [Info] provides detailed information when needed.
Exit Info mode by pressing either [Info], [Back], or [Cancel].
Navigation Keys
The four navigation arrows are used to navigate between the different
choices available in [Quick Menu], [Main Menu] and [Alarm Log].
Use the keys to move the cursor.
[OK] is used for choosing a parameter marked by the cursor and for
enabling the change of a parameter.
Operation Keys for local control are found at the bottom of the control
panel.
130BP046.10
[Hand On]
enables control of the adjustable frequency drive via the GLCP. [Hand On] also starts the motor, and it is now possible to enter the motor speed data by
means of the arrow keys. The key can be selected as
Enable
[1] or
Disable
[0] via par.0-40
[Hand on] Key on LCP
.
The following control signals will still be active when [Hand On] is activated:
[Hand On] - [Off] - [Auto on]
Reset
Coasting stop inverse
•Reversing
Set-up select lsb - Set-up select msb
Stop command from serial communication
•Quick stop
•DC brake
NOTE!
External stop signals activated by means of control signals or a serial bus will override a “start” command via the LCP.
VLT
®
HVAC Drive Programming Guide 2 How to Program
MG.11.C6.22 - VLT
®
is a registered Danfoss trademark
2-5
2
[Off]
stops the connected motor. The key can be selected as Enable [1] or Disable [0] via par.0-41
[Off] Key on LCP
. If no external stop function is selected
and the [Off] key is inactive the motor can only be stopped by disconnecting the line power supply.
[Auto on]
enables the adjustable frequency drive to be controlled via the control terminals and/or serial communication. When a start signal is applied on the control
terminals and/or the bus, the adjustable frequency drive will start. The key can be selected as Enable [1] or Disable [0] via par.0-42
[Auto on] Key on
LCP
.
NOTE!
An active HAND-OFF-AUTO signal via the digital inputs has higher priority than the control keys [Hand on] – [Auto on].
[Reset]
is used for resetting the adjustable frequency drive after an alarm (trip). It can be selected as
Enable
[1] or
Disable
[0] via par.0-43
[Reset] Key on
LCP
.
The parameter shortcut can be carried out by holding down the [Main Menu] key for 3 seconds. The parameter shortcut allows direct access to any
parameter.
2.1.2 How to operate numeric LCP (NLCP)
The following instructions are valid for the NLCP (LCP 101).
The control panel is divided into four functional groups:
1. Numeric display.
2. Menu key and indicator lights (LEDs) - changing parameters and
switching between display functions.
3. Navigation keys and indicator lights (LEDs).
4. Operation keys and indicator lights (LEDs).
NOTE!
Parameter copy is not possible with Numeric Local
Control Panel (LCP101).
Select one of the following modes:
Status Mode: Displays the status of the adjustable frequency drive or
the motor.
If an alarm occurs, the NLCP automatically switches to status mode.
A number of alarms can be displayed.
Quick Set-up or Main Menu Mode: Display parameters and parameter
settings.
Figure 2.1: Numerical LCP (NLCP)
130BP077.10
Figure 2.2: Status display example
2 How to Program VLT
®
HVAC Drive Programming Guide
2-6
MG.11.C6.22 - VLT
®
is a registered Danfoss trademark
2
Indicator lights (LEDs):
Green LED/On: Indicates if control section is on.
Yellow LED/Wrn.: Indicates a warning.
Flashing red LED/Alarm: Indicates an alarm.
130BP078.10
Figure 2.3: Alarm display example
Menu key
[Menu] Select one of the following modes:
Status
Quick Set-up
Main Menu
Main Menu is used for programming all parameters.
The parameters can be accessed immediately unless a password has been created via par.0-60
Main Menu Password
, par.0-61
Access to Main Menu w/
o Password
, par.0-65
Personal Menu Password
or par.0-66
Access to Personal Menu w/o Password
.
Quick Set-up is used to set up the adjustable frequency drive using only the most essential parameters.
The parameter values can be changed using the up/down arrows when the value is flashing.
Select Main Menu by pressing the [Menu] key a number of times until the Main Menu LED is lit.
Select the parameter group [xx-__] and press [OK]
Select the parameter [__-xx] and press [OK]
If the parameter is an array parameter, select the array number and press [OK]
Select the wanted data value and press [OK]
Navigation Keys [Back] for stepping backwards
Arrow [] [] keys are used for navigating between parameter groups, parameters and within parameters.
[OK] is used for choosing a parameter marked by the cursor and for enabling the change of a parameter.
130BP079.10
Figure 2.4: Display example
VLT
®
HVAC Drive Programming Guide 2 How to Program
MG.11.C6.22 - VLT
®
is a registered Danfoss trademark
2-7
2
Operation Keys
Keys for local control are found at the bottom of the control panel.
130BP046.10
Figure 2.5: Operation keys of the numerical CP (NLCP)
[Hand on] enables control of the adjustable frequency drive via the LCP. [Hand on] also starts the motor and it is now possible to enter the motor speed
data by means of the arrow keys. The key can be selected as
Enable
[1] or
Disable
[0] via par.0-40
[Hand on] Key on LCP
.
External stop signals activated by means of control signals or a serial bus will override a 'start' command via the LCP.
The following control signals will still be active when [Hand on] is activated:
[Hand on] - [Off] - [Auto on]
Reset
Coasting stop inverse
Reversing
Set-up select lsb - Set-up select msb
Stop command from serial communication
•Quick stop
•DC brake
[Off] stops the connected motor. The key can be selected as
Enable
[1] or
Disable
[0] via par.0-41
[Off] Key on LCP
.
If no external stop function is selected and the [Off] key is inactive, the motor can be stopped by disconnecting the line power supply.
[Auto on] enables the adjustable frequency drive to be controlled via the control terminals and/or serial communication. When a start signal is applied
on the control terminals and/or the bus, the adjustable frequency drive will start. The key can be selected as
Enable
[1] or
Disable
[0] via par.0-42
[Auto
on] Key on LCP
.
NOTE!
An active HAND-OFF-AUTO signal via the digital inputs has higher priority than the control keys [Hand on] [Auto on].
[Reset] is used for resetting the adjustable frequency drive after an alarm (trip). It can be selected as
Enable
[1] or
Disable
[0] via par.0-43
[Reset] Key
on LCP
.
2 How to Program VLT
®
HVAC Drive Programming Guide
2-8
MG.11.C6.22 - VLT
®
is a registered Danfoss trademark
2
2.1.3 Quick Transfer of Parameter Settings between Multiple Adjustable Frequency Drives
Once the set-up of an adjustable frequency drive is complete, we rec-
ommend that you store the data in the LCP or on a PC via MCT 10 Set-
up Software Tool.
Data storage in LCP:
1. Go to par.0-50
LCP Copy
2. Press the [OK] key.
3. Select “All to LCP”
4. Press the [OK] key.
All parameter settings are now stored in the LCP indicated by the progress bar. When 100% is reached, press [OK].
NOTE!
Stop the motor before performing this operation.
You can now connect the LCP to another adjustable frequency drive and copy the parameter settings to this adjustable frequency drive as well.
Data transfer from the LCP to the adjustable frequency drive:
1. Go to par.0-50
LCP Copy
2. Press the [OK] key.
3. Select “All from LCP”
4. Press the [OK] key.
The parameter settings stored in the LCP are now transferred to the adjustable frequency drive indicated by the progress bar. When 100% is reached,
press [OK].
NOTE!
Stop the motor before performing this operation.
VLT
®
HVAC Drive Programming Guide 2 How to Program
MG.11.C6.22 - VLT
®
is a registered Danfoss trademark
2-9
2
2.1.4 Parameter Set-up
The adjustable frequency drive can be used for practically all assignments, thus offering a significant number of parameters. The series offers a choice
between two programming modes - the Quick Menu mode and the Main Menu mode.
The latter provides access to all parameters. The former takes the user through a few parameters making it possible to program the majority of VLT
HVAC Drive applications.
Regardless of the mode of programming, you can change a parameter both in quick menu mode and in main menu mode.
2.1.5 Quick Menu Mode
Parameter Data
The graphical display (GLCP) provides access to all parameters listed under the quick menus. The numeric display (NLCP) only provides access to the
quick set-up parameters. To set parameters using the [Quick Menu] button - enter or change parameter data or settings in accordance with the following
procedure:
1. Press Quick Menu button
2.
Use the [
] and [
] buttons to find the parameter you want to change
3. Press [OK].
4.
Use [
] and [
] buttons to select the correct parameter setting
5. Press [OK].
6.
To move to a different digit within a parameter setting, use the [
] and [
] buttons
7. Highlighted area indicates digit selected for change
8. Press [Cancel] button to disregard change, or press [OK] to accept change and enter the new setting
Example of Changing Parameter Data
Assume parameter 22-60 is set to [Off]. However, you want to monitor the fan belt condition - non-broken or broken - according to the following procedure:
1. Press Quick Menu key
2.
Choose Function Set-ups with the [
] button
3. Press [OK].
4.
Choose Application Settings with the [
] button
5. Press [OK].
6. Press [OK] again for Fan Functions
7. Choose Broken Belt Function by pressing [OK]
8.
With [
] button, choose [2] Trip
The adjustable frequency drive will now trip if a broken fan belt is detected.
Select [My Personal Menu] to display personal parameters:
Select [My Personal Menu] to display only the parameters, which have been pre-selected and programmed as personal parameters. For example, an AHU
or pump OEM may have pre-programmed personal parameters to be in My Personal Menu during factory commissioning to make on-site commissioning/
fine tuning simpler. These parameters are selected in par.0-25
My Personal Menu
. Up to 20 different parameters can be programmed in this menu.
Select [Changes Made] to get information about:
the last 10 changes. Use the up/down navigation keys to scroll between the last 10 changed parameters.
the changes made since default setting.
2 How to Program VLT
®
HVAC Drive Programming Guide
2-10
MG.11.C6.22 - VLT
®
is a registered Danfoss trademark
2
Select [Loggings]:
to get information about the display line readouts. The information is shown as graphs.
Only display parameters selected in par.0-20
Display Line 1.1 Small
and par. 0-24
Display Line 3 Large
can be viewed. It is possible to store up to 120
samples in the memory for later reference.
Efficient Parameter Set-up for VLT HVAC Drive Applications:
The parameters can easily be set up for the vast majority of the VLT HVAC Drive applications only by using the [Quick Set-up] option.
After pressing [Quick Menu], the different choices in the quick menu are listed. See also illustration 6.1 below and tables Q3-1 to Q3-4 in the following
Function Set-ups
section.
Example of using the Quick Set-up option:
Assume you want to set the ramp-down time to 100 seconds!
1. Select [Quick Setup]. The first par.0-01
Language
in Quick Set-up appears
2.
Press [
] repeatedly until par.3-42
Ramp 1 Ramp-down Time
appears with the default setting of 20 seconds
3. Press [OK].
4.
Use the [
] button to highlight the third digit before the comma.
5.
Change '0' to '1' by using the [
] button.
6.
Use the [
] button to highlight the digit '2'.
7.
Change '2' to '0' with the [
] button.
8. Press [OK].
The new ramp-down time is now set to 100 seconds.
It is recommended to do the set-up in the order listed.
NOTE!
A complete description of the function is found in the parameter sections of this manual.
Figure 2.6: Quick Menu view
The Quick Set-up menu gives access to the 13 most important setup parameters of the adjustable frequency drive. After programming the adjustable
frequency drive will, in most cases, be ready for operation. The 13 (see footnote) Quick Set-up parameters are shown in the table below. A complete
description of the function is given in the parameter description sections of this manual.
VLT
®
HVAC Drive Programming Guide 2 How to Program
MG.11.C6.22 - VLT
®
is a registered Danfoss trademark
2-11
2
Par. [Units]
par.0-01
Language
par.1-20
Motor Power [kW]
[kW]
par.1-21
Motor Power [HP]
[HP]
par.1-22
Motor Voltage
[V]
par.1-23
Motor Frequency
[Hz]
par.1-24
Motor Current
[A]
par.1-25
Motor Nominal Speed
[RPM]
par.1-28
Motor Rotation Check
[Hz]
par.3-41
Ramp 1 Ramp-up Time
[s]
par.3-42
Ramp 1 Ramp-down Time
[s]
par.4-11
Motor Speed Low Limit [RPM]
[RPM]
par.4-12
Motor Speed Low Limit [Hz]
[Hz]
par.4-13
Motor Speed High Limit [RPM]
[RPM]
par.4-14
Motor Speed High Limit [Hz]
[Hz]
par.3-19
Jog Speed [RPM]
[RPM]
par.3-11
Jog Speed [Hz]
[Hz]
par.5-12
Terminal 27 Digital Input
par.5-40
Function Relay
Table 2.1: Quick Set-up parameters
*The display showing depends on choices made in par.0-02
Motor Speed Unit
and par.0-03
Regional Settings
. The default settings of par.0-02
Motor
Speed Unit
and par.0-03
Regional Settings
depend on which region of the world the adjustable frequency drive is supplied to but can be re-programmed
as required.
** par.5-40
Function Relay
, is an array, where one may choose between Relay1 [0] or Relay2 [1]. The standard setting is Relay1 [0] with the default
choice Alarm [9].
See the parameter description later in this chapter under Function Set-up parameters.
For detailed information about settings and programming, see the
VLT HVAC Drive Programming Guide, MG.11.CX.YY
x=version number y=language
NOTE!
If [No Operation] is selected in par.5-12
Terminal 27 Digital Input
, no connection to +24 V on terminal 27 is necessary to enable start.
If [Coast Inverse] (factory default value) is selected in par.5-12
Terminal 27 Digital Input
, a connection to +24 V is necessary to enable
start.
2 How to Program VLT
®
HVAC Drive Programming Guide
2-12
MG.11.C6.22 - VLT
®
is a registered Danfoss trademark
2
2.1.6 Function Set-ups
The Function set-up provides quick and easy access to all parameters required for the majority of VLT HVAC Drive applications including most VAV and
CAV supply and return fans, cooling tower fans, primary, secondary and condenser water pumps and other pump, fan and compressor applications.
How to access Function set-up - example
130BT110.1
0
Figure 2.7: Step 1: Turn on the adjustable frequency drive
(yellow LED lights)
130BT111.1
0
Figure 2.8: Step 2: Press the [Quick Menus] button (quick
menu choices appear).
130BT112.1
0
Figure 2.9: Step 3: Use the up/down navigation keys to
scroll down to Function set-ups. Press [OK].
130BT113.1
0
Figure 2.10: Step 4: Function set-ups choices appear.
Choose 03-1
General Settings
. Press [OK].
130BT114.1
0
Figure 2.11: Step 5: Use the up/down navigation keys to
scroll down to , e.g., 03-11
Analog Outputs
. Press [OK].
130BT115.1
0
Figure 2.12: Step 6: Choose par. 6-50. Press [OK].
VLT
®
HVAC Drive Programming Guide 2 How to Program
MG.11.C6.22 - VLT
®
is a registered Danfoss trademark
2-13
2
130BT116.1
0
Figure 2.13: Step 7: Use the up/down navigation keys to
navigate between the different choices. Press [OK].
Function Set-ups parameters
The Function Set-ups parameters are grouped in the following way:
Q3-1 General Settings
Q3-10 Adv. Motor Settings Q3-11 Analog Output Q3-12 Clock Settings Q3-13 Display Settings
par.1-90
Motor Thermal Protection
par.6-50
Terminal 42 Output
par.0-70
Set Date and Time
par.0-20
Display Line 1.1 Small
par.1-93
Thermistor Source
par.6-51
Terminal 42 Output Min
Scale
par.0-71
Date Format
par. 0-21
Display Line 1.2 Small
par.1-29
Automatic Motor Adapta-
tion (AMA)
par.6-52
Terminal 42 Output Max
Scale
par.0-72
Time Format
par. 0-22
Display Line 1.3 Small
par.14-01
Switching Frequency
par.0-74
DST/Summertime
par. 0-23
Display Line 2 Large
par.4-53
Warning Speed High
par.0-76
DST/Summertime Start
par. 0-24
Display Line 3 Large
par.0-77
DST/Summertime End
par.0-37
Display Text 1
par.0-38
Display Text 2
par.0-39
Display Text 3
Q3-2 Open-loop Settings
Q3-20 Digital Reference Q3-21 Analog Reference
par.3-02
Minimum Reference
par.3-02
Minimum Reference
par.3-03
Maximum Reference
par.3-03
Maximum Reference
par.3-10
Preset Reference
par.6-10
Terminal 53 Low Voltage
par.5-13
Terminal 29 Digital Input
par.6-11
Terminal 53 High Voltage
par.5-14
Terminal 32 Digital Input
par.6-12
Terminal 53 Low Current
par.5-15
Terminal 33 Digital Input
par.6-13
Terminal 53 High Current
par.6-14
Terminal 53 Low Ref./Feedb. Value
par.6-15
Terminal 53 High Ref./Feedb. Value
2 How to Program VLT
®
HVAC Drive Programming Guide
2-14
MG.11.C6.22 - VLT
®
is a registered Danfoss trademark
2
Q3-3 Closed-loop Settings
Q3-30 Single Zone Int. Setpoint Q3-31 Single Zone Ext. Setpoint Q3-32 Multi Zone / Adv
par.1-00
Configuration Mode
par.1-00
Configuration Mode
par.1-00
Configuration Mode
par.20-12
Reference/Feedback Unit
par.20-12
Reference/Feedback Unit
par.3-15
Reference 1 Source
par.20-13
Minimum Reference/Feedb.
par.20-13
Minimum Reference/Feedb.
par.3-16
Reference 2 Source
par.20-14
Maximum Reference/Feedb.
par.20-14
Maximum Reference/Feedb.
par.20-00
Feedback 1 Source
par.6-22
Terminal 54 Low Current
par.6-10
Terminal 53 Low Voltage
par.20-01
Feedback 1 Conversion
par.6-24
Terminal 54 Low Ref./Feedb. Value
par.6-11
Terminal 53 High Voltage
par.20-02
Feedback 1 Source Unit
par.6-25
Terminal 54 High Ref./Feedb. Value
par.6-12
Terminal 53 Low Current
par.20-03
Feedback 2 Source
par.6-26
Terminal 54 Filter Time Constant
par.6-13
Terminal 53 High Current
par.20-04
Feedback 2 Conversion
par.6-27
Terminal 54 Live Zero
par.6-14
Terminal 53 Low Ref./Feedb. Value
par.20-05
Feedback 2 Source Unit
par.6-00
Live Zero Timeout Time
par.6-15
Terminal 53 High Ref./Feedb. Value
par.20-06
Feedback 3 Source
par.6-01
Live Zero Timeout Function
par.6-22
Terminal 54 Low Current
par.20-07
Feedback 3 Conversion
par.20-21
Setpoint 1
par.6-24
Terminal 54 Low Ref./Feedb. Value
par.20-08
Feedback 3 Source Unit
par.20-81
PID Normal/ Inverse Control
par.6-25
Terminal 54 High Ref./Feedb. Value
par.20-12
Reference/Feedback Unit
par.20-82
PID Start Speed [RPM]
par.6-26
Terminal 54 Filter Time Constant
par.20-13
Minimum Reference/Feedb.
par.20-83
PID Start Speed [Hz]
par.6-27
Terminal 54 Live Zero
par.20-14
Maximum Reference/Feedb.
par.20-93
PID Proportional Gain
par.6-00
Live Zero Timeout Time
par.6-10
Terminal 53 Low Voltage
par.20-94
PID Integral Time
par.6-01
Live Zero Timeout Function
par.6-11
Terminal 53 High Voltage
par.20-70
Closed-loop Type
par.20-81
PID Normal/ Inverse Control
par.6-12
Terminal 53 Low Current
par.20-71
Tuning Mode
par.20-82
PID Start Speed [RPM]
par.6-13
Terminal 53 High Current
par.20-72
PID Output Change
par.20-83
PID Start Speed [Hz]
par.6-14
Terminal 53 Low Ref./Feedb. Value
par.20-73
Minimum Feedback Level
par.20-93
PID Proportional Gain
par.6-15
Terminal 53 High Ref./Feedb. Value
par.20-74
Maximum Feedback Level
par.20-94
PID Integral Time
par.6-16
Terminal 53 Filter Time Constant
par.20-79
PID Auto Tuning
par.20-70
Closed-loop Type
par.6-17
Terminal 53 Live Zero
par.20-71
Tuning Mode
par.6-20
Terminal 54 Low Voltage
par.20-72
PID Output Change
par.6-21
Terminal 54 High Voltage
par.20-73
Minimum Feedback Level
par.6-22
Terminal 54 Low Current
par.20-74
Maximum Feedback Level
par.6-23
Terminal 54 High Current
par.20-79
PID Auto Tuning
par.6-24
Terminal 54 Low Ref./Feedb. Value
par.6-25
Terminal 54 High Ref./Feedb. Value
par.6-26
Terminal 54 Filter Time Constant
par.6-27
Terminal 54 Live Zero
par.6-00
Live Zero Timeout Time
par.6-01
Live Zero Timeout Function
par.4-56
Warning Feedback Low
par.4-57
Warning Feedback High
par.20-20
Feedback Function
par.20-21
Setpoint 1
par.20-22
Setpoint 2
par.20-81
PID Normal/ Inverse Control
par.20-82
PID Start Speed [RPM]
par.20-83
PID Start Speed [Hz]
par.20-93
PID Proportional Gain
par.20-94
PID Integral Time
par.20-70
Closed-loop Type
par.20-71
Tuning Mode
par.20-72
PID Output Change
par.20-73
Minimum Feedback Level
par.20-74
Maximum Feedback Level
par.20-79
PID Auto Tuning
VLT
®
HVAC Drive Programming Guide 2 How to Program
MG.11.C6.22 - VLT
®
is a registered Danfoss trademark
2-15
2
Q3-4 Application Settings
Q3-40 Fan Functions Q3-41 Pump Functions Q3-42 Compressor Functions
par.22-60
Broken Belt Function
par.22-20
Low Power Auto Set-up
par.1-03
Torque Characteristics
par.22-61
Broken Belt Torque
par.22-21
Low Power Detection
par.1-71
Start Delay
par.22-62
Broken Belt Delay
par.22-22
Low Speed Detection
par.22-75
Short Cycle Protection
par.4-64
Semi-Auto Bypass Set-up
par.22-23
No-Flow Function
par.22-76
Interval between Starts
par.1-03
Torque Characteristics
par.22-24
No-Flow Delay
par.22-77
Minimum Run Time
par.22-22
Low Speed Detection
par.22-40
Minimum Run Time
par.5-01
Terminal 27 Mode
par.22-23
No-Flow Function
par.22-41
Minimum Sleep Time
par.5-02
Terminal 29 Mode
par.22-24
No-Flow Delay
par.22-42
Wake-up Speed [RPM]
par.5-12
Terminal 27 Digital Input
par.22-40
Minimum Run Time
par.22-43
Wake-up Speed [Hz]
par.5-13
Terminal 29 Digital Input
par.22-41
Minimum Sleep Time
par.22-44
Wake-up Ref./FB Difference
par.5-40
Function Relay
par.22-42
Wake-up Speed [RPM]
par.22-45
Setpoint Boost
par.1-73
Flying Start
par.22-43
Wake-up Speed [Hz]
par.22-46
Maximum Boost Time
par.1-86
Trip Speed Low [RPM]
par.22-44
Wake-up Ref./FB Difference
par.22-26
Dry Pump Function
par.1-87
Trip Speed Low [Hz]
par.22-45
Setpoint Boost
par.22-27
Dry Pump Delay
par.22-46
Maximum Boost Time
par.22-80
Flow Compensation
par.2-10
Brake Function
par.22-81
Square-linear Curve Approximation
par. 2-16
AC Brake Max. Current
par.22-82
Work Point Calculation
par.2-17
Over-voltage Control
par.22-83
Speed at No-Flow [RPM]
par.1-73
Flying Start
par.22-84
Speed at No-Flow [Hz]
par.1-71
Start Delay
par.22-85
Speed at Design Point [RPM]
par.1-80
Function at Stop
par.22-86
Speed at Design Point [Hz]
par.2-00
DC Hold/Preheat Current
par.22-87
Pressure at No-Flow Speed
par.4-10
Motor Speed Direction
par.22-88
Pressure at Rated Speed
par.22-89
Flow at Design Point
par.22-90
Flow at Rated Speed
par.1-03
Torque Characteristics
par.1-73
Flying Start
See also
VLT HVAC Drive Programming Guide
for a detailed description of the Function Set-ups parameter groups.
2.1.7 Main Menu Mode
Select main menu mode by pressing the [Main Menu] key. The readout
below appears on the display.
The middle and bottom sections on the display show a list of parameter
groups which can be chosen by toggling the up and down buttons.
Each parameter has a name and number which remain the same regardless of the programming mode. In main menu mode, the parameters are divided
into groups. The first digit of the parameter number (from the left) indicates the parameter group number.
All parameters can be changed in the main menu. However, depending on the choice of configuration (par.1-00
Configuration Mode
), some parameters
can be hidden.
2 How to Program VLT
®
HVAC Drive Programming Guide
2-16
MG.11.C6.22 - VLT
®
is a registered Danfoss trademark
2
  • Page 1 1
  • Page 2 2
  • Page 3 3
  • Page 4 4
  • Page 5 5
  • Page 6 6
  • Page 7 7
  • Page 8 8
  • Page 9 9
  • Page 10 10
  • Page 11 11
  • Page 12 12
  • Page 13 13
  • Page 14 14
  • Page 15 15
  • Page 16 16
  • Page 17 17
  • Page 18 18
  • Page 19 19
  • Page 20 20
  • Page 21 21
  • Page 22 22
  • Page 23 23
  • Page 24 24
  • Page 25 25
  • Page 26 26
  • Page 27 27
  • Page 28 28
  • Page 29 29
  • Page 30 30
  • Page 31 31
  • Page 32 32
  • Page 33 33
  • Page 34 34
  • Page 35 35
  • Page 36 36
  • Page 37 37
  • Page 38 38
  • Page 39 39
  • Page 40 40
  • Page 41 41
  • Page 42 42
  • Page 43 43
  • Page 44 44
  • Page 45 45
  • Page 46 46
  • Page 47 47
  • Page 48 48
  • Page 49 49
  • Page 50 50
  • Page 51 51
  • Page 52 52
  • Page 53 53
  • Page 54 54
  • Page 55 55
  • Page 56 56
  • Page 57 57
  • Page 58 58
  • Page 59 59
  • Page 60 60
  • Page 61 61
  • Page 62 62
  • Page 63 63
  • Page 64 64
  • Page 65 65
  • Page 66 66
  • Page 67 67
  • Page 68 68
  • Page 69 69
  • Page 70 70
  • Page 71 71
  • Page 72 72
  • Page 73 73
  • Page 74 74
  • Page 75 75
  • Page 76 76
  • Page 77 77
  • Page 78 78
  • Page 79 79
  • Page 80 80
  • Page 81 81
  • Page 82 82
  • Page 83 83
  • Page 84 84
  • Page 85 85
  • Page 86 86
  • Page 87 87
  • Page 88 88
  • Page 89 89
  • Page 90 90
  • Page 91 91
  • Page 92 92
  • Page 93 93
  • Page 94 94
  • Page 95 95
  • Page 96 96
  • Page 97 97
  • Page 98 98
  • Page 99 99
  • Page 100 100
  • Page 101 101
  • Page 102 102
  • Page 103 103
  • Page 104 104
  • Page 105 105
  • Page 106 106
  • Page 107 107
  • Page 108 108
  • Page 109 109
  • Page 110 110
  • Page 111 111
  • Page 112 112
  • Page 113 113
  • Page 114 114
  • Page 115 115
  • Page 116 116
  • Page 117 117
  • Page 118 118
  • Page 119 119
  • Page 120 120
  • Page 121 121
  • Page 122 122
  • Page 123 123
  • Page 124 124
  • Page 125 125
  • Page 126 126
  • Page 127 127
  • Page 128 128
  • Page 129 129
  • Page 130 130
  • Page 131 131
  • Page 132 132
  • Page 133 133
  • Page 134 134
  • Page 135 135
  • Page 136 136
  • Page 137 137
  • Page 138 138
  • Page 139 139
  • Page 140 140
  • Page 141 141
  • Page 142 142
  • Page 143 143
  • Page 144 144
  • Page 145 145
  • Page 146 146
  • Page 147 147
  • Page 148 148
  • Page 149 149
  • Page 150 150
  • Page 151 151
  • Page 152 152
  • Page 153 153
  • Page 154 154
  • Page 155 155
  • Page 156 156
  • Page 157 157
  • Page 158 158
  • Page 159 159
  • Page 160 160
  • Page 161 161
  • Page 162 162
  • Page 163 163
  • Page 164 164
  • Page 165 165
  • Page 166 166
  • Page 167 167
  • Page 168 168
  • Page 169 169
  • Page 170 170
  • Page 171 171
  • Page 172 172
  • Page 173 173
  • Page 174 174
  • Page 175 175
  • Page 176 176
  • Page 177 177
  • Page 178 178
  • Page 179 179
  • Page 180 180
  • Page 181 181
  • Page 182 182
  • Page 183 183
  • Page 184 184
  • Page 185 185
  • Page 186 186
  • Page 187 187
  • Page 188 188
  • Page 189 189
  • Page 190 190
  • Page 191 191
  • Page 192 192
  • Page 193 193
  • Page 194 194
  • Page 195 195
  • Page 196 196
  • Page 197 197
  • Page 198 198
  • Page 199 199
  • Page 200 200
  • Page 201 201
  • Page 202 202
  • Page 203 203
  • Page 204 204
  • Page 205 205
  • Page 206 206
  • Page 207 207
  • Page 208 208
  • Page 209 209
  • Page 210 210
  • Page 211 211
  • Page 212 212
  • Page 213 213
  • Page 214 214
  • Page 215 215
  • Page 216 216
  • Page 217 217
  • Page 218 218
  • Page 219 219
  • Page 220 220
  • Page 221 221
  • Page 222 222
  • Page 223 223
  • Page 224 224
  • Page 225 225
  • Page 226 226
  • Page 227 227
  • Page 228 228
  • Page 229 229
  • Page 230 230
  • Page 231 231
  • Page 232 232
  • Page 233 233
  • Page 234 234
  • Page 235 235
  • Page 236 236
  • Page 237 237
  • Page 238 238
  • Page 239 239
  • Page 240 240
  • Page 241 241
  • Page 242 242
  • Page 243 243
  • Page 244 244
  • Page 245 245
  • Page 246 246
  • Page 247 247
  • Page 248 248
  • Page 249 249
  • Page 250 250
  • Page 251 251
  • Page 252 252
  • Page 253 253
  • Page 254 254
  • Page 255 255
  • Page 256 256
  • Page 257 257
  • Page 258 258
  • Page 259 259
  • Page 260 260
  • Page 261 261
  • Page 262 262
  • Page 263 263
  • Page 264 264
  • Page 265 265
  • Page 266 266
  • Page 267 267
  • Page 268 268
  • Page 269 269
  • Page 270 270
  • Page 271 271
  • Page 272 272
  • Page 273 273
  • Page 274 274
  • Page 275 275
  • Page 276 276
  • Page 277 277
  • Page 278 278
  • Page 279 279
  • Page 280 280
  • Page 281 281
  • Page 282 282
  • Page 283 283
  • Page 284 284
  • Page 285 285
  • Page 286 286
  • Page 287 287
  • Page 288 288
  • Page 289 289
  • Page 290 290
  • Page 291 291
  • Page 292 292
  • Page 293 293
  • Page 294 294
  • Page 295 295
  • Page 296 296
  • Page 297 297
  • Page 298 298
  • Page 299 299
  • Page 300 300
  • Page 301 301
  • Page 302 302
  • Page 303 303
  • Page 304 304
  • Page 305 305
  • Page 306 306
  • Page 307 307
  • Page 308 308
  • Page 309 309
  • Page 310 310
  • Page 311 311
  • Page 312 312
  • Page 313 313
  • Page 314 314
  • Page 315 315
  • Page 316 316
  • Page 317 317
  • Page 318 318
  • Page 319 319
  • Page 320 320
  • Page 321 321
  • Page 322 322
  • Page 323 323
  • Page 324 324
  • Page 325 325
  • Page 326 326
  • Page 327 327
  • Page 328 328
  • Page 329 329
  • Page 330 330
  • Page 331 331
  • Page 332 332
  • Page 333 333
  • Page 334 334
  • Page 335 335
  • Page 336 336
  • Page 337 337
  • Page 338 338

Danfoss VLT HVAC Drive FC 102 Programming Guide

Type
Programming Guide
This manual is also suitable for

Ask a question and I''ll find the answer in the document

Finding information in a document is now easier with AI