Page is loading ...

Copal Printer Manual


DNP Photo Imaging America Corp.
Acknowledgements
ACKNOWLEDGEMENTS
The information contained in this document represents the current view of DNP Photo Imaging America Corp. on the issues discussed as of the date of
publication. Because DNP Photo Imaging America Corp. must respond to changing market conditions, it should not be interpreted to be a commitment on
the part of DNP Photo Imaging America Corp., and DNP Photo Imaging America Corp. cannot guarantee the accuracy of any information presented after
the date of publication.
This document is for informational purposes only. DNP Photo Imaging America Corp. MAKES NO WARRANTIES, EXPRESSED OR IMPLIED, AS TO
THE INFORMATION IN THIS DOCUMENT.
Complying with all applicable copyright laws is the responsibility of the user. Without limiting the rights under copyright, no part of this document may be
reproduced, stored in or introduced into a retrieval system, or transmitted in any form or by any means (electronic, mechanical, photocopying, recording,
or otherwise), or for any purpose, without the express written permission of DNP Photo Imaging America Corp..
DNP Photo Imaging America Corp. may have patents, patent applications, trademarks, copyrights, or other intellectual property rights covering subject
matter in this document. Except as expressly provided in any written license agreement from DNP Photo Imaging America Corp., the furnishing of this
document does not give you any license to these patents, trademarks, copyrights, or other intellectual property.
ScanStation™, PrintMaster™, iStation™, PicViewer™, Photo Theater™, MyPhotoLab™, NexLab™, PixelWare™, LabServer™, One Touch Digital
Prints™ and One Touch Digital Printing™ are trademarks of DNP Photo Imaging America Corp.. The names of actual companies and products mentioned
herein may be the trademarks of their respective owners.
PrintRush™ is a trademark of Dai Nippon Printing Company LTD.
Dell® is a registered trademark of Dell Inc., pcAnywhere® is a registered trademark of Symantec Corporation, Kodak™ is a trademark of Eastman Kodak
Company, Epson Stylus® is a registered trademark of Seiko Epson Corporation, and Sony® is a registered trademark of Sony Electronics Corporation.
GO Software™, PC-Charge™, Win-Charge™ are trademarks of GO Software, Inc. IrDA® is a registered trademark of Infrared Data Association.
Bluetooth® is a registered trademark of the Bluetooth SIG, and Macromedia® and Flash® are registered trademarks of Macromedia, Inc. All other
trademarks are the property of their respective owners.
DNP Photo Imaging America Corp. • PO Box 767 • San Marcos, TX 78667 • USA
© 2000-2006 DNP Photo Imaging America Corp.. All rights reserved.

DNP Photo Imaging America Corp.
Acknowledgements

32 DNP Photo Imaging America Corp.
Before You Begin Basic Maintenance
Q8 PRINTER
BEFORE YOU BEGIN
Figure 36. Q8 Printer
Attach the Q8 printer to the USB port on the computer designated for the Q8 or 8x10 printer. See the Installation and
Setup Guide for more information.
It is recommended that there be at least 50 mm (1.97 in) of space above and on either side of the M8C printer to allow
for proper airflow.
REMOVING AND REPLACING THE Q8 MEDIA
Note
Prior to performing this procedure, you must remove the ribbon from the printer.
Installing the Printer Paper
Attention
Touching the paper surface leads to smudges on exposed paper. Only touch the ends of the paper roll.
1. Orient the paper roll with the leading edge of the paper going over the top of the paper roll (with the label arrow
pointing down).
2. Open the plastic covering on the right side of the roll.
3. Insert the paper spool with the metal spindle on the right side of the paper roll.
4. Remove the plastic from the new paper roll.
5. Locate the other endcap with the release buttons.
6. While squeezing the buttons, align the endcap on the left side of the paper roll so that the metal bar goes through the
hole in the center of the endcap.
7. Press firmly on the endcaps to make sure the roll is seated against both endcaps and no space remains.
8. Attention:If the endcaps are not properly seated on the roll, the printer can jam.

DNP Photo Imaging America Corp. 33
Installing the Printer Ribbon Basic Maintenance
9. Remove the sticker from the paper roll.
10. Insert the paper spool in the spool guides in the printer compartment.
11. Insert the paper between the white and metal rollers and through the paper guides.
12. Continue sliding the paper through the feed path and between the metal guides until the edge of the paper is visible
through the three holes on the metal feed guide.
Installing the Printer Ribbon
Note
With new ribbon, the receive spool is the spool with less ribbon, while the supply spool has more
ribbon. The receive spool goes in the top set of spool sockets while the supply spool goes in the
bottom set of sockets.
1. Retrieve the new ribbon.
2. Touching only the spool ends, remove the plastic cover from the new ribbon.
Attention
Touching the ribbon results in damaged or poor quality prints.
Handle the ribbon by touching only the spool ends.
3. Insert the ribbon spools into the left spool sockets and slide the spools firmly to the left
until the right sides of the spools can be inserted into the spool guides on the right.
Make sure to insert the ribbon so that the spring loaded spool guides on the left go in
first.
4. Wind the receive spool towards the back of the printer to remove slack from the ribbon.
5. Make sure that the printer ribbon is wound so that it feeds from the bottom of the supply
spool to the top of the receive spool like a C (not in an S) pattern.
6. The printer prints up to five blank prints as any smudged ribbon and paper are adjusted.
7. Close the printer door.
8. The printer takes up to three minutes to make adjustments before continuing with printing prints. When the
indicator light turns a solid purple color, the printer is ready for operation.
Replacing the Q8 Media
Emptying the Paper Scrap Bin
Before replacing the printer media, remove the paper scraps from the printer scrap bin.

34 DNP Photo Imaging America Corp.
Replacing the Q8 Media Basic Maintenance
13. Locate the bin finger holes (see Figure 37).
Figure 37. Paper Scrap Bin
14. Pull the bin up and away.
15. Empty any paper scraps in the bin into a proper receptacle.
16. Carefully slide the bin into the scrap bin location and align the guides the bin with the guide holes in the printer.
You have now emptied the scrap bin.
Removing the Printer Ribbon
Attention
The printer thermal head becomes very hot during use and can cause injury. Take care not to touch the thermal
head when performing operations inside the printer.
Attention
Always replace the printer ribbon and paper at the same time..
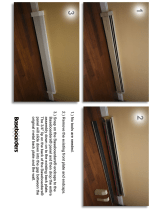
1. Lift the door release lever to open the printer door (see Figure 38).

DNP Photo Imaging America Corp. 35
Replacing the Q8 Media Basic Maintenance
Figure 38. Door Release Lever
2. Push the ribbon spools to the left and lift them from the printer.
You have now removed the printer ribbon.
Removing the Printer Paper
1. With the printer door open and the ribbon removed, turn the paper spool towards the back of the printer to unwind the
paper from the paper path.
2. Lift the paper spool from the paper compartment.
3. Squeeze the endcap release buttons to separate the endcap from the paper spool.
Attention
Do not discard the spool endcaps. Replacements do not come with new paper rolls.
Figure 39. Spool Endcap Release Buttons
You have now removed the paper spool and separated it to allow a new roll to be installed.

36 DNP Photo Imaging America Corp.
Replacing the Q8 Media Basic Maintenance
Cleaning the Media Compartment
Clean the media compartment once a week and every time you change the printer media to maintain your printer.
Note
Only wipe the cleaning cloth in one direction to avoid dust transfer.
1. Using a lint-free cloth dampened with isopropyl alcohol, wipe the bottom of the media compartment to remove any
dust or debris.
2. Remove the pinch roller guide from the printer by pulling up on the black roller guide knobs and removing the guide.
3. Using a new cloth dampened with isopropyl alcohol, clean the pinch roller by wiping the cloth over the roller in one
direction only. Rotate the roller to clean the entire surface.
4. Replace the pinch roller guide in the printer by placing the guide in place and securing the black knobs.
5. Using a new cloth dampened with isopropyl alcohol, clean the platen roller by wiping the cloth over the roller surface
in one direction only. Rotate the roller to clean the entire surface.

DNP Photo Imaging America Corp. 37
Replacing the Q8 Media Basic Maintenance
Installing the Q8 Paper
Attention
Touching the paper surface leads to smudges on exposed paper. Only touch the ends of the paper roll.
1. Remove the endcaps from the printer box.
2. Orient the paper roll with the leading edge of the paper going over the top of the paper roll (with the label arrow
pointing down).
3. Open the plastic covering on the right side of the roll.
4. Insert the paper spool with the metal spindle on the right side of the paper roll.
5. Remove the plastic from the new paper roll.
6. Locate the other endcap with the release buttons.
7. While squeezing the buttons, align the endcap on the left side of the paper roll so that the metal bar goes through the
hole in the center of the endcap.
8. Press firmly on the endcaps to make sure the roll is seated against both endcaps and no space remains.

38 DNP Photo Imaging America Corp.
Replacing the Q8 Media Basic Maintenance
Attention
If the endcaps are not properly seated on the roll, the printer can jam.
9. Remove the sticker from the paper roll.
10. Insert the paper spool in the spool guides in the media compartment.
11. Insert the paper between the white and metal rollers and through the paper guides.
12. Continue sliding the paper through the feed path and between the metal guides until the edge of the paper is visible
through the three holes on the metal feed guide.
Installing the Q8 Ribbon
Note
With new ribbon, the receive spool is the spool with less ribbon, while the supply spool has more
ribbon. The receive spool goes in the top set of spool sockets while the supply spool goes in the
bottom set of sockets.
1. Retrieve the new ribbon.
2. Touching only the spool ends, remove the plastic cover from the new ribbon.
Attention
Touching the ribbon results in damaged or poor quality prints. Handle the ribbon by touching only the spool ends.

DNP Photo Imaging America Corp. 39
Maintaining and Troubleshooting the Printer Basic Maintenance
3. Insert the ribbon spools into the left spool sockets and slide the spools firmly to the left until the right sides of the
spools can be inserted into the spool guides on the right. Make sure to insert the ribbon so that the spring loaded
spool guides on the left go in first.
4. Wind the receive spool towards the back of the printer to remove slack from the ribbon.
Note
Make sure that the printer ribbon is wound so that it feeds from the bottom of the
supply spool to the top of the receive spool like a C, and not in an S pattern.
5. Close the printer door.
6. The printer prints up to five blank prints as any smudged ribbon and paper are adjusted.
7. The printer takes up to three minutes to make adjustments before continuing with printing prints. When the indicator
light turns a solid blue color, the printer is ready for operation.
8. Close the printer door.
You have now installed the ribbon in the printer.
Maintaining and Troubleshooting the Printer
For more information on maintaining and troubleshooting the printer, contact Technical Support at 1-877-388-1776.
Clearing Paper Jams
For more information, contact Technical Support at 1-877-388-1776.
Cleaning the Air Filter
Suggested Cleaning Interval: Once a week
1. Locate the air filter cover on the side of the printer.

40 DNP Photo Imaging America Corp.
Maintaining and Troubleshooting the Printer Basic Maintenance
Figure 40. Air Filter Cover Location
2. Remove the air filter cover.
3. Using compressed air, spray the air filter to remove any dust from the filter.
4. Replace the air filter cover.
Cleaning the Pinch and Platen Rollers
Suggested Cleaning Interval: Once a week
Attention
It is important that the pinch roller is not damaged by dust or other particles. If the pinch roller is damaged, white
spots appear on prints.
1. Press the release lever to open the printer door.
Figure 41. Release Lever
2. Remove the ribbon and paper from the printer.
3. Remove the paper guide cover by pulling up on the black knobs and gently removing the guide cover from the printer
(see Figure 42).

DNP Photo Imaging America Corp. 41
Maintaining and Troubleshooting the Printer Basic Maintenance
Figure 42. Paper Guide
4. Using a clean, lint-free cloth moistened with isopropyl alcohol, wipe the white pinch roller while rotating it to make
sure that the entire roller is cleaned. The pinch roller is the smooth, white roller – not the grooved, white roller (see
Figure 43).
Figure 43. Pinch Roller
5. Using a clean, lint-free cloth moistened with isopropyl alcohol, wipe the black platen roller while rotating it to make
sure that the entire roller is cleaned (see Figure 44).

42 DNP Photo Imaging America Corp.
Maintaining and Troubleshooting the Printer Basic Maintenance
Figure 44. Platen Roller
6. Allow the rollers to dry for five minutes.
7. Replace the paper guide cover in the printer making sure to press the guide knobs until they click into place.
8. Replace the ribbon and paper in the printer. See “Replacing the Q8 Media” on page 33.
9. Close the printer door.
You have now cleaned the pinch and platen rollers.

PO BOX 767
S
AN MARCOS, TX 78667
WWW.DNPPHOTO.COM
PN: 35-3020-COPAL
Rev: 0208
/