Peerless PP730 User manual
- Category
- Flat panel wall mounts
- Type
- User manual
This manual is also suitable for

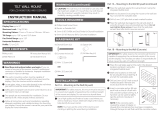
Installation and Assembly:
Paramount™ Pivot Wall Mount for 10" - 22" (25 - 56 cm) screens
Models: PP730, PP730-S
Max Load Capacity: 25 lb (11.34 kg)
©
U
L
USC
I
D
:
0
0
0
0
0
1
8
7
6
2
ISSUED: 10-01-07 SHEET #: 095-9272-2 06-15-09

2 of 20
ISSUED: 10-01-07 SHEET #: 095-9272-2 06-15-09
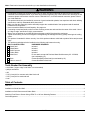
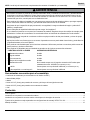
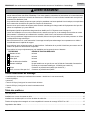
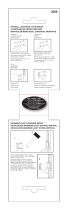
Notes: Read entire instruction sheet before you start installation and assembly.
Tools Needed for Assembly
•
• phillips screwdriver
• drill
• level
Table of Contents
Parts List.................................................................................................................................................................................3
Installation to Wood Stud Wall ................................................................................................................................................3
Installation to Solid Concrete and Cinder Block .....................................................................................................................4
Attaching Front Plate to Screen Using VESA 75 or 100 mm Mounting Patterns ...................................................................5
Cord management ..................................................................................................................................................................6
contained in this Installation Sheet. If you have any questions regarding any of the instructions or warnings, for US
your local distributor.
construction, and fully understands these instructions.
hardware and components.
power.
injury.
WALL CONSTRUCTION HARDWARE REQUIRED
x Wood Stud Included
x Wood Beam Included
x Solid Concrete Included
x Cinder Block Included
x
(not evaluated by UL)
x
x
WARNING

3 of 20
ISSUED: 10-01-07 SHEET #: 095-9272-2 06-15-09
C
AA
B
G
A
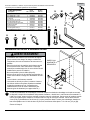
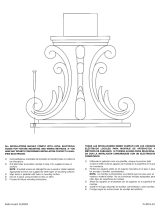
Before you begin, make sure all parts shown are included with your product.
Parts may appear slightly different than illustrated.
Parts List
PP730 PP730-S
Description Qty. Part # Part #
AA wall arm assembly 1 095-P1630 095-4630
A M4 x 12 mm phillips screw 4 504-9013 504-2014
B M4 x 20 mm phillips screw 4 504-9020 504-2013
C retaining spacer 4 590-5005 590-5003
D
E 5 mm allen wrench 1 560-9640 560-9640
F concrete anchors 2 590-0320 590-0320
G cable ties 2 560-9711 560-2004
H cable tie anchor 1 590-1290
590-1290
I
M
E
I
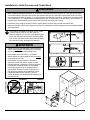
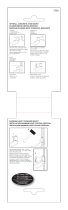
Installation to Wood Stud Wall
safely support the combined load of the equipment
and all attached hardware and components.
-
damage the screws, greatly reducing their holding
power.
standard thickness drywall or plaster into wood studs.
Installers are responsible to provide hardware for
other types of mounting situations (not UL approved).
WARNING
the wood stud used in mounting this product. Use of
Use a level to draw a vertical line down the center of
the stud. Use wall plate as template to mark center
assembly (AA
wood screws (D).
Skip to step 2.
1
D
AA
H
M
D
F

4 of 20
ISSUED: 10-01-07 SHEET #: 095-9272-2 06-15-09
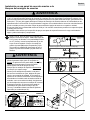
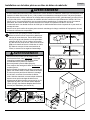
Installation to Solid Concrete and Cinder Block
Level and use wall plate as template to mark center
of holes.
F) in
AA)
over anchor and secure with wood screws (D). Make
sure wall arm is level, and tighten all fasteners.
D
AA
F
1
solid
concrete
cinder
block
1
3
2
F
Drill holes and insert anchors (F).
Place plate (AA) over anchors (F) and secure with screws (D).
Tighten all fasteners.
AA
F
D
concrete
surface
concrete thickness in the hole to be used for the concrete anchors. Do not drill into mortar joints! Be sure to mount
hammer drill to avoid breaking out the back of the hole when entering a void or cavity.
and components.
WARNING
but do not overtighten
screws, greatly reducing their holding power.
directly
to load-bearing concrete.
concrete covered with plaster, drywall, or other
shown below. Be sure concrete anchors do not
pull away from concrete when tightening screws.
custom fasteners must be supplied by installer (not
evaluated by UL).
WARNING
CUTAWAY VIEW
INCORRECT CORRECT
wall
plate
wall
plate
dry wall
dry wall
concrete
concrete

5 of 20
ISSUED: 10-01-07 SHEET #: 095-9272-2 06-15-09
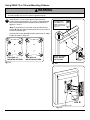
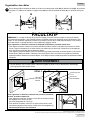
Insert two M4 x 12 mm screws (A) into top two holes of
Hook screws onto keyslots of adapter plate as indicated in
*Note: If hole pattern is in a pocket, insert two M4 x 20 mm
screws (B) with two retaining spacers (C) into top two holes of
screen as indicated right.
Insert two M4 screws (A or B) through bottom holes of adapt-
2
g.2.1
secured, damage may occur to screen or product may fail.
WARNING
g.2.2
A
Screen may appear
slightlydifferent
thanillustrated
g.2.3
A or B
ADAPTER PLATE
C
*Forscreenswith
aholepatternina
pocket, spacers (C) go
between adapter plate
and screen.
FOR VESA
®
75
MOUNTING PATTERN:
FOR VESA
100
MOUNTING PATTERN:
UsingVESA75or100mmMountingPatterns
ADAPTER
PLATE

6 of 20
ISSUED: 10-01-07 SHEET #: 095-9272-2 06-15-09
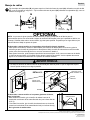
NOTE: Adjustment points (socket screws) are factory torqued for optimal performance. This factory torque setting is
recommended to prevent the screen from slipping over time. If more or less tension is desired follow this optional step.
You may not achieve optimal torque value if factory torque settings are adjusted.
Ifmoreorlesstensionisdesiredintiltmechanism,removesnapcapsasshownindetail2.Insertaathead
screwdriverintoslotandprycapawayfromtiltmechanism:
E).
OPTIONAL
cause the screen to fall.
WARNING
SCREW
DETAIL 2
Ifmoreorlesstensionisdesiredinthearmpivotpoints,
dothefollowing:
I).
allen wrench (I).
NOTE:Donotturnmorethanhalfaturn.
© 2009, Peerless Industries, Inc. All rights reserved.
All other brand and product names are trademarks or registered trademarks of their respective owners.
Peerless Industries, Inc.
Melrose Park, IL 60160
www.peerlessmounts.com
Attach cable tie anchor (H) to top or bottom of wall arm (AA) using M4 screw (M
cables to wall arm (AA) using cable tie (G
CordManagement
g.3.1
CABLES
M
H
3
AA
G
g.3.2
Page is loading ...
Page is loading ...
Page is loading ...
Page is loading ...
Page is loading ...
Page is loading ...
Page is loading ...
Page is loading ...
Page is loading ...
Page is loading ...
Page is loading ...
Page is loading ...

19 of 20
ISSUED: 10-01-07 SHEET #: 095-9272-2 06-15-09
such products will be free from defects in material and workmanship, provided they are installed and used in compliance with the instructions established by
Peerless Industries, Inc. Subject to applicable legal requirements, during the warranty period Peerless will repair or replace, or refund the purchase price of, any
such product which fails to conform with this warranty.
Limited Five-Year Warranty.
This warranty does not cover damage caused by (a) service or repairs by the customer or a person who is not authorized for such service or repairs by Peerless
when installing, using or storing the product, or (d) misuse or accident, in transit or otherwise, including in cases of third party actions and force majeure.
In no event shall Peerless be liable for incidental or consequential damages or damages arising from the theft of any product, whether or not secured by a security
device which may be included with the product.
distributor, installer or other person is authorized to modify or extend this warranty or impose any obligation on Peerless in connection with the sale of any product
manufactured or supplied by Peerless.
product.
LIMITED FIVE-YEAR WARRANTY
Español
www.peerlessmounts.com
si se trata de acciones atribuibles a terceros o de casos de fuerza mayor.
de seguridad incluido con el producto.
GARANTÍA LIMITADA DE CINCO AÑOS
www.peerlessmounts.com
Page is loading ...
-
 1
1
-
 2
2
-
 3
3
-
 4
4
-
 5
5
-
 6
6
-
 7
7
-
 8
8
-
 9
9
-
 10
10
-
 11
11
-
 12
12
-
 13
13
-
 14
14
-
 15
15
-
 16
16
-
 17
17
-
 18
18
-
 19
19
-
 20
20


Peerless PP730 User manual
- Category
- Flat panel wall mounts
- Type
- User manual
- This manual is also suitable for
Ask a question and I''ll find the answer in the document
Finding information in a document is now easier with AI
in other languages
- français: Peerless PP730 Manuel utilisateur
- español: Peerless PP730 Manual de usuario
Related papers
-
Peerless WSP415 User manual
-
-
-
-
-
-
-
-
-
Other documents
-
Peerless Industries PARAMOUNT PT660 User manual
-
 DYNAVISTA Adjustable Tilt Swivel TV Wall Mount Bracket Fits up to 24 Inch LCD LED TV Flat Screen Monitors Low-Profile Rotating Tilting TV Mount Compatible User manual
-
Peerless Industries SUF650P User manual
-
 ClosetMaid Indoor Furniture 3543 Operating instructions
-
 Closet Maid Indoor Furniture 3528 User manual
-
Peerless Industries SUA746PU User manual
-
-
 Kichler Lighting 9551BK User manual
-
-
RCA MAF15BKR User manual


