Page is loading ...

THANK YOU
We appreciate the trust and condence you have placed in Hampton Bay through the purchase of this LED wall
sconce. We strive to continually create quality products designed to enhance your home. Visit us online to see our full
line of products available for your home improvement needs. Thank you for choosing Hampton Bay!
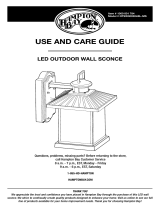
USE AND CARE GUIDE
LED OUTDOOR WALL SCONCE
Questions, problems, missing parts? Before returning to the store,
call Hampton Bay Customer Service
8 a.m. - 6 p.m., EST, Monday - Friday
1-877-527-0313
HAMPTONBAY.COM
Item #1000 001 782 (US)
777-418 (Canada)
Model #RFSW30030LRS-MS (US)
RFSW30030LRSC-PCIR (Canada)

2
Table of Contents
Safety Information ....................................2
Warranty ...................................................2
Pre-Installation .........................................3
Planning Installation ..............................3
Tools Required .......................................3
Hardware Included .................................3
Package Contents ..................................4
Installation ................................................5
Planning Installation ..............................6
Operation...................................................7
Care and Cleaning ....................................8
Troubleshooting ........................................8
Maintenance .............................................8
Safety Information
Read all safety precautions and installation instructions
carefully before installing or servicing this xture.
Failure to comply with these instructions could result in
potentially fatal electric shock and/or property damage.
It is recommended that a quali ed electrician perform all
wiring. This xture must be wired in accordance with all
national and local electrical codes.
This xture is designed for use in a 110-120VAC, 60Hz
fused circuit. Do not use on a dimming circuit.
This xture is intended to be used for general outdoor
lighting in wet locations.
WARNING: Do not handle any energized xture or
attempt to energize any xture with wet hands or while
standing on a wet or damp surface or in water.
WARNING: To reduce the risk of electrical shock, and to
assure proper operation, this xture must be adequately
grounded. To accomplish proper grounding, there must
be a separate ground wire (green) contact between this
xture and the ground connection of your main power
supply panel.
WARNING: There is no serviceable part inside the
motion sensor. DO NOT try to repair or disassemble the
unit. Doing so could damage the unit or create possibility
the electrical shock. Consult a quali ed electrician if
needed.
DISCLAIMER
NOTE: This equipment has been tested and found to comply with the limits for a Class B digital device, pursuant to
Part 15 of the FCC Rules and Canadian ICES-003. These limits are designed to provide reasonable protection against
harmful interference in a residential installation. This equipment generates, uses and can radiate radio frequency
energy and, if not installed and used in accordance with the instructions, may cause harmful interference to radio
communications. However, there is no guarantee that interference will not occur in a particular installation. If this
equipment does cause harmful interference to radio or television reception, which can be determined by turning
the equipment off and on, the user is encouraged to try to correct the interference by one or more of the following
measures:
□ Reorient or relocate the receiver antenna.
□ Increase the separation between the equipment and receiver.
□ Install the product onto on a circuit different from that to which the receiver is connected.
□ Consult with the dealer or an experienced radio/TV technician for help.
□ Any modi cations to this xture may void the warranty and interfere with the safe operation of the
luminaire.
Warranty
LIMITED FACTORY WARRANTY
The manufacturer warrants this xture to be free from defects in materials and workmanship when installed and
used under normal operating conditions for a period of 3 years from the date of purchase. This warranty covers all
component parts and extends only to the replacement of a defective xture or components; it does not cover failure
due to improper installation, misuse, mishandling, or damage incurred in transit.
Contact the Customer Service Team at 1-877-527-0313 or visit www.hamptonbay.com.

3 HamptonBay.com
Please contact 1-877-527-0313 for further assistance.
Pre-Installation
PLANNING INSTALLATION
□ Turn off the electrical power at your fuse or circuit breaker box before installing or servicing any part of this
xture.
□ Carefully remove the xture from the carton, and check that all parts are included. Be careful not to misplace
any of the screws or parts needed for installing the xture.
TOOLS REQUIRED
Wire
cutters
Phillips
screwdriver
Flathead
screwdriver
HARDWARE INCLUDED
NOTE: Hardware not shown to actual size.
AA
BB CC
DD EE
Part Description Quantity
AA Screw 2
BB Nut 2
CC Stud 2
DD Acorn nut 2
EE Wire nut 3

4
Pre-Installation (continued)
PACKAGE CONTENTS
A
B
C
Part Description Quantity
A Gem bar (preassembled to Backplate (B)) 1
B Backplate 1
C Light xture 1

5 HamptonBay.com
Please contact 1-877-527-0313 for further assistance.
Installation
1
Installing the gem bar
□ Remove the acorn nuts (DD) to separate the
gem bar from the xture.
□ Install the gem bar (A) on the junction box by
securing it with two screws (AA).
IMPORTANT: If a 4 in. square junction box is used, then
a square to round at converter must be placed to accept
the gem bar provided.
AA
DD
2
Connecting the wires
CAUTION: Make sure the main power is off at the fuse
or circuit breaker box. Check the power wires for damage
or scrapes. If the power supply wires are within three
inches of the ballast power supply, use wire suitable for at
least 90°C (194°F). Most dwellings built before 1985 have
supply wire rated to 60°C. Consult a quali ed electrician
before installing.
IMPORTANT: All wiring must take place inside the
junction box.
□ Connect the bare copper wire from the xture
to the grounding wire from the power source.
□ Connect the black wire from the xture to the
black wire from the power source.
□ Connect the white wire from the xture to the
white (neutral) wire from the power source.
□ Secure all wiring connections together with
wire connectors (EE) and tuck all connections
neatly into the junction box.
A
EE
Copper/Ground
Wires
Black Wire
White Wire

6
Installation (continued)
3
Mounting the light fixture
□ Align the mounting holes in the backplate (B)
with the two studs (CC).
□ Insert the two studs (CC) through the backplate
(B), and secure the xture with the two acorn
nuts (DD).
□ Restore the power at the fuse or circuit
breaker box.
B
C
DD
CC
4
Testing the light fixture
The sensitivity switch adjusts the amount of distance
that is required to activate the unit. To set to a desired
level of sensitivity:
□ Turn on the circuit breaker and the light
switch. The sensor has 1-2 minutes warm up
period before it will detect motion. When rst
turned on, wait 1-1.5 minutes.
□ Set the Time switch to the “TEST” position
and the Sensitivity switch to the “M” position.
The lights turn off in about 5 seconds. Keep
in mind a better sensitivity is achieved by
walking across the coverage area, not walking
towards or away from the motion sensor.
□ Set the sensitivity to the “H” position for a
higher level of sensitivity and “L” for a lesser
level of sensitivity. The reach is approximately
a 30 ft. radius from the motion sensor if set to
the “H” position.
Test
Time Switch
PIR Motion
Sensitivity
Switch
2” 6”
LMH
D to D

7 HamptonBay.com
Please contact 1-877-527-0313 for further assistance.
Operation
OPERATION MODES
Set the amount of time you want the lights to stay on after motion is detected: 2 or 6 minutes. After the selected
amount of time, the light will be automatically turned off.
Mode Sensitivity
Switch Position
Timer Switch
Position
Explanation
Stand-by
Mode
L - Less
M - Medium
H - High
Test, 2, or 6 This is the state when the power is turned on. If you have
turned off the power for a long period of time and upon
restoring power to the xture, the light will turn on in 2
seconds and remain on for approximately 60 seconds
regardless of motion. Then it enters the Auto Detection Mode
or Test Mode based on the setting of the Timer switch.
Auto
Detection
Mode
L - Less
M - Medium
H - High
2 or 6 This is the normal motion detection mode. The motion
detector turns the light on automatically after sensing
movement in its coverage area at dusk and stays on as long
as motion is detected. When motion stops, the light remains
on for the predetermined time you set (2 or 6 minutes) and
then turns off automatically.
Test Mode L - Less
M - Medium
H - High
Test This mode allows you to adjust the sensitivity of the motion
detector to a desired level at dusk or dawn. When motion
stops, the light will turn off in about 5 seconds.
Manual
Override
Mode with
Auto Reset
L - Less
M - Medium
H - High
2 or 6 This mode allows you to turn on and off your xture by
using the existing wall switch, regardless of the presence
of motion. The manual override mode works only when it is
dark (light intensity level is below 30 Lux). The unit resets
itself back to Auto Detection Mode after 8 hours. To activate
the feature, turn the existing wall switch off then back on
within 3 seconds so the light stays on continuously. The unit
will turn off and reset itself to Auto Detection Mode after 8
hours.
Dusk-to-
Dawn Mode
L - Less
M - Medium
H - High
D to D In this mode, the light turns on at dusk and off at dawn
automatically, regardless of the presence of motion. The “D to
D” setting ensures lights are non-operational in daylight and
only function at night. To activate, set the Timer switch to the
“D to D” position.
Motion Sensor Unit
LED
AC Power Supply
Mounting Side
Photocell
Lense
Motion Detector
Indicator Light
Test
Time Switch
PIR Motion
Sensitivity
Switch
2” 6”
LMH
D to D

8
Care and Cleaning
To clean the xture, use a dry or slightly dampened cloth to wipe the glass and surface of the xture. Do not use any
cleaners with chemicals, solvents, or harsh abrasives. If necessary, use a mild soap to clean off any dirt or stains.
Troubleshooting
Problem Possible Cause Solution
The light will not come on. The wall switch is turned off. Turn on the wall switch.
There is a faulty wire connection. Access the outlet box, and check and
secure the wire connections.
The circuit breaker is off. Ensure the circuit breaker is set in the
On position.
The fuse blows or a circuit
breaker trips when the light is
turned on.
There are crossed wires or the
power wire is not grounded.
Access the outlet box and x the wire
connections or consult an electrician
Maintenance
REPLACING THE LED DRIVER
□ Turn off main power at fuse or circuit breaker box.
□ Remove the xture from the wall.
□ Disconnect the xture power supply wires from
the branch circuit wires.
□ Remove the two screws holding the driver to the
back plate of the xture.
□ Cut the cable ties holding the bundled wires
together.
□ Cut each individual colored wire pair immediately
below the crimp/wire connector.
□ Strip each colored wire 3/8 in. from the end of the
wire.
□ Attach the new driver to the back plate with the
previously-removed screws.
□ Connect the driver colored wires to the
corresponding colored xture wires using wire
nuts or crimp connectors.
□ Reattach the xture to the wall.
□ Restore power to the xture.

Questions, problems, missing parts? Before returning to the store,
call HamptonBay Customer Service
8 a.m.-6 p.m., EST, Monday-Friday
1-877-527-0313
HAMPTONBAY.COM
Retain this manual for future use.
8060749
/