Page is loading ...

THANK YOU
We appreciate the trust and confidence you have placed in Hampton Bay through the purchase of this 3-light LED rail
light. We strive to continually create quality products designed to enhance your home. Visit us online to see our full
line of products available for your home improvement needs. Thank you for choosing Hampton Bay!
Item #1000-001-036
Model #847658005014
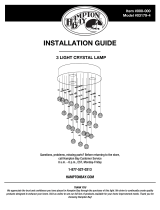
USE AND CARE GUIDE
3-LIGHT LED RAIL LIGHT CORD AND PLUG
Questions, problems, missing parts? Before returning to the store,
call Hampton Bay Customer Service
8 a.m. - 6 p.m., EST, Monday - Friday
1-877-527-0313
HAMPTONBAY.COM
1500T3

2
Table of Contents
Table of Contents ..................................2
Safety Information .................................2
Warranty .................................................2
Pre-Installation ......................................3
Planning Installation ................................... 3
Tools Required ........................................... 3
Hardware Required .................................... 3
Package Contents ...................................... 3
Installation ............................................. 4
Power Plug Assembly ........................... 5
Safety Information
Read these installation instructions and review the
diagrams thoroughly before installing the track
system. Save these instructions.
□ This track light is rated at 120 volts, 60Hz,
170mA, 15.5W.
□ This product is damp-listed.
WARNING: Deviation from the assembly
instructions may result in a risk of fire or electric
shock.
WARNING: This equipment has been tested and
found to comply with the limits for a Class B digital
Device pursuant to Part 15 of the FCC Rules. These
limits are designed to provide reasonable protection
installation. This equipment generates and can
radiate radio frequency energy and, if not installed
and used in accordance with the instructions, may
cause harmful interference.
However, there is no guarantee that interference will
not occur in a particular installation. If this
equipment does cause harmful interference to radio
or television reception, which can be determined by
turning the equipment off and on, the user is
encouraged to try to correct the interference by one
or more of the following measures:
Reorient of relocate the receiving antenna.
Increase the separation between the
equipment and receiver.
Connect the equipment into a different outlet
and circuit from the receiver outlet and
circuit.
Consult the dealer or an experienced radio/TV
technician for help.
Changes or modifications to this unit not expressly
approved by the party responsible for compliance
could void the user’s authority to operate the
equipment.
Warranty
LIMITED WARRANTY
The manufacturer warrants this product to be free from defects in materials and workmanship for a period of three
(3) years from date of purchase. This warranty applies only to the original consumer purchaser and only to products
used in normal use and service. If this product is found to be defective, the manufacturer's only obligation, and your
exclusive remedy, is the repair or replacement of the product at the manufacturer's discretion, provided that the
product has not been damaged through misuse, abuse, accident, modifications, alterations, neglect, or mishandling.
This warranty shall not apply to any product that is found to have been improperly installed, set-up, or used in any
way not in accordance with the instructions supplied with the product. This warranty shall not apply to a failure of
the product as a result of an accident, misuse, abuse, negligence, alteration, or faulty installation, or any other
failure not relating to faulty material workmanship. The manufacturer specifically disclaims any liability and shall not
be liable for any consequential or incidental loss or damage, including labor/expense costs involved in the
replacement or repair of said product.
Contact the Customer Service Team at 855-HD-HAMPTON (1-855-434-2678) or visit www.Hamptonbay.com.

3 HAMPTONBAY.COM
Please contact 1-877-527-0313 for further assistance.
Pre-Installation
PLANNING INSTALLATION
Before you begin installation, check to ensure all parts listed in the Package Contents section are contained within
the packaging and that there is no damage to any of the parts.
TOOLS REQUIRED
Drill
Phillips
screwdriver
HARDWARE REQUIRED
NOTE: Hardware not shown to actual size.
PACKAGE CONTENTS
Part Description Quantity
A Rail light 1
AA CCBB
A
Part Description Quantity
AA Back panel screw (preassembled to Rail light (A) 2
BB Anchor 4
CC Wall screw 4

4
Installation
1
Preparing the light for
installation
2
Installing the back panel
□ Remove the back panel screws (AA) from the
back of the rail light (A).
□ Remove the back panel (1) from the light (A).
□ Determine the installation location and
using the back panel (1) as a template,
mark the installation holes with a pencil.
□ Drill two holes at the installation locations
and insert the anchors (BB) into the wall
holes.
□ Attach the back panel (1) to the wall using
the wall screws (CC).
3
Installing the rail light
4
Finalizing the installation
□ Install the rail light (A) to the back panel (1)
using the previously-removed back panel
screws (AA).
□ Adjust the lights and plug the rail light into
an outlet.
□ To turn the lights on and adjust the
brightness, turn the dimmable On/Off
switch (1) clockwise.
AA
A
1
CC
1
BB
AA
A
1

5 HAMPTONBAY.COM
Please contact 1-877-527-0313 for further assistance.
Power Plug Assembly
1
Preparing the wire
2
Attaching the wire to the
plug
WARNING: Disconnect the power before wiring.
WARNING: This is a polarized plug. One blade is
wider and marked WHITE. This blade must be
connected to the ribbed side of the wire.
□ Cut the end of the wire. One line is shorter by 0.2 in.
(5.0 mm) than the other. Ensure there are no strands
sticking out of the insulation.
□ Slide the cap off. With the plug in position as shown,
place the wire with the ribbed side at the bottom.
CAUTION: Do not use type TPT extra flexible
cords (as used on electric shavers) or type XT (as
used on Christmas tree lights), or any small
diameter cords. To avoid overheating, do not use on
broilers, toasters, irons or devices rated over 1000
watts (8 amps and 125 volts).
□ Bend the end of the wire and push into
the bottom of the groove.
□ Push the wire down with your thumb and
slide the cap completely into place.
Ribbed Side
Wider Blade
.2 in.

Questions, problems, missing parts? Before returning to the store,
call Hampton Bay Customer Service
8 a.m.- 6 p.m., EST, Monday-Friday
1-877-527-0313
HAMPTONBAY.COM
Retain this manual for future use.


□
□
□
□
□
□
□
□

□
□
□
□

/