weatherstrong.com 888-745-0004
Grill Bases and Side Burner Cabinets have a few extra steps that make up the proper installation.
Firstandforemost,ifyouareinstallingadrop-ingrillorsideburnerinyourcabinets,youMUSTrstinstallan
insulated heat jacket before inserting the gas appliance. This protects your cabinets from the extreme heat
and protects your limited warranty.
Please Note: You must purchase the insulated heat jacket from the manufacture of the gas appliance. Please
follow the manufacturer’s instructions on how to properly support your appliance and insulated jacket inside
the cabinet.
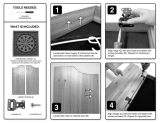
CabinetModication:
1. Your grill base or side burner cabinet comes with two panels in the upper, apron part of the cabinet. One
apron panel is built into the cabinet. The second overlay panel is manufactured from the same material as the
cabinet doors. Make sure to not throw this loose piece away!
2. Clamp the decorative overlay panel to the apron panel using C-Clamps. Make sure to line up the top of the
overlay panel with the top of the cabinet apron panel.
3. Mark the required cut-out necessary to install the insulated heat jacket and the gas appliance. Refer to the
specicationandinstallationguidessuppliedbytheappliancemanufacturer,oruseatemplateifprovided.
Remember to account for the countertop thickness.
4. Carefully cut out the required space on the cabinet apron and decorative overlay panel.
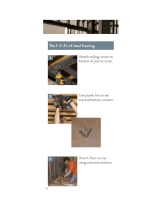
5.Placeheatlinerintothecutouttoinsureapropert.
6. Fabricate a support brace, inside the cabinet, based on the appliance manufacturer’s recommendation.
7. We recommend hiring a licensed professional to install the gas appliances and the heat liners.
Grill Double Door Base
• Thefaceplateismodiedineldtoaccepttherespectiveheatlinerusedwiththegasgrill
• 3/4”All-Weatherboard™compositematerialcabinetconstruction
• Fully integrated back panel
• Includes4‘SureLevel’polymerlegs,shippedlooseforeldinstallationandleveling
• Availableinalldoorstylesandnishes
• Separate toe kick with vent included
• Stainless steel handles sold separately
Please Note:Allbuiltingrillheadsrequireaninsulatedjacket.Pleaseconsultyourgrillmanufacturerforthe
appropriate model
.
Grill Bases and Side Burner Cabinets