Page is loading ...

■ General ■ Stereo Radio
Frequency Range
Usable Sensitivity
Stereo Separation
87.5 - 108 MHz
6 dB/µV(S/N 30 dB)
35 dB (at 1 kHz)
Frequency Range
Usable Sensitivity
531 - 1 602 kHz
28 dB/µV (S/N 20 dB)
Frequency Range
Usable Sensitivity
153 - 279 kHz
32 dB/µV (S/N 20 dB)
■ CD Player
Sampling Frequency
Pick-Up Type
Light Source
Wavelength
Frequency Response
Total Harmonic Distortion
Signal to Noise Ratio
Wow and Flutter
Channel Separation
Astigma 3-beam
Semiconductor laser
780 nm
20 Hz - 20 kHz (±1 dB)
96 dB
0.01 % (1 kHz)
Below measurable limits
75 dB
8 times oversampling
FM
MW
LW
Specifications
CD Changer: CX-DP880N
(For Upgrade)
(For CQ-RDP153/RDP143/RDP133N)
Stereo/Mono Power Amplifier:
CY-M7052EN/CY-M9054EN
(For Upgrade)
Note:
Specifications and design are subject to modification
without notice due to improvements.
CQ-RDP153N CQ-RDP143N
CQ-RDP133N CQ-RDP123N
CQ-RDP113N CQ-RDP103N
CQ-RDP003N
Thank you very much for purchasing a Panasonic CD Player/Receiver.
Sophisticated Product Achieived by Optional Functions
●Sound System with Spurting Realism
(2-channel or 4-channel Power Amplifier)
●Powerful Heavy Bass
(Stereo/Mono Power Amplifier) : CY-M7052EN/CY-M9054EN
●Smooth Uninterrupted Play
(CD Changer) : CX-DP880N, etc
Fantastic
Sound Space!
■Radio The newly developed Alpha tuner enhances the reception sensitivity of FM broadcasts.
It is also less affected by receiving conditions inside and outside the vehicle.
■RDS The sensitivity in the AF mode is adjustable and the region-to-region signal strength is
memorized, which means the automatic best program reception can be achieved.
Subwoofer (For Upgrade)
Power Supply
Tone Controls (Bass)
Tone Controls (Treble)
Current Consumption
Maximum Power Output
Power Output
Speaker Impedance
Pre-Amp Output Voltage
Pre-Amp Output Impedance
Dimensions (Main Unit)
Weight (Main Unit)
12 V DC(11 V - 16 V),
Test Voltage 14.4 V, Negative Ground
±12 dB at 100 Hz
±12 dB at 10 kHz
Less than 2.5 A
(CD mode, 0.5 W 4-Speaker)
45 W x 4 (at 4 Ω)
20 W x 4 (DIN45 324, at 4 Ω)
4 - 8 Ω
2.5 V (CD mode)
200 Ω
178(W) x 50(H) x 155(D) mm
1.4 kg
Removable Front Panel CD Player/Receiver with CD Changer Control
CQ-RDP153/RDP143/RDP133N
Removable Front Panel CD Player/Receiver
CQ-RDP123/RDP113/RDP103/RDP003N
Operating Instructions
Something wrong....?!
(Ex. smoke, smell and no sound
B
possibility of fire or shorting.)
q
Turn off the power.
w
Detach the power cord and bring the unit to your dealer.
Product service, repair and enquiry
8Consult your nearest Panasonic Service Centre.
Trouble Check point
● Adjust the balance and fader.
● Verify the wiring.
●
Connect the speaker cord correctly.
3Sound quality
Left and right
sounds are
reversed
No sound from
left, right, front,
or rear speaker
3Error indication
●CD dirtied
●CD upside
down
●CD
scratched
●No operation
by some
cause.
●No CD in
magazine
CD player
●Eject the CD.
CD changer
●Next CD auto-
selected
●Consult your near-
est Panasonic
Service Centre.
●Insert CDs in the
magazine.
Message
Cause Remedy
(Changer only)
Troubleshooting
3General
No sound
Noise
●
Tune in to another high-intensity station.
● Make sure that the antenna mount-
ed point is grounded properly.
3Radio
Frequent
noise
● Load the CD correctly.
● Clean the CD.
● The maximum permissible tilt is
30°.
● Secure the unit.
3CD Player
No sound, or
disc is automati-
cally ejected
Sound skip
due to
vibration
●
Never try repair by yourself.
No power
● Start the engine. (
Or turn the
ignition switch to the ACC position.
)
● Verify the wiring. (Ex. Battery cord,
ACC cord, grounding cord, etc.)
● Fuse blown (Contact the nearest
Panasonic Service Centre.)
● Ask a professional for fuse
replacement.
●
Be sure to use the same rated fuse.
● Disable the mute function.
● Verify the wiring.
● Wait until the dew disappears
before turning on the unit.
● Make sure that the ground lead is
grounded properly.
● Connect the battery cord correctly.
Preset data
deleted
Sound skip,
poor
sound quality
● Clean the CD.
Trouble Check point
3CD Player (CONTINUED)
CD not
ejectable
● Press [u]. If the CD is not ejected,
contact the nearest Panasonic
Service Centre.
YEFM284003 ND1202-0 Printed in China
Matsushita Electric Industrial Co., Ltd.
Web Site : http://www.panasonic.co.jp/global/
www.panasonic.co.uk (for UK customers only)
8Order accessory and consumable items for your
product with ease and confidence by telephoning
our Customer Care Centre Mon–Friday
9:00am–5:30pm. (Excluding public holidays.)
8Or go on line through our Internet Accessory
ordering application.
8Most major credit and debit cards accepted.
8
All enquiries transactions and distribution facilities
are provided directly by Panasonic UK Ltd.
8It couldn’t be simpler!
Customer Care Centre
For UK customers: 08705 357357
For Republic of Ireland customers: 01 289 8333
8This operating instruction manual applies to the seven models below.
The difference among these models are mentioned below.
8All illustrations represent model CQ-RDP153N unless otherwise specified.
8Remote control unit is an option. (CA-RC61EX)
Models Changer Control Pre-out
4(Front/Rear)
4(Front/Rear)
4(Front/Rear)
2(Rear)
2(Rear)
2(Rear)
2(Rear)
CQ-RDP153N Yes
CQ-RDP143N Yes
CQ-RDP133N Yes
CQ-RDP123N None
CQ-RDP113N None
CQ-RDP103N None
CQ-RDP003N None
Face Color
Plating Silver
Plating Silver
Plating Silver
Coating Black
Coating Black
Coating Black
Coating Silver
CQ-RDP153N
Note: An alarm is generated to remind you of the
face plate when turning off the power.
3Install the face plate
1
2
Release the
face plate.
Cautions
This product is a class I laser product.
●A laser beam leak results in hazardous radiation
exposure.
●Do not open covers and do not repair it by your-
self. Refer servicing to qualified personnel.
●Wave length : 780 nm
●Laser power : No hazardous radiation is
emitted with safety protection.
BAND
DISP
]
TUNE
[
qSlide the left side.
wPress the right side
until a
“
click
”
is heard.
Press [BAND] to
select the radio AM
(MW/LW) mode
(aRefer to “Radio”)
Press [DISP]
Hold down
[DISP]
for 2
seconds or more
Press []TUNE[]
Press [DISP]
Press []TUNE[]
Press [DISP]
Precaution
(Attached sheet
☞
q)
3For safe driving
Moderate the volume not to miss traffic information.
3
Shorting prevention
Do not wet this unit.
3
CD slot
Do not insert anything other than a CD.
3
Power supply
12-volt negative ground battery system
3
Protection of preset memory
Never disconnect the battery cord.
Accessories
(Attached sheet
☞
w)
●Operating Instructions
●Installation Instructions
●Supplied Hardware (
aInstallation Instructions)
●Warranty Card
●Removable Face Plate Case
Fuse
●Use fuses of the same specified rating (15A).
●Using different substitutes or fuses with higher
ratings, or connecting the unit directly without a
fuse, could cause fire or damage to the unit.
●If the fuse replacement fails, contact your near-
est authorized Panasonic Service Centre.
Maintenance
● Wipe the unit with a soft dry cloth.
● Never apply volatile liquids such as benzine and
thinner to prevent damage.
Take the face plate with you when leaving the car.
Theft Prevention
3Remove the face plate
qPull the right side.
wSlide the left side.
Detach the face
plate.
Put the face plate into
the case.
● Only when
“
NO CT
”
appears in the step w
below, set the clock.
Clock Setting
Notes on discs
(Attached sheet
☞
e)
●Do not touch the recorded surface.
●Avoid leaving CDs in places with direct sunlight,
dust and moisture such as seat and dashboard.
●Do not use irregular shaped discs.
●You may have trouble playing discs in the follow-
ing cases.
●
Dirt, fingerprints, scratches on the disc surface
●
If a disc is damaged from leaving inside a car for
extended periods, etc.
●
Inappropriate writing software and a CD changer
are used.
●
Contains other than CD-DA data.
(AM mode)
(NO CT)
(Blink: Hours)
Adjust hours
(Blink: Minutes)
Adjust minutes
(Completed)
1
2
(CD)
(CD)
(CD)
(Changer)
Disc No.
(Changer)
(Changer)
Illumination Color
Blue/Red
Amber
Green
Blue/Red
Amber
Green
Amber
Disc No.
(
☞
)-marked points in this book have supplemen-
tary information. Refer to the information as needed.
English

CQ-RDP153N
MONO OFF/LOCAL OFF
MONO ON/LOCAL OFF
MONO ON/LOCAL ON
MONO OFF/LOCAL ON
How to Enjoy Music
Power on
Enjoy music in each mode
Press to select a band.
FM1
FM2
FM3
AM (LW/MW)
Mono/Local Selection
Mono: Reduce noise if weak signals are received
Local: Only strong signals of stations are searched
for in seek tuning.
Display Change
Program Service Name
Frequency
Clock Time
(3 seconds)
Note: A station name appears when it is an RDS
station.
Remote Control Sensor
PTY(Programme Type)/
MONO/LOC(Local)
AF(Alternative Frequency)/
REG(Region)
DISP(Display)/CT(Clock Time)
SRC(Source)/
POWER
MUTE/LOUD(Loudness)
CD Slot Eject
{DISC}
Note: When first powered up, a demonstration message
appears. Press
[DISP] to stop the demonstration message.
<
TUNE
>
6 TRACK 7
Fast Forward/Fast Reverse
■FM broadcast
Hold down [PTY](MONO/LOCAL) for 2 seconds or more
to
change the mode.
■AM(LW/MW) broadcast
Press [PTY](MONO/LOCAL)
to change the mode.
Turn to change each level
Turn to adjust
■Sound Control
■Volume Adjustment
(Setting range: 0 to 40)
■Mute ■Loudness
Sound Controls
●Next track: [
7
] Press
●Start of current track: [
6
] Press once
●Previous track: [
6
] Press twice
●Fast forward: [
7
] Hold down
●Fast reverse: [
6
] Hold down
●Previous disc : [{] Press
●Next disc : [
}] Press
Disc indicator
Make sure that the disc indicator is off before loading a disc.
If the disc indicator lights, eject the disc, then load a new disc.
Only discs with the label at
right are available.
Note: Not compatible with CD-RW (except when CX-DP880N is connected).
Trouble may occur while playing CD-Rs/CD-RWs. Refer to the section on “Notes
on discs (CD-R, CD-RW)”
(Attached sheet
☞
e)
(–12 to +12 in 2 dB step)
(–12 to +12 in 2 dB step)
(left/right: 1 to 15)
(front/rear: 1 to 15)
(0 to 40)
Bass
Treble
Balance
Note:
If no operation takes place for 5 seconds or more (2 seconds in the
volume mode), the display return to the regular mode.
Fader
1
CQ-RDP153N
PTY (MONO/LOC)
DISP
Press to select a mode
Press to switch on and off.
●Mute the sound completely.
Hold down for 2 seconds or more
to switch on and off.
●Enhance bass and treble tones at low
volume.
Volume
Radio
CD Changer
CD Player
TA(Traffic Announcement)
VOLUME/SEL(Select)
2
■Seek tuning
Hold down for 0.5 seconds or more.
Tuning will automatically stop when the next station is found.
[>]: higher frequency
[<]: lower frequency
■Manual Tuning
[>]: higher frequency
[<]: lower frequency
LOCAL OFF
LOCAL ON
■Disc Eject
■Pause
Radio
CD
Player
CD
Changer
For
CQ-RDP153
CQ-RDP143
CQ-RDP133N
Display Change
Track Number/Playing Time
Clock Time
■CD player mode ■CD changer mode
Clock Time
(Hold down for 2 seconds
or more)
Disc Number/Track Number
Playing Time
When a disc is loaded.
●
Press to select a mode as follows.
●When a disc is not loaded
Insert a disc and playback starts automatically. (Attached sheet
☞
!0)
■Track selection and track search
●When magazine is not loaded
Insert a magazine with discs and playback starts automatically.
■Disc selection
■Track selection and track search
(Refer to the CD player mode.)
●
Press to power on.
●
Press again and hold to power off.
Changer indicator
Lights when a changer with magazine is connected.
REPEAT
RANDOM
SCAN
REP
1st track on each disc
(changer only):
Hold down [5] for 2 seconds or more.
All tracks: Press [5].
R5
DISC
●10 seconds play of each track.
●Random play
●Press again to cancel in each play mode.
Press
LOUD
(Press)
CD-RW
CD-RW
CD-RW
WMA
WMA
WMA
●Available Discs ●Non-available
MP3
MP3
MP3
8 cm
8 cm
8 cm
1 to 6 (Preset Memory)
BAND/APM(Auto Preset Memory)/
y
/5
(Pause)
When a changer is connected.
(For CQ-RDP153/RDP143/RDP133N)
Release it to resume regular CD play.
Press [
u
] to stop CD play and eject the disc.
Press [BAND] (
h/5) to pause. Press again to resume to playback.
Press
All tracks: Press [4]. lights.
All tracks on the current disc
(changer only):
Hold down [4] for 2 seconds
or more. blinks.
R5
R5
●Repeat play
Current track:
Press [6]. lights.
Current disc
(changer only):
Hold down [6] for 2 seconds
or more. blinks.
REP
REP
Convenient Function
Radio Data System (RDS)
RDS is a system performing convenient functions for FM stations in
such as Europe. However, there may be some areas where RDS is
not effective for reception.
8Station name appears instead of the frequency.
8The clock is automatically adjusted.
AF Alternative frequency
8When reception is poor, an RDS station broadcasting the same pro-
gram is tuned in automatically.
3
To select AF receiving sensitivity
a
Press [AF]
(Attached sheet
☞
r
)
AF1 : For mountain areas and places enclosed by high-rise
buildings or other objects that prevent radio reception.
(Default)
AF2 : For suburbs and other places free of obstructions of view.
OFF : For the AF function inactivated.
3
To change AF range
a
Hold down [AF] for 2 seconds
or more
8REGION ON : To select a station broadcasting the same program
8REGION OFF : To select an AF station of the same network
(The program may be different) (Default)
3
AF1 or AF2 auto preset memory
8The memory is valid for the RDS stations only.
8A station of the same network in good receiving condition is
received.
8If a preset station is in poor receiving condition, another station in
good receiving condition can be tuned in to by pressing the same
preset button. (Best Station Research)
8PI Seek (Attached sheet
☞
t)
TA Traffic Announcements
8To automatically listen to a station that gives
traffic information periodically.
3
To select TA mode
a
Press [TA]
(Attached sheet
☞
y
)
(Default : TA OFF)
8
To cancel
a
Press
[TA]
again.
Notes:
8
If a selected station is in poor receiving condition, another station
giving traffic announcements will be automatically tuned in.
8When TA ON is selected, only TP station will be searched. When TA
ON is selected, only TP station will be memorized automatically.
8Even in CD player and CD changer modes, a station giving the traf-
fic information is automatically received.
3
To listen to TA only
a
Hold down [TA] for 2 seconds
or more (in FM mode)
8To cancel aPress [TA] again.
(Or, raise the volume with [VOL]).
3
TA Volume Set
(Attached sheet
☞
u
)
PTY Program Type
8Stations can be selected by program type,
for example, news and rock.
3
To select mode PTY
a
Press [PTY]
(Attached sheet
☞
i
)
8To cancel aPress [PTY] again.
3
PTY preset call
a
Press [1] to [6]
8The following program types are preset. (Attached sheet
☞
o)
qNews wSpeech eSport rPop music tClassics yMusic
3
PTY selection
qPress [
]
TUNE
[
] to select a program type below.
wPress [BAND] for automatic selection.
3
PTY preset change
qSelect a program type by using PTY selection or PTY pre-
set call.
wHold down [1] to [6] for 2 seconds or more.
Note:
When there is no corresponding program type, “NO PTY” is
displayed.
3
Emergency Announcement
8An emergency announcement, if broadcast, is automatically
received.
8
This function operates in other than the radio mode, and
“
ALARM
”
flashes.
Note: Press
[DISP]
to switch the PTY display language to Swedish.
EON Enhanced Other Networks
8Traffic information of the other networks is received.
8Preset AF data is refreshed at all times.
FM broadcast AM(LW/MW)
broadcast
(Changer)(CD)
Note: Remote control unit is an option (CA-RC61EX). For details, refer to the manual of the remote
control unit.
SPEECH
INFO
CULTURES
ROCK M
OTHER M
SOCIAL A
LEISURE
OLDIES
AFFAIRS
DRAMA
POP M
CLASSICS
CHILDREN
TRAVEL
NATIONAL
NEWS
EDUCATE
VARIED
LIGHT M
FINANCE
PHONE IN
COUNTRY
DOCUMENT
MUSIC
SPORT
SCIENCE
M_O_R_ M
WEATHER
RELIGION
JAZZ
FOLK M
Preset Memory
●Up to 6 stations can be stored in each of the FM1, FM2, FM3 and AM (LW/MW) band
selections.
Press to select a band for preparation.
■Auto Preset Memory
Hold down for 2 seconds or more.
●Automatically tune the 6 stations with good reception and save
under preset buttons [1] to [6].
●Preset stations appear for 5 seconds each.
Notes:
●
Only RDS stations will be saved at default setting (AF is ON).
●To stop scanning, press one of the preset buttons [1] to [6].
■Manual Preset Memory
Hold down one of the preset buttons [1] to [6] until the display
blinks once.
Note: New stations overwrite existing saved stations after following this procedure.
Press [1] to [6] to call a preset station.
Caution: Never preset stations while driving.
■Preset station calling
Use seek or manual tuning to find a station.
This unit does not support CD text display.
Band
Preset Number
Frequency

Cyan Magenta Yellow Black
CQ-RDP153N Installation Instructions (1)
q
w
q
w
q
w
q
w
q
w
q
w
30°
53mm
182mm
4.5 mm – 6.0 mm
4
e
4
Removable Front Panel CD Player/Receiver with CD Changer Control
CQ-RDP153/RDP143/RDP133N
Removable Front Panel CD Player/Receiver
CQ-RDP123/RDP113/RDP103/RDP003N
(CQ-RDP153N)
CQ-RDP153N
Installation Instructions
Einbauanleitung
Instructions d’installation
Installatiehandleiding
Installation Instructions
Einbauanleitung
Instructions d’installation
Installatiehandleiding
●
Please read these instructions carefully before using this product and keep this manual for future reference.
●
Bitte lesen Sie diese Bedienungsanleitung vor der Verwendung dieses Produktes aufmerksam durch und bewahren
Sie sie danach für spätere Nachschlagzwecke sorgfältig auf.
●
Prière de lire ces instructions attentivement avant d’utiliser le produit et garder ce manuel pour l’utilisation ultérieure.
●
Leest u deze instructie alstublieft zorgvuldig door voor u dit product in gebruik neemt en bewaar deze handleiding voor later gebruik.
YEFM292919 ND1202-0 Printed in China
Matsushita Electric Industrial Co., Ltd.
Web Site : http://www.panasonic.co.jp/global/
Consult a professional for installation.
●Verify the radio using the antenna and speakers before installation.
Wenden Sie sich zum Einbau an einen Fachmann.
●Probieren Sie den Radiobetrieb vor dem Einbau mit Antenne
und Lautsprechern aus.
Prenez contact avec un spécialiste pour le montage.
●Vérifiez l’autoradio avant de procéder au montage.
Vraag een vakman voor de installatie.
●Controleer voor de installatie of de radio werkt met de antenne en
de luidsprekers.
●Mounting angle side to side : horizontal
front to rear : 0-30°
●Montagewinkel seitlich : horizontal
vorne-hinten : 0-30°
●Angle de montage latéral : horizontal
longitudinal : 0 à 30°
●Bevestigingshoek links/rechts : horizontaal
voor/achter : 0 - 30°
●Mounting space
●Einbauöffnung
●Espace nécessaire pour le montage
●Benodigde ruimte
Before Installation/Vor dem Einbau
Avant l'installation/Voor de installatie
Before Wiring/Vor der Verdrahtung
Avant le câblage/Voor het aansluiten van de bedrading
How to install the unit/Einbau des Gerätes/Mode de montage de l’appareil/Installeren van het toestel
Supplied Hardware/Mitgelieferte Hardware/Matériel d’installation/Meegeleverde onderdelen
1
1
1
1
2
1
No. Diagram
Q'ty
Item No. Diagram
Q'ty
Item
Mounting collar
Einbauhalterung
Cadre de montage
Bevestigingskraag
Bolt (5 mm )
Befestigungsschraube (5 mm )
Boulon (5 mm )
Bout (5 mm )
ISO antenna adapter
ISO-Antennenadapter
Adaptateur d’antenne ISO
ISO antenne-adapter
Lock cancel plate
Verriegelungsfreigabeplatte
Plaque anti-blocage
Ontgrendelingsplaat
Power connector
Versorgungsstecker
Connecteur d’alimentation
Stroomstekker
Installation/Einbau/Montage/Installatie
1
2
Mounting collar insertion Bend mounting tabs.
Einsetzen der Einbauhülse
Biegen Sie die Einbaulaschen ab.
Insertion du collier de fixation Replier les languettes de fixation
Inbrengen bevestigingskraag Buig bevestigingslipjes om.
Connection of power connector
Anschluß des Versorgungssteckers
Raccordement du connecteur d'alimentation
Aansluiten van de stroomstekker
3
4
5
Trim plate mounting
Anbringen der Abdeckplatte
Installation de la plaque de garniture
Bevestigen van de afwerkingsrand
6
Cable reconnection
Wiederanschließen des Kabels
Rebranchement du câble
Opnieuw aansluiten kabel
Remove the front panel.
Nehmen Sie das
Bedienteil ab.
Retirez le panneau de
façade.
Verwijder het voorpaneel.
1
Remove the trim plate.
Entfernen Sie die
Abdeckplatte.
Enlevez la plaque de
garniture.
Verwijder de afwerkingsrand.
2
3
Pull out the unit with
both hands.
Ziehen Sie das Gerät mit
beiden Händen heraus.
Retirez l’appareil à deux
mains.
Trek het toestel met beide
handen naar buiten.
4
Trim plate
Abdeckplatte
Plaque de garniture
Afwerkingsrand
How to remove the unit/Ausbau des Gerätes
Dépose de l’appareil/Verwijderen van het toestel
Lock release
q Insert the plate until you
hear a click.
w Pull the main unit while
pushing the plate inward.
Freigabe der Verriegelung
q Schieben Sie die Platte ein,
bis Sie ein Klickgeräusch
vernehmen können.
w Ziehen Sie an dem
Hauptgerät, während Sie die
Platte hineindrücken.
Libération du verrouillage
q
Insérer la plaque jusqu'à ce
qu'un déclic se produise.
w
Dégager l'appareil principal
tout en repoussant la plaque
vers l'intérieur.
Ontgrendeling
q Steek de plaat naar binnen
tot u een klik hoort.
w Trek het hoofdtoestel naar
buiten terwijl u de plaat
naar binnen drukt.
Cautions :
● Wear gloves for safety.
●
Make sure that wiring is completed
before installation.
Vorsicht :
● Tragen Sie Handschuhe, um sich
vor Verletzungen zu schützen.
●
Achten Sie vor dem Einbau darauf,
daß die Verdrahtung fertiggestellt ist.
Précautions:
● Porter des gants à des fins de sécurité.
●
S'assurer que le câblage est terminé avant
l'installation.
Let op:
● Draag handschoenen voor uw veiligheid.
●
Controleer of de bedrading correct is aangelegd
voor u gaat installeren.
Remove the cable from the battery negative terminal.
Trennen Sie das Kabel von der negativen Batterieklemme ab.
Retirer le câble de la borne négative de la batterie.
Koppel de kabel van de negatieve aansluiting van de accu los.
Bend appropriate tabs to secure the unit
without backlash.
Die entsprechenden Einbaulaschen so
umbiegen, daß das Gerät ohne Spielraum
fest sitzt.
Replier les languettes
de fixation appropriées
pour immobiliser
l'appareil sans
contrecoup.
Buig de juiste lipjes om
zodat het toestel vast
zit zonder speling.
Main unit securing q Screw the bolt into the main unit.
w Secure the rear of the main unit.
e
Snap the right and left springs into each hole.
Befestigung q Schrauben Sie die Schraube in das
des Hauptgerätes Hauptgerät.
w Sichern Sie die Rückseite des
Hauptgerätes.
e
Lassen Sie die rechten und linken Federn in den
löchern einschnappen.
q Visser le boulon dans l'appareil principal.
w Fixer l'arrière de l'appareil principal.
e
Bouteroller les ressorts droit et gauche dans chaque trou.
q Schroef de bout in het hoofdtoestel.
w Zet de achterkant van het hoofdtoestel vast.
e Pas de rechter en linker veren in de
bijbehorende gaten.
1
Exclusively operated with 12-volt battery with
negative (–) ground.
Dieses Gerät ist ausschließlich für den Anschluß
an Bordnetze mit 12 V Batterie und negativer Klemme
an Masse bestimmt.
Alimentez l’appareil absolument par la batterie de 12
volts avec sa polarité négative (–) mise à la masse.
Uitsluitend voor gebruik met een 12 Volt accusysteem
met negatieve (–) aarding.
2
Connect the power lead (red)
very last.
(for non-ISO connector)
Schließen Sie den
Versorgungsleiter(rot) zum
Schluß an
(wenn kein ISO-Stecker
verwendet wird)
.
Raccorder le fil d'alimentation
(rouge) en dernier.
(pour un connecteur non-ISO)
Sluit de stroomdraad (rood) pas het allerlaatst
aan.
(voor een niet-ISO aansluiting)
3
Connect the battery lead (yellow) to the positive
(+) terminal of the battery or fuse block terminal (BAT).
(for non-ISO connector)
Schließen Sie das Batteriekabel (gelb) an die positive (+)
Klemme der Batterie oder an die (BAT) Klemme des
Sicherungsblocks an
(wenn kein ISO-Stecker verwendet wird).
Connectez le fil (jaune) à la borne positive (+) de la
batterie ou à la borne (BAT) de la boîte à fusibles.
(pour un connecteur non-ISO)
Sluit de accudraad (geel) aan op de positieve (+)
aansluiting van de accu of van het zekeringenblok (BAT).
(voor een niet-ISO aansluiting.)
4
Apply insulating tape to bare leads.
Isolieren Sie alle freiliegenden Leiter.
Recouvrez les fils nus d’un ruban isolant.
Isoleer blote draadeinden met
isolatieband.
Secure loosened leads.
Sichern Sie alle losen Leiter.
Resserrez les connexions de fils.
Zet loshangende draden vast.
5
4
w
Securing to fire wall
Befestigung an Brandschutzwand
Obtenir un pare-feu
Vastzetten aan het brandschot
Using the rear support strap (Option)
Using the rubber cushion (Option)
Verwendung der Einbauleiste (Option) Verwendung des Gummikissens (Option)
Utiliser de la barrette de support arrière (Option) Utiliser la bague d'amortisseur en caoutchouc (Option)
Gebruik van de achter-steunstrip (optioneel)
Gebruik van het rubber stootkussen (optioneel)
3mm Tap ping screw (Option)
Blechschraube (Option)
Vis taraudeuse (option)
Zelftappende schroef
(los verkrijgbaar)
To the unit
An das Gerät
Côté appareil
Naar het toestel
Rear support strap (Option)
Einbauleiste (Otpion)
Plaque-support arrière (option)
Achter-steunstrip
(los verkrijgbaar)
Hexagonal nut (Option)
Sechskantmutter (Option)
Ecrou hexagonal (option)
Zeskantige moer
(los verkrijgbaar)
Rear support bracket
(supplied with car)
Einbauleiste (vorhanden im
Fahrzeug)
Support arrière
(fourni avec votre voiture)
Achter-steunbeugel
(behorend bij de auto)
Rubber cushion (Option)
Gummikissen (Option)
Canon en caoutchouc (option)
Stootrubber (los verkrijgbaar)
To the unit
An das Gerät
Côté appareil
Naar het toestel
Clank!
Fixation de l'appareil
principal
Vastzetten
hoofdtoestel
EnglishDeutschFrançaisNederlands
IMPORTANT
When this unit is installed in dashboard,
ensure that there is sufficient air flow
around the unit to prevent damage from
overheating, do not block any ventilation
holes on the unit.
WICHTIG
Bei Einbau des Geräts im Armaturenbrett
sollte darauf geachtet werden, daß der
Luftstrom um das Gerät nicht behindert ist,
um Beschädigung durch Überhitzen zu
verhindern, und die Belüftungsöffnungen
des Geräts nicht blockiert sind.
IMPORTANT
Lorsque cet appareil est installé dans le
tableau de bord, assurez-vous qu'il y a une
circulation d'air suffisante autour de
l'appareil afin d'éviter tout endommagement
provoqué par une surchauffe et qu'aucun
trou d'aération de l'appareil n'est obturé.
BELANGRIJK
Wanneer dit toestel in het dashboard wordt
geïnstalleerd, moet u ervoor zorgen dat er
voldoende ventilatie is rond het toestel. Om
oververhitting te voorkomen mogen de
ventilatie-openingen in het toestel niet
afgedekt worden.

Cyan Magenta Yellow Black
CQ-RDP153N Installation Instructions (1)
ACC
BATTERY 15A
ACC
BATTERY 15A
ACC
BATTERY 15A
L
R
ACC
BATTERY 15A
(❈)
(❈)
(❈)
(❈)
(❈)
(❈)
CD·C-IN
Wiring/Verdrahtung/Câblage/Bedrading
●The pin arrangement of the power connector
conforms to ISO standard.
●Please check that the pin arrangement of the
connector in your car conforms to ISO standard.
●For car types A and B, change the wiring of the
red and yellow leads as shown at below.
●After connection, insulate the portions marked (❈)
with insulating tape.
Note : For cars other than types A and B, please
consult your local car shop.
Precautions
(
ISO Connector
)
●Die Stiftbelegung des Versorgungssteckers entspricht
em ISO-Standard.
●Bitte stellen Sie sicher, daß die Stiftbelegung
des Steckers in Ihrem Fahrzeug dem ISO-Standard
entspricht.200
●Für Fahrzeuge der Typen A und B, ändern Sie die
Verdrahtung der roten und gelben Leiter gemäß Abbildung.
●Nach dem Anschluß isolieren Sie die mit (❈) markierten
Abschnitte mit Isolierband.
Hinweis : Für andere Fahrzeuge als Typ A und B,
wenden Sie sich bitte an eine örtliche Pkw-Werkstatt.
Vorsichtsmaßregeln (ISO-Stecker)
●La disposition des broches du connecteur d'alimentation
est conforme à la norme ISO.
●Veuillez vérifier si que la disposition des broches du
connecteur d'alimentation dans votre voiture est conforme
à la norme ISO.
●Pour les types de voiture A et B, changer le câblage des
fils rouge et jaune comme indiqué ci-dessous.
●Après avoir fait les connexions, isoler les sections
marquées (❈) avec de la bande isolante.
Remarque: Pour les voitures autres que des types A et B,
veuillez consulter votre magasin de matériel automobile local.
Précautions (Connecteur ISO)
●De pen-configuratie van de stroomstekker voldoet aan de
ISO standaard.
●Controleer of de pen-configuratie van de stekker in uw
auto eveneens voldoet aan de ISO standaard.
●
Voor auto's van type A en B, dient u de bedrading voor de rode
en gele draden te wijzigen zoals hieronder staat aangegeven.
●Na het aansluiten dient u de gedeelten die met (❈)
gemarkeerd zijn met isolatieband af te plakken.
Opmerking: Voor andere auto's dan die van type A en B
dient u uw garage te raadplegen.
Voorzorgen (ISO stekker)
Standard ISO/ISO-Standard/Normes ISO/Standaard ISO
IGN or ACC 12V supply
12 V-Versorgung
(IGN/ACC)
Alimentation 12 volts en
IGN ou ACC
IGN of ACC 12 V
stroomvoorziening
Car-side connector
Steckverbinder am Fahrzeug
Connecteur côté voiture
Stekker aan autozijde
Car-side connector
Steckverbinder am Fahrzeug
Connecteur côté voiture
Stekker aan autozijde
Car-side connector
Steckverbinder am Fahrzeug
Connecteur côté voiture
Stekker aan autozijde
12V Batteries (Continuouse supply)
12 V-Batterie (Dauerversorgung)
Batterie de 12 volts (alimentation continue)
12 V accu (doorlopende stroomvoorziening)
Car Type A/Kraftfahrzeug des Typs A/Type de voiture A/Autotype A
Car Type B/Kraftfahrzeug des Typs B/Type de voiture B/Autotype B
A7 A4
IGN or ACC 12V supply
12 V-Versorgung
(IGN/ACC)
Alimentation 12 volts en
IGN ou ACC
IGN of ACC 12 V
stroomvoorziening
A4
12V Batteries (Continuouse supply)
12 V-Batterie (Dauerversorgung)
Batterie de 12 volts (alimentation continue)
12 V accu (doorlopende stroomvoorziening)
A7
No connection
Kein Anschluß
Aucune connexion
Geen aansluiting
A4
12V Batteries (Continuouse supply)
12 V-Batterie (Dauerversorgung)
Batterie de 12 volts (alimentation continue)
12 V accu (doorlopende stroomvoorziening)
A7
Connect as follows.
Nehmen Sie den Anschluß wie folgt vor.
Branchez les haut-parleurs comme suit.
Sluit de luidsprekers als volgt aan.
●Use ungrounded speakers only.
Allowable input : 45W or more
Impedance : 4 – 8 Ω
●Distance between speaker and amplifier: 30 cm or more
●Verwenden Sie nur nicht geerdete Lautsprecher.
Zulässige Belastbarkeit: 45 W oder mehr
Impedanz : 4 – 8 Ω
●Entfernung zwischen Lautsprecher und Verstärker: 30 cm oder mehr
●Utilisez uniquement des haut-parleurs non reliés à la masse.
Puissance d'entrée admissible: 45 W ou davantage
Impédance: 4 – 8 Ω
●Distance entre le haut-parleur et l'amplificateur: 30 cm ou davantage
●Gebruik uitsluitend ongeaarde luidsprekers.
Toegestaan ingangsvermogen: 45 W of hoger
Impedantie: 4 - 8 Ω
●Afstand tussen luidspreker en versterker: 30 cm of meer
A
B7 :
Rear Left + (Green)
Hinten Links + (Grün)
Arrière gauche + (Vert)
Links achter + (Groen)
B5 :
Front Left + (White)
Vorne Links + (Weiß)
Avant gauche + (Blanc)
Links voor + (Wit)
B3 :
Front Right + (Gray)
Vorne Rechts + (Grau)
Avant droit + (Gris)
Rechts voor + (Grijs)
B1 :
Rear Right + (Violet)
Hinten Rechts + (Violett)
Arrière droit + (Violet)
Rechts achter + (Paars)
C1 :
External Mute Lead
To the Navi Mute lead of the Panasonic car navigation system
or car telephone mute lead.
Externe-Stummschaltungskabel
An das Navigationssystem-Stummschaltungskabel des
Panasonic Navigationssystems oder an das
Autotelefon-Stummschaltungskabel.
Fil de Mise en sourdine extérieure
A raccorder au fil Navi Mute du système de navigation automobile de
Panasonic ou au fil de mise en sourdine du téléphone pour véhicule.
Externe-geluiddempingsdraad
Naar de Navi Mute draad van een Panasonic auto-navigatiesysteem
of naar de dempingsdraad voor deautotelefoon.
B2 :
Rear Right – (Violet w/black stripe)
Hinten Rechts – (Violett mit schwarzem Streifen)
Arrière droit – (Violet à rayures noires)
Rechts achter – (Paars met zwarte streep)
B4 :
Front Right – (Gray w/black stripe)
Vorne Rechts – (Grau mit schwarzem Streifen)
Avant droit – (Gris à rayures noires)
Rechts voor – (Grijs met zwarte streep)
B6 :
Front Left – (White w/black stripe)
Vorne Links – (Weiß mit schwarzem Streifen)
Avant gauche – (Blanc à rayures noires)
Links voor – (Wit met zwarte streep)
+
-
+
B7
-
B8
+
B1
-
B2
+
B3
-
B4
+
B5
-
B6
B
ISO Connector
ISO-Stecker
Connecteur ISO
ISO aansluiting
B
B
B
B
B8 :
Rear Left – (Green w/black stripe)
Hinten Links – (Grün mit schwarzem Streifen)
Arrière gauche – (Vert à rayures noires)
Links achter – (Groen met zwarte streep)
Power connector/Versorgungsstecker/Connecteur d’alimentation/Stroomstekker
Speaker Connection/Anschluß der Lautsprecher/Branchement avec les haut-parleurs/Aansluiten van de luidsprekers
C3 :
External Remote Control Lead
When using a non-Panasonic external remote control,
refer to the manufacture for their product before connecting.
Leitungsdraht für externe Fernbedienung
Wenn Sie eine externe Fernbedienung verwenden, die nicht von Panasonic
hergestellt wurde, wenden Sie sich vor dem Anschluß an den Hersteller
des Produktes.
Fil de la télécommande extérieure
En cas d’utilisation d’une télécommande extérieure non-Panasonic, se
référer aux conseils du fabricant concerné pour les connexions électriques.
Externe afstandsbedieningsdraad
Bij gebruik van een externe afstandsbediening die niet van Panasonic is,
dient u voor aansluiting de handleiding of de fabrikant van het product in
kwestie te raadplegen.
Warning: Do not connect the power connector until the whole wiring is completed.
Warnung: Schließen Sie den Versorgungsstecker erst an, nachdem die gesamte
Verdrahtung beendet wurde.
Avertissement: Ne pas raccorder le connecteur d'alimentation tant que la totalité
des câblages n'est pas complètement terminée.
Waarschuwing: Sluit de stroomstekker pas aan wanneer de volledige bedrading
is aangesloten.
B
Antenna
Antenne
Antenne
Antenne
ISO Antenna Adapter
(
If needed
)
ISO-Antennen-adapter
(falls erfor derlich)
Adaptateur d'antenne ISO
(si nécessaire)
ISO antenne-adapter (Indien nodig)
Preamp Out Connector
(
Rear
)
Vorverstärker-Ausgang (Rückseite)
Connecteur de sortie de préamplificateur (arrière)
Uitgangsaansluiting voorversterker (achter)
Preamp Out Connector (Front)
Only for CQ-RDP153/RDP143/RDP133N
Vorverstärker-Ausgang (Vorderseite)
Nur CQ-RDP153/RDP143/RDP133N
Connecteur de sortie de préamplificateur (avant)
Uniquement pour CQ-RDP153/RDP143/RDP133N
Uitgangsaansluiting voorversterker (voor)
Alleen voor de CQ-RDP153/RDP143/RDP133N
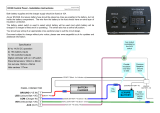
CD Changer Input Connector Only for CQ-RDP153/RDP143/RDP133N
The RCA cord of a CD changer (ex. CX-DP880N) should be connected.
CD-Wechsler-Eingangssteckverbinder Nur CQ-RDP153/RDP143/RDP133N
Hier das RCA-Kabel eines CD-Wechslers (z.B. CX-DP880N) anschließen.
Connecteur d'entrée de changeur de disque CD Uniquement pour CQ-RDP153/RDP143/RDP133N
Le cordon RCA d'un sélecteur de changeur de disque CD (expl. CX-DP880N) doit être raccordé.
Ingangsaansluiting CD-wisselaar Alleen voor de CQ-RDP153/RDP143/RDP133N
Sluit het RCA (tulpstekker) snoer van de CD-wisselaar (bijv. CX-DP880N) aan.
(
L
)/(
L
)/(
G
)/(
L
)
(
R
)/(
R
)/(
D
)/(
R
)
(
L
)/(
L
)/(
G
)/(
L
)
(
R
)/(
R
)/(
D
)/(
R
)
CD.C-IN
ISO Connector
A
ISO-Stecker
A
Connecteur ISO
A
ISO aansluiting
A
A7 :
Power Lead
(
ACC or IGN
)
To ACC power, +12V DC.
Versorgungskabel (ACC oder IGN)
An die ACC-Stromklemme, +12 V Gleichspannung.
Fil d’alimentation (ACC ou IGN) A l’alimentation ACC, +12V CC
Stroomdraad (ACC of IGN) Naar ACC stroomvoorziening, + 12 V gelijkstroom.
A8 :
Ground Lead To a clean, bare metallic part of the car chassis.
Massekabel An ein sauberes, metallisches Teil des Fahrzeugchassis.
Fil de mise à la masse A une partie métallique propre découverte du châssis de voiture
Aarding Naar een schoon, bloot metalen onderdeel van het chassis.
A4 :
Battery Lead To the car battery, continuous +12 V DC.
Batteriekabel An die Batterie des Fahrzeuges, kontinuierlich +12 V Gleichspannung.
Fil de batterie A la batterie de voiture, alimentation continue de +12 V CC
Accudraad Naar de accu van de auto, doorlopende stroomvoorziening + 12 V gelijkstroom.
A5 :
Motor Antenna Relay Control Lead To Motor Antenna. (Max. 500 mA) (This lead is not intended for use with a switch actuated power antenna)
Amp·Relay Control Power Lead To Panasonic power amplifier. (synchronized with the power on/off of amplifier)
Steuerkabel für Relais der motorbetriebenen Antenne (Zu motorbetriebenen Antenne) (max. 500 mA)
Dieses Kabel dient nicht für die
Verwendung mit einer über einen Schalter aktivierten motorbetriebenen Antenne.
Verstärker/Relais-Steuerstromleiter An den Panasonic Leistungsverstärker (synchronisiert mit der Ein/Ausschaltung des Verstärkers).
Fil de commande de relais d’antenne motorisée
A l’antenne motorisée (500 mA maxi.) (Ce fil n’est pas conçu pour l’usage avec l’antenne commandée par interrupteur.)
Cordon d’alimentation de la commande de relais d’amplificateur
A l’amplificateur de puissance de Panasonic (synchronisé à la mise sous/hors tension de l’amplificateur)
Stuurdraad relais gemotoriseerde antenne Naar de gemotoriseerde antenne. (Max. 500 mA)
(Deze draad is niet bedoeld voor een gemotoriseerde antenne die met een schakelaar wordt ingeschakeld.)
Stuurstroomdraad versterker relais
Naar de Panasonic eindversterker. (Gesynchroniseerd met het in-/uitschekelen van de stroom voor de versterker.)
A
A5
(
L
)/(
L
)/(G)/(L)
Ground Lead
Massekabel
Fil de masse
Massadraad
Battery Lead
Batteriekabel
Fil de batterie
Accudraad
DIN Cord
DIN-Kabel
Cordon DIN
DIN snoer
RCA Cord
(
L
)
Cinch-Kabel
(
L
)
Cordon RCA
(
G
)
RCA-(tulp) snoer
(
L
)
RCA Cord
(
R
)
Cinch-Kabel
(
R
)
Cordon RCA
(
D
)
RCA-(tulp) snoer
(
R
)
CX-DP880N
System Upgrade Example: Connecting with a CD changer Only for CQ-RDP153/RDP143/RDP133N
Beispiel für die Systemerweiterung: Anschluß an einen CD-Wechsler Nur CQ-RDP153/RDP143/RDP133N
Exemple de mise à niveau de système: Raccordement à un changeur de disque CD Uniquement pour CQ-RDP153/RDP143/RDP133N
V
oorbeeld uitbreiding systeem: aansluiten van een CD-wisselaar Alleen voor de CQ-RDP153/RDP143/RDP133N
CQ-RDP153N
(
R
)/(
R
)/(D)/(R)
Fuse (15 A) Refer fuse replacement to your nearest authorized Panasonic
Service Center. Do not try fuse replacement by yourself.
Sicherung (15 A): Wenden Sie sich zum Austausch der Sicherung an eine autorisierte
Panasonic-Kundendienststelle in Ihrer Nähe. Versuchen Sie nicht, den Austausch
selbst vorzunehmen. Steckverbinder am Fahrzeug
Fusible (15 A) Confier le remplacement de fusible au centre de service de
service après-vente Panasonic agréé le plus proche. Ne pas essayer de
remplacer le fusible tout(e) seul(e).
Zekering (15 A) Laat het vervangen van de zekering over aan uw dichtstbijzijnde
Panasonic service-centrum. Probeer in geen geval zelf de zekering te vervangen.
●Do not connect more than one speaker to
one set of speaker leads. (except for connecting to
a tweeter)
●Schließen Sie niemals mehr als einen Lautsprecher
an einen Satz Lautsprecherleiter an. (außer bei
Anschluß eines Hochtonlautsprechers)
●Ne raccorder pas plus d'un haut-parleur à un
ensemble de fils de haut-parleur. (Sauf lors du
raccordement à un tweeter)
●Sluit niet meer dan één luidspreker aan op één paar
luidsprekerdraden. (Behalve bij aansluiting op een
tweeter.)
CD Changer Control Connector Only for CQ-RDP153/RDP143/RDP133N The DIN cord of a CD changer (ex. CX-DP880N) should be connected.
Steckverbinder der CD-Wechslersteuerung Nur CQ-RDP153/RDP143/RDP133N Hier das DIN-Kabel eines CD-Wechslers (z.B. CX-DP880N) anschließen.
Connecteur de commande de changeur de disque CD Uniquement pour CQ-RDP153/RDP143/RDP133N
Le cordon DIN d'un changeur de disque CD (expl. CX-DP880N) doit être raccordé.
Stekker CD-wisselaar bediening Alleen voor de CQ-RDP153/RDP143/RDP133N Sluit het DIN snoer van de CD-wisselaar (bijv. CX-DP880N) aan.
●Do not use a 3-wire type speaker system
having a common earth lead.
●Verwenden Sie niemals Lautsprechersysteme mit
Dreierverkabelung, die einen gemeinsamen
Erdungsleiter aufweist.
●Ne pas utiliser pas de système de haut-parleur
de type à 3 fils ayant un fil de mise à la masse
commun.
●Gebruik geen luidsprekersysteem met drie
draden en een gedeelde aarddraad.
(Brown w/black stripe)/(Braun mit schwarzem Streifen)/
(Brun à rayures noires)/(Bruin met zwarte streep)
(Orange)/(Orange)/(Orange)/(Oranje)
(Red)/(Rot)/(Rouge)/(Rood)
(Black)/(Schwarz)/(Noir)/(Zwart)
(Yellow)/(Gelb)/(Jaune)/(Geel)
(Blue w/white stripe)/(Blau mit weißem Streifen)/(Bleu à rayures blanches)/(Blauw met witte streep)

Preset No. Program Type Contents
1 NEWS NEWS
2 SPEECH AFFAIRS, INFO, EDUCATE,
DRAMA, CULTURES, SCIENCE,
VARIED, WEATHER, FINANCE,
CHILDREN, SOCIAL A,
RELIGION, PHONE IN, TRAVEL,
LEISURE, DOCUMENT
3 SPORT SPORT
4 POP M POP M
5 CLASSICS CLASSICS
6 MUSIC ROCK M, M_O_R_M, LIGHT M,
OTHER M, JAZZ, COUNTRY,
NATIONAL, OLDIES, FOLK M
UpDown
This sheet adds information to the operating instructions as a supplement. Refer to this sheet as
needed.
The following explanations (
☞
q
–
☞
!0
) correspond to the numbers that are marked with fingers
in the operating instructions.
Attached sheet (Supplementary Information Sheet)
(
☞
q
)
Precaution
Note: The preset memory is cleared to return to the original fac-
tory setting when the power connector or battery is disconnect-
ed.
(
☞
e
)
Notes on discs (CD-R, CD-RW)
¡ You may have trouble playing back some CD-R/RW discs
recorded on CD recorders (CD-R/RW drives), either due to
their recording characteristics or dirt, fingerprints, scratches,
etc. on the disc surface.
¡ CD-R/RW discs are less resistant to high temperatures and
high humidity than ordinary music CDs. Leaving them inside
a car for extended periods may damage and make playback
impossible.
¡ Some CD-R/RWs can not be played back successfully
thanks to incompatibility among writing software, a CD
recorder (CD-R/RW drive) and the discs.
¡ This player cannot play the CD-R/RW discs if the session is
not closed.
¡ This player cannot play the CD-R/RW discs which contains
other than CD-DA.
¡ Be sure to observe the instructions of CD-R/RW disc for han-
dling it.
(
☞
t
)
PI seek
(Program Identification Seek)
Another station broadcasting the same program is searched for
if a station with an appropriate frequency cannot be found even
by means of BSR (Best Stations Research).
Note: For PI Seek, cancel the TA mode first, then execute PI
Seek.
(
☞
r
)
Radio Data System (RDS)
AF
Alternative Frequency
(
☞
w
)
Accessories
XXXXXXXXXXXXXXX
XXXXXXXXXXXXXXXXX
XXXXXXXXXXXXXX
XXXXXXXXXXXXXXXX
OO-OOOOO
q
1 set
Operating
Instructions
w
1 set
Installation
Instructions
t
1
Supplementary
Information Sheet
e
1
Warranty Card
r
1
Removable Face
Plate Case
Supplied Hardware
(1 set)
(a Installation
Instructions)
AF indicator
(
☞
y
)
TA
Traffic Announcement
(
☞
u
)
TA volume set
(Volume Level: 0 to 40)
Turn [VOL] while receiving traffic announcements. The TA vol-
ume differs from the regular volume (by up to 5 levels).
TA indicator TP indicator
Lights up while receiving a TP
station
(
☞
i
)
PTY
Program type
(
☞
o
)
PTY preset call
(
☞
!0
)
CD player
¡ It takes several seconds between the instant when inserting
a CD and the instant when starting playback.
¡ Do not use discs that have a seal or label attached.
¡ Be sure to close the front panel while CD playback.
¡ Do not pinch your finger or hand in the front panel.
¡ Do not insert foreign matter into the disc slots.
PTY indicator
Festsendertasten-Nr
. Programmtyp Beschreibung
1 NEWS NEWS
2 SPEECH AFFAIRS, INFO, EDUCATE,
DRAMA, CULTURES, SCI-
ENCE, VARIED, WEATHER,
FINANCE, CHILDREN,
SOCIAL A,
RELIGION, PHONE IN,
TRAVEL, LEISURE, DOCU-
MENT
3 SPORT SPORT
4 POP M POP M
5 CLASSICS CLASSICS
6 MUSIC ROCK M, M_O_R_M, LIGHT
M, OTHER M, JAZZ, COUN-
TRY, NATIONAL, OLDIES,
FOLK M
Erhöhung
der Lautstärke
Verminderung
der Lautstärke
Dieses Blatt enthält zusätzliche Informationen zur Bedienungsanleitung. Bitte beziehen Sie sich
darauf, wenn erforderlich.
Die Erläuterungen (
☞
q
–
☞
!0
) entsprechen den im Text mit einem Finger gekennzeichneten
Nummern.
Anlage (Zusatzinformationen)
(
☞
q
)
Vorsichtmaßregeln
Hinweis: Der voreingestellte Inhalt des Speichers wird gelöscht
und auf die werksseitigen Vorgaben zurückgestellt, wenn der
Versorgungsstecker oder die Batterie abgetrennt wird.
(
☞
e
)
Hinweise zu den Discs (CD-R, CD-RW)
¡ Aufgrund der Aufnahmeeigenschaften oder Schmutz,
Fingerabdrücken, Kratzer usw. auf der Oberfläche der Disc,
kann es bei der Wiedergabe von CD-R/RW Discs, die auf
bestimmten CD-Recordern (CD-R/RW-Laufwerken) bespielt
wurden, zu Schwierigkeiten kommen.
¡ CD-R/RW Discs weisen geringeren Widerstand gegenüber
hohen Temperaturen und hoher Luftfeuchtigkeit als
gewöhnliche Musik-CDs auf. Falls Sie solche Discs für
längere Zeit in einem Fahrzeug belassen, können diese
Discs beschädigt werden, so daß Wiedergabe nicht mehr
möglich ist.
¡ Das Gerät kann vielleicht eine CD-R/RW nicht erfolgreich
wiedergeben, die durch einer Kombination aus
Schreibsoftware, CD-Recorder (CD-R/RW-Laufwerk) und
Disc hergestellt wurde, die nicht kompatibel sind.
¡ Dieser Spieler kann CD-R/RW Discs nicht wiedergeben,
wenn die Session nicht abgeschlossen wurde.
¡ Auf diesem Gerät können keine CD-R/RW-Discs
wiedergegeben werden, die andere als CD-DA-Daten
enthalten.
¡ Beachten Sie bei der Handhabung von CD-R/RW Discs die
damit mitgelieferten Instruktionen.
(
☞
t
)
PI-Suchlauf
(Programmkennungssuche)
Ein anderer Sender mit dem gleichen Programm wird gesucht,
wenn auch mit BSR (Bestsendersuche) kein Sender mit der
entsprechenden Frequenz gefunden wird.
Hinweis: Bevor PI-Suchlauf gestartet wird, zunächst den TA-
Modus aufheben.
(
☞
r
)
Radio-Daten-System (RDS)
AF
– Alternative Frequenz
(
☞
w
)
Zubehör
XXXXXXXXXXXXXXX
XXXXXXXXXXXXXXXXX
XXXXXXXXXXXXXX
XXXXXXXXXXXXXXXX
OO-OOOOO
q
1 satz
Bedienungsanl
eitung
w
1 satz
Einbauanleitung
t
1
Zusatzinformationen
e
1
Garantiekarte
r
1
Etui für abnehm-
bares Bedienteil
Mitgelieferte
Hardware (1 satz)
(a Einbauanleitung)
AF Indikator
(
☞
y
)
TA
– Verkehrsfunkdurchsagen
(
☞
u
)
Einstellen der TA-Lautstärke
(Lautstärkepegel: 0 bis 40)
[VOL] während des Empfangs einer Verkehrsfunkdurchsage
einstellen. Die TA-Lautstärke unterscheidet sich von der
gewöhnlichen Lautstärke (um bis zu 5 Pegel).
TA Indikator TP Indikator
leuchtet auf, wenn ein TP-
Sender empfangen werden.
(
☞
i
)
PTY
– Programmtyp
(
☞
o
)
PTY-Wahl
(
☞
!0
)
CD-Spieler
¡ Nach dem Einsetzen der CD dauert es einige Sekunden,
bis die Wiedergabe beginnt.
¡
Verwenden Sie keine Discs mit angebrachtem Etikett oder Label.
¡
Schließen Sie unbedingt die Fronttafel während der CD-Wiedergabe.
¡
Klemmen Sie Ihre Finger oder Ihre Hand nicht an der Fronttafel ein.
¡
Setzen Sie niemals Fremdgegenstände in den CD-Einschub ein.
PTY Indikator
N° présyntonisé Type de programme
Contenu
1 NEWS NEWS
2 SPEECH AFFAIRS, INFO, EDUCATE,
DRAMA, CULTURES, SCI-
ENCE, VARIED, WEATHER,
FINANCE, CHILDREN,
SOCIAL A,
RELIGION, PHONE IN,
TRAVEL, LEISURE, DOCU-
MENT
3 SPORT SPORT
4 POP M POP M
5 CLASSICS CLASSICS
6 MUSIC ROCK M, M_O_R_M, LIGHT
M, OTHER M, JAZZ, COUN-
TRY, NATIONAL, OLDIES,
FOLK M
AugmentationDiminution
Cette fiche rajoute des informations à la notice d'instructions en tant que supplément. Référez-vous
à cette fiche si nécessaire.
Les explications suivantes (
☞
q
–
☞
!0
) correspondent aux numéros qui sont identifiés par des
doigts dans la notice d'instructions.
Fiche jointe
(Fiche d'informations supplémentaires)
(
☞
q
)
Mesures de précaution
Remarque: Les données prémémorisées sont effacées et ceci
ramène l’appa-reil dans ses réglages usine d’origine lorsque le
connecteur d’alimentation ou la batterie est débranchée.
(
☞
e
)
Remarques à propos des disques (CD-R, CD-RW)
¡ Il se peut que vous rencontriez des difficultés à la lecture de
certains disques CD-R/RW enregistrés sur des graveurs CD
(lecteurs CD-R/RW) en raison des paramètres à l’enreg-
istrement ou encore de la présence de saleté, d’empreintes,
de rayures, etc., sur la surface du disque.
¡ Les disques CD-R/RW résistent moins bien aux
températures élevées et à l’humidité que les CD ordinaires.
Aussi, est-il recommandé de ne pas les laisser dans une
voiture pendant de longues périodes.
¡ L’appareil ne peut pas reproduire avec succès un CD-R/RW
qui a été fait par la combinaison d’un logiciel d’écriture, d’un
graveur (lecteur de CD-R/RW) et d’un CD s’ils sont incom-
patibles l’un avec l’autre.
¡ La lecture d’un CD-R/RW n’est possible que si la session
d’enregistrement a été close.
¡
Ce lecteur ne peut pas lire de disques CD-R/RW sur lesquels se
trouvent des données autres que des données CD-DA.
¡
Respecter les consignes concernant la manipulations des CD-
R/RW.
(
☞
t
)
Recherche PI
(Exploration par identification de programme)
Une autre station diffusant le même programme est recherchée
si une station ayant une fréquence appropriée ne peut pas être
retrouvée même au moyen de la fonction BSR (Recherche des
meilleures stations).
Remarque:
Pour le mode d'exploration PI Seek, annuler d'abord
le mode TA mode, puis exécuter le mode d'exploration PI Seek.
(
☞
r
)
Système de données de réception radio (RDS)
AF Fréquence déroutée
(
☞
w
)
Accessoires
XXXXXXXXXXXXXXX
XXXXXXXXXXXXXXXXX
XXXXXXXXXXXXXX
XXXXXXXXXXXXXXXX
OO-OOOOO
q
1 ensemble
Manuel d'in-
structions
w
1 ensemble
Instructions
d’installation
t
1
Fiche d'informations
supplémentaires
e
1
Carte de
garantie
r
1
Boîtier de plaque de
façade amovible
Matériel fourni
(1 ensemble)
(a Instructions d’in-
stallation)
Indicateur AF
(
☞
y
)
TA
Annonce d'informations routières
(
☞
u
)
Volume TA réglé
(Niveau de sortie: 0 à 40)
Tournez [VOL] pendant la réception des informations routières.
Le volume TA varie à partir du volume normal (par échelons de
5 niveaux maximum).
Indicateur TA Indicateur TP
S'allume pendant la réception
d'une station TP
(
☞
i
)
PTY
PTY Type de programme
(
☞
o
)
Sélection PTY
(
☞
!0
)
Lecteur de disque CD
¡ Il faut plusieurs secondes entre le moment où de l'insertion
d'un CD et le moment où la lecture commence.
¡ N’utilisez pas un disque sur lequel est apposé un sceau ou
une étiquette.
¡ Ne pas oublier de fermer le panneau de façade pendant la
lecture de CD.
¡ Ne pas se faire pincer le doigt ou la main par le panneau de
façade.
¡
Ne pas introduire de matières étrangères dans la fente à disque.
Indicateur PTY
Voorkeuzenummer Programmatype
Inhoud
1 NEWS NEWS
2 SPEECH AFFAIRS, INFO, EDUCATE,
DRAMA, CULTURES, SCI-
ENCE, VARIED, WEATHER,
FINANCE, CHILDREN,
SOCIAL A,
RELIGION, PHONE IN, TRAV-
EL, LEISURE, DOCUMENT
3 SPORT SPORT
4 POP M POP M
5 CLASSICS CLASSICS
6 MUSIC ROCK M, M_O_R_M, LIGHT
M, OTHER M, JAZZ, COUN-
TRY, NATIONAL, OLDIES,
FOLK M
OmhoogOmlaag
Dit inlegvel bevat aanvulleningen op de handleiding. Raadpleeg dit inlegvel indien nodig.
De volgende uiteenzettingen (
☞
q
–
☞
!0
) corresponderen met de door de handjes aangegevn
nummers in de handleiding.
Aangehecht vel
(Aanvullende informatie inlegvel)
(
☞
q
)
Voorzorgen
Opmerking: Het voorkeuzegeheugen zal gewist worden en
worden teruggezet op de oorspronkelijke fabrieksinstelling
wanneer de stroomaansluiting of de accu los wordt gekoppeld.
(
☞
e
)
Opmerkingen over discs (CD-R, CD-RW)
¡ Het is mogelijk dat u problemen ondervindt bij het afspelen
van sommige CD-R/RW discs opgenomen op bepaalde CD-
recorders (CD-R/RW stations), vanwege de opname-karak-
teristieken of vanwege vuil, vingerafdrukken, krassen enz. op
het oppervlak van de disc.
¡ CD-R/RW discs zijn minder goed bestand tegen hoge tem-
peraturen en vocht dan gewone muziek-CD’s. Als u ze lan-
gere tijd in de auto bewaart, kunnen ze schade oplopen en
kan het na verloop van tijd onmogelijk blijken ze af te spelen.
¡ Het toestel is mogelijk niet in staat een CD-R/RW af te spelen
die is opgenomen met een combinatie van schrijf-software,
CD-recorder (CD-R/RW station) en disc die het eindresultaat
ongeschikt maakt voor deze speler.
¡ Deze speler kan geen CD-R/RW disc afspelen als de sessie
op de disc nog niet is afgesloten.
¡ Deze speler kan geen CD-R/RW discs afspelen met andere
dan CD-DA gegevens.
¡ Neem de aanwijzingen voor het omgaan met de CD-R/RW
disc in acht.
(
☞
t
)
PI zoeken
(Programma Identificatie zoekfunctie)
Er zal worden gezocht naar een andere zender die hetzelfde
programma uitzendt als er via de BSR (opzoeken van de sterk-
ste zenders) zoekfunctie geen andere frequentie voor deze
zender gevonden kan worden.
Opmerking: Om de PI zoekfunctie te kunnen gebruiken, moet
u eerst de TA functie uitschakelen.
(
☞
r
)
Radio Data Systeem (RDS)
AF
Alternatieve frequentie
(
☞
w
)
Toebehoren
XXXXXXXXXXXXXXX
XXXXXXXXXXXXXXXXX
XXXXXXXXXXXXXX
XXXXXXXXXXXXXXXX
OO-OOOOO
q
1 set
Gebruiksaanwij
zing
w
1 set
Installatiehandl
eiding
t
1
Aanvullende
informatie inlegvel
e
1
Garantiekaart
r
1
Houder voor afneem-
baar voorpaneel
Meegeleverde
onderdelen (1 set)
(a
Installatiehandleiding)
AF indicator
(
☞
y
)
TA
Verkeersberichten
(
☞
u
)
TA volume instelling
(Volumeniveau: 0 t/m 40)
Verdraai [VOL] terwijl u naar een verkeersbericht luistert. Het
TA volume verschilt van het normale volume (met maximaal 5
niveaus).
TA indicator TP indicator
Licht op wanneer er een TP
zender ontvangen wordt.
(
☞
i
)
PTY
programmatype
(
☞
o
)
Selecteren van een programmatype
(
☞
!0
)
CD-speler
¡ Er zitten een paar seconden tussen het inbrengen van een
CD en het moment dat deze begint te spelen.
¡ Gebruik geen discs met stickers of labels.
¡ U moet het voorpaneel sluiten wanneer er een CD wordt
afgespeeld.
¡ Wees voorzichtig dat uw hand of vinger niet klemgedrukt
wordt bij het sluiten van het voorpaneel.
¡ Steek nooit een ander voorwerp dan een CD in de CD-gleuf.
PTY indicator
YEFM99928 ND1202-1013
English
Deutsch
Français
Nederlands
/