Page is loading ...

Sentry Safety Pool Fence 13100 State Road 54, Odessa, FL 33556 1-877-349-3362
Installation instructions for:
Visi-Guard and EZ-Guard Pool Fence Kits

Sentry Safety Pool Fence 13100 State Road 54, Odessa, FL 33556 1-877-349-3362
Planning: Layout Your Pool Fence
Planning is the first step of any successful
project. Decide where you would like your
fence to surround; the recommended distance
to stay from the edge of the pool is 2 feet or
more. Never plan to run your fence within
8 inches of poolside.
While planning your fence, make sure no
other activity other than the pool is within the
protected area. Children should never need to
enter the pool fence area other than to swim
when properly supervised. If toys and other
objects are stored within the protected area
move the storage area.
Take a thick rope, garden hose or other
similar object and place it on the intended
path of the fence. Step back and look; ask yourself is there anything on the inside of the fence
that will attract my child? Will I have enough room to move around to clean my pool? Mark the
beginning and ending points of the fence of your rope or hose. Pull the hose straight and use a
tape measure to measure from the marked beginning point to the ending point.
Entryway
Planning your entryway is an important step that should be taken in consideration prior to de-
ciding how many fence sections, ground sleeves, and poles are needed. Our fence does not
come with a hinged gate, it can be purchased separately. An opening on our fence is where two
sections of fencing meet. When two sections of fence meet there will be two poles next to one
another connected by a spring loaded spring-loaded hook and eye. To enter the pool area you
would follow the same procedure as you would if you were removing the fence; unhook the
spring-loaded hook and eye and remove the first pole of the section from the hole. Now you can
either role that pole along the mesh to the next pole in the section and place it in a set back hole
or pull the pole back at an angle away from the fence and place it in a set back hole. You can
create as many openings as you would like, the fence will remain taught and secure.
We recommend the design of the opening be either 3 or 6 feet wide and should be located
near the steps or where you would naturally enter the pool.

Sentry Safety Pool Fence 13100 State Road 54, Odessa, FL 33556 1-877-349-3362
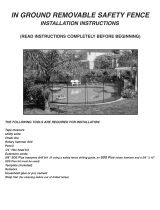
Preparation: Tools Needed
• Hammer Drill
• 5/8” Masonry Drill Bit
• Screwdriver
• Standard Drill
• 1/16th Drill Bit
• Pliers
• Hammer
• Tape Measure
• Chalk or Marker
• Box Cutter
• Stapler
• Concrete anchors may be needed for gate or hook and eyes for some installations

Sentry Safety Pool Fence 13100 State Road 54, Odessa, FL 33556 1-877-349-3362
Installation: Marking Your Holes
Your fence comes with a hole template. Mark your entryway first with a pencil. The entryway
is a point where you want two sections to meet so you can unhook them from one another and
enter your fenced area.
If you purchased a hinged gate: proceed to the measurements section of this manual for
the gate and mark the gate holes first, then return to this section of the manual and pro-
ceed with marking the fence holes.
After marking the entryway, continue using the template to mark your fence both directions
from your entry way. You can change
directions at every pole. After every 5th pole you will have two poles next to one another
where you are starting a new section.
IMPORTANT: Before marking holes check the distance from center hole to center hole
on the template using a tape measure to make sure you are choosing the correct holes to
use for your fence. Also check a section in the holes after drilling your first two of holes:
• 36”: 4’ tall safety fence - pole
to pole
• 30”: 5’ tall safety fence - pole
to pole
• 2.5”: Spacing between fence
sections where two poles will
be next to each other
.

Sentry Safety Pool Fence 13100 State Road 54, Odessa, FL 33556 1-877-349-3362
Installation: Drilling at angles
When installing the pool fence any poles that are not on a straight run should be angled at either
2.5 degrees or 5 degrees. Also an angle would be used at the end of fence sections. The top of
the pole should be leaning away from the turn.
0 Degrees (No Angle)
On straight runs of pool fence the hole
should be drilled at 0 degree. Without
any angling at all.
2.5 Degrees
If the change of direction of fence is less than
90 degrees or if you are at the end of one
fence section and starting a new fence section
the hole should be drilled at 2.5 degrees.
On a turn the drilling should lean AWAY
from the turn.
At the end of a section the drilling should lean
the two poles toward each other.
5 Degrees
If the change of direction of fence is 90
degrees the hole should be drilled at 5
degrees.

Sentry Safety Pool Fence 13100 State Road 54, Odessa, FL 33556 1-877-349-3362
Installation: Drilling
Drilling should be done using a 5/8 masonry drill bit and a
rotary hammer drill.
Drill your hole at a depth of 4”. It is best to mark your drill bit using electrical tape at 4” from
the bottom of the bit.
Many times when drilling 4” you will reach the bottom of the pool deck and reach dirt. This is
ok.
Drilling should only take a few seconds per hole however concrete decks are made of different
types of concrete in different areas of the country - drilling may be slower if your concrete is
harder. If drilling starts very slow from the beginning, be sure your drill is set to rotary ham-
mer; the action of the bit should be spinning and pulsating up and down simultaneously.
If drilling slows do not use more pressure as this will not make it go faster; the motion of a ro-
tary hammer drill is not such that pressure will make a difference. You may need a new drill bit
if drilling slows.
If you hit rebar stop. You can purchase rebar drill bits that can cut through it.
Do not drill on joints - reposition the fence direction instead to skip over the joint.
Wear protective gear at all times when drilling and keep children away from the drill.
When you finish a hole move the drill up and down in the hole a few times to clear away con-
crete dust. You can also use a shop vacuum to help clear concrete dust.

Sentry Safety Pool Fence 13100 State Road 54, Odessa, FL 33556 1-877-349-3362
Installation: Insert Sleeves and Erect Fence
Every hole should have a plastic sleeve inserted into it.
Important: The sleeve should be tight in the hole however you should be able to push the
sleeve about 80 percent of the way into the hole pushing down with the heel of your palm and
tap with a blunt object like a mallet the remaining way in.
If you cannot, do not force the sleeve. Pull it back out and using your drill run the bit up and
down the hole putting slight pressure on the side walls of the hole. Then try reinserting the
sleeve.
If you force the sleeve the pole will also be tight and make it more difficult to be removable.
Next stand your fence upright in the holes with sleeves in them. When you are first installing
the fence expect there to be tension to reach from base of pole to base of pole. Tension at the
top of the poles however is not achieved until after the sections of fence are fully attached to
one another by hook and eyes.
General rule is you should be able to
push by hand (still with firm force)
the sleeve about 80% into the hole.

Sentry Safety Pool Fence 13100 State Road 54, Odessa, FL 33556 1-877-349-3362
Installation: Install Hook and Eyes
If you are making a complete circle with your fence just use the
hook and eye to create tension by screwing the two hooks to both poles.
Remove the second screw from the top, replace it with the hook and
eyes.
If you have a trimmed section or need an alternate placement for the
hook and eye on the pole due to steps or uneven surfaces use a 1/16 drill bit to
drill a hole through the backing and the one side of the pole.
This hole will be tight for the hook and eye and will allow it to self tap into the
pole for proper gripping. Use a pair of pliers to tighten the hook and eyes through
the self-tapping phase.
If you are NOT making a complete circle with your fence take into consideration
that the fence must be attached to a fixed structure.
Then use the hook and eye to attach it and create tension.

Sentry Safety Pool Fence 13100 State Road 54, Odessa, FL 33556 1-877-349-3362
Installation: Modifying a section
1. D
rill your last hole where you need it
.
2. M
easure from the last hole to second last hole; center hole to center hole
.
3. R
emove the backing by unscrewing the screws on the back of the pole using a Roberts
on #2
s
crewdriver
.
4. M
easure on the mesh the same measurement you measured on the ground Add a 3/4” the
n
c
ut the lining; then measure 1.5” or more of mesh and cut
.
5.
Lay the pole centered on the original measurement. The extra lining should go past the pole
.
6. F
old the extra mesh and re-attach the backing. Cut off any extra mesh to clean up the look of
the fence
.

Sentry Safety Pool Fence 13100 State Road 54, Odessa, FL 33556 1-877-349-3362
Installation: Installing a hinged gate (optional)
1.
Plan where your gate will be. This should be marked out on the pool deck first, and then the
fence should be measured off in both directions. PLACEMENT TIP: Don’t put the gate on a
corner, the effect the tension of the fence will have on the gate may cause locking alignment
issues. The gate works best in the middle of a straight run of fence.
2.
First lay out a tape measure and mark the two outside holes. The measurement center hole
to center hole is 35”. MEASURING TIP: don’t use the end of the tape measure as the start-
ing point for measuring, it is far more accurate to pick an inch mark and measure 35” from
that inc
h.
3.
Measure in from both those marks towards the center of the gate 2 ½” and mark the inside
center holes.
4.
Before drilling your gate holes, use your fence template to mark your first fence poles off
each side. These will be placed 2 ½” center hole of the outside gate post to center hole of
first fence pole (This is the same spacing as that used in between fence sections). The fence
post (not gate post) will be drilled at a 5 degree angle toward the gate trusses. (See next
page for illustration)
5.
Drill all four gate truss holes at zero degrees (no angle).

Sentry Safety Pool Fence 13100 State Road 54, Odessa, FL 33556 1-877-349-3362
Installation: Installing a hinged gate (continued)
7. You can place the hinges on either the left or right. Insert the two gate trusses with the tall
top plate on the latch side.
127(2QDIRRWWDOOJDWHWKHODWFKPXVWEHDWWKHORZHVWSRLQWWKHPRXQWLQJEUDFNHWRQWKH
WUXVVHVDOORZV
8. Attach your hinges and latch to the flat metal supports welded to the gate trusses. The gate
should swing out away from the enclosed pool area (if you are standing outside your fenced
area it should swing toward you).
9. Follow the directions provided with your Magna Latch kit for attaching and adjusting your
hinges and latch
10. If extra support is needed (recommended) there are two holes in the base flanges of the
trusses. (note: the base flanges are supposed to only be welded on one side) Using 1/4” x 2
1/4” concrete wedge anchors purchased from a hardware store, use those holes to bolt the
trusses to the pool deck. Drill holes for anchors using bit size recommended on anchor
package.
11. Angle the end poles of the adjacent fence sections toward the gate using the mid circle point
on your drill guide (used previously for slight turns) towards the gate.
12. Using a 1/16 bit drill a hole in the outside pole of the frame to hook your hook & eyes to the
adjacent fence posts. This is just a pilot hole, the hook and eye are designed to be self tap-
ping. Attach the poles to the gate trusses using the hook and eyes.
5
Degrees

Sentry Safety Pool Fence 13100 State Road 54, Odessa, FL 33556 1-877-349-3362
Finished Installation: Maintenance and Warranty
Lifetime warranty on Pool Fence.
EZ Guard and VisiGuard pool fence by Sentry Pool Safety Fence is warranted to be free
of defects in material and workmanship.
This warranty extends only to: (1) the original retail purchaser of a pool fence directly from an
authorized retailer; (2) the authorized wholesale purchaser of a pool fence directly from a dis-
tributer. However, in the event of a sale, transfer or conveyance of a pool fence from any of the
three proceeding persons or entities, any rights, duties and obligations associated with this war-
ranty shall be null and void and of no further force and effect. Freight charges to and from the
customer are the responsibility of the customer. This includes freight charges for parts shipped
to enable the services of the pool fence.
This warranty is void if the pool fence has been altered in a way other than instructed, misused,
or abused. Such instances shall include installation or use of the pool fence in deviation to the
published instructions. The warranty extends only to the manufacturing defects and does not
cover the damages resulting from mishandling of the product by the owner, contact with pets or
other animals, or damage from natural forces or accidents. All damage to pool fence must be
repaired immediately.
Sentry Pool Safety Fence and Web Direct Brands, Inc shall not be liable for the loss of use of
the pool fence or other incidental or consequential damages. Under no circumstances shall Sen-
try Pool Safety Fence or Web Direct Brands, Inc. or any of its representatives be held liable for
injury to any persons or damages to any properties. Specifications are subject to change without
notice.
Maintenance of your fence:
The Sentry Pool Safety fence is generally maintenance free. If the fence gets dirty clean only
with soapy water – mild detergents. Do not use harsh chemicals like bleach.
After a day of splashing from the pool hose down the fence with the garden hose. Depending on
the level of chlorine in the pool – pool water left on the fencing could pose deterioration issues
or changes in color.
Store the pool fence in a dry, mold free area. Do not store with pool chemicals as the vapors or
leakage may cause deterioration issues or changes in color.
Do not hang anything on the fence, like towels or toys. This may cause unwanted sag of fencing
material.
/