Fig. 7
Barn Door Track Installation
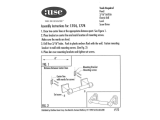
4. Attach the Roller Brackets to
the Door
Note: You may skip this step
if you have already attached
the brackets to the nished
door during the Barn door
assembly process.
Make sure the door is
laying at in a safe and
secure position. To determine the
location of the Roller
brackets, measure 4 ½” in
from the side on the left and
right sides of the door and
mark these locations with a
pencil. Using a Square, draw a vertical line. Then from the top
of the door, measure down 1 ½” and make a mark. Using the
square, draw a horizontal line. The intersection of these 2 lines
will be the location for your rst hole. Place a rolling bracket
on the door and align the top hole with the mark for the rst
bolt. Drill a 3/8” hole and insert a bolt. Using the bracket and a
square as a template, make sure the bracket is square and mark
the second hole with a pencil and drill a 3/8” hole and insert the
second bolt. Repeat these steps for the second
Roller
bracket.
Remove the bolts and brackets until the door has desired nish
on it. Once you have nished your Barn door to your desired
look, place the two roller brackets back into
place. Reinsert
the 4 bolts with the decorative nut on the front of the door and
put the washers and bolts onto the back side of the door and
tighten. See Figure #3.
1-1/2”
4-1/2”
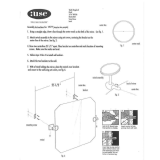
5. Install Safety Spacers
Once the Roller brackets have been
secured, it is important to install the
Safety spacers. These spacers
help to protect the door from being
bumped off of the track. With the
door laying flat in a safe and secure
position, place one of the two
spacers approximately 2” to the
inside of one of the roller brackets.
Place slightly off center towards the
front of the door
. Using a drill,
secure the spacer with the
screw provided. Repeat steps to install the
second spacer inside the other roller bracket.
See Figure #4.
2”
2”
Fig. 4
6. Place Door onto Track
Position the door over the
opening and slightly tilt the
bottom of the door outward
away from the wall. Set the
rollers securely onto the track.
Once the door is safely
mounted and is secure, turn
the 2 safety spacers 180
degrees towards the wall. This
positions them properly. See Figure #5.
Fig. 5
8. Secure Door Stops to Track
Move the door to the
Closed position and
slide the Door stop
to desired location.
Using the provided Allen
wrench, tighten the
screws in the door stop
to secure it in
into place. Then
carefully glide the
door into the full open
position and repeat the
steps for the remaining
Door stop.
See gure # 7.
7. Secure Bottom Door Guide
The Bottom Door guide keeps the
door from swinging outward away
from the wall. To locate the proper
installation position in the oor, slide
the door into the closed position. Take
the oor guide and remove the screw
and washer. Set them aside with
the top piece of the guide. Take the
bottom piece of the guide and place
it on the oor under the outer edge of
the door about ½” in from the edge of
the door. The back of the guide will
sit between the wall and the back of
the door but should not
touch the door. Mark the
front hole location in the
guide. Move the door to
the open position to make
sure the guide is in the
proper position. Whether
the door is in the open or
closed position, the door
should NEVER leave the
Door guide. Once you
have the proper position
for the guide, move the
door out of the way and
install the rst screw into
the guide. Make sure the
guide is plumb and install the second
screw in the guide. Re-insert the top
piece of the guide with the screw and
washer setting the width of the oor
guide to 1 7/8” to 2”. Pre-drill holes if
necessary for your oor type. Using a drill
and the screws provided, secure the Door
guide to the oor.
See Figure #6.
Fig. 3
1/2”
WARNING: Safety spacers MUST be installed and rotated properly
after door installation to prevent the door from lifting and falling o the
track. Improper installation could cause serious bodily harm.
1-7/8”
to 2”
Fig. 6