Page is loading ...

Please read this installation and
maintenance guide in its entirety
before removing vanity top from
box and installing.
CAUTION
THIS VANITY TOP IS HEAVY. WE
RECOMMEND TWO PEOPLE FOR
LIFTING AND INSTALLATION.
This box contains the following:
1 (one) quartz vanity top with
attached porcelain bowl
1 (one) - 4" loose backsplash
1 (one) Installation &
Maintenance Guide
Engineered Quartz
Vanity Installation &
Maintenance Guide

1
4
3
2
CARE & MAINTENANCE
INSTALLATION INSTRUCTIONS
Your quartz vanity top is a manufactured product. As such,
every vanity will have its own unique characteristics, such
as veining and coloration. Be sure to fully inspect your top
for satisfaction before installation.
If you are not satised with your purchase or your vanity top
is damaged, please contact Customer Care
Quartz is a beautiful, durable and resilient surface that will
provide you with many years of trouble free performance.
Maintaining marble is simple and easy. Just follow the care
and maintenance below.
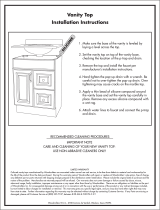
Prepare and level the vanity cabinet and secure it to
the wall. Use additional interior supports if the vanity is
frameless or does not have full support around the frame.
Additional wood supports should be 1” x 2” and afxed to
the sides with caulking adhesive and short wood screws
that do not protrude through any exposed sides.
Be sure to follow the recommended instructions for
installation from your vanity cabinet manufacturer.
Install the faucet system and the drain plumbing
system. Using your hand, tighten the drainpipe connec-
tion to the bottom of the bowl. DO NOT USE A WRENCH.
Tightening by wrench can result in damage to the bowl.
Follow the manufacturer’s instructions
for installing the faucet and drain.
Be sure the wall is clean, dry and smooth. Remove
loose paint or any wallpaper or decorative material
before installation of the back splash. Apply two beads of
caulking on the rear of the back splash and push rmly to
the wall. You may have to use a patching compound if your
wall is uneven or has holes or indentations.
Apply a bead of silicone sealer on the top edges of the
vanity cabinet. Place your vanity top on it with an over-
hang of 1/2" on the edges and permit the sealer to dry.
See manufacturer’s instructions for drying time.
HELPFUL HINT #3: Any spill should be cleaned as soon
as possible. Blot spills with a paper towel or clean rag as
wiping a spill may spread the stain.
Helpful Hint #2: The pre-drilled holes will ac-
commodate most faucets; however we recom-
mend you check to see that your faucet will work
properly. Check to make sure the spout is long
enough to extend out over the bowl.
Helpful Hint #1: Before attaching to vanity cabinet,
hand-tighten nuts on the bottom of your vanity
top that may have loosened during shipping.
Tools Needed:
Caulking gun
Silicone sealer
Caulking adhesive
For every day cleaning use a soft sponge or dishcloth
with warm water.
For stubborn or greasy clean-ups use a gentle liquid
cleaner like Mr. Clean, 409, Simple Green, Fantastic
etc. or ordinary dish washing detergent e.g. Palmolive
with warm water and a "White Scotch Brite".
Never use red or green Scotch Brite on your vanity as
they contain aluminum oxide (the same abrasive in
sand paper) and may dull the nish.
Do not use abrasive cleaning agents such as regular
Comet and Ajax. If needed, Bon Ami and Bar Keepers
Friend are both approved non-abrasive cleaning pow-
ders that will clean without affecting the nish.
Though most common household cleaners have no
effect, never allow your vanity to come in contact with
drain cleaners, paint strippers or products containing
Hydrouoric acid, Methylene chloride, Trichloroeth-
ylene or any product with a very high or very low PH.
These types of chemicals may etch or discolor the
surface.
There is no need to seal your quartz. Sealers cannot
penetrate and remain on the surface. Eventually the
sealer will start to wear off unevenly in high use areas
causing the polish to appear inconsistent.
Quartz is scorch resistant and under normal conditions
is not affected. Always use a trivet or hot pad between
the surface and any heat generating device including
but not limited to crock pots, deep fryers, hot pots
and pans or electric skillets. Sudden or rapid change
of temperature or sustained heating, especially near
edges and cut outs, may create enough thermal ex-
pansion energy to cause your countertop to crack.
Damage caused by thermal expansion is not covered
under the warranty.
•
•
•
•
•
•
•
•
Follow these simple care and use guidelines and your
vanity will provide you with many years of trouble free use.
/