Page is loading ...

Please read this installation and
maintenance guide in its entirety
before removing vanity top from
box and installing.
CAUTION
THIS VANITY TOP IS HEAVY. WE
RECOMMEND TWO PEOPLE FOR
LIFTING AND INSTALLATION.
This box contains the following:
1 (one) natural stone vanity top with
attached porcelain bowl
1 (one) - 4" loose backsplash
1 (one) Installation &
Maintenance Guide
Natural Stone
Vanity Installation &
Maintenance Guide

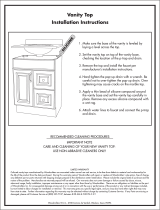
1
4
3
2
CARE & MAINTENANCE
INSTALLATION INSTRUCTIONS
Your natural stone vanity top is made of stone quarried from
the earth. Every slab has its own unique characteristics,
such as veining and coloration. Be sure to fully inspect your
top for satisfaction before installation.
If you are not satised with your purchase or your vanity top
is damaged, please contact Customer Care
Your new vanity top has been factory sealed and polished to
a smooth gloss nish. In order to maintain the surface, we
recommend the following procedures:
Prepare and level the vanity cabinet and secure it to
the wall. Use additional interior supports if the vanity is
frameless or does not have full support around the frame.
Additional wood supports should be 1" x 2" and afxed to
the sides with caulking adhesive and short wood screws
that do not protrude through any exposed sides.
Be sure to follow the recommended instructions for
installation from your vanity cabinet manufacturer.
Install the faucet system and the drain plumbing
system. Using your hand, tighten the drainpipe connec-
tion to the bottom of the bowl. DO NOT USE A WRENCH.
Tightening by wrench can result in damage to the bowl.
Follow the manufacturer’s instructions
for installing the faucet and drain.
Be sure the wall is clean, dry and smooth. Remove
loose paint or any wallpaper or decorative material
before installation of the back splash. Apply two beads of
caulking on the rear of the back splash and push rmly to
the wall. You may have to use a patching compound if your
wall is uneven or has holes or indentations.
Apply a bead of silicone sealer on the top edges of the
vanity cabinet. Place your vanity top on it with an over-
hang of 1/2" on the edges and permit the sealer to dry.
See manufacturer’s instructions for drying time.
HELPFUL HINT #3: Natural stone is porous and can be
stained. When removing stains, it is important to identify
what has caused the stain rst. Be sure to use a product
specically recommended for removing that stain. We
recommend you contact [Customer Care] for more infor-
mation on how to safely remove any difcult stains that
may have occurred.
HELPFUL HINT #4: Any spill should be cleaned as soon
as possible. Blot spills with a paper towel or clean rag as
wiping a spill may spread the stain.
Helpful Hint #2: The pre-drilled holes will ac-
commodate most faucets; however we recom-
mend you check to see that your faucet will work
properly. Check to make sure the spout is long
enough to extend out over the bowl.
Helpful Hint #1: Before attaching to vanity cabinet,
hand-tighten nuts on the bottom of your vanity
top that may have loosened during shipping.
Tools Needed:
Caulking gun
Silicone sealer
Caulking adhesive
Seal your top before rst use. All stone products
require resealing at least once a year. You will need to
schedule your top for resealing accordingly.
Before applying the sealer, the exposed areas should
be completely clean and dry. Follow the instructions
on the sealer container.
Routine maintenance and cleaning should be done
weekly and more frequently as needed.
To keep your vanity top hygienically clean, use a spray
disinfectant designed to kill all types of bacteria and is
FDA and EPA approved for food handling surfaces.
Liquid spills, such as alcohol, medications, etc. should
be cleaned up promptly. Some liquids with high-acid
content can etch surfaces if left for any length of time.
Other products that should be promptly removed
are: shaving cream, toothpaste, perfume, cologne,
nail polish remover, hair coloring and perm products,
shampoo, drain opener, and toilet bowl cleaner.
Place protective pads on the bottoms of any heavy
objects, such as pottery, appliances, or other objects
that may scratch the surface.
Avoid abrasive cleaners or rough cleaning pads. If
necessary, a soft bufng pad can be used.
Use coasters under drinking glasses to prevent glass
rings on the surface.
Do not stand on the top to x overhead lights or other
items. Do not place extremely heavy items on the top.
•
•
•
•
•
•
•
•
•
Follow these simple care and use guidelines and your
vanity will provide you with many years of trouble free use.
/