Page is loading ...

Lifetime Residential
Limited Warranty
Halstead International warrants that the vanity top will be
free from manufacturing defects for the life of the home,
provided the original purchaser resides in or owns the
home of installation. Halstead warrants that the granite top
will not crack, discolor or chip during the lifetime warranty,
provided the granite top is maintained according to the
installation and maintenance instructions contained within
and supplied by Halstead.
During the first 10 years, Halstead will replace any
defective top free of charge and cover 100% of the cost of
replacement. For the period beyond the first 10 years,
Halstead will reimburse the cost of replacement on pro
rata basis with a maximum of 65% of the original cost and
replacement.
This warranty shall not include damages caused by
improper installation or procedures as specifically defined
in this pamphlet. This warranty does not include loss of
time, inconvenience, incidental expenditures or
consequential damages. Some states do not allow
exclusions or limitations so that these limitations and
exclusions may not apply to you. This warranty gives you
specific legal rights, and you may have other legal rights,
which can vary from state to state.
This warranty is in lieu of any other express warranties.
This warranty is available only by notice to Halstead
International, Norwalk, Conn. 06850, through the dealer
from whom the purchase was made accompanied by the
original invoice. The execution of this warranty can only
be authorized by Halstead International.
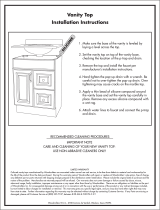
Figure 2
Placement of Clip Hardware
Figure 1
Location of Silicone Sealer
S
ilicone Sealer
Epoxy Adhesive
Construction
Adhesive
You will need:
2
3
Figure 3
Wing Nut on
Clip Hardware Base
1
Be sure to completely read this installation and
maintenance guide before removing vanity top
from box and installing.
CAUTION: This vanity top is heavy. We recommend
two people for lifting and installing. Remember to
bend at the knees, not at the waist when lifting
heavy objects!
This box contains the following:
1 (one) Granite vanity top with attached porcelain bowl
1 (one) 4” loose backsplash
1 (one) Installation/Care & Maintenance/Warranty
Brochure
INSTALLATION
INSTRUCTIONS:
Your granite vanity top is made of natural stone quarried
from the earth. Every slab of granite has its own unique
characteristics, such as veining and coloration. Be sure to
fully inspect your top for satisfaction before installation.
If you are not satisfied with your purchase or your granite
vanity top is damaged, please contact our customer
HOTLINE at 800-860-6490.
Tools Needed:
1. Caulking gun
2. Silicone sealer
3. Caulking adhesive
(It is our experience that GE Silicone is not the best match with our
granite products and should be avoided.)
1. Prepare and level the vanity cabinet and secure it to the
wall. Use additional interior supports if the vanity is
frameless or does not have full support around the frame.
Your granite vanity top is heavy natural stone. Additional
wood supports should be 1” x 2” and affixed to the
sides with caulking adhesive and short wood screws that
do not protrude through any exposed sides.
Be sure to follow the recommended instructions for
installation from your vanity cabinet manufacturer.
Helpful Hint #1: Be sure to hand tighten wing nuts
on the bottom of your granite vanity top, that may have
loosened during shipping, before attaching to vanity
cabinet.
2. Apply a bead of silicone sealer on the top edges of the
vanity cabinet. Place your granite top on it with an
overhang of 1/2” on the edges and permit the sealer to
dry. See manufacturers instructions for drying time.
GRANITE
VA NITY TOP
INSTALLATION
•
CARE &
MAINTENANCE
•
WARRANTY
INSTALLATION
•
CARE &
MAINTENANCE
•
WARRANTY
H A L S T E A D
I N T E R N A T I O N A L
Norwalk, Conn. 06850

3. Apply two beads of caulking on the rear of the back
splash (and the side splash if required) and push firmly to
the wall. Be sure the wall is clean, dry and smooth. You
may have to use a patching compound if your wall is
uneven or has holes or indentations. Remove loose paint
or any wallpaper or decorative material before installation
of the back or side splash.
Helpful Hint #2: Your granite vanity top has pre-
drilled holes for an 8” offset or 4” faucet spread. You
must use an 8” or 4” spread faucet. The pre-drilled
holes will accommodate most 8” or 4” faucets,
however we recommend you check to see that your
faucet will work properly. Check to make sure the spout
is long enough to extend out over bowl. See diagram
on other side.
4. Install the faucet system and the drain plumbing system. Do
NOT tighten the drainpipe connection to the bottom of the
bowl with a wrench. Tighten by hand only. Tightening by
wrench can result in damage to the bowl. Follow the
manufacturers instructions for installing the faucet and drain.
GRANITE CARE &
MAINTENANCE
Your new granite vanity top has been factory sealed and
polished to a smooth gloss finish. In order to maintain the
surface and keep it looking fresh and natural, we
recommend the following procedures:
1. Seal your granite top before first use. All stone products
require resealing at least once a year. You will need to
schedule your top for resealing accordingly.
2. Before applying the sealer, the exposed areas should be
completely clean and dry. Follow the instructions on the
sealer container. We recommend Stone Care International’s
“Stoneguard Penetrating Sealer.” You may call them at
1-800-839-1654 or visit their web site at
www.stonecare.com for complete information.
3. For routine maintenance and cleaning, we recommend
Stone Care’s “Clean Encounters.” The cleaner should
be used weekly and more frequently with heavier than
usual use or for cleaning of chemicals, such as those
commonly found in the bathroom. Be sure to follow the
instructions on the container.
4. To keep your granite vanity top hygienically clean, we
recommend Stone Care’s “Counterriffic” on a weekly
basis. This spray disinfectant will kill all types of
bacteria and is FDA and EPA approved for food
handling surfaces.
5. Liquid spills, such as alcohol, medications, etc should
be cleaned up promptly. Some liquids with high-acid
content can etch granite surfaces if left for any length of
time. Popular products that should be promptly cleaned
up are: shaving cream, toothpaste, perfume, cologne,
nail polish remover, hair coloring and perm products,
shampoo, drain opener, and toilet bowl cleaner.
6. Place protective pads on the bottoms of any heavy
objects, such as pottery, appliances, or other objects
that may scratch the granite surface.
7. Avoid abrasive cleaners or rough cleaning pads. If
necessary, a soft buffing pad can be used.
8. Use coasters under drinking glasses to prevent glass
rings on the surface.
9. Do not stand on the granite top to fix overhead lights
or other items. Do not place extremely heavy items on
the top.
HELPFUL HINT #3: Granite is porous and can be
stained, but these can be removed. When removing
stains, it is important to identify what has caused the
stain first. Be sure to use a product specifically
recommended for removing that stain. We recommend
you contact Stone Care International at 1-800-839-1654
for more information on their products and how to safely
remove any difficult stains that may have occurred.
Types of Stain that can occur (but not limited to):
• Oil-Based Stains: Grease, Tar, Cooking Oil,
and food stains.
• Organic Stains: Coffee, Tea, Fruit, Tobacco,
cosmetics etc.
• Metal Stains: Iron (rust), copper, bronze, etc.
• Biological Stains: Algae, mildew, lichens, etc.
• Ink Stains: Magic Marker, pen, ink, etc.
HELPFUL HINT #4: Any spill should be cleaned as
soon as possible. Blot spills with a paper towel or clean
rag. Wiping a spill may spread the stain. If the stain
remains you can remove it by literally pulling the stain
out of the stone with both a chemical and material that
will absorb the stain. This combination is what is called a
poultice. Poultices are commonly powder or cloth
materials that can be mixed with a chemical and placed
on top of the stain to draw it out. Many homeowners
have the tools to remove stains right in their home.
Some common poultice materials include but not limited
to: Paper towels, cotton balls, gauze pads, flour, clays,
chalk and Diatomaceous Earth.
How to apply a poultice?
• Pre-wet the stained area with a little distilled water. This
fills the pores of the stone with water isolating the stain
and accelerating the removal by chemical;
• Refer to the chart below and determine which chemical
to use for the stain;
• If a powder is to be used, premix powder and the
chemical of choice into a thick paste, the consistency of
peanut butter;
• If a paper poultice is to be used, soak the paper in the
chemical. Lift the paper out until it stops dripping;
• Apply the poultice to the stained area approximately
1/4” thick and overlapping the stain by about 1”. Do
not make the application too thick, or it will take too
long to dry;
• Cover the poultice with a plastic sandwich bag or food
wrap. Tape the plastic using a low-contact tape. It helps
to poke several small holes in the plastic to help
poultice dry;
• Allow the poultice to dry thoroughly. This is a very
important step. The drying is what pulls the stain out.
Allow to dry for 24 to 48 hours;
• Once it has dried, remove the poultice by scraping and
rinse with distilled water and buff dry with soft cloth;
• Examine the stain. If it still remains, but is lighter,
re-poultice until it is gone. It may take up to five
applications for difficult stains. If the stain refuses to
disappear completely, it is time to call a stone specialist.
• Stain removal can be very difficult, and care must be
taken when using a poultice.
BOWL MAINTENANCE
Your granite vanity top included an affixed porcelain
under-mount bowl, please follow these care and
maintenance procedures.
1. Clean the bowl surface with a mild solution of warm
water and liquid soap. After washing the surface, wipe
it clean with soft dry cloth. For an excessively dirty
surface, use a strong solution of warm water and liquid
soap. For stubborn dirt or grease spots, you may use
an undiluted all purpose cleaner. AVOID any abrasive
cleaners. Do NOT use solvents.
2. Do not soak dirty dishes for long periods of time, and
avoid leaving coffee grounds, tea bags or possible
staining agents in the sink.
3. To maintain a sparkling clean appearance, clean your
sink routinely once a day and thoroughly once a week.
Bowl testing COMPLIES with:
IAMPO - ASME - A112.19.2M-1998
IAMPO - CSA - B45.0-99 & CSA-B45.1-99
Reminders
1. Retain your sales receipt.
2. Fill out and mail your warranty registration card.
Stain caused by: Poultice with:
Rust Iron Out
Coffee or Tea Hyrdogen Peroxide
Ink, Magic Marker Methylene Chloride
Oil Ammonia or a degreaser
Paint Mineral Spirits
/