WARNING – Read all product labels and instructions before installing fixture.
WARNING –
Risk
of
fire
or
electric
shock.
LED
Retrofit
Kit
installation
requires
knowledge of luminaires electrical systems. Installation should be performed only by a qualified
electrician in accordance with the National Electrical Code and relevant local code.
WARNING – Risk of fire or electric shock. Install this kit only in the luminaires that have the construction features and dimensions shown in the photographs and/or drawings.
WARNING – To prevent wiring damage or abrasion, do not expose wiring to edges of sheet metal or other sharp objects.
WARNING – Do not make or alter any open holes in an enclosure of wiring or electrical components during kit installation.
WARNING – The recessed luminaire is intended for mounting only in a covered ceiling where only the led side of the luminaire will be exposed to damp or dry locations.
WARNING – INSTALLATION SHOULD ONLY BE PERFORMED AFTER POWER TO THE FIXTURE HAS BEEN DISCONNECTED.
COMMERCIAL DOWNLIGHT INSTALLATION GUIDE – WARNING
For model #:D846,D848,110-277VAC,50/60HZz
Where means CRI (90) and CCT(3000/4000/5000)
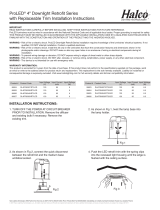
RETROFIT INSTALLATION
1. Make sure the POWER IS TURNED OFF at the source to the location in which you are installing the product.
2. Attach the carabiner safety clip to a secure place inside the ceiling (fig. 1).
3. Insert lamp conduit into the J-box and wire to power source (black to hot, white to neutral, green to ground) (fig. 2). Reattach J-box cover when done.
4. Adjust the lamp power to desired lumen output by sliding the selector switch (fig. 3).
5. Squeeze the two housing clips so they are in an upright position and insert lamp into the ceiling (fig. 4).
6. Once lamp is inside the ceiling, release the housing clips and continue pushing lamp into ceiling until securely fixed and flush (fig. 5).
NEW CONSTRUCTION INSTALLATION
1. Make sure the POWER IS TURNED OFF at the source to the recessed housing in which you are installing the product.
2. Remove the existing lamps and trim (fig. 1).
3. Attach the carabiner safety clip to the existing fixture housing (fig. 2).
4. Open the J-box and cut away all wires connected to the ballast. Insert lamp conduit into the J-box and wire to power source (black to hot, white to
neutral, green to ground) (fig. 3). Reattach J-box cover when done.
5. Adjust the lamp power to desired lumen output by sliding the selector switch (fig. 4).
6. Squeeze the two housing clips so they are in an upright position and insert lamp into housing (fig. 5).
7. Once lamp is inside the housing, release the housing clips and continue pushing lamp into housing until securely fixed and flush with ceiling (fig. 6).
D846
D846
is compatible with most standard housing with aperture ranging from 6.0''-7.4'' (153-190mm)
COMMERCIAL DOWNLIGHT HOUSING COMPATIBILITY
5.87'' (149mm) 8.27'' (210mm)
4.02'' (102mm)
7.44'' (189mm)
10.24'' (260mm)
4.33'' (110mm)
D848
D848
is compatible with most standard housing with aperture ranging from 7.6''-9.4'' (195-240mm)