Page is loading ...

6400 SYCAMORE CANYON BLVD.
RIVERSIDE, CALIFORNIA 92507
855-680-9595
WWW.DV8OFFROAD.COM
PRODUCT
INSTALLATION MANUAL
SPEC SERIES
TUBE FENDERS
2018+ JEEP WRANGLER JL
FDJL-06
TOOLS REQUIRED SKILL LEVEL TIME REQUIRED
- Trim Clip Tool
- 4mm Allen Bit
- 10mm Socket
- 10mm, 12mm Wrench
- Angle Grinder or Cutting Tool of Choice
- Zip Ties (Optional)
Before you install this kit — Read and understand all
instructions, warnings, cautions, and notes contained in
this installation instruction guide. Consult your vehicle
owner’s manual for proper disconnection of electrical and
lifting of vehicle if required for installation of this product.
This install may require some technical skills and
knowledge of basic mechanical work. If you do not feel that
you are capable of performing this install please take this
product to a trained professional.
After reading this guide please contact us with any
questions or concerns before installing product.
Customer Service: 855-680-9595
DV8 Offroad is not responsible for any bodily injury or harm to you
or your vehicle as a result of an improper install.
Proper installation of this kit required knowledge of the factory
recommended procedures for removal and installation of original
equipment components. We recommend that the factory shop manual
and any special tools needed to service your vehicle be on hand during
the installation. Installation of this kit without proper knowledge of the
factory recommended procedures may affect the performance of these
components and the safety of the vehicle
• Always wear eye protection when operating power tools
Inspect all contents of this package to make sure product is not damaged
and all installation hardware has been included. If parts are missing from
kit, please be prepared to provide the following information
1. Name of purchase location
2. Bar Code on side of box
3. Date above bar code
4. Date inside box cover
- Novice/Intermediate
- 1 (you) to 2 persons
Little skill level required, you can
easily install it by yourself however,
additional help will be useful.
- 2.5 Hours
Time to install this should only
take about two and a half hours.
WARNINGS/CAUTIONS BEFORE STARTING INSTALLATION
855-680-9595
NEED HELP?

INSTALLATION MANUAL
NEED HELP? 855-680-9595
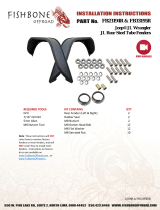
STEP 1 | Use a 10mm socket to
remove the bolts along the top and at the
front of the inner fender.
Use a trim clip tool to remove the clips on
interior of the inner fender.
Use a trim clip tool to remove the clips
running along the outside, securing the
inner fender to the vehicle.
Remove inner fender by pulling down,
then out.
Note: Pictured are un-install and installation of
the passenger side fender.
FRONT UNINSTALL

INSTALLATION MANUAL
NEED HELP? 855-680-9595
STEP 2 | Unplug the turn signal
indicator by pulling the red release tab
out and pulling.
STEP 3 | Use a 10mm socket to
remove the bolt securing the fender to the
vehicle.
Then, remove the fender by pulling away
from the vehicle to release the clips.
Be sure to pull “straight” away from the
vehicle to avoid breaking clips.
STEP 4 | Use a trim clip tool to
remove the factory clips along the fender.
Repeat process for the other side.

INSTALLATION MANUAL
NEED HELP? 855-680-9595
STEP 5 | Use a trim clip tool to
remove the clips located along the interior
of the inner fender.
Then remove the clips securing the inner
fender to the vehicle running along the
outside edge of the fender are.
Remove fender by pulling down then out.
REAR UNINSTALL

INSTALLATION MANUAL
NEED HELP? 855-680-9595
STEP 6 | Remove the fender are by
pulling directly away from the vehicle.
Be sure to pull “straight” away from the
vehicle to prevent breaking clips.
STEP 7 | Use a trim clip tool to
remove the clips along the edge of the
fender.
Repeat process for the other side.

INSTALLATION MANUAL
NEED HELP? 855-680-9595
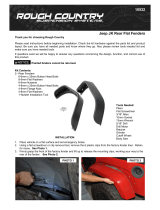
STEP 8 | Cut the front fender mount
off and grind it down so it is ush with
the vehicle. Paint is recommended on the
bare steel to prevent rust.
STEP 9 | Install the provided
nutserts using a nutsert tool. If you do not
own a nutsert tool, we provide one with
our kit.
For instructions on how to use the nutsert
tool, scroll to the last page.
Tip: Hold up the fender the vehicle as a guide to
determine which holes require a nutsert.
FRONT INSTALL
Begin by unpacking all items and inspecting
for missing pieces or damage. If you have any
concerns, please contact the company the
product was purchased from. Extra hardware
may be included with the product.
(42) M6x20 Allen
(2) M6x25 Allen
(44) M6 Nutserts
(46) M6 Flat Washers
(4) M6 Serrated Nuts
(1) Nutsert Tool
HARDWARE INCLUDED

INSTALLATION MANUAL
NEED HELP? 855-680-9595
STEP 10 | Install the gaskets onto
the fender.
The gaskets are notched to line up with
the mounting holes on each fender.
Install the fender are
onto the vehicle using the provided
M6x20 hardware with a 4mm allen bit.
Secure the front mounting support using
the supplied M6x25 hardware with a 4mm
allen bit and 10mm wrench.
During install, check the gasket on the
fenders and tuck away any extra gasket
using a trim clip tool.
Note: Assistance is recommended to prevent
injury and damage to the product or vehicle.
STEP 11 | Route and secure the
wiring to your preference and install the
new turn signal into the factory connector.
Repeat process for the other side.

INSTALLATION MANUAL
NEED HELP? 855-680-9595
STEP 12 | Use the provided nutsert
tool with 12mm wrench and 10mm socket
to install the provided nutserts.
Tip: Place the fender on the vehicle as a
guide to determine which holes require a
nutsert.
Install the fender are
onto the vehicle using the provided M6
hardware with a 4mm allen bit.
Note: Assistance is recommended to prevent
injury or damage to the product and vehicle.
Double check all hardware is secure.
Repeat process for other side.
REAR INSTALL

INSTALLATION MANUAL
NEED HELP? 855-680-9595
STEP 13 | Check the gasket on both
fenders after install and tuck away any
extra gasket using a trim clip tool.
Double check all hardware is secure.
NOTE: If the Jeep was not equipped with OEM
LED lighting, then aftermarket/dealership
programming may be necessary to access all
LED functions.
Repeat process for other side.
STEP 14 | Congrats! You are nished
with the install of the 2018+ Jeep Wrangler
JL Tube Fenders!

INSTALLATION MANUAL
NEED HELP? 855-680-9595
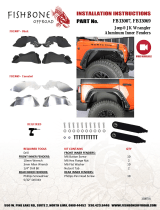
STEP 15 | To use the nutsert tool,
slider the M6 washer and spacer onto the
provided M6x50 bolt.
Then install a nutsert onto the exposed
threads by hand.
STEP 16 | Slide the nutsert tool
with the nutsert into the mounting hole.
Ensure the ange of the nutsert is at
against the vehicle prior to tightening.
STEP 17 | Use a 12mm wrench to
hold the spacer while tightening with
a 10mm socket. Tighten slowly until
the nutsert is set properly. Do not over
tighten.
Nutsert should be “crushed” against the
inside of the fender so that it is tight and
secure.
When nished remove the nutsert tool
using a 10mm socket and repeat as
needed.
Note: Be sure to hold the spacer tight so it does
not move and scratch paint.
/