Metra 95-6549 Operating instructions

Category
Car kits
Type
Operating instructions
CAUTION!
All accessories, switches, climate
controls panels, and especially air bag indicator
lights must be connected before cycling the
ignition. Also, do not remove the factory radio
with the key in the on position, or while the
vehicle is running.
Metra. The World’s Best Kits.
®
MetraOnline.com © COPYRIGHT 2018 METRA ELECTRONICS CORPORATION REV. 7/26/18 INST95-6549
INSTALLATION INSTRUCTIONS
95-6549
KIT FEATURES
ISO DDIN radio provision
Complete center dash panel for a factory look
KIT COMPONENTS
• A) Radio/climate control panel • B) Radio brackets • C) Tray • D) Storage pocket • E) Dummy panel • F) Climate control spacers
• G) (6) #8 x 3/8” Pan-head Phillips screws • H) (4) #8 x 5/8” Pan-head Phillips screws • I) (3) #8 x 1/2” Truss-head Phillips screws
TOOLS REQUIRED
• Panel removal tool • Phillips screwdriver
• 3/8’ socket wrench • Cutting tool • Grinding tool
• 1/8” drill bit
TABLE OF CONTENTS
Dash Disassembly ..................................................2
Kit Preparation ....................................................2-3
Kit Assembly ..........................................................3
WIRING & ANTENNA CONNECTIONS
(sold separately)
Wiring Harness: 70-1817
Antenna Adapter: N/R
A B
C
F
HG I
D E
Jeep Wrangler 1997-2002
1.800.221.0932
|
MetraOnline.com
2
1. Unclip the top cover from the instrument
panel, then remove (2) Phillips screws
exposed.
2. Remove the ashtray, then remove (1)
Phillips screw exposed.
3. Starting from the bottom edge of the
radio/climate control panel, unclip,
unplug, and remove the panel.
4.
Remove (2) 3/8” screws securing the
radio to the dash. Slide the radio out,
then unplug and remove the radio.
Continue to Kit Preparation
(Figure A)
1. Remove (4) Phillips screws securing the
climate control panel to the dash, then
temporarily move it out of the way in
preparation for the next step.
2. Cut the shaded area in the sub-dash
to allow room for the radio assembly.
(Figure A)
Note: Some radios may require more
cutting than shown. Cut as needed to
allow room for the aftermarket radio.
Note: The dash cut goes through the
center of the lower left mounting hole.
(See detail)
From the factory radio/climate control panel:
3. Unclip and remove the a/c vents.
(Figure B)
4. Unclip and remove the cigarette lighter/
switch panel.
5. Remove the (2) panel clips.
Continued on the next page
DASH DISASSEMBLY KIT PREPARATION
(Figure A)
Remove shaded area
Detail
(Figure B)
REV. 7/26/2018 INST95-6549
3
To the 95-6549 radio/climate control panel:
7. Clip in the a/c vents.
8. Clip in the cigarette lighter/switch panel.
9. Attach the (2) panel clips.
10.
Clip in either the
storage pocket
or
dummy
panel
to replace the factory ashtray
.
11. Secure the
tray
to the
radio climate/control
panel
using the (2) #8 x 3/8” Phillips
pan-head screws provided. (Figure C)
12. Grind down the climate control panel
locater pins. (Figure D)
13. 1997-1999: Place the
climate control
spacers
onto the back of the climate
control panel, then secure the climate
control panel back to the vehicle using
the (4) #8 x 5/8” pan-head screws screws
provided. (Figure E)
2000-2002: Secure the climate control
panel to the
6549 panel
using the (4)
#8 x 3/8” Phillips pan-head screws
provided.
Continue to Kit Assembly
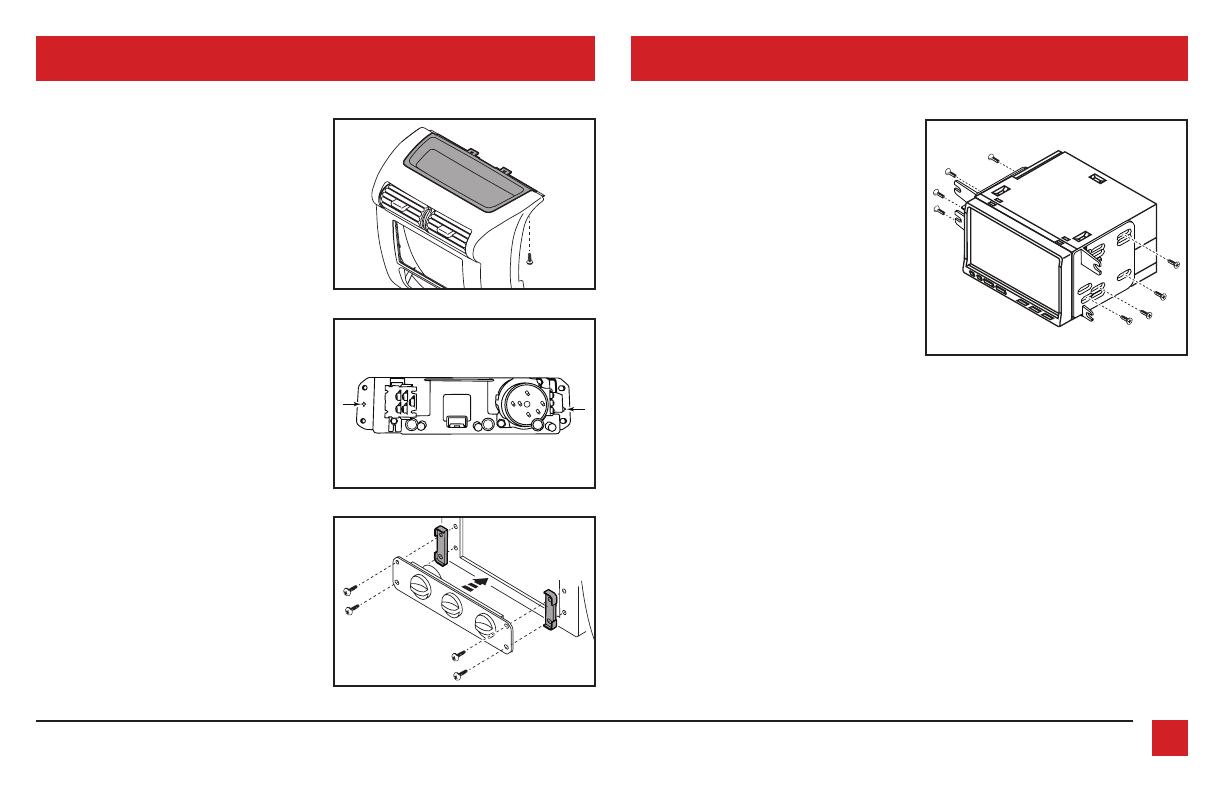
KIT PREPARATION (CONT.) KIT ASSEMBLY
1. Secure the
radio brackets
to the radio
using the screws supplied with the
radio. (Figure A)
2.
Locate the factory wiring harness and
antenna connector in the dash and
complete all necessary connections to the
radio. Metra recommends using the proper
mating adapter from Metra and/or Axxess.
Test the radio for proper operation
.
3. Secure the radio assembly to the dash
using (1) factory screw in the top right.
Drill an 1/8” hole in the (3) remaining
screw holes in the brackets, then use the
(3) #8 x 1/2” Phillips truss-head screws
provided to fully secure the radio.
4.
Reassemble the dash in reverse order of
disassembly to complete the installation
.
(Figure A)
(Figure C)
(Figure E)
(Figure D)
KNOWLEDGE IS POWER
Enhance your installation and fabrication skills by
enrolling in the most recognized and respected
mobile electronics school in our industry.
Log onto www.installerinstitute.com or call
800-354-6782 for more information and take steps
toward a better tomorrow.
®
Metra recommends MECP
certified technicians
IMPORTANT
If you are having difficulties with the installation of this product,
please call our Tech Support line at 1-800-253-TECH. Before
doing so, look over the instructions a second time, and make
sure the installation was performed exactly as the instructions
are stated. Please have the vehicle apart and ready to perform
troubleshooting steps before calling.
Metra. The World’s Best Kits.
®
MetraOnline.com © COPYRIGHT 2018 METRA ELECTRONICS CORPORATION REV. 7/26/18 INST95-6549
INSTALLATION INSTRUCTIONS
95-6549
  • Page 1 1
  • Page 2 2
  • Page 3 3
  • Page 4 4

Metra 95-6549 Operating instructions

Category
Car kits
Type
Operating instructions

Ask a question and I''ll find the answer in the document

Finding information in a document is now easier with AI