Sony ILCE-9 Operating instructions
- Category
- Car video systems
- Type
- Operating instructions

ILCE-9
d-830-100-91(1)
ILCE-9
d-830-100-91(1)
C:\d830100911\d830100911ILCE9AP2\00COV-ILCE9AP2\000COV.indd
DTP data saved: 2019/02/19 12:37
PDF file created: 2019/02/19 12:38
Interchangeable Lens
Digital Camera
Instruction Manual
E-mount
If your camera’s system software version is earlier than Ver.5.0,
refer to the Instruction Manual at the following URL.
http://helpguide.sony.net/ilc/ilce9/d832100911.pdf

ILCE-9
d-830-100-91(1)
C:\d830100911\d830100911ILCE9AP2\01GB-ILCE9AP2\010BEF.indd
2019/02/19 12:40
GB
2
English
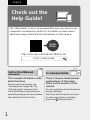
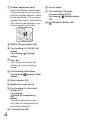
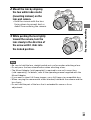
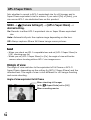
Check out the
Help Guide!
The “Help Guide” is an on-line manual that you can read on your
computer or smartphone. Refer to it for details on menu items,
advanced usage, and the latest information on the camera.
Scan
here
http://rd1.sony.net/help/ilc/1830/h_zz/
Instruction Manual
(this book)
In-Camera Guide
This manual introduces some
basic functions.
For the quick start guide, see
“Startup guide” (page26). The
“Startup guide” introduces the
initial procedures from when you
open the package until you release
the shutter for the first shot.
The [In-Camera Guide] shows
explanations of the menu
items on the monitor of the
camera.
You can quickly pull up information
during shooting.
Select an item for which you want
to view a description, and then
press the
(Delete) button.
ILCE-9 Help Guide

C:\d830100911\d830100911ILCE9AP2\01GB-ILCE9AP2\010BEF.indd
2019/02/19 12:40
ILCE-9
d-830-100-91(1)
GB
3
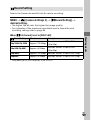
Table of contents
Check out the Help Guide! ....................................................... 2
Notes on using your camera.................................................... 6
Preparations for shooting
Checking the camera and the supplied items .......................10
Identifying parts ...................................................................... 11
Front side ....................................................................... 11
Rear side ........................................................................13
Top side/Side view ........................................................15
Bottom ...........................................................................18
Basic operations ......................................................................19
Using the control wheel ................................................19
Using the multi-selector ................................................19
Assigning frequently used functions to buttons
(Custom Key) ............................................................20
Using the Fn (Function) button (Function menu) .........21
How to use the Quick Navi screen ............................... 23
Startup guide ......................................................................... 26
Step 1: Charging the battery pack ................................ 26
Step 2: Inserting the battery pack into the camera ......27
Step 3: Inserting a memory card .................................. 28
Step 4: Attaching a lens ............................................... 30
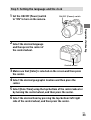
Step 5: Setting the language and the clock ................. 33
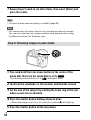
Step 6: Shooting images in auto mode ....................... 34
Shooting
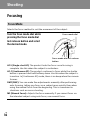
Focusing ................................................................................. 36
Focus Mode .................................................................. 36
Auto focus .............................................................................. 38
Focus Area .................................................................... 38
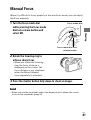
Manual Focus ..........................................................................41
Direct manual focus (DMF) ........................................... 42

ILCE-9
d-830-100-91(1)
C:\d830100911\d830100911ILCE9AP2\01GB-ILCE9AP2\010BEF.indd
2019/02/19 12:40
GB
4
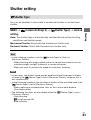
Shutter setting ....................................................................... 43
Shutter Type ............................................................ 43
Using the electronic shutter ......................................... 44
Displaying the release timing (Shoot. Timing Disp.) ... 47
Shoot. Start Disp. .......................................................... 47
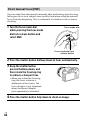
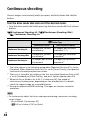
Continuous shooting .............................................................48
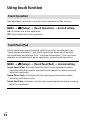
Using touch function ............................................................. 50
Touch Operation ........................................................... 50
Touch Panel/Pad ........................................................... 50
Touch Focus ...................................................................51
Touch Tracking .............................................................. 53
Selecting a still image size/image quality ............................ 54
File Format .............................................................. 54
JPEG Quality ............................................................ 54
JPEG Image Size ..................................................... 55
APS-C/Super 35mm ...................................................... 56
Shooting movies
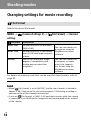
Changing settings for movie recording ................................. 58
File Format............................................................... 58
Record Setting ......................................................... 59
Using network functions
Using the Wi-Fi/One-touch (NFC)/Bluetooth/wired LAN
functions ................................................................................ 62
Installing Imaging Edge Mobile ................................... 62
Recording location information to
captured images ...................................................... 63
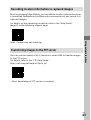
Transferring images to the FTP server ......................... 63
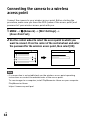
Connecting the camera to a wireless access point ............... 64

C:\d830100911\d830100911ILCE9AP2\01GB-ILCE9AP2\010BEF.indd
2019/02/19 12:40
ILCE-9
d-830-100-91(1)
GB
5
Using a computer
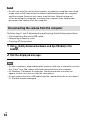
Connecting the camera to a computer ................................. 65
Connecting to a computer ........................................... 65
Disconnecting the camera from the computer ........... 66
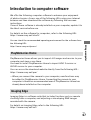
Introduction to computer software ....................................... 67
PlayMemories Home .................................................... 67
Imaging Edge ............................................................... 67
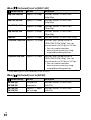
MENU items/List of icons
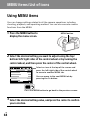
Using MENU items .................................................................68
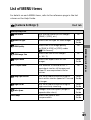
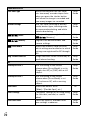
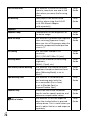
List of MENU items ................................................................. 69
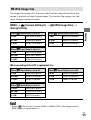
(Camera Settings 1) ................................................69
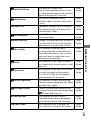
(Camera Settings 2) ............................................... 74
(Network) ................................................................. 79
(Playback) ...............................................................80
(Setup) .....................................................................81
(My Menu) ............................................................... 84
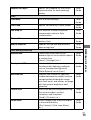
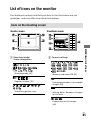
List of icons on the monitor ................................................... 85
Icons on the shooting screen ....................................... 85
Icons on the playback screen ....................................... 90
About this product
Specifications ......................................................................... 92
Battery life and number of recordable images............ 92
Memory cards that can be used .................................. 93
Number of recordable images ..................................... 94
Recordable movie times............................................... 96
Specifications ................................................................99
Index ....................................................................103
For details on the Wi-Fi functions and NFC One-touch functions, refer to the
“Help Guide” (page 2).

ILCE-9
d-830-100-91(1)
C:\d830100911\d830100911ILCE9AP2\01GB-ILCE9AP2\010BEF.indd
2019/02/19 12:40
GB
6
Notes on using your camera
Along with this section, also see
“Precautions” in the Help Guide.
Notes on handling the product
• This camera is designed to be dust
resistant and splash resistant, but
it is not guaranteed to completely
prevent the ingress of dust or water
droplets.
• Do not leave the lens or the
viewfinder exposed to a strong light
source such as sunlight. Because
of the lens’s condensing function,
doing so may cause smoke, fire, or
a malfunction inside the camera
body or the lens. If you have to
leave the camera exposed to a light
source such as sunlight, attach the
lens cap to the lens.
• When you shoot with backlighting,
keep the sun sufficiently far away
from the angle of view. Otherwise,
the sunlight may enter the focus
inside the camera and cause smoke
or fire. Even if the sun is slightly
away from the angle of view, it may
still cause smoke or fire.
• Do not directly expose the lens to
beams such as laser beams. That
may damage the image sensor and
cause the camera to malfunction.
• Do not look at sunlight or a strong
light source through the lens when
it is detached. This may result in
unrecoverable damage to the eyes.
• Do not leave the camera, the
supplied accessories, or memory
cards within the reach of infants.
They may be accidentally
swallowed. If this occurs, consult a
doctor immediately.
Notes on the monitor and
electronic viewfinder
• The monitor and electronic
viewfinder are manufactured
using extremely high-precision
technology, and over 99.99% of the
pixels are operational for effective
use. However, there may be some
small black dots and/or bright
dots (white, red, blue or green in
color) that constantly appear on the
monitor and electronic viewfinder.
These dots are normal due to the
manufacturing process and do not
affect the images in any way.
• When shooting with the viewfinder,
you may experience symptoms
such as eyestrain, fatigue,
travel sickness, or nausea. We
recommend that you take a break
at regular intervals when you are
shooting with the viewfinder.
• If the monitor or electronic
viewfinder is damaged, stop using
the camera immediately. The
damaged parts may harm your
hands, face, etc.
Notes on continuous shooting
During continuous shooting, the
monitor or viewfinder may flash
between the shooting screen and a
black screen. If you keep watching
the screen in this situation, you may
experience uncomfortable symptoms
such as feeling of unwellness. If you
experience uncomfortable symptoms,
stop using the camera, and consult
your doctor as necessary.

C:\d830100911\d830100911ILCE9AP2\01GB-ILCE9AP2\010BEF.indd
2019/02/19 12:40
ILCE-9
d-830-100-91(1)
GB
7
Notes on recording for long
periods of time or recording 4K
movies
• The camera body and battery may
become warm with use – this is
normal.
• If the same part of your skin
touches the camera for a long
period of time while using the
camera, even if the camera does
not feel hot to you, it may cause
symptoms of a low-temperature
burn such as redness or blistering.
Pay special attention in the following
situations and use a tripod, etc.
–When using the camera in a high-
temperature environment
–When someone with poor
circulation or impaired skin
sensation uses the camera
–When using the camera with the
[Auto Power OFF Temp.] set to
[High].
Notes on shooting with an external
flash
When shooting with an external flash,
light and dark stripes may appear on
the image if the shutter speed is set
to faster than 1/4000seconds.
Sony lenses/accessories
Using this unit with products from
other manufacturers may affect its
performance, leading to accidents or
malfunction.
On the data specifications
described in this manual
The data on performance and
specifications are defined under
the following conditions, except
as described in this manual: at an
ordinary ambient temperature of
25ºC (77°F), and using a battery pack
that has been fully charged until the
charge lamp has turned off.
Warning on copyright
Television programs, films,
videotapes, and other materials
may be copyrighted. Unauthorized
recording of such materials may
be contrary to the provisions of the
copyright laws.
Notes on location information
If you upload and share an image
tagged with a location, you may
accidentally reveal the information
to a third party. To prevent third
parties from obtaining your location
information, set
[
Location Info. Link Set.] to [Off]
before shooting images.
Notes on discarding or transferring
this product to others
When discarding or transferring
this product to others, make sure to
perform the following operation to
protect private information.
• Select [Setting Reset] [Initialize].

ILCE-9
d-830-100-91(1)
C:\d830100911\d830100911ILCE9AP2\01GB-ILCE9AP2\010BEF.indd
2019/02/19 12:40
GB
8
Notes on discarding or transferring
a memory card to others
Executing [Format] or [Delete] on
the camera or a computer may not
completely delete the data on the
memory card. When transferring
a memory card to others, we
recommend that you delete the
data completely using data deletion
software. When discarding a memory
card, we recommend that you
physically destroy it.
Note on network functions
When you use network functions,
unintended third parties on
the network may access the
camera, depending on the usage
environment.
For example, unauthorized access
to the camera may occur in network
environments to which another
network device is connected or can
connect without permission. Sony
bears no responsibility for any loss
or damage caused by connecting to
such network environments.
How to turn off wireless network
functions (Wi-Fi, etc.) temporarily
When you board an airplane,
etc., you can turn off all wireless
network functions temporarily using
[Airplane Mode].
CAUTION
For safety, do not connect the
connector for peripheral device wiring
that might have excessive voltage to
LAN terminal. Follow the instructions
for LAN terminal.
Power Cord
For the customers in the UK, Ireland,
Malta, Cyprus and Saudi Arabia
Use the power cord (A). For safety
reasons, the power cord (B) is not
intended for above countries/regions
and shall therefore not be used there.
For the customers in other EU
countries/regions
Use the power cord (B).
(A) (B)
LAN cable
Use a Category 5e or higher Shielded
Twisted Pair (STP) cable with high
shielding performance.

C:\d830100911\d830100911ILCE9AP2\01GB-ILCE9AP2\010BEF.indd
2019/02/19 12:40
ILCE-9
d-830-100-91(1)
GB
9
For Customers in the U.S.A.
For question regarding your product
or for the Sony Service Center nearest
you, call 1-800-222-SONY (7669).
Declaration of Conformity
Trade Name: SONY
Model No.: WW361847
Responsible Party: Sony Electronics
Inc.
Address: 16535 Via Esprillo, San
Diego, CA 92127 U.S.A.
Telephone Number: 858-942-2230
This device complies with part 15 of
the FCC rules. Operation is subject
to the following two conditions:
(1)This device may not cause harmful
interference, and (2)this device must
accept any interference received,
including interference that may cause
undesired operation.
The supplied interface cable must be
used with the equipment in order to
comply with the limits for a digital
device pursuant to Subpart B of Part
15 of FCC Rules.

ILCE-9
d-830-100-91(1)
C:\d830100911\d830100911ILCE9AP2\01GB-ILCE9AP2\020PRE.indd
2019/02/19 12:40
GB
10
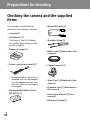
Preparations for shooting
Checking the camera and the supplied
items
The number in parentheses
indicates the number of pieces.
• Camera (1)
• AC Adaptor (1)
The type of the AC Adaptor
may differ depending on the
country/region.
• Battery Charger (1)
• Power cord (mains lead) (1)*
* Multiple power cords may be
supplied with this equipment.
Use the appropriate one that
matches your country/region.
See page 8.
• Rechargeable Battery Pack
NP-FZ100 (1)
• Micro USB cable (1)
• Shoulder Strap (1)
• Body Cap (1) (Attached to the
camera)
• Cable Protector (1)
• Shoe Cap (1) (Attached to the
camera)
• Eyepiece Cup (1) (Attached to
the camera)
• Instruction Manual (1) (this
manual)
• Reference Guide (1)

C:\d830100911\d830100911ILCE9AP2\01GB-ILCE9AP2\020PRE.indd
2019/02/19 12:40
ILCE-9
d-830-100-91(1)
GB
11
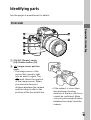
Preparations for shooting
GB
11
Preparations for shooting
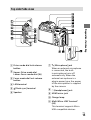
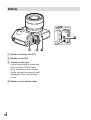
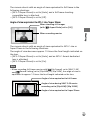
Identifying parts
See the pages in parentheses for details.
Front side
ON/OFF (Power) switch
(33)/Shutter button (34)
Image sensor position
mark
• The image sensor is the
sensor that converts light
into an electric signal. The
mark shows the location
of the image sensor. When
you measure the exact
distance between the camera
and the subject, refer to the
position of the horizontal line.
• If the subject is closer than
the minimum shooting
distance of the lens, the focus
cannot be confirmed. Make
sure you put enough distance
between the subject and the
camera.

ILCE-9
d-830-100-91(1)
C:\d830100911\d830100911ILCE9AP2\01GB-ILCE9AP2\020PRE.indd
2019/02/19 12:40
GB
12
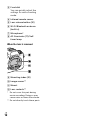
Front dial
You can quickly adjust the
settings for each shooting
mode.
Infrared remote sensor
Lens release button (32)
Wi-Fi/Bluetooth antenna
(built-in)
Microphone*
AF illuminator (71)/Self-
timer lamp
When the lens is removed
Mounting index (31)
Image sensor**
Mount
Lens contacts**
* Do not cover this part during
movie recording. Doing so may
cause noise or lower the volume.
** Do not directly touch these parts.

C:\d830100911\d830100911ILCE9AP2\01GB-ILCE9AP2\020PRE.indd
2019/02/19 12:40
ILCE-9
d-830-100-91(1)
GB
13
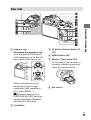
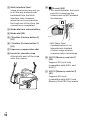
Preparations for shooting
Rear side
Eyepiece cup
To remove the eyepiece cup
Push the grips at the bottom
of the eyepiece cup to the left
and right and lift up the cup.
Remove the eyepiece cup
when attaching an angle
viewfinder (sold separately).
Also, select MENU
(Camera Settings 2)
[FINDER/MONITOR], and then
switch [Viewfinder (Manual)]
and [Monitor (Manual)].
Viewfinder
C3 button (Custom button 3)
(20)
MENU button (68)
Monitor/Touch panel (50)
You can adjust the monitor to
an easily viewable angle and
shoot from any position.
Eye sensor

ILCE-9
d-830-100-91(1)
C:\d830100911\d830100911ILCE9AP2\01GB-ILCE9AP2\020PRE.indd
2019/02/19 12:40
GB
14
Diopter-adjustment dial
Adjust the diopter-adjustment
dial according to your eyesight
until the display appears clearly
in the viewfinder. If it is hard to
operate the diopter-adjustment
dial, remove the eyepiece cup
before operating the dial.
MOVIE (Movie) button (35)
For shooting: AF-ON (AF On)
button
For viewing:
(Enlarge)
button
Rear dial
You can quickly adjust the
settings for each shooting
mode.
For shooting: AEL button
For viewing:
(Image Index)
button
Multi-selector (19)
Media slot cover switch
For shooting: Fn (Function)
button (21)
For viewing:
(Send to Smartphone)
button
You can display the screen
for [Send to Smartphone] by
pressing this button.
Control wheel (19)
Access lamp
For shooting: C4 button
(Custom button 4) (20)
For viewing:
(Delete) button
(35)
(Playback) button (35)

C:\d830100911\d830100911ILCE9AP2\01GB-ILCE9AP2\020PRE.indd
2019/02/19 12:40
ILCE-9
d-830-100-91(1)
GB
15
Preparations for shooting
Top side/Side view
Drive mode dial lock release
button
Upper: Drive mode dial
Lower: Focus mode dial (36)
Focus mode dial lock release
button
LAN terminal
(Flash sync) terminal
Speaker
(Microphone) jack
When an external microphone
is connected, the built-
in microphone turns off
automatically. When the
external microphone is a
plugin-power type, the power
of the microphone is supplied
by the camera.
(Headphones) jack
HDMI micro jack
Charge lamp
Multi/Micro USB Terminal*
(65)
This terminal supports Micro
USB-compatible devices.

ILCE-9
d-830-100-91(1)
C:\d830100911\d830100911ILCE9AP2\01GB-ILCE9AP2\020PRE.indd
2019/02/19 12:40
GB
16
Multi Interface Shoe*
Some accessories may not go
in all the way and protrude
backward from the Multi
interface shoe. However,
when the accessory reaches
the front end of the shoe, the
connection is completed.
Mode dial lock release button
Mode dial (35)
C2 button (Custom button 2)
(20)
C1 button (Custom button 1)
(20)
Exposure compensation dial
Hooks for shoulder strap
Attach both ends of the strap
onto the camera.
(N mark) (62)
• This mark indicates the touch
point for connecting the
camera and an NFC-enabled
Smartphone.
• NFC (Near Field
Communication) is an
international standard
of short-range wireless
communication technology.
SLOT 1 (Memory card slot 1)
(28)
Supports SD cards only
(compatible with UHS-I and
UHS-II)
SLOT 2 (Memory card slot 2)
(30)
Supports SD cards
(compatible with UHS-I) and
Memory Stick PRO Duo media

C:\d830100911\d830100911ILCE9AP2\01GB-ILCE9AP2\020PRE.indd
2019/02/19 12:40
ILCE-9
d-830-100-91(1)
GB
17
Preparations for shooting
* For details on compatible
accessories for the multi interface
shoe and the Multi/Micro USB
Terminal, visit the Sony website, or
consult your Sony dealer or local
authorized Sony service facility.
Accessories for the Accessory Shoe
can also be used. Operations with
other manufactures’ accessories
are not guaranteed.
To attach the cable protector
Use the cable protector to prevent
the HDMI cable from being
disconnected when shooting
images with the HDMI cable
connected. Open both of the jack
covers and insert an HDMI cable
into the camera. Swing the HDMI
micro jack cover downward and
attach the cable protector as
illustrated so that the end of the
cable protector fits in the slit under
the Multi/Micro USB Terminal.
Secure the cable protector with the
attachment screw. Then secure the
HDMI cable with the fixing dial.
Fit the end in the slit Fixing dial
Attachment screw

ILCE-9
d-830-100-91(1)
C:\d830100911\d830100911ILCE9AP2\01GB-ILCE9AP2\020PRE.indd
2019/02/19 12:40
GB
18
Bottom
Battery insertion slot (27)
Battery cover (27)
Tripod socket hole
Use a tripod with a screw less
than 5.5mm (7/32inches)
long. Otherwise, you cannot
firmly secure the camera, and
damage to the camera may
occur.
Battery cover release lever

C:\d830100911\d830100911ILCE9AP2\01GB-ILCE9AP2\020PRE.indd
2019/02/19 12:40
ILCE-9
d-830-100-91(1)
GB
19
Preparations for shooting
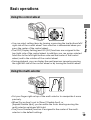
Basic operations
Using the control wheel
• You can select setting items by turning or pressing the top/bottom/left/
right side of the control wheel. Your selection is determined when you
press the center of the control wheel.
• The DISP (Display Setting) and ISO (ISO) functions are assigned to the
top/right side of the control wheel. In addition, you can assign selected
functions to the left/right/bottom side and the center of the control
wheel, and to the rotation of the control wheel.
• During playback, you can display the next/previous image by pressing
the right/left side of the control wheel or by turning the control wheel.
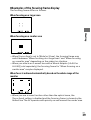
Using the multi-selector
• Put your finger right on top of the multi-selector to manipulate it more
precisely.
• When [Focus Area] is set to [Zone], [Flexible Spot], or
[Expand Flexible Spot], you can move the focus area by pressing the
multi-selector up/down/left/right.
• The [Focus Standard] function is assigned to the center of the multi-
selector in the default settings.

ILCE-9
d-830-100-91(1)
C:\d830100911\d830100911ILCE9AP2\01GB-ILCE9AP2\020PRE.indd
2019/02/19 12:40
GB
20
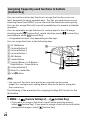
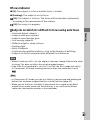
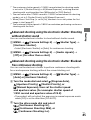
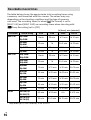
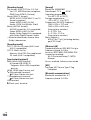
Assigning frequently used functions to buttons
(Custom Key)
You can use the custom key function to assign the functions you use
most frequently to easily operable keys. This lets you skip the process of
selecting items from MENU, so you can recall the functions more quickly.
You can also assign [Not set] to easily operable keys to prevent accidental
operation.
You can separately assign functions to custom keys for the still image
shooting mode (
Custom Key), movie shooting mode ( Custom Key),
and playback mode (
Custom Key).
• Assignable functions vary depending on the keys.
You can assign functions to the following keys.
AF-ON Button
Custom Button 3
Custom Button 2
Custom Button 1
AEL Button
Center Button
Control Wheel / Left Button /
Right Button / Down Button
Custom Button 4
Multi-Slc Center Btn
Fn/ Button
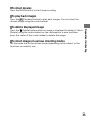
Hint
• You can recall functions more quickly by using the Function menu
(page21) to configure each setting directly from the Fn button, along with
the custom keys.
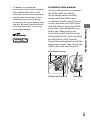
The following is the procedure for assigning the [Eye AF] function to the
AEL button.
1
MENU (Camera Settings 2) [ Custom Key].
• If you want to assign a function to recall while shooting movies,
select [
Custom Key]. If you want to assign a function to recall while
playing back images, select [
Custom Key].
Page is loading ...
Page is loading ...
Page is loading ...
Page is loading ...
Page is loading ...
Page is loading ...
Page is loading ...
Page is loading ...
Page is loading ...
Page is loading ...
Page is loading ...
Page is loading ...
Page is loading ...
Page is loading ...
Page is loading ...
Page is loading ...
Page is loading ...
Page is loading ...
Page is loading ...
Page is loading ...
Page is loading ...
Page is loading ...
Page is loading ...
Page is loading ...
Page is loading ...
Page is loading ...
Page is loading ...
Page is loading ...
Page is loading ...
Page is loading ...
Page is loading ...
Page is loading ...
Page is loading ...
Page is loading ...
Page is loading ...
Page is loading ...
Page is loading ...
Page is loading ...
Page is loading ...
Page is loading ...
Page is loading ...
Page is loading ...
Page is loading ...
Page is loading ...
Page is loading ...
Page is loading ...
Page is loading ...
Page is loading ...
Page is loading ...
Page is loading ...
Page is loading ...
Page is loading ...
Page is loading ...
Page is loading ...
Page is loading ...
Page is loading ...
Page is loading ...
Page is loading ...
Page is loading ...
Page is loading ...
Page is loading ...
Page is loading ...
Page is loading ...
Page is loading ...
Page is loading ...
Page is loading ...
Page is loading ...
Page is loading ...
Page is loading ...
Page is loading ...
Page is loading ...
Page is loading ...
Page is loading ...
Page is loading ...
Page is loading ...
Page is loading ...
Page is loading ...
Page is loading ...
Page is loading ...
Page is loading ...
Page is loading ...
Page is loading ...
Page is loading ...
Page is loading ...
Page is loading ...
Page is loading ...
Page is loading ...
Page is loading ...
-
 1
1
-
 2
2
-
 3
3
-
 4
4
-
 5
5
-
 6
6
-
 7
7
-
 8
8
-
 9
9
-
 10
10
-
 11
11
-
 12
12
-
 13
13
-
 14
14
-
 15
15
-
 16
16
-
 17
17
-
 18
18
-
 19
19
-
 20
20
-
 21
21
-
 22
22
-
 23
23
-
 24
24
-
 25
25
-
 26
26
-
 27
27
-
 28
28
-
 29
29
-
 30
30
-
 31
31
-
 32
32
-
 33
33
-
 34
34
-
 35
35
-
 36
36
-
 37
37
-
 38
38
-
 39
39
-
 40
40
-
 41
41
-
 42
42
-
 43
43
-
 44
44
-
 45
45
-
 46
46
-
 47
47
-
 48
48
-
 49
49
-
 50
50
-
 51
51
-
 52
52
-
 53
53
-
 54
54
-
 55
55
-
 56
56
-
 57
57
-
 58
58
-
 59
59
-
 60
60
-
 61
61
-
 62
62
-
 63
63
-
 64
64
-
 65
65
-
 66
66
-
 67
67
-
 68
68
-
 69
69
-
 70
70
-
 71
71
-
 72
72
-
 73
73
-
 74
74
-
 75
75
-
 76
76
-
 77
77
-
 78
78
-
 79
79
-
 80
80
-
 81
81
-
 82
82
-
 83
83
-
 84
84
-
 85
85
-
 86
86
-
 87
87
-
 88
88
-
 89
89
-
 90
90
-
 91
91
-
 92
92
-
 93
93
-
 94
94
-
 95
95
-
 96
96
-
 97
97
-
 98
98
-
 99
99
-
 100
100
-
 101
101
-
 102
102
-
 103
103
-
 104
104
-
 105
105
-
 106
106
-
 107
107
-
 108
108


Sony ILCE-9 Operating instructions
- Category
- Car video systems
- Type
- Operating instructions
Ask a question and I''ll find the answer in the document
Finding information in a document is now easier with AI
Related papers
-
Sony DSC-RX100M3 Operating instructions
-
-
-
-
-
-
-
-
-
Other documents
-
Polycom REMOTE001 User manual
-
Canon PowerShot S110 User guide
-
Hasselblad HV User manual
-
Canon PowerShot G15 User manual
-
 PhaseOne XF User manual
-
 Phase One XF Camera System Quick start guide
-
-
 Promaster SonyA7III BatteryGrip Owner's manual
-
Shimano CM-1100 User manual
-
 Western Telematic APS-8 User manual


