Page is loading ...

User’s Guide

This household sewing machine is designed to comply with 2006/42/EC (Machinery) and UL1594.
IMPORTANT SAFEGUARDS AND WARNINGS
WHEN USING EMBROIDERY MACHINES, THE FOLLOWING SAFETY PRECAUTIONS MUST
BE FOLLOWED TO REDUCE THE RISK OF FIRE, ELECTRIC SHOCK, AND/OR INJURY.
• The embroidery machine is provided with the following warning label:
• Exercise the important safeguards and warnings associated with the label.
• Improper use of this embroidery machine may result in temporary, permanent or fatal injuries.
• To prevent injuries, keep hands, body parts and other objects away from needle bar rack, guide
rail, etc.
• Keep the machine away from heat sources.
• This embroidery machine is only for indoor household use. Do NOT use outdoors.
• Do NOT use embroidery machine for other than its intended use.
• This embroidery machine is NOT intended to be used by persons (including children) with re-
duced physical, sensory, or mental capabilities, or lack of experience and knowledge unless they
are supervised while using the embroidery machine and given instruction on how to use the em-
broidery machine by the person responsible for their safety. The person who is giving instruction
MUST have read and understand how to use this embroidery machine and assumes total respon-
sibility for the safety of the person they are supervising.
• Children must NOT use this embroidery machine.
• Children should be supervised to make sure that they do NOT play with packing materials, plas-
tic bags and/or the embroidery machine.
• Close supervision is necessary when the embroidery machine is used near children.
• To protect against electrical shock, do NOT immerse cord plug or embroidery machine in water
or other liquids.
• Turn off and unplug the embroidery machine from the electrical outlet when NOT in use and
before cleaning. To unplug the embroidery machine, grab the power plug and pull it outwards
from the electrical outlet. Do NOT pull the power cord.
• Make sure the embroidery machine is turned off before inserting and/or removing parts.
• It is recommended to regularly inspect the embroidery machine. Do NOT operate the embroi-
dery machine with a damaged cord, plug, needles, bobbins, etc., or after the embroidery machine
malfunctions or has been damaged in any manner.
• Do NOT use accessory attachments that are NOT recommended by the embroidery machine
manufacturer, since it may cause injuries and malfunctions of the embroidery machine.
• Do NOT touch needles or sharp embroidery machine parts when installing or removing embroi-
dery frames, accessory ttings or while providing maintenance to the embroidery machine.
• Do NOT over extend power cord or let it touch hot surfaces.
• Do NOT place embroidery machine on or near hot gas, an electric burner, an oven, a gas or elec-
tric cooktop, an open ame, an iron, or steam embroidery machine.
• To turn off the embroidery machine press the “Stop” button, turn off the power switch at the rear
of the embroidery machine and then unplug the power cord from electrical outlet. See the Turn-
ing off section for more information.
• When using the embroidery machine, provide adequate air space above and around the sides of
the machine for circulation. Do not block any ventilation opening while the embroidery machine
is being used and make sure the ventilation opening is free from the accumulation uff, dust and
NOT covered by a cloth.

• For extra protection, when operating the embroidery machine, use safety glasses and closed toe
shoes to prevent injuries.
• To replace the needles, use tweezers or pliers to grab the needle. Do NOT use your ngers.
• Do NOT leave the embroidery machine unattended while in use, and press “Stop” in the case of
an emergency. See the Turning off section for more information.
• The embroidery machine weighs about 95 pounds and should be carried between two people.
Only lift the embroidery machine from its base and use caution to prevent back, knees and/or
other types of injuries or damage to the embroidery machine.
• Do NOT lift or grab embroidery machine by the touch-screen or any of the removable parts.
• The embroidery machine’s power cord MUST be plugged into a UPS power supply to protect it
from a power surge, power outage and to provide enough time for embroidery job to be com-
pleted in case of a power outage.
• If there is a power outage and the embroidery machine is NOT plugged into a UPS power sup-
ply, it will turn off. If it is plugged into a UPS power supply, once the job is completed, turn off
the embroidery machine and unplug it from the UPS power supply.
• If there is a power outage, turn off the embroidery machine and unplug it from the electrical outlet.
• Do NOT operate the embroidery machine if it is covered by or touching ammable materials,
including towels, curtains, draperies, walls or anything similar.
• Do NOT store any ammable liquids near the embroidery machine.
• Do NOT operate the embroidery machine in a place where sprays are used or oxygen is stored.
• Do not store the embroidery machine in a place with direct sunshine or high humidity. Do not
use or store the embroidery machine close to a heater, iron, halogen lamp or another high-tem-
perature object.
• Do NOT place any item on top of the embroidery machine while in operation.
• Do NOT store any materials or items other than the manufacturer’s recommended accessories
on top or beneath the embroidery machine when NOT in use.
• Do NOT use any materials that are not recommended for the embroidery machine such as pa-
per, cardboard, plastic, foam and other such materials or their likes.
• Use extreme caution MUST be used when moving the embroidery machine to prevent any in-
juries. It is recommended that the embroidery machine NOT be moved while it is being used or
plugged into the electrical outlet.
• To prevent needle breakage, do not use damaged needles or an incorrect needle plate.
• Keep foreign objects away from embroidery machine openings to avoid personal injuries.
• When using scissors or seam rippers, keep hands and ngers away from the cutting direction to
avoid injuries and only use them for their specied purpose.
• Do NOT use the embroidery machine on an unstable surface. Place the embroidery machine on
a stable, leveled, and durable surface or use the embroidery machine stand.
• Do NOT use the embroidery machine stand to store anything else but the embroidery machine
and its accessories.
• If the embroidery machine falls to the oor, it has been splashed with or soaked in water or oth-
er liquids do NOT use it – contact your local dealer to schedule an appointment with a qualied
technician to service the embroidery machine. Contact your local PFAFF
®
dealer.
• Do NOT use the embroidery machine if it begins to heat up, color changes or deformation oc-
curs, stop using the embroidery machine immediately, turn it off, and unplug it from the electri-
cal outlet. Then contact your local PFAFF
®
dealer.
• Never wear loose articles of clothing that can be caught by the needles or any part of the em-
broidery machine while it is being used.

• The end user MUST never attempt to repair or modify the embroidery machine in any way and
MUST contact their local PFAFF
®
dealer or customer service to schedule repairs with a factory
certied technician. Working on the PFAFF
®
embroidery machine by the end user may result in
voiding of the warranty.
• VSM Group AB, its owners, partners, ofcers, employees, afliates, manufacturers, factories,
importers, promoters, parent companies and anyone else who does business with them are NOT
responsible or liable for anyone misusing the embroidery machine, modifying the original em-
broidery machine in anyway, servicing it with unauthorized personnel, not following or ignor-
ing instructions, or using the embroidery machine for anything else other than its intended use.
• Three-prong plug: The embroidery machine has a 3-prong plug. To reduce the risk of electric
shock, this plug is intended to t into the outlet only one way. If the plug does not fully t into
the outlet, contact a qualied electrician. Do not attempt to modify the plug in any way. Do
NOT use an extension cord with this embroidery machine.
• Tamper-resistant screw: This appliance is equipped with a tamper-resistant screw to prevent re-
moval of the outer cover. To reduce the risk of re or electric shock, DO NOT attempt to remove
the outer cover. There are no user-serviceable parts inside. Authorized service personnel should
ONLY do the repair.
• Power cord: To prevent damage, electric shock or re hazard, do NOT operate the embroidery
machine with a damaged power cord or if power plug is not completely inserted into the electri-
cal outlet. If the power cord is damaged, please contact your local PFAFF
®
dealer.
• If the LED lamp is damaged or broken, it must be replaced by the manufacturer or it's service
agent or a similarly qualied person, in order to avoid a hazard.
SERVICING OF DOUBLE INSULATED PRODUCTS
In a double-insulated product, two systems of insulation are provided instead of grounding. No
ground means is provided on a double-insulated product, nor should a means for grounding
be added to the product. Servicing of a double-insulated product requires extreme care and
knowledge of the system and should be done only by qualied service personnel. Replacement
parts for a double-insulated product must be identical to those parts in the product. A double-
insulated product is marked with the words ‘DOUBLE INSULATION’ or ‘DOUBLE INSULATED’.
READ ALL INSTRUCTIONS PRIOR TO OPERATING
• This manual is a comprehensive step-by-step user instruction guide on how to use the 10-needle
home embroidery machine with the 7-inch HD LCD touch-screen panel.
• Make sure to read, understand and follow all these instructions.
• To address any questions relating to ordering parts, operating the 10-needle home embroidery
machine with the 7-inch HD LCD touch-screen panel, troubleshooting, maintenance or service,
please contact your local dealer.
WATTAGE
110V/60Hz or 220V/50Hz available
SAVE THESE INSTRUCTIONS
THIS EMBROIDERY MACHINE IS FOR INDOOR HOUSEHOLD USE ONLY
CUSTOMER SERVICE, SUPPORT AND TRAINING
If you should have any questions regarding your embroidery machine or training,
please contact your local PFAFF
®
dealer to schedule an appointment.

CONTENTS
Quick Reference Guide/Checklist 7
INTRODUCTION 9
Embroidery machine overview 9
Front view 9
Rear view 9
Display overview 10
Embroidery hoop overview 10
Toolbox and spareparts 10
PREPARATION 11
Unpack your embroidery machine 11
Adjust and secure your embroidery machine 11
Thread stand assembly 12
Attaching the thread stand to the machine 12
Getting started 13
Turning on 13
Turning off 13
Electronic bobbin winder 14
Specications 14
Bobbin winder overview 14
Assembling the bobbin winder 15
Winding the bobbin 15
Bobbin overview 16
Placing the bobbin in the bobbin case 16
Inserting the bobbin case into the rotary hook 17
Removing the bobbin 17
Threading the top threads 18
Threading the thread rack 19
Threading the top of the machine 19
Threading the needle bar frame 19
Threading the needle 19
Fast threading of the top thread 20
Flat hoop support 21
Attaching the at hoop support 21
Removing the at hoop support 21
Adjusting the width of the at hoop support 21
Positioning the at hoop support 21
Attaching the hoop 22
Removing the hoop 22
Hooping the fabric 23
Cap hoop 24
Cap driver installation 24
Cap station installation 24
Hooping the cap 25
Attaching the cap hoop to the cap driver 25
Removing the cap hoop from the cap driver 25
Removing the cap driver from the embroidery
arm 25
Tension 26
Factors that affect thread tension 26
Check thread tension 26
Adjusting the thread tension 26
Changing the needle 27
Control panel functions 28
Start/stop 28
Trimming 28
100-Degree button 28
COLOR TOUCH SCREEN 29
The touch screen 29
Home page – overview 30
Logo selection page – overview 31
Color sequence page – overview 31
Design setting page – overview 32
Comprehensive setting page – overview 32
Importing/uploading a design 33
Selecting a design 34
Selecting an embroidery hoop 34
Selecting the color sequence 35
Color change mode 35
How to switch to color change mode 35
Needle switch display icon 36
Embroidery design trace 36
How to trace your design 36
Using oat mode 37
How to oat through a design 37
Offsetting the hoop on one needle 38
Setting low speed on a specic needle 38
Embroidery status 39
Tracing the embroidery area 39
Deleting a design 39
Adding a font 40

How to abort a job 41
How to adjust speed 41
How to bring the hoop out 41
EMBROIDERY PROCESS 42
Completing a at design (start to nish) 42
Prepare 42
Embroider 42
Completing a cap design (start to nish) 43
Prepare 43
Embroider 43
MAINTENANCE & CARE 44
Rotary hook 44
Machine head 44
Lever arms 44
Head rail 45
Bobbin case maintenance 45
Thread break 46
If no thread break is apparent: 46
If a thread has broken: 46
Reasons 46
Garment or fabric 46
Embroidery design 46
Prevention 46
Needle break 46
Timing overview 47
Bobbin tension 47
Thread break (“t-break”) 47
Needle break 47
Main axis not at 100 degrees 48
If you are still receiving the error message 48
THREADS, STABILIZERS & NEEDLES 49
Thread ber choices 49
Rayon thread 49
Polyester thread 49
Metallic thread 49
Cotton thread 49
Thread consumption 49
Bobbin ber choices 50
Cotton 50
Nylon 50
Continuous lament polyester 50
Spun polyester 50
Magna glide 50
Backing/stabilizer 51
Cut-away 51
Tear-away 51
Specialty backing 51
Needles 52
Anatomy of a needle 52
Needle lifetime 52
When to change the needle 52
Selecting a needle 52
Topping 52
Foam 52
Poly mesh backing 52
Fusibal backing 52
Blade size 53
Needle nishes 53
Point types 53
Needle and thread matrix 54
Backing and needle recommendations 54

INTRODUCTION – 7
IMPORTANT – BEFORE GETTING STARTED
• Make sure the temperature of the environment
surrounding the machine is in between the 40°F
– 104°F (5°C – 40°C).
• In the case of lightning, make sure to turn-off
the embroidery machine
• Set up the embroidery machine near an electrical
outlet.
• Keep the machine free of dust.
• Do not keep liquid near the embroidery
machine.
• Make sure all packaging materials have been
removed.
• Make sure all base feet are at the same height.
• Make sure all base feet are locked.
• Exercise caution when removing parts.
• Do not plug the embroidery machine into the
socket until the machine is set-up and ready to
begin.
• Wear glasses and gloves when lubricating the
embroidery machine.
• Do not block the ventilation of the embroidery
machine.
• Make sure the embroidery machine is not in
direct sunlight.
• Set the embroidery machine two inches (2”)
away from the wall.
• Lift the embroidery machine with at least two
people.
• Lift the embroidery machine from he bottom –
ONLY.
• Make sure there are no objects underneath the
embroidery machine
• Make sure there are no objects within the
moving range of the embroidery machine.
• Set the embroidery machine on a leveled,
balanced and durable surface.
QUICK REFERENCE GUIDE/CHECKLIST
Before embroidery machine operation, please conrm the following steps have been performed.
Step Operation Reference page
1
Important: Before getting started
7
2
Threading of top thread
18
3
Check thread tension
26
4
Bobbin in the rotary hook
16-17
5
Turning on the machine
13
6
Importing a design
33
7
Select embroidery design
34
8
Select embroidery hoop
34
9
Hoop fabric
23
10
Attach embroidery hoop onto the embroidery machine
22
11
Check embroidery area
36
12
Start embroidery
42
13
Remove embroidery hoop and fabric
22
14
Turning off
13

8 – INTRODUCTION
1
13
2
3
4
5
6
7
8
9
10
11
12
14
15 16
17
19
20
21
22
23
18

INTRODUCTION – 9
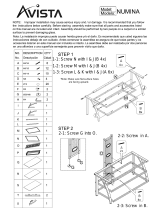
EMBROIDERY MACHINE OVERVIEW
Embroidery machine may vary slightly from what is illustrated.
FRONT VIEW
1. Thread stand
2. Thread guides
3. Upper thread tension
4. Thread guide tube
5. Spool pin
6. Sponge cushion
7. Thread rack
8. Thread take up lever
9. Needle bar frame
10. Embroidery arm
11. Flat hoop support
12. Hoop holder
13. Hoop
14. Bobbin housing unit
15. Thread cutter
16. Presser foot
17. Base feet
18. Needle
19. Color touch screen
20. Lower thread tension clip
21. Lower thread tension knob
22. Thread guide
23. Upper thread tension clip
REAR VIEW
1. Hand wheel/Degree knob
2. Power switch (On/Off)
3. Power cord socket
INTRODUCTION
1
2
3

10 – INTRODUCTION
DISPLAY OVERVIEW
1. Color Touch Screen
2. Start/Stop button
3. Thread trimming button
4. 100-degree button
5. Speaker
6. Panel arm adjusting knobs
7. Panel adjusting knob
8. USB port
9. Computer network interface
(insert internet cable)
EMBROIDERY HOOP OVERVIEW
1. Cap hoop (260X60mm)
2. Embroidery hoop A (70x50mm)
3. Embroidery hoop B (110x110mm)
4. Embroidery hoop C (190x140mm)
5. Embroidery hoop D (310x210mm)
TOOLBOX AND SPAREPARTS
(not pictured)
• Sponge Cushion x5
• Bobbins
• Needle Pack-DBxK5 75/11
• USB stick
• Brush
• Scissors
• Adjustable screw driver 4 by 107 mm
• Double end wrench
• Oil can – 40 grams
• Electronic Bobbin Winder
• Threading tool
• Spare parts box-D type
1
2
3
5
6
7
9
8
4
1
2
3
5
4

PREPARATIONS – 11
UNPACK YOUR EMBROIDERY MACHINE
It is recommended to keep all shipping materials.
Practice safety by using two (2) people to carry the
embroidery machine.
!
1. Carefully remove the box by pulling upwards,
using the cutouts found on the sides of the box.
2. Identify all of the accessories encased within
the exterior of the styrofoam surrounding the
embroidery machine.
3. Remove the accessories:
• Cap driver
• Thread stand
• Flat hoop support
• Toolbox
• Ethernet cable
• Cap station
• Thread cone holders
• Embroidery hoops
• Connecting cable
• Power cord
4. Remove the styrofoam.
5. Remove the Velcro tie from the plastic bag
covering the embroidery machine.
6. Pull the plastic cover down.
7. Lift the embroidery machine from the bottom
and place it on top of the stand. Use caution.
8. Remove the protection lm.
ADJUST AND SECURE YOUR EMBROIDERY MACHINE
To avoid accidents or injuries, lift the embroidery machine between two (2) people.
Keep the embroidery machine two inches (50 mm) away from the wall.
Do not block the embroidery machine’s ventilation.
• Set up the embroidery machine on top of a leveled, balanced, and durable surface. Make sure to remove
all packaging materials from the embroidery machine.
• Adjust the height of the base feet by rotating the adjusting nuts (1) clockwise or counter clockwise.
Once desired height has been achieved, lock the
base feet by tightening the lock nut (2).
Make sure all feet have the same height.
• Adjust the length of the display arm, by
loosening the adjusting knobs (3).
• Tilt the display by loosening the panel adjusting
knob (4), then tighten it again to hold the panel
in place.
PREPARATION
2
1
3
4

12 – PREPARATIONS
THREAD STAND ASSEMBLY
Assemble the thread rack by inserting a spool pin
in each hole. Put a sponge cushion onto each spool
pin. If needed, put a plastic thread reel onto each
spool pin. The plastic thread reels are used to help
keep the thread spool in place as the machine runs
and/or when using larger spools.
ATTACHING THE THREAD
STAND TO THE MACHINE
1. Loosen the lower screws (A) on the thread stand
columns.
Lift off the thread stand.
2. Remove the lower lock nuts (B) on the thread
stand columns.
Place the thread rack onto the thread stand
columns.
Replace and tighten the lower lock nuts (B) to
the thread stand columns.
If needed, also tighten the upper lock nuts (C).
3. Put the assembled thread stand back onto the
machine.
Tighten the lower screws (A) on the thread
stand columns to secure the thread rack.
Loosen the upper screws (D) on the thread
stand columns to adjust the height of the thread
stand columns.
1
2
3
A
B
C
D

PREPARATIONS – 13
GETTING STARTED
To prevent injury, keep hands and other objects
away from the needle bar rack.
• The main power switch is located on the back of
the embroidery machine.
• The “O” icon (1) turns the embroidery machine
OFF.
• The “I” icon (2) turns the embroidery machine
ON.
• Once the embroidery machine is turned on, the
needle bar rack will automatically move to the
position of needle bar 5.
TURNING ON
• Insert the power cord into the back of the
embroidery machine (3).
• Connect power supply cord to an electrical
outlet.
A surge protector is highly recommended.
• Move the main power switch on to “I.”
The needle bar rack will automatically move
to the position of needle bar #5 and the Color
Touch Screen will turn on.
TURNING OFF
To prevent injury, make sure embroidery machine
is turned off when not in use.
In the case of a power outage, while the embroidery
machine is in use, perform steps one (1) and two (2)
identied below.
1. Move the main power switch to “O.”
2. Disconnect the power supply cord from the
electrical outlet.
3. Disconnect the power supply cord from the
embroidery machine.
12 3

14 – PREPARATIONS
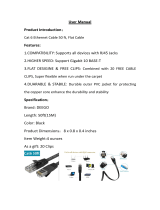
ELECTRONIC BOBBIN WINDER
Among the accessories, you nd the electronic bobbin winder. This device is commonly used in home and
commercial embroidery to wind bottom thread, also known as bobbin thread.
SPECIFICATIONS
Packing size Product size Voltage Net weight Gross weight
355 X 90 X 115 mm 225 X 80 X 215 mm AC90~240 490 G 540 G
1. Bobbin thread/Spool pin
2. Thread guide
3. Thread tension guide
4. Adjusting bolt - adjusts the height of the tension
unit
5. Thread tension knob - adjusts thread tension
6. Indicator light;
green - working mode
red - power on
7. Winding motor
8. Thread amount adjuster - loosen the screw
and move to determine the amount of thread
wounded to the spool
9. Detection sensor - detects when bobbin is full
10. Main motor - controls the system carrier
11. Thread cutter
12. Start button - start winding
13. Stop button - stop manually
BOBBIN WINDER OVERVIEW
1
2
4
56
7
9
10 11 12 13
8
3

PREPARATIONS – 15
ASSEMBLING THE BOBBIN WINDER
Inspect the package and device for any damages. If
there are no damages, install the main engine to the
bottom plate, with the two screws (1).
Attach the thread guide (2) and the spool pin (3) as
illustrated.
WINDING THE BOBBIN
• Place the bobbin thread spool on the spool pin
(1).Guide the thread through the thread guide
(2), and through the hole in the tension thread
guide (3).
• Place the thread between the thread tension
discs under the thread tension knob.(4).
• Place a bobbin on the winding motor (5) and
wind a few turns of thread clockwise around it.
Touch the “Start” button to start winding. The
winding motor stops automatically when the
bobbin is full.
2
1
3
1
2
4
5 3

16 – PREPARATIONS
BOBBIN OVERVIEW
1. Bobbin
2. Tension spring
3. Opening
4. Bobbin case
5. Bobbin case release latch
6. Thread guide/Pig tail
• An “L” size/style bobbin must be used for your
embroidery machine.
• The bobbin case can be found in the tool box.
• Remove the foam piece in the rotary hook before
use.
• The embroidery machine will not indicate
remaining quantity of bobbin thread. Before
starting your embroidery, make sure sufcient
bobbin thread for the embroidery design.
• If the bobbin runs out of thread, the embroidery
machine will display a thread break (“T-break”)
notication. See the Thread break section for
more information.
• On average, bobbins usually last for about
35,000 to 42,000 stitches depending on the stitch
length of your design.
• Clean the bobbin case when replacing the
bobbin.
• Open the needle plate and clean the trimming
set area weekly.
• Wind self-wound bobbins or buy pre-wound
commercial bobbins in disposable cartridges.
• For a high speed, commercial embroidery
machine, a smooth and consistent release
of thread is required for proper function.
Commercial pre-wound bobbins are economical
and they run smoothly. It is better to run a
polyester bobbin, than a cotton bobbin because
it leaves less lint.
PLACING THE BOBBIN IN
THE BOBBIN CASE
Inserting your bobbin correctly will help your
embroidery machine run smoothly.
An issue with the bobbin thread affects all needle
bars.
• Hold the bobbin with the thread in the clockwise
direction (1).
• Insert the bobbin into the bobbin case (2).
• Pass the thread through the opening slit (3).
• Pull the bobbin thread under the tension arm
and exit the notch at the other end (4).
• Turn the bobbin over, and pull on the thread.
Make sure the bobbin rotates in a clockwise
direction.
• Wrap the thread around the pigtail twice (5).
1
4
3
2
6
1
4
2
5
3
5

PREPARATIONS – 17
INSERTING THE BOBBIN CASE INTO
THE ROTARY HOOK
Note: When inserting the bobbin case into the rotary
hook, make sure the thread tail is no longer than 3
inches (7 cm). A longer tail can wrap around the shaft
and create a buildup of thread. If the thread is not long
enough, the needle will be unable to grab it.
• Hold the bobbin case by the bobbin case release
latch with the pigtail facing up.
• Insert the bobbin case into the rotary hook
by aligning bobbin case with the rotary hook
groove (1).
• Push in the bobbin case slightly and make sure
the bobbin case clicks into place.
• Close the bobbin housing unit.
REMOVING THE BOBBIN
1. Open the bobbin housing unit.
2. Identify the thread hook. If thread hook is not
forward, then pull it forward.
Note: Do not pull thread hook beyond its capacity. It only
moves to a certain extent.
3. Grab the bobbin case by the bobbin case release
latch.
4. Gently remove the bobbin case from the
machine.
5. Remove the empty or nearly empty bobbin from
the bobbin case and discard or rewind.
1

18 – PREPARATIONS
THREADING THE TOP THREADS
To complete top threading, please follow the threading instructions carefully. Incorrect threading may
cause thread or needle breakage. The threading paths are numbered from 1-10, they can be threaded in any
order, but must follow it’s own threading path. The example below illustrates threading path #10.
Note: A pair of tweezers might be a good help when threading the machine.
1
5
2
7
9
10
11
8
17
4
6
3
12
13
15
14
16
4-7
8
14-17
1-3
9
1012-13

PREPARATIONS – 19
THREADING THE THREAD RACK
• Place a thread spool on the spool pin at the rear
right. Pull out some thread.
• Pass the thread through the bottom eyelet of the
rear metal rack (1).
• Proceed to pull the thread through the vertical
eyelet (2).
• Pass the thread through the corresponding
eyelet of the front metal rack (3).
• Feed the thread through the eyelet of the upper
tension knob (4).
Pass the thread (from right to left) in between
the tension plates (5).
• Hold the upper end of the thread guide tube (6),
and carfully remove it, by pulling it upwards
and then out.
Repeat with the other end of the tube.
• Take the threading tool, and insert it completely
into the thread guide tube. Hook the thread
around the threading tool (7).
• Carefully pull the threading tool (and thread)
back through the tube (7).
Unhook the thread.
Snap the plastic tube ends back into place.
Pull the thread out of the tube (enough thread
to be able to continue threading down the entire
thread path down to the presser foot).
THREADING THE TOP OF THE MACHINE
• Guide the thread from right to left under the
upper thread tension clip (8).
On the machine cover, there are arrows guiding you
through the correct threading path.
• Thread around the thread guide as indicated by
the arrows.
• Turn the thread 1,5 turns around the lower
thread tension knob (9).
• Thread around the thread guide as indicated by
the arrows.
• Guide the thread from left to right under the
lower thread tension clip (10).
Note: For spool 1-5, thread from right to left, For
spool 6-10, thread from left-right.
THREADING THE NEEDLE BAR FRAME
• Pass the thread over the upper thread course
(11).
• Pass the thread down through the right path of
the threading slot (12). Pull the thread around
the bottom of the divider and bring the thread
up again.
• Pass the thread through the eye of the take-up
lever from right to left (13), and then down
through the slot again.
THREADING THE NEEDLE
• Lead the thread through the eylet in the needle
bar (14).
• Pass the thread behind the thread hook from
right to left (15).
• Thread the needle from front to back and then
through the hole in the presser foot (16).
• Pull the thread up and around the thread cutter
(17), from the left to the right.

20 – PREPARATIONS
FAST THREADING OF THE TOP THREAD
You can quickly replace a thread spool by tying
the old thread to the new thread. Follow the steps
below to correctly replace a spool.
1. Clip the thread from the spool you would like
to replace. Clip the thread right above the spool,
making sure the thread is still in the thread path.
2. Remove the old spool and place the new thread
spool on the spool pin.
3. Securely tie the new thread to the previous
thread. Use a knot that will pull easily through
the needle’s eye. The best knots are the square
knot and the weaver’s knot.
4. Grab the thread under the presser foot, and pull
the new thread all the way through the needle.
5. If the knot does not make it through the needle
eye, cut off the knot and re-thread the needle.
/