Page is loading ...

Q700
Wireless Intercom System
Owner’s Manual
(revision 3.41 - August 1, 2001)

Q700 2
Quick Setup
Some info about reading the detail section
found later in the manual (indexing this sec-
tion would be helpful!)
Quick Setup Procedure
1. Attach the two wire whip
antennas to the BNC
connectors on the back panel
of the MS-700 master station.
2. Install the power cord and plug
it into the AC source. Turn on
the MS-700 with the front
panel power switch.
3. Insert fresh batteries into the
BP-700 bodypacks and turn
them "on" via the power switch
on the main volume control.
The power indicator near this
control should illuminate briefly.
4. Plug a compatible headset into
each BP-700.
5. Make certain that the
operating frequency ranges of
the MS-700 and BP-700 match.
If there is any question, look at
the frequency labels on the
bottom of the MS-700 and
inside the battery compartment
of the BP-700’s.
6. Verify that the frequency
ranges and specific frequencies
programmed into the MS-700
and BP-700’s are those
authorized for the location. If
you are not certain that the
currently-programmed
frequencies are correct, verify
each of them using the
procedure on page 7.
7. Move the BP-700 beltpacks at
least 6 feet (2 M) away from
the MS-700 and separate them
from each other by at least 10
inches (40 cm). Momentarily
depress the “A” pushbutton.
8. Observe the "RF" LED's on the
receiver section of the front
panel of the MS-700. The LED
corresponding to each active
BP-700 should be illuminated.
If not, recheck that the BP-700
is turned on and that the
frequencies are correct.
9. In turn, momentarily depress
the "B" and "C" pushbuttons
on each BP-700. The
corresponding receiver "mode"
LED's on the MS-700 should
illuminate red for pushbutton
"B", green for "C" and orange
for “D”.
10. Depress the "on" pushbutton
on the front panel of the
MS-700 for each active receiver
channel. The adjacent LED
should illuminate to indicate
that the channel is selected.
11. Speak into the headset
microphone for each BP-700
while alternately pressing and
releasing pushbutton "A" on
the unit. You should be able to
hear your voice in the headset
earpiece in one position or the
other. If not, the headset
microphone type may be set
incorrectly. See page 8 for
programming a BP-700 for
dynamic or electret
microphones.
Note: Whether audio is present
when the pushbutton is
pressed or when it is released
depends upon the programmed
operating mode of the BP-700.
See page 8 for details.

Q700 3
Quick Setup (continued)
12. While speaking into each of the
BP-700 headset mics, select the
corresponding monitor "
MON"
switch on the MS-700 front
panel. Observe the bar-graph
LED's on the left side of the
MS-700 front panel. The "-2"
LED should illuminate often on
voice peaks, but the "+3" LED
should illuminate only rarely.
13. If necessary, adjust the
microphone gain for the
BP-700 via the screwdriver
adjustment access hole on the
side of the unit closest to the
"D" pushbutton. This is the top
adjustment to the right of the
XLR connector and to the left
of the "D" pushbutton.
14. If applicable, connect the wired
intercom system to the rear
panel of the MS-700. Two
intercom channels can be
accommodated at the same
time. For standard Clear-Com
intercom lines, connect line one
to the IC1/IC2 XLR connector,
and line two to the IC2
connector. For "TW" and RTS
systems, both channels are on
the same connector, which
should be plugged into
"IC1/IC2".
15. Select "Clear-Com" on the rear
panel (Clear-Com – TW/RTS
pushbutton "in") for standard
Clear-Com lines, or "TW/RTS"
for Clear-Com two-wire or RTS
intercom lines (pushbutton
"out").
16. On the MS-700 front panel,
select one or both intercom
channels via the "on"
pushbuttons in the intercom
area on the panel. The
incoming signal can be
monitored by selecting the
appropriate monitor "
MON"
pushbutton and observing the
bar-graph LED's as described
above.
17. Adjust the intercom input and
output levels for the intercom
lines as necessary with the
front panel "in" and "out"
trimmers. If the "null" control
requires adjustment, see
page 14 “Operational Features.”
18. If applicable, connect balanced
line-level program audio or IFB
audio to the "PROG" XLR
connector on the MS-700 rear
panel. Monitor and adjust level
with the corresponding
controls on the front panel of
the unit.
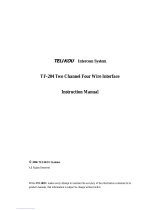
Tx mic gain
adjustment
Rx squelch
sensitivity

Q700 4
Table of Contents
Quick Setup . . . . . . . . . . . . . . . . . . . . . . .2
MS-700 Controls and Indicators . . . . . .5
Front Panel . . . . . . . . . . . . . . . . . . . . .5
Rear Panel . . . . . . . . . . . . . . . . . . . . . .6
Programming System Frequencies . . . . .7
via Front Panel Controls . . . . . . . . . . .7
via QPK-1 Kit and Software . . . . . . . .8
Programming Beltpack Frequencies . . . .9
Locking the MS-700 Control Panel . . . .9
Changing the Software Password . . . . . .9
Programming Beltpack Mode . . . . . . . .10
via Panel/Pushbuttons . . . . . . . . . . .10
via QPK-1 Kit and Software . . . . . . .12
Beltpack Batteries . . . . . . . . . . . . . . . . .13
Battery Information . . . . . . . . . . . . .13
Installing Batteries . . . . . . . . . . . . . .13
System Operation and Features . . . . . .14
System Operation . . . . . . . . . . . . . . .14
Operational Features . . . . . . . . . . . .14
BP-700 Headset Compatibility . . . . .15
Specifications . . . . . . . . . . . . . . . . . . . .16
A word to Vega Users
In selecting a Vega intercom system, you
are assured of the highest quality and
performance. Vega has been the leader
in wireless intercom systems for well
over a decade. This experience insures
you of a Vega Intercom System of
quality, performance and reliability.
Unpacking
Verify the number of boxes shown
“as shipped” and that all have been
received in good condition. Unpack your
equipment, saving all cartons for
storage or reshipping. If, for any reason,
you do not find the equipment to be
completely satisfactory, please
immediately contact your Vega dealer or
the Vega factory.
Should service ever be required,
remember your authorized Vega service
dealer knows your equipment best. they
have the training and test equipment
necessary to restore your equipment to
its’ peak performance.
And of course, please feel free to
contact either your authorized Vega
dealer or the Vega factory for
information or assistance at any time.

Q700 5
MS-700 Controls and Indicators
Summary: This section gives a brief overview
of the controls and indicators of the MS-700
as found on the front and rear control panels.
Front Panel Controls
and Connectors
Monitor Volume Control
– Adjusts the
volume of the headset monitor output.
Used for aural monitoring of the output
for: internal receivers, intercom input,
program audio input, or transmitter audio
signal as selected by one of the 10 monitor
("
MON
") pushbuttons. Any combination of
these ten "
MON
" button functions can be
simultaneously monitored. If additional
MS-700’s are connected via the rear panel
‘monitor cascade’ (“
MON CAS IN
” and “
MON CAS
OUT
”), any combination of the ten monitor
("
MON
") button functions on any or all of
the MS-700’s can be monitored.
Monitor Output
– Stereo 1/4" (6.35 mm)
headset jack. Use only with stereo-wired
headsets (25 ohm minimum impedance per
side); connection of mono-wired headsets
will short one side of the audio and cause
distortion.
Monitor Bar-graph
– Five segment LED
bar-graph display, dB scaled, designated +3
dB (overload), -2 dB (normal peak), -7 dB
(high normal), -12 dB (normal), -24 dB
(active, low).
Receivers Controls
and Indicators
(identical for all six)
RF LED
– Indicates that the associated
receiver channel is receiving a valid RF signal,
including the tone squelch/data subcarrier.
MODE LED
–
• When off (when RF LED is on)
indicates that the associated BP-
700 beltpack is sending the "mode
A" command (see below).
• When red, indicates that the
associated BP-700 beltpack is
sending the "mode B" command.
• When green, indicates that the
associated BP-700 beltpack is
sending the "mode C" command.
• When orange, indicates that the
associated BP-700 beltpack is
sending the "mode D" command.
BATT LED
– When illuminated, indicates
that the battery in the associated beltpack
is low. When this indicator first illuminates,
approximately 30 minutes of useful battery
life remains.
ON
- When selected (as indicated by the
associated LED), enables the receiver audio
and routes it to the other audio circuitry in
the MS-700.
MON
– When selected (as indicated by the
associated LED), routes a sample of the
receiver audio to the monitor amplifier and
bar-graph. The audio may be monitored
whether on not it is selected (ON).
LVL Control
– Trims the level from the
receiver channel to accommodate soft or
loud speakers. Limited adjustment range.
SQ Control
– Adjusts the signal level
squelch circuitry in the associated receiver.
Clockwise rotation will set the receiver such
that a stronger signal is required to open
the squelch gate in the receiver. The
squelch adjust control does not affect the
tone coded squelch function.
IC Controls and Indicators
(identical for two intercom interfaces)
PWR
– Indicates that the associated
intercom line is powered. For Clear-Com
lines, the LED's are independent and show
status for each line individually. For the TW
mode, both LED's will illuminate if the two-
wire line has power on channel 2.
ON LED
– Enables the associated intercom
channel in the same manner as for the
receiver channels.
MON LED
– Operates in the same manner
as the receiver monitor (“
MON
”) switches.
IN Control
– Trims the audio level coming
from the wired intercom system (when ON).
OUT Control
– Trims the audio level from
the MS-700 to the wired intercom system
NULL Control
– For Clear-Com and TW
intercom interfaces, adjusts the different line
impedances to control the sidetone level.
PROG MON
– Enables the monitor
function for the incoming program or IFB
audio.
PROG IN
– Adjusts the level of incoming
program/IFB audio.
PROG TX MON
– Monitors the audio
input to the master station transmitter
main audio channel.
Frequency Programming
Controls
(Behind front panel door,
see detail drawing)
Function Select Switch
–
Selects the transmitter or
receiver to be programmed,
as follows:
• Position "0" – Accepts external
programming input via the 2.5 mm
connector.
• Position "1" – Programs receiver #1
frequency.
• Positions "2" through 6" – Programs
receiver #2 through #6 respectively.
• Position "7" – Programs the master
station transmitter frequency.
• Position "8" – With beltpack
connected via 2.5mm connector,
programs the beltpack receiver
frequency.
• Position "9" – With beltpack
connected, programs the beltpack
transmit frequency.

Q700 6
MS-700 Controls and Indicators (continued)
Digital Frequency Switches - (four)
use to program channel frequencies.
• Use the four digital switches to set
frequencies for either receiver or
transmit frequencies.
• 1200 frequencies available: “0001 -
1200.” Example: To set a frequency
to “500,” set switches to “0500.”
• Frequency channel settings
dialed-in above “1200” will not be
programmed. Example: “2578” will
not program.
Program Pushbutton
– Programs the
receiver or transmitter selected by the
function switch. When pushed, the
"program" red LED will flash followed by
the “verify” green LED flash to signify
correct programming of the associated
device.
Verify Pushbutton
– When pushed,
verifies that the receiver or transmitter
selected by the function switch is
programmed to the channel selected by the
digits switches. If so, the “verify” green LED
will flash. If not, there will be no response.
In either case, the programming of the
associated device is not changed.
Rear Panel Controls
and Connectors
This section gives a brief overview of each of
the controls and indicators of the MS-700 as
found on the rear panel.
TX Antenna Connector – BNC antenna
connector. Designed for 50 ohm
impedance. See table for quarterwave-
length required for different splits.
OFF-LO-HI (Transmitter Power)
Switch – In the OFF position, disables
the internal transmitter. In the LO
position, enables the transmitter and
sets power output to the LO or "normal"
value (nominally 50 mw). In the HI
position, sets power output to 250 mW
maximum.
Clear-Com/TW Switch - In the
depressed position, configures the two
intercom interfaces to be compatible
with the Clear-Com standard. In this
mode, intercom channel #1 is
connected to the IC1/IC2 XLR connector
(beneath the "TW INTERCOM" desig-
nation) and intercom channel #2 is
connected to the adjacent IC2 XLR
connector. In the "TW/RTS" mode
(pushbutton "out"), both intercom
inputs are via the IC1/IC2 connector.
TW INTERCOM Connectors – See
above.
4 W INTERCOM Connectors –
Four-pin XLR connectors for balanced
"four-wire" interface to the MS-700 for
intercom channels #1 and #2. These
interfaces are active at the same time as
the "TW" connectors and either or both
may be used simultaneously.
PROGRAM IN Connector – Standard
3-pin XLR connector for balanced line-
level program audio or IFB input.
AUX OUT Connector – Standard 3-pin
XLR connector for balanced line-level
auxiliary audio output.
AUX RELAY Connector – Standard
9-pin "D" connector with the normally
open auxiliary relay contacts.
MONITOR OUT Connector - 1/4" (6.35
mm) stereo phone jack with balanced
line-level "monitor" output. This is a
fixed level summed signal consisting of
all currently-selected monitor sources.
MON CAS IN - This is a 1/4" (6.35 mm)
stereo phone jack that accepts a
summed monitor cascade input from
other MS-700 master stations, allowing
monitoring of multiple systems with one
headset and volume control.
MONITOR CAS OUT - This is a 1/4"
(6.35 mm) stereo phone jack that sends
a summed monitor cascade output to
other MS-700 master stations.
RX Antenna Connector - BNC antenna
connector. Designed for 50 ohm
impedance. See table for quarterwave-
length required for different splits.

Q700 7
Programming System Frequencies
Summary: This section describes the proce-
dure for programming frequencies from the
master station control panel.
System Frequency Info
The Q700 is shipped from the factory on
default receiving and transmitting
frequencies (center of the split). In order
to operate the system, these frequencies
must be reset to those authorized for
the location where the system will be
used. This may be accomplished via the
front panel controls on the MS-700
master station, or via a computer with
the optional QPK-1 programming kit. In
most cases, the frequencies of the Q700
will seldom be changed, and
programming from the front panel of
the MS-700 will be more than adequate.
All frequencies in the Q700 are based
upon fixed frequency ranges, with the
actual frequencies being determined by
the starting frequency of the particular
range, plus the channel number (0001
to 1200) multiplied by 0.025 MHz. For
the US and Canada, the available
frequency ranges are as follows:
470 – 500 MHz
500 – 530 MHz
530 – 560 MHz
560 – 590 MHz
590 - 620 MHz
620 – 650 MHz
650 – 680 MHz
680 – 710 MHz
710 – 740 MHz
Other frequency ranges will be
available for international use; consult
the Vega factory for more information.
Please also note that the operating
frequency range of each transmitter
and receiver is set at time of
manufacturing, and it is impractical to
change this range at a later date.
The operating ranges for a system are
printed on the FCC labels on the master
station and the beltpacks.
Important: In a particular system, the
receive and transmit ranges must be
separated by one range. For example, if
the base transmitter operates in the 590
to 620 MHz range, the base receivers
may not operate in the 560 – 590 or
620 – 650 MHz ranges. In this case, the
receivers can operate in the ranges from
650 to 740 MHz. All master station
receiving frequencies must be in the
same range.
To program a specific frequency, first
make certain that the desired
frequencies are within the operating
range of the unit. Then subtract the
lower band limit frequency from the
desired frequency. When this difference
is divided by .025 MHz, the channel
number is obtained.
For example, assume that the desired
frequency is 674.775 MHz. Since the
start of this band is 650.000 MHz, the
arithmetic is:
Therefore, the channel number is
"991", and this should be entered into
the front panel digit select switches as
"0991".
Programming System
Frequencies using the Front
Panel Controls
A 2.5 mm miniature stereo cable is
included with the MS-700 and is
required in order to program the BP-700
beltpacks (replacement cables may be
purchased at an electronics store).
To program one of the master station
receivers or the master station
transmitter, set the function select
switch to the correct position. For
example, set the function switch to "3"
to program receiver number “3”, or "7"
to program the master station
transmitter. Then set the channel digit
select switches to the correct value,
such as "0991" in the above example.
Then momentarily press the "program"
674.775
-650.000
= 24.775
24.775 / .025 = 991
pushbutton. If programming was
successful, the "program" red LED will
flash briefly followed by the “verify”
green LED flash to indicate successful
completion. Once programmed, the
frequency will be stored internally and
the unit will go to this frequency each
time the master station is turned "on".
Frequencies may also be verified via
the front panel controls without
reprogramming the existing frequencies.
Set the function select switch to the
receiver or transmitter whose frequency
is to be verified, and the digit select
switch to the channel number
corresponding to the desired frequency.
Depress the "verify" pushbutton on the
MS-700 front panel. If the programmed
channel number matches the channel
number stored in the receiver or
transmitter, the "verify" green LED will
flash. If no LED flash is observed, then
the channel numbers do not match.
To program the beltpacks, make
certain that they are turned "on" and
have good batteries. Then plug one end
of the 2.5 mm cable into the 2.5 mm
connector on the front panel of the
MS-700 and plug the other end into the
2.5 mm connector on the first beltpack.
Set the function select switch to "8"
to program the beltpack receiver, or "9"
to program the beltpack transmitter. Set
the channel switches in the same
manner as for the master station and
push the "program" pushbutton to set
the operating frequency of the beltpack
transmitter or receiver. Program both
frequencies, then proceed in the same
manner for the other beltpacks.
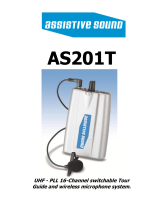
470 - 500
14 - 18
470.025
470.050
470.075
~
499.050
499.075
500.000
500.025
500.050
500.075
~
529.050
529.075
530.000
530.025
530.050
530.075
~
559.050
559.075
560.000
560.025
560.050
560.075
~
589.050
589.075
590.000
590.025
590.050
590.075
~
619.050
619.075
620.000
620.025
620.050
620.075
~
649.050
649.075
650.000
650.025
650.050
650.075
~
679.050
679.075
680.000
680.025
680.050
680.075
~
709.050
709.075
710.000
710.025
710.050
710.075
~
739.050
739.075
740.000
4
Freq, MHz
UHF T.V. Channels
0001
0002
0003
~
1198
1199
1200
Q700 Split #
Q700
Channel
Numbers
500 - 530
19 - 23
5
530 - 560
24 - 28
6
560 - 590
29 - 33
7
North American Frequency Range Chart for the Q700 Intercom
590 - 620
34 - 38
8
620 - 650
39 - 43
9
650 - 680
44 - 48
10
680 - 710
49 - 53
11
710 - 740
54 - 58
12

Q700 8
Programming System Frequencies (continued)
Programming System
Frequencies using the
QPK-1 Kit & Software
With the QPK-1 Kit, complete frequency
management via the laptop is available.
Operating frequencies may be set, read
from a system and stored as a disk file,
or read from a file into the Q700 system.
The QPK-1 Kit consists of an interface
unit and software. The QPK-1 interface
connects to the serial port of the
computer and then to the MS-700
master station or BP-700 beltpack via a
standard 2.5 mm miniature stereo cable.
Software for Windows™ 95 or 98, and
Windows™ NT 4.0 or 2000 is included.
Connecting the QPK-1
Interface
Turn everything on and connect the
QPK-1 interface unit.
1. Connect the serial cable to the
QPK-1 and to Com Port 1 (default)
or Com Port 2 on your computer.
(These instructions assume the
programming software has already
been installed on your computer. If it
is not, please see the separate
loading instructions included with
the software disk.)
2. Plug in and turn on the MS-700
master station.
3. Plug the 2.5 mm stereo cable
between the QPK-1 interface and
the MS-700 master station (the
jack is located behind the access
door on the MS-700 front panel).
4. Turn on the QPK-1 interface using
the small toggle switch on back.
5. Turn on all beltpacks which require
programming (be sure the beltpacks
have fresh batteries).
6. Start up the Q700 Application Tools
software on your computer.
If an error message “Error reading
MS-700 data” occurs, first confirm
power to both units is on and check
all connections. If you connected the
serial cable to Com Port 2, go to
“Com Port” in the menu bar and
select Com Port 2.
Master Station Frequency Setup
• Click “Master Station” in the menu
bar to bring up the Master Station
Frequency Setup screen. The screen
displays the preset frequency
ranges and current user-definable
frequencies of both the transmitter
and receivers in the MS-700. It also
lists the beltpack frequencies and
user names, and has buttons which
allow easy programming of the
beltpacks (see page 9).
Programming the Transmitter
Frequency in the MS-700.
1. To change the transmitter
frequency, enter a channel number
or frequency within the range
indicated (entries must be made
within 0.025 MHz increments, and
will default to the closes 25 KHz
increment if entered incorrectly).
2. Click the “Program” button to
program the MS-700. When
prompted, enter your password*
and click “Yes” to store the new
settings.
(*If this is the first time you are using
the software, enter the default
password “bhappy” (all lower case).
Passwords may be changed by
choosing “Change Passwords” from
“File” in the menu bar.) see page 9.
Programming the Receiver
Frequencies in the MS-700.
1. Enter the desired channel number
or frequency in MHz (within the
preset range indicated) for each of
the six receivers in the MS-700
master station. You may also enter
a “User” name for each of the
corresponding beltpacks.
Note: When selecting beltpack
frequencies, allow at least 400 KHz
(0.400 MHz) between beltpacks for
best performance.
2. Click the “Program” button to
program the MS-700. When
prompted, enter your password*
and click “Yes” to store the new
settings.
(*see page 9 for password info)

Q700 9
Programming System Frequencies (continued)
Programming the BP-700
beltpack frequencies.
The preferred method for
programming beltpack frequencies
is from within the Master Station
Frequency Setup screen; it is faster
and ensures proper matching with
the master station.
1. Turn on the BP-700 beltpack to be
programmed (be sure a fresh set of
batteries in installed).
2. Plug the 2.5 mm cable from the
QPK-1 interface into the jack on
the side of the BP-700 beltpack
(see page 8 for connection info).
3. Click the program button (BP-1
through BP-6) which corresponds to
the beltpack you want to program,
and click “OK” at the prompt, then
click “Yes” at the following prompt
to store the settings in the BP-700.
4. Important: In order to apply the
program changes, the BP-700
beltpack power switch MUST be
cycled “off” and the “on” again.
5. Press the “Back” button to return to
the master station window.
If error message “Error reading BP-
700 data” or “Beltpack contains
invalid data” occurs, confirm power
to both units is on and check all
connections.
6. To program another BP-700
beltpack, repeat steps 1 - 5 for each
corresponding beltpack.
Locking the Master Station
Control Panel.
The Q700 application software allows
you to lock the front panel switches on
the MS-700 master station, thereby
preventing changes to frequency and
channel settings until the software is
used to make changes or unlock the
switches. The ‘Lock Controls’ feature is
found on the Master Station Frequency
Controls screen.
• To lock the front panel controls,
press the “Lock Controls” button.
Enter your password* and confirm
at the following screen.
(*The default password for the Lock
Controls feature is “bcareful” (all
lower case). Passwords may be
changed by choosing “Change
Passwords” from “File” in the menu
bar.)
Changing the
default passwords
The Q700 application software has
individual passwords for
programming the master station
frequencies, configuring the beltpack
and locking the front panel controls.
The default passwords are the
following, entered in lower case:
“bhappy” = program settings
“bcertain” = configuring the
beltpack operating
mode
“bcareful” = locking the front
panel controls
To change the default passwords,
choose “change passwords” under
File menu in the menu bar, then
select the specific password you
wish to change. Enter the default
password (or your existing one), and
follow the prompts to complete the
change.

Q700 10
Programming the Beltpack Operating Mode
Summary: Pages 10 and 11 give instructions
on programming the BP-700 operating mode
via the beltpack buttons.
Programming the
BP-700 Beltpack
Operating Mode
The BP-700 has several functions that
can be programmed from its control
panel via the four pushbuttons:
1. Dynamic or electret microphone.
2. Pushbutton modes (each
individually): Push-to-talk (PTT),
Push-to-mute, Push-to-enable.
3. Button action (each individually):
Momentary, alternate action,
click-latch.
4. Return to default configuration.
Several advanced functions can only
be programmed via the optional QPK-1
Programming kit. They include:
1. Default configuration.
2. Pushbutton disable (no action taken).
3. Pushbutton assignment/
reassignment
("A" = "B", "B" = "A", etc.).
4. Pushbutton duplication
("A" or "B" = "A", ALL = "B", etc.).
See page 12 for programming the
beltpack mode via the QPK-1 kit.
Programming the Operating
Mode via the Pushbuttons.
Push and hold both "A" and "D"
pushbuttons for more than 7
seconds to enter the programming
mode: (Level 1)
• The beltpack transmitter will be
inhibited during programming.
• All four LED's will rapidly flash
three times to indicate that the
unit is now in programming mode,
then all LED's will go off.
• If no button is pushed for 10
seconds, the LED's will flash three
times once again.
• This is repeated every 10 seconds
until a button is pushed or 60
seconds has elapsed.
• If no button is pushed within 60
seconds, the beltpack will exit the
programming mode.
• The programming mode can be
exited at any time by again holding
down "A" and "D" for more than 7
seconds.
Simultaneously push both "A" and
"B" for more than 2 seconds to enter
microphone-type programming
mode. (Level 2)
• "A" and "B" LED's will go on
continuously.
• Push "C" for electret mic, "C" LED goes
on continuously, "D" LED will go off.
• Push "D" for dynamic mic, "D" LED
goes on continuously, "C" LED will
go off.
• Simultaneously push both "A" and
"B" for more than 2 seconds to exit
mic type programming.
• All 4 LED's will flash three times to
indicate that you are back in the top
level programming mode. (Level 1)
• If no button is pushed for 10
seconds, the LED's will flash three
times once again.
• This is repeated every 10 seconds
until a button is pushed or 60
seconds has elapsed.
• If no button is pushed within 60
seconds, the beltpack will exit the
programming mode.
Simultaneously push both "A" and
"C" for more than two seconds to
enter button mode programming:
(Level 2)
• "A" and "C" will flash twice, then all
LED's will go off for 2 seconds.
• Each of the four LED's will then
display the current mode for the
associated pushbutton, as described
below.
• Push "A" once for the PTT mode,
the "A" LED goes on continuously.
• Push "A" again for the push-to-
mute (PTM) mode, "A" LED will flash
continuously at a fast rate
(noticeably faster that the rate of
the triple flash when entering the
programming mode).
• Push "A" a third time for the push-
to-enable (PTE) mode, "A" LED will
flash continuously at a slow rate
(noticeably slower than the triple
flash rate).
• "B", "C" and "D" are programmed in
same manner.
• All four LED's indicate the current
mode of the associated pushbutton
by being on continuously, fast
flashing or slow flashing, as
programmed.
• Simultaneously push and hold "A"
and "C" for more than 2 seconds to
exit button action programming.
• All 4 LED's will flash three times to
indicate that you are back in the
top level programming mode.
(Level 1)
• If no button is pushed for 10
seconds, the LED's will flash three
times once again.
• This is repeated every 10 seconds
until a button is pushed or 60
seconds has elapsed.
• If no button is pushed within 60
seconds, the beltpack will exit the
programming mode.
Simultaneously push "B" and "C" for
more than two seconds to enter the
button action programming mode.
(Level 2)
• "B" and "C" flash twice, then all
LED's will go off for 2 seconds.
• Each of the four LED's will then
display the current mode for the
associated pushbutton, as such:
• Push "A" once for the momentary
mode, the "A" LED will go on
continuously.
• Push "A" again for the alternate
action mode, the "A" LED will
flash continuously at a fast rate.
• Push "A" a third time for the
click-latch mode, the "A" LED
will flash continuously at a slow
rate.

Q700 11
Programming the Beltpack Operating Mode (continued)
• "B", "C" and "D" are programmed
in same manner. All four LED's
will indicate their current mode
by being on continuously, fast
flashing or slow flashing as
programmed.
• Simultaneously push and hold "B"
and "C" for more than two seconds
to exit the button action
programming.
• If no button is pushed for 10
seconds, the LED's will flash three
times once again.
• This is repeated every 10 seconds
until a button is pushed or 60
seconds has elapsed.
• If no button is pushed within 60
seconds, the beltpack will exit the
programming mode.
Simultaneously push "C" and "D" for
more than 7 seconds to restore
defaults. (Level 2)
• The "C" and "D" LED's will flash
alternately for 3 seconds to
indicate restoration of the preset
defaults.
• After a pause, all four LED's will
triple flash to indicate return to top
level programming mode. (Level 1)
• If no button is pushed for 10
seconds, the LED's will flash three
times once again.
• This is repeated every 10 seconds
until a button is pushed or 60
seconds has elapsed.
• If no button is pushed within 60
seconds, the beltpack will exit the
programming mode.
Push and hold "A" and "D" for more
than 7 seconds to exit programming
mode. (Back to operational level)
• At the operational level when
beltpacks are first turned on, or
when leaving the programming
mode, the following occurs:
• The LED's do not flash.
• The beltpack will go to the
standby condition.
• All pushbuttons will be in the
inactive or deselected mode.
• There will be no transmission in
the PTT mode.
• There will be no transmission in
the PTM or PTE modes.
• At this point, you must push one of
the beltpack buttons to activate
unit, and to begin normal operation.

Q700 12
Programming the Beltpack Operating Mode (continued)
Programming the
Beltpack Operating
Mode via the QPK-1
Kit and Software.
The QPK-1 consists of an interface unit
and software, and allows programming
the beltpack with the following
advanced functions (in addition to the
basic mode functions described earlier):
1. Default Configuration
2. Pushbutton disable (no action
taken).
3. Pushbutton assignment/
reassignment
("A" = "B", "B" = "A", etc.).
4. Pushbutton duplication
("A" or "B" = "A", ALL = "B", etc.).
The software also allows the user to
assign descriptive names to the
individual beltpacks and graphically set
BP-700 configurations via check boxes.
Connecting the QPK-1
Turn everything on and connect the
QPK-1 interface unit.
1. Connect the serial cable to the
QPK-1 and to Com Port 1 (default)
or Com Port 2 on your computer.
(These instructions assume the
software has been installed on your
computer. If it’s not, see the loading
instructions included with the disk.)
2. Plug the 2.5 mm cable from the
QPK-1 interface into the jack on
the side of the beltpack.
3. Turn on the QPK-1 interface using
the small toggle switch on back.
4. Turn on the BP-700 beltpack to be
programmed (be sure a fresh set of
batteries in installed).
5. Start up the Q700 Application Tools
software on your computer.
If error “Beltpack contains invalid
data” occurs, confirm power to the
beltpack is on units is on and check
all connections. If you connected the
serial cable to Com Port 2, go to
“Com Port” in the menu bar and
select Com Port 2.
Programming the Operating Mode
• Click “Belt Pack” in the menu bar to
bring up the Belt Pack Configuration
window. This screen indicates the
name of the connected beltpack, the
Tx and Rx frequencies, and a graphic
representation of the mode settings
of the beltpack.
1. For each pushbutton, select the
button assignment (A-D), mode and
action type (the graphic changes to
reflect the settings).
To set the microphone type, select
either “Dynamic” or “Electret.”
2. Click the “program” button to apply
the new settings to the beltpack.
When prompted, enter your
password* and click “Yes” to store
the new settings in the BP-700.
(*see page 9 for default password).
3. Important: In order to apply the
changes, the BP-700 beltpack
power switch MUST be cycled
“off” and then “on” again.
4. To program another beltpack,
connect it to the QPK-1 interface
and repeat steps 1 - 4.
* Note: It is possible to change the
beltpack Tx and Rx frequencies from
the Belt Pack Configuration Screen. If
doing so, you MUST then connect the
MS-700 master station to coordinate
the frequencies.
Default Configuration
The software allows the user to store a
default configuration in the BP-700.
This feature allows the user to have a
'back-up' (default) Rx/Tx frequency
and/or switch settings that can be
programmed from a standalone beltpack
in the field (without the QPK-1).
• Click the "Default" button in the
Belt Pack Configuration screen (the
default configuration is displayed).
• Modify the frequency and mode
settings of the connected beltpack,
then click the “Program” button
(follow prompts as instructed.)
Note: When a new "Default"
condition is programmed to the
beltpack, the information is stored
into the beltpack EEPROM and can
only be implemented via the
pushbutton programming mode.
Implementing the Default
• Press the "A" and "D" pushbuttons
on the beltpack for more than 7
seconds to enter the programming
mode and then simultaneously
press "C" and "D" for more than 7
seconds to implement the beltpack
defaults. (The "C" and "D" LEDS will
flash alternately for 3 seconds to
indicate implementation of the
defaults, then all four LED's will
triple flash indicating a return to
the top level programming mode.)
• Press "A" and "D" for more than 7
seconds to exit the programming
mode. (See section pages 10 and 11
for more information concerning
the beltpack programming mode).

Q700 13
BP-700 Beltpack Batteries
Battery Information
The BP-700 operates from six "AA"
batteries in a removable battery pack.
Only alkaline or NiMH (nickel metal
hydride) cells should be used. For non-
rechargeable use, Duracell™, Eveready™
and other premium quality alkaline cells
are recommended. Zinc carbon batteries
generally cannot supply the required
current and provide only very limited
life. Off-brand alkalines also may
provide only a fraction of the life
available from premium batteries. Vega
has determined that Duracell Ultra™
batteries provide longer life in the BP-
700 than regular Duracell™ batteries and
Eveready™ batteries. However, they are
also more expensive.
Alkaline cells gradually lose capacity
over time. When stored at room
temperature (approximately 68 degrees
F, or 20 degrees C), typical capacity loss
is 30% to 40% over 4 years. However, if
the storage temperature is higher or the
storage location has high humidity, the
rate of loss is much higher. Under poor
conditions, more than 50% of initial
capacity can be lost in as little as 18
months.
For rechargeable batteries, only NiMH
"AA" cells should be used. NiCad
batteries are subject to the "memory
effect", which gradually reduces
capacity and life if the cells are not fully
discharged each time they are used.
NiMH batteries do not have this
problem and are not significantly more
expensive. They also provide somewhat
longer operating life in the BP-700 than
NiCads of the same rated capacity. "AA"
size NiMH batteries are available in
several capacities ranging from as little
as 800 milliampere hours to about 1600
milliampere hours for industrial-quality
cells. Obviously, the higher capacity
batteries will provide much longer
operating life than low-capacity
consumer cells.
All rechargeable batteries gradually
lose capacity as they are repeatedly
charged and discharged. The rate of loss
depends upon a number of factors,
including the recharging method and
maximum charge rate, operating
temperature, battery construction, depth
of discharge and maximum discharge
rate. Even quality NiMH cells can be
expected to lose at least 25% of initial
capacity after 400 to 500 charging
cycles. Even if the reduced capacity is
acceptable, their useful life will normally
be no more than 750 to 1000 cycles.
One significant practical problem with
using rechargeable batteries is simply
making certain that fully-charged
batteries are available when needed. It is
all too easy to forget recharging, often
resulting in embarrassing failures. Even
fully discharged batteries will often
work for only a few minutes if allowed
to sit overnight, making it appear that
they are ready for service. The best
solution is to develop and maintain a
regular routine for recharging batteries.
However, this often worsens the
"memory" problem for NiCad batteries.
This is one of the reasons that NiCads
are not recommended.
Mistakenly recharging alkaline cells
can cause overheating, battery venting
and even fire. To help avoid this
problem, Vega provides two types of
battery packs for the BP-700, one for
use with alkaline cells and one for use
with NiMH cells. The version for alkaline
batteries does not have operational
battery charging contacts, so inserting
the pack into the optional changer will
not cause any problems. The NiMH
version is marked in red and the cells
will be charged if the pack is inserted
into the charger.
WARNING: Never install alkaline
batteries in a red-marked battery
pack.
The optional QBC-1 battery charger
will fully charge multiple BP-700 battery
packs in less than 4 1/2 hours. It is
optimized for NiMH cells rated at 1500
to 1600 milliampere hours. Lower
capacity cells may not be able to
accommodate the high charging rate of
the QBC-1, and their life may be
shortened. This charger is a "smart"
design that monitors the charging
process to optimize results and
maximize battery life. Simpler chargers
can be used, but the charging process
will take considerably longer and the
number of usable charging cycles is
likely to lower.
In the continuous transmit mode, you
can expect battery life to be 9 to 10
hours for new, fresh Duracell™ or
Eveready™ batteries. Battery life will
usually be 1/2 to 2 hours less for cells
that have been in storage for some time.
Duracell Ultra™ batteries can be
expected to last 1 1/2 to 2 hours longer.
NiMH batteries rated at 1600
milliampere hours can be expected to
last 7 to 8 hours when new and fully
charged. However, the operating life will
slowly decline as the batteries are
repeatedly recharged. Battery life in the
RF Push-To-Talk mode will be
considerably longer, especially if
transmissions are infrequent.
Installing Batteries in
the BP-700
1. Turn off the BP-700 via the main
volume control on its top panel.
2. On the bottom of the BP-700, slide
the battery compartment latch near
the whip antenna towards the
antenna.
3. Holding the latch open, grasp the
battery pack grip on the bottom of
the BP-700 and carefully pull it out
of the unit.
4. For alkaline cells, remove the
discharged batteries and replace
with new, fresh ones.
5. Carefully note the polarity marking
on the battery compartment to
make certain the cells are correctly
inserted. All cells on one side are
inserted in one direction, and all
cells on the other side are inserted
in the opposite direction.
Note: The compartment has
spacers to prevent the battery
terminals from touching the
contacts if incorrectly inserted.
For this reason, a reversed cell
will prevent the pack from
operating.
6. While holding the latch open,
reinsert the battery pack. Then
release the latch to lock in the
pack.
For NiMH cells, insert the entire
pack into the QBC-1 charger. If
spare packs are available, they may
be used in the BP-700 while the
other packs are recharging.

Q700 14
System Operation and Features
System Operation
Assuming that all active receivers are
enabled, and that there are two separate
active intercom lines, operation of the
Q700 system in the standard
configuration is as follows:
• Incoming audio from the primary
wired intercom channel is always
routed to the MS-700 transmitter
main audio channel.
• Incoming audio from the secondary
wired intercom channel is not
continuously routed.
• Program/IFB audio is continuously
routed to the MS-700 subcarrier
audio channel.
• If no BP-700 beltpacks are
transmitting, all MS-700 receiver
audio outputs are muted.
• The BP-700 continuously sends a
digital control signal when it
transmits.
• The actual digital control signal
transmitted from the beltpack
depends upon whether pushbutton
“A”, “B”, “C” or “D” is depressed.
• Audio routing of the receiver audio
signals in the MS-700 is determined
by the control signals from the
BP-700’s.
• If the beltpack is in the continuous
transmit mode, the audio will be
routed in accordance with the last
control button pushed.
• If a specific beltpack user selects
“A”, the associated receiver audio
will be routed to the MS-700
transmitter main audio channel and
to the primary wired intercom
channel. This is the basic operating
mode.
• If the beltpack user selects “B”, the
receiver audio will be routed to the
MS-700 transmitter main audio
channel and to the secondary wired
intercom channel. It will not be
routed to the primary intercom
channel. At the same time, audio
from the secondary intercom
channel will be routed to the
transmitter main audio channel.
This allows a beltpack user to
communicate on the secondary
intercom channel while still
monitoring the primary channel,
without mixing the two intercom
channels.
• If the beltpack user selects “C”, the
receiver audio will be routed to the
MS-700 transmitter main audio
channel only. It will not be routed
to either the primary or secondary
wired intercom channel. However,
incoming audio from the primary
intercom channel will continue to
be applied to the transmitter main
audio channel. This allows the
wireless beltpack users to have a
private conversation while still
monitoring the primary intercom
channel.
• If the beltpack user selects “D”, the
receiver audio will be routed to the
MS-700 transmitter main audio
channel and to the auxiliary audio
output connector. At the same
time, the auxiliary control relay
contacts will close. Receiver audio
will not be routed to either the
primary or secondary intercom
channel. However, as above,
incoming audio from the primary
intercom channel will continue to
be applied to the transmitter main
audio channel.
• Operation of each beltpack is
independent of each other, so more
than one of the above modes can
exist at the same time. Only in the
case of mode “B”, where the
secondary intercom channel is
applied along with the primary
channel monitoring to the MS-700
transmitter, will the modes interact.
Operational Features
MS-700 Intercom Interfaces
The MS-700 master station will
interface with two intercom lines
simultaneously, as well as accommodate
both four-wire inputs/outputs and
conventional intercom inputs/outputs
for each line at the same time. Standard
Clear-Com, Clear-Com TW and RTS
systems are accommodated via two 3-
pin XLR connectors, while the four-wire
interfaces appear on two adjacent 4-pin
XLR connectors. All intercom interfaces
are fully transformer isolated to reduce
hum and noise.
A pushbutton switch is provided to
allow easy selection of the Clear-Com
and TW/RTS modes. This switch selects
the input connector for intercom line
two (IC1/IC2 or IC2) and adjusts the
interface level to accommodate the
differences between the two types of
lines. The switch does not affect the
four-wire interfaces.
Front panel enable switches are
provided for each of the two intercom
lines, as well as input and output level
adjustment controls. These controls are
for trimming levels, they do not have a
wide adjustment range. A null control is
also provided for each intercom line.
This control allows adjustment of
sidetone level of the lines to
accommodate different cable lengths
and wired intercom system
configurations. It does not directly
affect the four-wire output, but can
introduce unwanted sidetone on the
four-wire output if not adjusted
properly.
To adjust this control, enable the
intercom line and adjust the input and
output level controls as necessary. Have
a BP-700 user activate button "A" and
then speak into their headset
microphone. Enable this beltpack with
the corresponding receiver "on" button.
Monitor the intercom line via the
headset jack on the MS-700 front panel.
Initially adjust the null control for
minimum sidetone level on the intercom
line. Then readjust the control slightly to
increase the sidetone level and give it a
natural sound quality. Try both sides of
the minimum sidetone adjustment
point.
Program Audio Input
The MS-700 accepts a line-level
balanced audio input via a 3-pin XLR
connector. The signal is normally routed
to the second audio channel (subcarrier
channel) of the MS-700 transmitter. The
audio is then available to BP-700 users,
where it can be adjusted by a second
volume control. This capability provides
built-in IFB or program audio capability
in the BP-700, but may be used for
other purposes such as connection to a
remote ENG or production vehicle. The
incoming signal may be monitored and
adjusted from the front panel of the
MS-700, but can only be completely
disabled by disconnecting the source.
Auxiliary Output
The MS-700 also provides a fixed, line-
level balanced audio output on a 3-pin
XLR connector. Audio from one or more
BP-700 beltpacks will be routed to this
connector when the beltpack user
selects pushbutton "D" on the beltpack
control panel. Unless one beltpack user
selects their mode "D", no audio appears
on this output.
There is also an associated contact
closure available on a 9-pin type "D"
connector on the MS-700 rear panel.
This contact closes when a BP-700 user

Q700 15
System Operation and Features
selects mode "D" and remains closed as
long as any BP-700 transmits in this
mode. The auxiliary output and
associated relay closure can be used for
public address announcements or
connection to a remote ENG or
production vehicle.
Monitor Inputs and Outputs
The MS-700 has a balanced line-level
output derived from the monitor signal
buss in the master station. This output
appears on a 1/4" (6.35 mm) stereo jack
and can be used for remote master
station monitoring, local or remote
monitor speakers and similar purposes.
The level of this signal varies with the
setting of the front panel monitor
volume control. This output will be the
sum of all signals selected by the "mon"
pushbuttons on the MS-700 front panel.
If the monitor cascade is connected,
monitor audio from one or more
additional MS-700 master stations may
also be available.
The MS-700 also has fixed-level
monitor cascade inputs and outputs on
two 1/4" (6.35 mm) stereo jacks. One
jack has a single-ended monitor input
and the other a single-ended output. If
the monitor cascade output of one
MS-700 is connected to the monitor
cascade input of another MS-700, both
systems can be monitored from a
headset plugged into the last master
station in the chain. The cascade output
jack in the last master station may also
be used for external monitoring of the
monitor cascade buss.
Transmitter Control Switch
A transmitter control switch is included
on the rear panel of the MS-700. In the
"off" position, the internal transmitter is
disabled and no RF output will be
present. This mode is sometimes useful
to conserve frequencies when more
than one Q700 system is in use at a
location. In the "lo" position, the
transmitter will be on with a power
output of 50 mW, minimum. This is the
normal operating mode. In the "hi"
position, the transmitter will be on and
the power output will be 250 mW,
maximum. To minimize interference, the
“hi” mode should be used with caution,
and is most applicable to large outdoor
events.
MS-700 Fan Control
The MS-700 has a small internal cooling
fan. Normally, this fan is unnecessary
and does not operate. However, if a
MS-700 is rack mounted with a number
of other units and the ambient
temperature is high, additional cooling
may be required. When the internal
temperature of the MS-700 reaches
about 105 degrees F (41 deg. C), the fan
will begin to rotate at low speed. If the
internal temperature continues to rise,
the fan will reach full RPM when the
internal temperature reaches
approximately 150 deg. F (65 deg. C).
Rack Mounting the MS-700
The MS-700 master station may be rack
mounted by means of the supplied rack
mounting brackets. This method of
mounting is adequate for fixed use.
Screw Length Warning! Use only the
screws supplied with the rack mounting
bracket. The length of any replacement
screws MUST BE LESS THAN 5/8” or
0.625” (15 mm) — the use of longer
mounting screws will damage internal
components of the MS-700.
However, when the master station will
be shipped while mounted in a rack,
when in wheeled cabinets, or when
rough handling is likely, additional rear
support is necessary. Vega offers
optional QRS-2 rear mounting brackets
for the MS-700, which support the back
of the unit to help the chassis resist
shock and vibration. These brackets
require the use of rear mounting rails in
the rack or cabinet, which not all such
devices have. Mechanical and electronic
damage due to extreme shock and
vibration is not covered by the Q700
warranty.
BP-700 Headset
Compatibility
The BP-700 beltpack will accommodate
headsets with dynamic and electret
microphones. The beltpack may be
externally programmed for either type
of microphone as described on page 8.
When the electret mode is programmed,
microphone preamplifier gain is reduced
and positive microphone bias is applied.
The BP-700 accepts only positive-bias
"two wire" electret microphones, with
the audio and positive bias connections
combined on one conductor. This is by
far the most common configuration for
available headsets with electret
microphones.
The BP-700 headset driver has a
balanced output and neither side can
be connected to the microphone return
lead or the connector shell without
causing severe distortion and
intermittent operation. The driver will
supply approximately 200 mW into a
50 ohm headset, and roughly 20 mW
into a 600 ohm headset. The use of
headset impedances below 25 ohms is
not recommended due to reduced
battery life.
The BP-700 comes standard with a
Neutrik™ 4-pin male XLR connector
installed. This is the same type
connector used for Vega’s previous
generations of wireless intercoms. The
BP-700 can be optionally fitted with
4-pin or 5-pin female XLR connectors at
additional cost. When using 5-pin dual
muff headsets, both earpieces will
receive the same audio.

Q700 System
Frequency Range: 470 – 740 MHz in nine 30-MHz bands
(U.S. and Canada)
Frequency Selection: Synthesized; 1200 channels per 30 MHz
band, 25 kHz steps
Transmission Modes: Continuous or push-to-talk;
full or half duplex
Frequency Stability: ± 0.0025%
Operating Range: To 1500 ft (450 M) under good
conditions
Modulation: FM, 50 kHz peak deviation
Spurious Output: -64 dBc, minimum
Harmonics: -56 dBc, minimum
Frequency Response: 120 Hz to 10 kHz, ± 3 dB
Distortion: Less than 1% THD at 1 kHz
SNR: Greater than 90 dB (excluding wired
intercom)
Audio Processing: 2:1 companding
Squelch: Tone-coded plus signal level
Intercom Modes: Normal, ISO 1, ISO 2, Aux
Program Audio/IFB: Built-in, transmission via
high frequency subcarrier
MS-700 Master Station
Transmitter Power: Switchable, 50 mW or 250 mW
Receiver Channels: Six: four standard plus two optional
Receiver Type: Dual conversion
Band Separation: Receiver and transmitter bands must be
separated by at least one 30 MHz band
Frequency Selection: Front panel controls or external PC (via
optional serial interface adapter and
Windows™ software)
Antennas: 1/4 wave wire whips, one transmit, one
receive; BNC connectors
Intercom Channels: Two; simultaneous and
independent
Intercom Interfaces: Clear-Com
®
or RTS
®
, externally switchable,
via two 3-pin XLR's; simultaneous four-
wire via two 4-pin XLR's
Intercom Modes: Controlled by individual beltpacks via
subcarrier data
Program/IFB Input: Balanced, line-level, 3-pin XLR
Auxiliary Output: Balanced, line level, via 3-pin XLR, with
auxiliary contact closure on DB15
connector
Auxiliary Relay Output: SPDT (form “C”) contacts, rated at 1 A,
24V max. The relay “common” is on pin 6
of the DB15, “NC” is on pin 4, and “NO” is
on pin 8
Monitor Outputs: Balanced line-level output and cascade
in/out via three 1/4"
(6.3 mm) stereo phone jacks
Controls: Select, monitor and level adjust for
receivers and intercom; intercom mode;
frequency selection switches; monitor
level, ac power switch; transmit power
switch and additional controls.
Indicators: Signal present, mode, beltpack low
battery warning, select status and
monitor status for each receiver; monitor
LED bar graph; power present, select
status and monitor status for intercom
channels and additional indicators.
Size: 19" (48 cm) rack mounting, one rack unit,
14" (36 cm) deep (excluding connectors
and controls)
Weight: 10 lbs. (4.5 kg)
Power: 100 – 260 vac, 50 – 60 Hz, 20 watts
maximum, IEC connector
Q700 16
Specifications
BP-700 Beltpack
Transmitter Power: 50 mW, minimum
Transmit Antenna: Flexible 1/4 wave, insulated
metal-coated Kevlar™ fiber
Receive Antenna: Internal wideband helical
Headset Connector: XLR, 4-pin male standard,
4- and 5-pin female optional
Microphone Types: Dynamic or 2-wire electret,
externally programmable
Microphone Gain: Externally accessible control
Headset Power Output: 150 mW, minimum, into 50 ohms
Controls: Main volume control with power
switch, program/IFB volume control,
four mode switches
Indicators: Low Battery/Power, PTT, four mode
LED’s
Batteries: Six "AA" alkaline, optional rechargeable
NiMH cells
Battery Life: 8 – 10 hours for alkaline,
6 – 8 hours for NiMH, both longer in
PTT mode
Battery Replacement: Removable battery holder; optional
charger available for NiMH version
Size: Approximately 1.25 x 4 x 5 inches
(3 x 10.2 x 12.8 cm)
Weight: Approximately 19 ounces (540 gm)
with batteries
Construction: Molded high-impact reinforced ABS
Manufactured by Clear-Com Intercom Systems, Emeryville, CA, USA
VEGA | 4065 Hollis St., Emeryville, CA 94608, 510-496-6666
Model: BP-700 | FCC ID: BFDQ700BP__ | CAN:
Receiver complies with Part 15 of the FCC rules. Operation is
subject to the following two conditions: This receiver may not
cause harmful interference and this receiver must accept any
interference including interference that may cause undesired
operation.
Transmitter complies with Part 74 of the FCC rules.
Vega Wireless, North American Sales Office
1855 W. Katella Ave., Suite 220• Orange, California 92867
(800) 877-1771 U.S./Canada• (714)744-6305 •Fax: (714) 744-6309
PN#V0990112
/