Bestway SPLASH-IN-SHADE PLAY POOL Owner's manual

Category
Above ground pools
Type
Owner's manual

Bestway SPLASH-IN-SHADE PLAY POOL is a great choice for families with young children. It's easy to set up and comes with everything you need to get started, including a pump, filter, and ladder. The pool is made of durable materials and is designed to last for years. It's also easy to maintain, with a built-in skimmer and filter that help keep the water clean. The pool is the perfect size for kids to splash and play, and it's also great for adults to relax in.

Bestway SPLASH-IN-SHADE PLAY POOL is a great choice for families with young children. It's easy to set up and comes with everything you need to get started, including a pump, filter, and ladder. The pool is made of durable materials and is designed to last for years. It's also easy to maintain, with a built-in skimmer and filter that help keep the water clean. The pool is the perfect size for kids to splash and play, and it's also great for adults to relax in.

S-S-004346/21.0x28.5cm/(AU) JS-YF-2016-B-02376/ 封面
S-S-004346
QUESTIONS? PROBLEMS?
MISSING PARTS?
For FAQ, Manuals Or
Spare Parts, Please Visit
www.bestwaycorp.com
TO THE STORE
SPLASH-IN-SHADE
PLAY POOL
OWNER’S MANUAL
www.bestwaycorp.com
Visit Bestway YouTube channel
Put 1” to 2” water in the pool to cover the floor. Once pool floor is slightly covered, gently smooth out
all wrinkles. Start in the center of the pool and work your way clockwise to the outside.
2
S-S-004346/21.0x28.5cm/(AU) JS-YF-2016-B-02376/
S-S-004346
WARNING
smooth out the bottom
S-S-004346/21.0x28.5cm/(AU) JS-YF-2016-B-02376/
S-S-004346
3
Note: Drawings not scaled to size.
Please see FAQ’S for additional information.
CHOOSE THE CORRECT LOCATION
IMPORTANT: The pool must be set up on a completely flat and level surface. Please
do not install the pool if the surface is Inclined or sloped.
Correct conditions to set up the pool:
• The selected location has to be capable of uniformly supporting the weight for the
entire time the pool is installed, moreover the location must be flat and must be
cleared of all objects and debris including stones and twigs.
• We recommend positioning the pool away from any objects kids could use to climb
into the pool.
NOTE: Position the pool near an adequate drainage system to deal with overflow or
to discharge the pool.
NOTE: Position the pool near an AC power outlet protected by a RCD (Residual
Current Device).
Incorrect conditions to set up the pool:
• On uneven ground the pool may collapse causing serious personal injury and/or
damage to personal property and will void the warranty and prevent any service
claims.
• Sand should not be used to create a level base; the ground must be dug out if
necessary.
• Directly under overhead power lines or trees. Be sure the location does not contain
underground utility pipes, lines or cables of any kind.
• Do not set up the pool on driveways, decks, platforms, gravel or asphalt surfaces.
The selected location should be firm enough to withstand the pressure of the water;
mud, sand, soft / loose soil or tar are not suitable.
• Grass or other vegetation under the pool will die and may cause odors and slime to
develop, therefore we recommend removing all grass from the selected pool
location.
Avoid areas prone to aggressive plant and weed species that may grow through the
ground cloth or liner.
NOTE: Check with your local city council for by-laws relating to fencing, barriers,
lighting and safety requirements and ensure you comply with all laws.
NOTE: If have a filter pump, refer to the pump’s manual for instructions.
NOTE: The ladder must match the pool size and should to be used only for entering
and exiting the pool. It is forbidden to exceed the permitted payload of the ladder.
Check regularly if the ladder is properly assembled.
Installation usually takes approximately 20 minutes with 2-3 people
excluding earthworks and filling.
WARNING
Carefully read, understand, and follow all information in this user manual before
installing and using the swimming pool. These warnings, instructions, and safety
guidelines address some common risks of water recreation, but they cannot cover
all risks and dangers in all cases. Always use caution, common sense, and good
judgment when enjoying any water activity. Retain this information for future use.
Non Swimmers safety
- Continuous, active, and vigilant supervision of weak swimmers and non-swimmers
by a competent adult is required at all times (remembering that children under five
are at the highest risk of drowning).
- Designate a competent adult to supervise the pool each time it is being used.
- Weak swimmers or non-swimmers should wear personal protection equipment
when using the pool.
- When the pool is not in use, or unsupervised, remove all toys from the swimming
pool and its surrounding to avoid attracting children to the pool.
Safety devices
- In order to prevent children from drowning, it is recommended to secure the
access to the pool with a protection device. In order to prevent children climbing
from the inlet and outlet valve, it is recommended to install a barrier (and secure all
doors and windows, where applicable) to prevent unauthorized access to the
swimming pool.
- Barriers, pool covers, pool alarms, or similar safety devices are helpful aids, but
they are not substitutes for continuous and competent adult supervision.
Safety equipment
- It is recommended to keep rescue equipment (e.g. a ring buoy) by the pool.
- Keep a working phone and a list of emergency phone numbers near the pool.
Safe use of the pool
- Encourage all users especially children to learn how to swim
- Learn Basic Life Support (Cardiopulmonary Resuscitation - CPR) and refresh this
knowledge regularly. This can make a life-saving difference in the event of an
emergency.
- Instruct all pool users, including children, what to do in case of an emergency
- Never dive into any shallow body of water. This can lead to serious injury or death.
- Do not use the swimming pool when using alcohol or medication that may impair
your ability to safely use the pool.
- When pool covers are used, remove them completely from the water surface
before entering the pool.
- Protect pool occupants from water related illnesses by keeping the pool water
treated and practicing good hygiene. Consult the water treatment guidelines in the
user’s manual.
- Store chemicals (e.g. water treatment, cleaning or disinfection products) out of the
reach of children.
- Use the signage as outlined below. Signage is to be displayed in a prominent
position within 2m of the pool.
Keep children under supervision in the aquatic environment. No diving.
- Removable ladders shall be placed on a horizontal surface.
- Irrespective of materials used for swimming pool construction, accessible surfaces
have to be checked regularly to avoid injuries.
- Regularly monitor bolts and screws. Remove splinters or any sharp edges to avoid
injuries.
ATTENTION: Do not leave the drained pool outside. The empty pool is liable to
become deformed and/or displaced due to wind.
- If you have a filter pump, refer to the pump’s manual for instructions.
WARNING! The pump cannot be used while people are inside the pool!
- If you have a ladder, refer to the ladder’s manual for instructions.
WARNING! The use of a swimming pool implies compliance with the safety
instructions described in the operating and maintenance guide. In order to prevent
drowning or other serious injuries, pay particular attention to the possibility of
unexpected access to the swimming pool by children under 5 years by securing
the access to it, and, during the bathing period, keep them under constant adult
supervision.
Please read carefully and keep for future reference
C
E
Underwater adhesive
repair patch
J
D
O
K
N
M
A B
G
#F4A019B-01
I
#F4A018B-02
H
#F4A019B-03A
F
Components list
NOTE: Some parts already have been installed on the pool.
L
QTY Part Code
A
B
C
D
E
F
G
H
I
J
K
L
M
N
O
Part NO.
Description
8’x20’’(2.44mx51cm)
8
8
8
18
8
1
1
1
3
1
8
8
1
1
1
P2A024Q17
P61077
P61078
P61618
P61012
P61026
P61619
P6A1158
F6D419
P6A1418
56543ASS17
P61079
P61080
P61082
P61619
P61620
Complete structure
Top Rail
Vertical Pool Leg
T-connector
Pin
Footing
Sprayer
Drain Valve
Hose adaptor
Stopper plug
Liner
Tent leg
Fiberglass pole
Hose
Adapor
Tent's outer cloth
3. Check pool for any leaks at valves or seams, check ground cloth for any evident
water loss. Do not add chemicals until this has been done.
NOTE: In the event of a leak, patch your pool using the underwater adhesive repair
patch provided. Refer to the FAQ’s for further information.
Parameters
Water clarity
Colour of the water
Turbidity in FNU/NTU
Nitrate concentration above that of fill water in mg/l
Total organic carbon (TOC) in mg/l
Redox potential against Ag/AgCI 3,5 m KCl in mV
pH value
Free active chlorine (without cyanuric acid) in mg/l
Free chlorine used in combination with cyanuric acid in mg/l
Cyanuric acid in mg/l
Combined chlorine in mg/l
Values
clear view of the pool bottom
no colour should be observed
max. 1,5 (preferably less than 0,5)
max. 20
max. 4,0
min. 650
6,8 to 7,6
0,3 to 1,5
1,0 to 3,0
max 100
max 0,5 (preferably close to 0,0 mg/l)
NOTE: Drawings for illustration purpose only. May not reflect actual product.
Not to scale.
POOL MAINTENANCE
Warning: If you do not adhere to the maintenance guidelines covered herein, your
health might be at risk, especially that of children. Pool water treatment is essential
for the safety of the users. Using chemicals inappropriately will cause property
damage and personal injury.
NOTE: The pump is used to circulate the water and to filter small particles. In order
to keep your pool water clean and hygienic, you must also add chemicals.
1. It is recommended not to fill the pool with catchment water, drilling water, or
drainage well water: these waters generally contain polluted organic substances
including nitrates and phosphates. Filling pools with water from the public network
is advised.
2. Always keep your pool clean and apply the correct pool chemicals. Unsanitary
water is a serious health hazard. It is recommended to use disinfectant, flocculant,
acid or alkali chemicals to treat your pool.
3. Clean the PVC liner regularly with non-abrasive brushes or a pool vacuum cleaner.
4. Throughout the season, the water filtration system must run long enough each day
to clean the entire volume of water in the pool.
5. Check the filter cartridge (or sand in a sand filter) regularly and replace dirty
cartridges (or sand).
6. Regularly check the screws, bolts and all the metal parts for rust. Replace if
necessary.
7. If it rains, check that the water level is not higher than the specified level. If water
exceeds the specified levels, drain the pool to the specified level.
8. Do not use the pump when the pool is in use.
9. Cover the pool when not in use.
10. For pool water treatment, the pH value is very important.
ATTENTION: Do not leave the drained pool outside.
The following parameters ensure good quality water
4
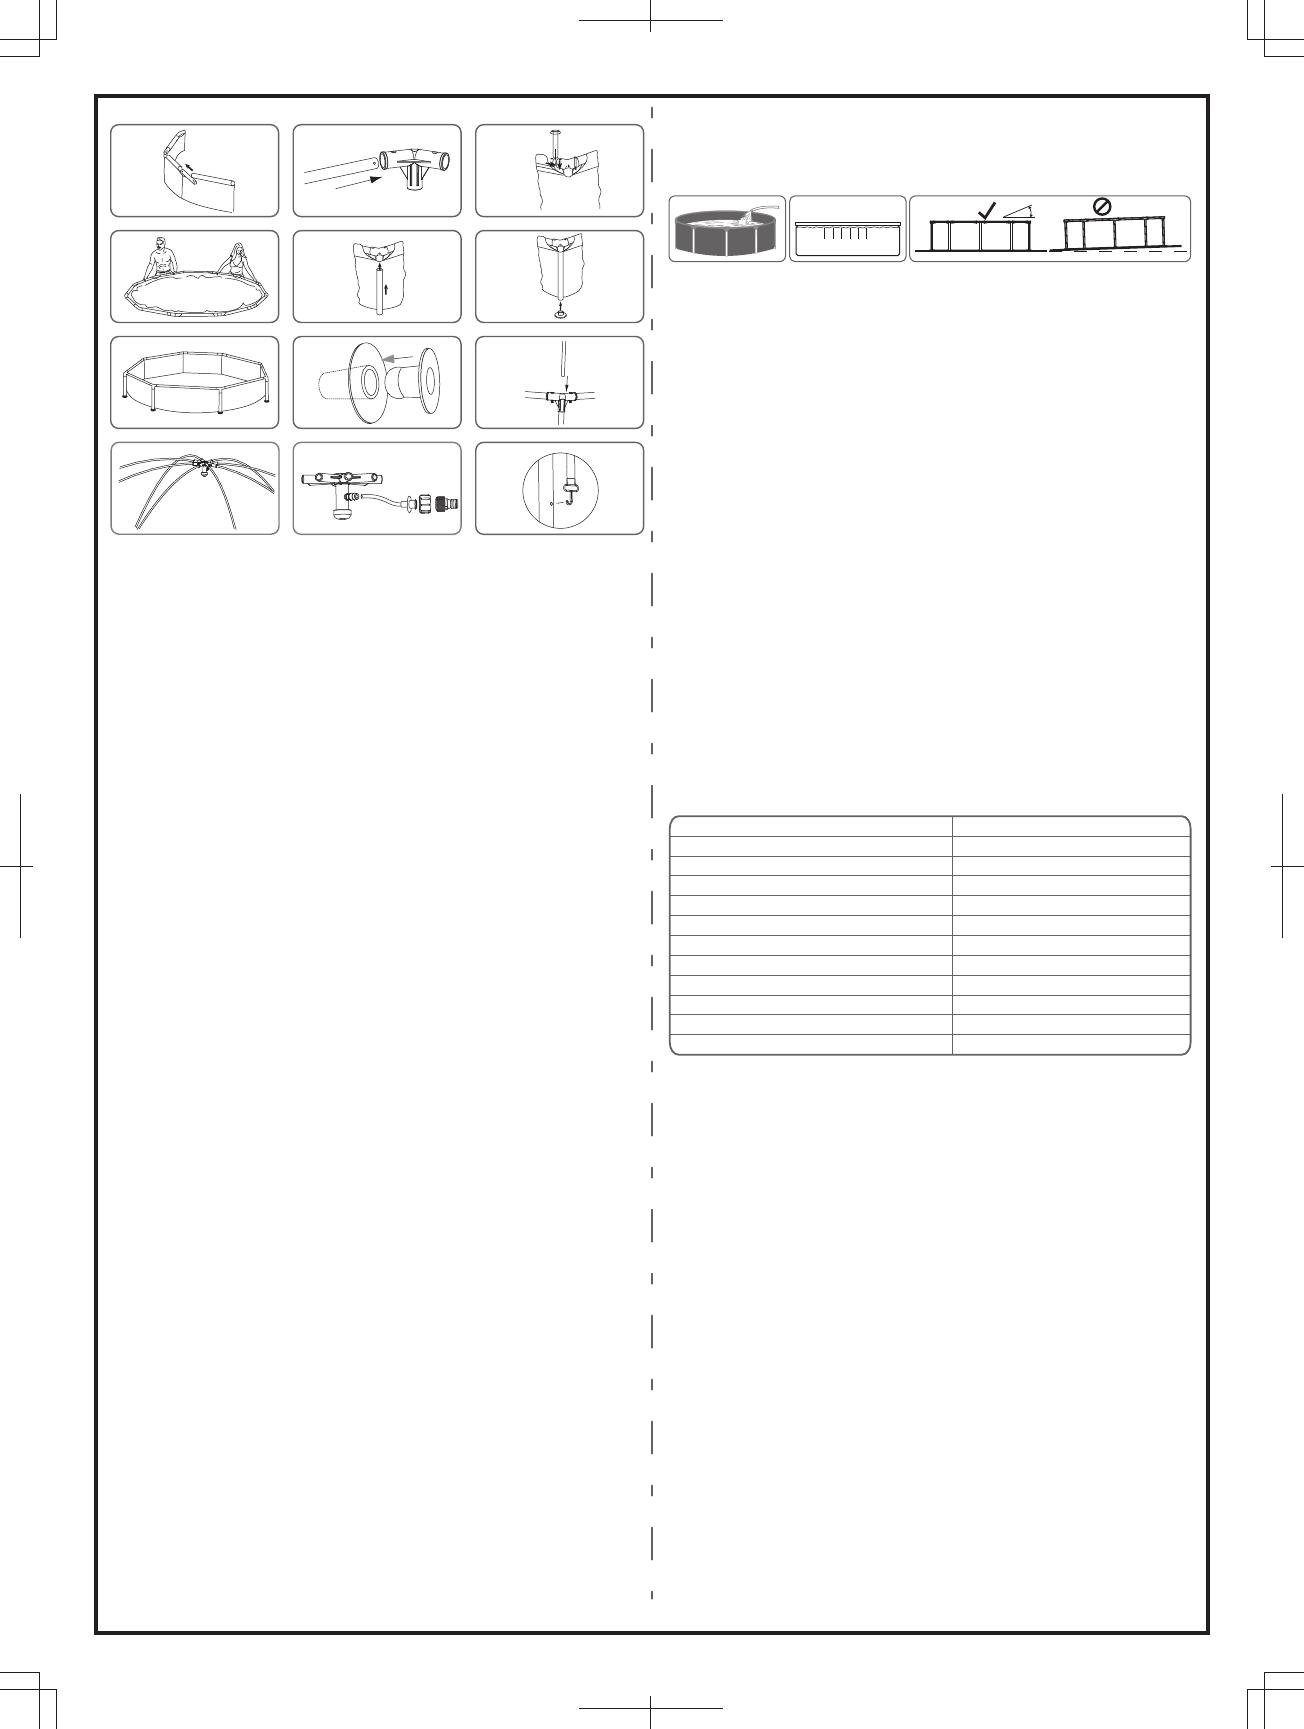
Assembly the Splash-in-Shade play pool no need any tools.
Bestway Inflatables will not be responsible for damage caused to the pool due to
mishandling or failure to follow these instructions.
1. Lay out all parts and check that you have the correct quantities as listed in the
components list. If you are missing any part do not assemble the pool, contact
Bestway Customers Service.
2. Spread out the pool and make sure the pool is right side up, let it sit exposed to
direct sunlight for 1 hour or more so that the pool is more flexible during set up.
3. Turn the pool so the drain valve is near the area where your plan to drain the
water.
ATTENTION: Do not drag the pool on the ground in order to avoid puncturing
from sharp objects.
4. Insert top rail (A) into the pole pockets at the top of the pool. (See Fig. 1)
5. Connect top rail (A) with T-Connector (C) at each of corner and insert pins (D) into
pre-drilled holes of the frame. (See Fig. 2, 3)
6. Repeat steps 5 and 6 until all top rails (A) are connected with all T-Connectors (C)
and the top frame is set up.
NOTE: For ease of assembly slightly raise the last 2 rails to an inverted v shape
and insert into the last T-Connectors(C). Slowly lower until fully connected taking
care not to pinch your fingers. (See Fig. 4)
7. Connect vertical pool leg (B) into the bottom of the T-Connector (C). (See Fig. 5)
NOTE: Make sure the hole on the vertical pool leg (B) is facing outward.
8. Attach all footings (E) to the bottom of the vertical pool legs (B). (See Fig. 6)
9. When the pool is completely assembled pull the frame from different directions to
ensure all rails, pool legs and connectors are firmly jointed. (See Fig. 7)
10. Insert the stopper plug into the inlet and outlet on the wall of the pool from the
inside of the pool. (See Fig. 8)
11. Ensure drain valve is firmly closed. Smooth out the bottom.
12. Insert the 8 Tent legs (K) to the 8 T-Connectors (C) (See Fig. 9)
13. One fiberglass pole (L) has 3 sections. Extend the fiberglass pole by pulling out
each section and place it into the metal ferrules.
14. Insert one end of the pre-extend fiberglass pole to the Tent leg (K), the other end
to the Sprayer (F). Repeat this step for the other fiberglass poles. Make sure the 8
fiberglass poles form a semidome. (See Fig. 10)
15. Connect the hose (M) to the Sprayer (F) and the Hose adaptor (N).(See Fig. 11)
NOTE: The Hose Adapter can be used with two different garden hoses.
16. Spread the tent’s outer cloth (O), make sure the center is above on the
Sprayer (F), adjust the tent’s outer cloth (O) position until the sewing lines are
superposed to the fiberglass poles (L). Hook the tent’s outer cloth (O) to the hole
of the vertical pool leg (B).(See Fig. 12)
17. Tie the outer cloth (O) to the fiberglass pole (L) by using the 3 pairs ropes at the
inner of outer cloth (O). The rope can also fix the hose (M).
18. Smooth out all wrinkles on the outer cloth and make it perfect.
IMPORTANT: Put 1” to 2” water in the pool to cover the floor. Once pool floor is
slightly covered, gently smooth out all wrinkles.
Start in the center of the pool and work your way clockwise to the outside.
Filling Pool with Water
ATTENTION: Do not leave pool unattended while filling with water
1. Fill pool until water capacity is 90%, DO NOT OVERFILL as this could cause the
pool to collapse. In times of heavy rainfall you may need to empty some of the
water to ensure the level is correct. (See Fig. 13.14)
2. When filling the pool is completed, check that the water is not collecting on any side
to ensure the pool is level.
IMPORTANT: If pool is not level, drain water and re-level ground by digging out
(See Fig. 15). Never attempt to move the pool with water in it, serious personal
injury or damage to the pool may result.
WARNING: Your pool may contain up to xxxxx liters/xxxx gallons which equals
xxxxx pounds of pressure. If your pool has any bulge or uneven side then the pool
is not level, the sides may burst and the water may discharge suddenly causing
serious personal injury and/or damage to property.
Fig. 15
Fig. 13 Fig. 14
Proper Water Level
S-S-004346/21.0x28.5cm/(AU) JS-YF-2016-B-02376/
S-S-004346
Fig. 1 Fig. 3
Fig. 4
Fig. 2
Fig. 9
Fig. 12
Fig. 5 Fig. 6
Fig. 8Fig. 7
Fig. 11
Fig. 10
Repair
If your pool is damaged, use the repair patch. -see FAQ’s for instructions.
Dismantling
1. Unscrew the drain valve cap on the outside of the pool counter clockwise and
remove.
2. Connect the adaptor to the hose and put the other end of the hose in the area
where you are going to drain your pool.
(Check local regulations for drainage by-laws).
3. Screw control ring of the hose adaptor onto the drain valve clockwise. The drain
valve will be open and water will start to drain automatically.
ATTENTION: Water flow can be controlled with the control ring.
4. When draining is finished, unscrew the control ring to close the valve.
5. Disconnect the hose.
6. Screw the cap back onto the drain valve.
7. Air dry pool.
ATTENTION: Do not leave the drained pool outside.
Storage
1. Please remove all the accessories and spare parts of the pool and store them
clean and dry.
2. Once pool is completely dry, sprinkle with talcum powder to prevent pool from
sticking together, fold pool carefully. If pool is not completely dry, mould may result
and will damage the pool liner.
3. Store liner and accessories in a dry place with a moderate temperature between
5ºC / 41ºF and 38ºC / 100ºF.
4. During rainy season, pool and accessories should be storaged as above
instruction also.
5. Unproper draining of the pool might cause serious personal injury and/or damage
to personal property.
Frequently Asked Questions
1. What is a suitable base for the Frame Set pool?
Almost any completely flat, solid, level surface can be used. Do not use sand as a leveling material as it is prone to shifting under the pool. The ground should be dug out
until it is perfectly level. Do not set up on driveways, decks, platforms, gravel or asphalt. The ground should be firm enough to withstand the weight and pressure of the water:
mud, sand, soft / loose soil or tar are not suitable. A concrete base can be used but care should be taken not to drag the pool across the surface as abrasions could tear the
liner. If the pool is to be set up on a lawn, it is recommended that the grass is removed from where the pool will sit as it will die and may cause odors / slime. Certain types of
hardy grass can grow through the liner as can aggressive bushes / plants by the side of the pool. Ensure adjacent vegetation is cut back where necessary. Use of a ground
cloth assists in protecting the base of the pool.
2. How will I know if my pool is set up on unleveled ground?
If your pool appears to be bulging on one side it is not set up on level ground. It is important that you empty your pool and move the pool to a level site. If the pool is not on
level ground it will place undue stress on the seams and could result in the seams bursting which will cause flooding, property damage and potentially personal injury or death.
Fill your pool following the instructions in the owner’s manual carefully. This will ensure that you do not waste water and the pool can be moved easily so that the ground can
be leveled at an appropriate time and not after you have completely filled it with water.
3. Can I have my pool filled by a water service?
We recommend using a garden hose under low pressure for filling your pool. If it is necessary to use a water delivery service, it is best to fill the pool with one inch of water
by hose and smooth wrinkles first. Use a water service that is able to regulate the flow of water to prevent damage. Ensure you stop at each step as noted in the instruction
manual to ensure your pool is level. Bestway will not be held responsible for pools damaged or weakened by water delivery services.
4. What is the maximum fill height of the pool?
Fill pool until water capacity is 90% up to the bottom of the top rail of the pool. Never attempt to fill your pool beyond the base of the rail. We recommend leaving extra room
to account for water displacement when occupants are inside the pool. You may have to top up the water during the season which has been lost through evaporation or normal
use.
5. My pool is leaking, what do I do to fix it?
The pool does not need to be emptied to fix any holes. Self-adhesive underwater repair patches can be purchased at your local pool / hardware store. For external use, use
the repair patch provided. For internal holes, clean the hole on the inside of the pool to wipe off any oils and algae. Cut a circle large enough to cover the hole and apply the
patch securely onto the side in the water. Cut a second patch and apply to the outside of the pool for extra strength. If the hole is in the base of the pool use one patch only and
weigh it down with a heavy object while it bonds. If you have patched the pool when it is empty we recommend you leave it at least 12 hours before filling.
6. Where can I buy filter cartridges and how often should I change them?
Filter cartridges to fit your filter pump should be available from the store where you purchased your pool. If not, most mass retailers sell filter cartridges as an accessory. If
you are unable to obtain replacements please call our toll-free number and we will assist you in finding a source local to you. The cartridges should be changed every 2 weeks
dependent upon use of the pool. Check the filter on a weekly basis and clean by hosing down any debris and particles. Note: Ensure your pump is disconnected from the
electrical supply before checking the filter cartridge.You can also visit our website www.bestwaycorp.com for cartridge purchase.
7. How many times a year should I change the water?
This is dependant on the amount of use the pool receives, and the attention paid to covering the pool and keeping chemicals properly balanced. If maintained correctly the
water should last a full summer season. Please contact your local pool chemical supplier for detailed information regarding chemicals, they will be able to advise you how to
best maintain the cleanliness of your water.
8. Do I need to take my pool down for the winter?
Yes, Above-ground pools may collapse under the weight of ice and snow and the PVC walls will be damaged. We recommend taking the pool down when temperatures fall
below 8ºC / 45ºF. The pool should be stored indoors in a moderate temperature between 5ºC / 41ºF and 38ºC / 100ºF. Please store away from chemicals and rodents and out
of the reach of children.
9. My pool is fading – why is that?
Excessive use of chemicals can cause the color of the inside of the liner to fade; this is similar to a swimsuit fading over time from repeated contact with chlorinated water.
10. How many years will the pool last?
There is no set time limit for the pool to last; following the instructions in the owner’s manual and with proper care, maintenance and storage you can considerably increase
the life of your pool. Improper set-up, use or care can result in failure of the pool.
11. Do you recommend the use of a filter pump with a Bestway pool?
Absolutely! We strongly recommend you use a filter pump which will maintain the cleanliness of the water.
12. Which are the most important functions of my filter pump?
The most important function of a filter pump is the elimination of every sort of impurity from the water with the aid of a filter cartridge and chemical products for its
sterilization.
5
S-S-004346/21.0x28.5cm/(AU) JS-YF-2016-B-02376/
S-S-004346
S-S-004346/21.0x28.5cm/(AU) JS-YF-2016-B-02376/
S-S-004346
6
REQUIRED INFORMATION - PLEASE WRITE THE SHIPPING ADDRESS
Please write the Batch Number and Item Code located near the drain valve
Name: Address:
Zip Code: Retailer:
Country: City:
Mobile: Telephone:
E-mail:
Item Code:Batch Number:
TO: Bestway
®
Service Department Date:
Date of purchase:
Customer Code Number:
Limited BESTWAY
®
Manufacturers Warranty
The product you have purchased comes with a limited warranty. Bestway
®
stands behind our quality guarantee and assures, through a replacement warranty, your product will
be free from manufacturer’s defects.
The following provision is only valid within the European member state countries. The legal regulation of Directive 1999/44/EC will not be effected by this BESTWAY
limited warranty.
To enact a warranty claim, this form must be completed and submitted with a copy of your receipt/purchase to your local Bestway After Sales Center. Before any claims can be
accepted, the Bestway After Sales Center may ask you to send a piece of the defective part to the center (e.g. a cut out of the production batch number / drain valve). Please
contact your local Bestway After Sales Center before sending any documents. They will provide full instructions of what is needed for your claim.
Bestway
®
is not responsible for economic loss due to water or chemical costs. Bestway
®
will not replace any products deemed to have been damaged due to negligence or
having been used outside of the owner’s manual guidelines.
Bestway’s warranty covers manufacturing defects discovered while unpacking the product or during use, within the limits of use and respectful of warnings and instructions
given within the user’s manual. This warranty applies only to products which have not been modified by any 3rd parties. The product must be stored and handled in accordance
with the technical recommendations.
The Limited Warranty is valid for the period indicated above. The warranty start date is the date of sale shown on the original receipt/purchase invoice.
Please choose the type of your pool:
FAX/E-MAIL/TEL: Please refer to your country according to the information found on the back cover or on our website: www.bestwaycorp.com.
Please provide your address details in full. Note: Incomplete address details will result in delayed shipments.
Bestway reserves the right to charge for redelivery of undelivered packages where the recipient is at fault.
Fax:
22’X52”
#BXXXXX
BWSHFXXXXXX
YYYY-MM-DD
Batch Number
Item Code
Problem description
Item is torn / Leaking
Missing part (Please use the code for the missing part. This can be found in the owner's manual.)
Other (Please describe)
Faulty welding Faulty upper ring Faulty drain valve
Bestway reserves the right to request photographic evidence of defective parts, or to require sending the item for additional testing. In order to best assist you, we
request all information you provide to be complete.
FOR FAQ, MANUALS, VIDEOS OR SPARE PARTS, PLEASE VISIT OUR WEBSITE: www.bestwaycorp.com
VIDEOS ARE ALSO AVAILABLE ON OUR BESTWAY CHANNEL ON YOU TUBE: www.youtube.com/user/BestwayService
IMPORTANT: ONLY THE DAMAGED PART WILL BE REPLACED, NOT THE COMPLETE SET.
  • Page 1 1
  • Page 2 2
  • Page 3 3
  • Page 4 4
  • Page 5 5
  • Page 6 6

Bestway SPLASH-IN-SHADE PLAY POOL Owner's manual

Category
Above ground pools
Type
Owner's manual

Bestway SPLASH-IN-SHADE PLAY POOL is a great choice for families with young children. It's easy to set up and comes with everything you need to get started, including a pump, filter, and ladder. The pool is made of durable materials and is designed to last for years. It's also easy to maintain, with a built-in skimmer and filter that help keep the water clean. The pool is the perfect size for kids to splash and play, and it's also great for adults to relax in.

Ask a question and I''ll find the answer in the document

Finding information in a document is now easier with AI