Page is loading ...

TR1
Series VFD
Variable Frequency Drive
Installation and Operation Manual
LonWorks
®
TR1-SVX01A-EN
175R5562
December, 2003

DANGER
!
DANGER
!
Rotating shafts and electrical equipment can
be hazardous. Therefore, it is strongly
recommended that all electrical work
conform to National Electrical Code (NEC)
and all local regulations. Installation, start-
up and maintenance should be performed
only by qualified personnel.
Motor control equipment and electronic controls are
connected to hazardous line voltages. When servicing
drives and electronic controls, there will be exposed
components at or above line potential. Extreme care
should be taken to protect against shock. Stand on an
insulating pad and make it a habit to use only one hand
when checking components. Always work with another
person in case of an emergency. Disconnect power
whenever possible to check controls or to perform
maintenance. Be sure equipment is properly grounded.
Wear safety glasses whenever working on electric control
or rotating equipment.
WARNING
!
Warnings Against Unintended
Start
1. While the drive is connected to the AC line, the motor
can be brought to a stop by means of external switch
closures, serial bus commands or references. If personal
safety considerations make it necessary to ensure that
no unintended start occurs, these stops are not sufficient.
2. During programming of parameters, the motor may start.
Be certain that no one is in the area of the motor or
driven equipment when changing parameters.
3. A motor that has been stopped may start unexpectedly
if faults occur in the electronics of the drive, or if an
overload, a fault in the supply AC line or a fault in the
motor connection or other fault clears.
4. If the “Local/Hand” key is activated, the motor can only
be brought to a stop by means of the “Stop/Off” key or
an external safety interlock.
CAUTION
!
Electronic components of LonWorks option card
are sensitive to electrostatic discharge (ESD).
ESD can reduce performance or destroy
sensitive electronic components. Follow proper
ESD procedures during installation or servicing
to prevent damage.
Touching electrical parts may be fatal, even after equipment has
been disconnected from AC line. To be sure that capacitors have
fully discharged, wait 14 minutes for 208 V and 460 V units and
30minutes for 600 V units over 25 HP after power has been
removed before touching any internal component.
Copyright © 2003 American Standard, Inc. All rights reserved.

3
Table of Contents
Overview
Introduction ............................................................................................. 5
About This Manual .................................................................................. 5
Assumptions ............................................................................................ 5
What You Should Already Know ............................................................. 5
References ............................................................................................... 5
LonWorks Overview ................................................................................. 6
LON Concept ............................................................................................ 6
Applications ............................................................................................. 6
TR1 Series VFD Applications .................................................................. 7
TR1 Series VFD LonWorks Option Card ................................................. 7
Network Management .............................................................................. 7
Free Topology Network Configuration
System Performance ............................................................................... 8
System Specifications ............................................................................. 8
Transmission Specifications .................................................................. 8
Cable Specifications ................................................................................ 8
Free Topology Specifications ................................................................. 8
Doubly-terminated Bus Topology Specifications ................................... 8
Free Topology Network Configuration .................................................... 9
Network Termination Option ................................................................... 10
Terminator and Service Switch Locations ............................................. 10
Installation
Wiring Installation ................................................................................... 11
Card Installation ...................................................................................... 11
Tools Required ........................................................................................ 11
Packing List ............................................................................................. 11
TR1 Series VFD LonWorks Option Card ................................................. 12
Installation Instructions .......................................................................... 13
Network Initialization of LonWorks Option Card ................................... 20
LonMark Drive Profile ............................................................................. 20
Diagnostic LEDs
LonWorks Card Diagnostic LEDs ........................................................... 21
Status LED ............................................................................................... 21
Service LED ............................................................................................. 21
Service LED Patterns and Descriptions ................................................. 22

4
Interface/Network Variables
Network Configuration Properties (Nci) .................................................. 23
Network Drive Control Input ................................................................... 23
Drive Feedback to Network ..................................................................... 26
Drive Status Bit Definitions ..................................................................... 27
Network Timer Functions ....................................................................... 28
Standard Object Support ........................................................................ 29
Alarm Descriptions .................................................................................. 30
Parameters
Parameter List ......................................................................................... 30
Parameter Description ............................................................................. 30
Appendix
Application Notes .................................................................................... 33
Table of Contents (continued)

5
This manual is intended to be used for both
instruction and reference. It only briefly touches
on the basics of the LonWorks protocol
whenever necessary for gaining an
understanding of the LonWorks profile for drives
and the LonWorks Option Card for the TR1
Series VFD.
Introduction
About This
Manual
What You
Should
Already Know
Assumptions
This manual provides comprehensive
instructions on the installation and set up of
the LonWorks Option Card for the TR1 Series
VFD Variable Frequency Drive to communicate
over a LonWorks network.
For specific information on installation and
operation of the variable frequency drive, refer
to the TR1 Series VFD Installation and
Operation Manual.
Portions of this manual are printed with the
permission of the Echelon Corporation and the
National Electrical Contractors Association
(NECA) of the USA.
Echelon
®
, LonTalk
®
, Neuron
®
and LonWorks
®
are registered trademarks of the Echelon
Corporation. TR1
TM
is a registered trademark
of Trane Company.
The Trane LonWorks Option Card is designed
to communicate with any controller node that
supports the interfaces defined in this
document. It is assumed that you have full
knowledge of the capabilities and limitations of
the controller node.
This manual assumes that you have a controller
node that supports the interfaces in this
document and that all the requirements
stipulated in the controller node, as well as the
TR1 Series VFD, are strictly observed, along
with all limitations therein.
This manual is also intended to serve as a
guideline when you specify and optimize your
communication system. Even if you are an
experienced LonWorks programmer, we
suggest that you read this manual in its entirety
before you start programming, since important
information can be found in all sections.
References
TR1
TM
Series VFD Installation and Operation
Manual, document number TR1-SVX10A-EN.

6
LON
Concept
LonWorks
Overview
Applications
LonWorks is both an existing standard and
hardware developed by Echelon Corporation.
Echelon's stated goal is to establish a com-
modity solution to the presently daunting
problems of designing and building control
networks.
The result is LonMark Interoperability which
makes it possible for independent network
devices to operate together over a LonWorks
network. The LonMark program was
developed to address interoperability issues.
As a result, the LonMark Interoperability
Association Task Groups were developed.
The task groups determine that each device
on the network has an object definition,
create standards and models to be used by
The LonWorks communications structure is
similar to that of a local area network (LAN)
in that messages are continually exchanged
between a number of processors. A
LonWorks system is a determined local
operating network (LON). LON technology
offers a means for integrating various
distributed systems that perform sensing,
monitoring, control, and other automated
functions. A LON allows these intelligent
devices to communicate with one another
through an assortment of communications
media using a standard protocol.
LON technology supports distributed, peer-
to-peer communications. That is, individual
network devices can communicate directly
with one another without need for a central
control system. A LON device is designed to
move sense and control messages which are
typically very short and which contain
commands and status information that trigger
actions. LON performance is viewed in terms
of transactions completed per second and
response time. Control systems do not need
vast amounts of data, but they do demand
that the messages they send and receive are
absolutely correct. The critical factor in LON
technology is the assurance of correct signal
transmission and verification.
An important LonWorks benefit is the
network’s ability to communicate across
different types of transmission media. The
NEURON chip is the heart of the LonWorks
system. The NEURON chip's communication
port allows for the use of transceivers for other
media (such as coax and fiber optic) to meet
special needs.
LonWorks control devices are called nodes.
Physically, each node consists of a NEURON
chip and a transceiver. With proper design,
the nodes become building blocks that can
be applied to control a variety of tasks, such
as lighting or ventilating, integrating a variety
of communications media.
The tasks which the nodes perform are
determined by how they have been connected
and configured. Because hardware design,
software design, and network design may be
independent in a LonWorks-based system, a
node’s function can be programmed to
accommodate the networks in which it will be
used.
particular applications and create a common
platform for presenting data. A standard
network variable type (SNVT) facilitates
interoperability by providing a well defined
interface for communication between devices
made by different manufacturers. The TR1
Series VFD supports the LonMark functional
profile for variable speed motor drives. It also
supports node object and controller standard
object definitions.
Customers are currently using LonWorks for
process control, building automation, motor
control, elevator operation, life safety systems,
power and HVAC distribution and similar
intelligent building applications.

7
TR1 Series
VFD
LonWorks
Option Card
The Trane TR1 Series VFD LonWorks option
card is comprised of a control card with a
NEURON chip and a memory card. When
installed into the TR1 Series variable frequency
drive, the unit enables the drive to
communicate with other devices on the LON.
The TR1 Series drive is designed to provide
precision control of standard induction electrical
motors for HVAC applications. The drive
receives three reference signals along with
start/stop and reset commands from the
network. The drive also receives a 16-bit control
word that provides full operational control of
the drive. (See Network Drive Control Input for
additional details.)
In response, the drive provides 16 output
network variables containing important drive
and motor data. (See Drive Feedback to
Network.) Output to the network includes drive
status, current, voltage, motor and inverter
thermal status, and alarms and warnings.
The TR1 Series VFD LonWorks free topology
option card, 176F1515, supports four
transmission media, which also operates on a
link power network (used for Comm 5). A router
is required to interface to a LonWorks network
when not supported by the option card.
Network
Management
Depending on the level of a given application,
a LonWorks network may or may not require
the use of a network management node. A
network management node performs
management functions, such as:
• Find unconfigured nodes and download
their network addresses.
• Stop, start, and reset node applications.
• Access node communication statistics.
• Configure routers and bridges.
• Download new applications programs.
• Extract the topology of a running
network.
TR1 Series
VFD
Applications
Common applications for the Trane TR1 Series
VFD include the following.
• The TR1 is factory mounted or field
applied under control of discrete I/O from
another controller. It is possible to
monitor the TR1 using Tracer Summit's
generic LonTalk device (GLD) object.
• The TR1 is field applied using closed loop
PID control. It is possible to enable/
disable, change setpoints, and monitor
the control through Tracer Summit using
the GLD object.
• The TR1 can be controlled digitally when
used in conjunction with Trane's AH540
and MP580 Comm 5 (LON) controllers.
• The TR1 could be operated in an open
loop control method and, under certain
circumstances, an override or contact
closure can send the drive to a preset
value.
Within a Trane BAS system, the Tracer Summit
building controller unit (BCU) and/or Rover
Service tool act as the network managers.

8
System
Performance
• The average temperature of the wire
must not exceed 131° F. Individual
segments of wire may be as hot as
185° F.
System
Specifications
Free topology system specifications and
transmission specifications are described
below. Both specifications should be met to
ensure proper operation.
The transmission specification depends on such
factors as resistance, mutual capacitance and
the velocity of propagation.
The system designer may choose from a variety
of cables, depending on cost, availability, and
desired performance. Performance may vary
with cable type. Contact Echelon for cable types
and the characterization of system performance.
Note
The following specifications are for
one network segment. Multiple
segments may be combined using
repeaters to increase the number of
nodes and distance.
Transmission
Specifications
Free Topology nodes run at 78 kbps
transmission speeds.
Doubly-
Terminated
Bus
Topology
Specifications
Free
Topology
Specifications
Cable
Specifications
Trane recommends the use of shielded
LonWorks communication cable, for example
• Up to 64 FTT-10 transceivers are allowed
per network segment.
18 guage shielded twisted pair, tinned-copper
conductors (Trane "purple" wire).
Belden 85102 1650 ft 1650 ft
Belden 8471 1300 ft 1650 ft
Level IV, 22AWG 1300 ft 1650 ft
JY (St) Y 2x2x0.8 1050 ft 1650 ft
*Trane 400-2028 1300 ft 1650 ft
Belden 85102 8850 ft 7200 ft
Belden 8471 8850 ft 7200 ft
Level IV, 22AWG 4500 ft 3800 ft
JY (St) Y 2x2x0.8 2950 ft 2450 ft
*Trane 400-2024 4500 ft 3800 ft
*Recommended

9
Free
Topology
Network
Configuration
The Free Topology Transceiver (FTT) system is
designed to support free topology wiring and
accommodates single and doubly terminated
bus topologies. The FTT transceiver located
on the TR1 Series VFD LonWorks option card
provides I/O functions. Flexible wiring capability
simplifies system installation and makes it easy
to add nodes for system expansion. The figures
below represent network topologies.
TERMINATION
TERMINATION
TERMINATION
TERMINATION
TERMINATION
TERMINATION
Singly Terminated
Bus Loop
Doubly Terminated
Bus Loop
Star Topology
Mixed Topology
Loop Topology
Loop Topology
Mixed Topology
(Recommended)

10
Network
Termination
Option
Terminator
and Service
Switch
Locations
The option of using termination on the
LonWorks card is provided. The option card
has a 105 ohm termination resistor built in which
is activated by the terminator switch. Use of
the terminator is optional, depending upon the
network configuration. If termination is provided
elsewhere in the network, the termination
function should be OFF. Terminator switch
position functions are provided in the table
below. The factory default setting is OFF.
OFF
1
2
Switch Position Functions
Free Topology LonWorks Control Card
No termination Net Term OFF Net Term OFF
Single termination Net Term ON Net Term OFF
Double termination Net Term ON Net Term ON
NOTE
Termination resistor selection
should be made prior to installing
option card. It is recommended to
use an external termination
resistor because switches will not
be viable after assembly.

11
Wiring
Installation
TR1 Series variable frequency
drive contains dangerous voltages
when connected to line power.
After disconnecting from line, wait
at least 14 minutes before
touching any electrical com-
ponents.
Only a competent electrician
should carry out electrical
installation. Improper installation
of motor or TR1 drive can cause
equipment failure, serious injury
or death. Follow this manual,
National Electrical Code and local
safety codes.
WARNING
!
CAUTION
!
CAUTION
!
Electronic components of TR1
variable frequency drives are
sensitive to electrostatic dis-
charge (ESD). ESD can reduce
performance or destroy sensitive
electronic components. Follow
proper ESD procedures during
installation or servicing to prevent
damage.
It is responsibility of user or
installer of TR1 Series variable
frequency drive to provide proper
grounding and motor overload
and branch protection according
to National Electrical Code and
local codes.
DANGER
!
The variable frequency drive generates a carrier
frequency with a pulse frequency between 3
kHz and 14 kHz. This results in radiated
frequency noise from the motor cables. It is
very important that the LonWorks cable be
isolated as much as possible from the drive
Card
Installation
output cabling to the motor. Use the
recommended Trane Comm 5 twisted-
shielded pair when connecting to the TR1 VFD
(refer to BAS-SVN01A-EN). Do not run
LonWorks cabling and motor cables in parallel
or in close proximity to one another. Ensure
that the drive is properly grounded.
The following section describes the installation
procedures for the LonWorks option card (see
following illustration). For additional information
on installation and operation of the TR1 Series
VFD, refer to the TR1
Series VFD Installation
and Operation Manual.
Tools
Required
Flat-head screw driver
Torx T-10 screw driver
Torx T-20 screw driver
Packing List
LonWorks control board
Memory board
(3) T-10 screws
Grounding strip (left)
Grounding strip (right)
Hardware kit 175L5900

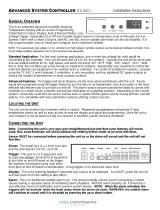
12
LEDs
Terminal
Connector
Service Pin
Switch SW1
Mounting Hole
LEDs
Terminal
Connector
Service Pin
Switch SW3
Terminator
Switch
Ribbon
Cable
Socket
(to Memory
Board)
Ribbon
Cable
Socket
(to Control
Board)
Memory Board
Ribbon
Cable
Socket
(to drive
control
board)
LonWorks Control Board
TR1 Series VFD LonWorks Option Card
(Free Topology Model FTT 10A)
Host
Chip
Drive
Memory

13
Installation Instructions
1. Access to
Control
Card
Cassette
• Remove control wiring by unplugging
connector terminals (A).
• Remove grounding clamps (B) by
removing two screws holding each in
place. Save screws for reassembly.
• Loosen two captive screws (C) securing
cassette to chassis.
2. Disconnect
Control
Card
Cassette
NEMA 1
• Remove Local Control Panel (LCP) by
pulling out from top of display (A) by hand.
LCP connector on panel back will
disconnect.
• Remove protective cover by gently
prying with a screw driver at notch (B)
and lift cover out of guide pin fittings.
NEMA 12
• Open front panel of drive by loosening
captive screws and swing open.
• Disconnect Local Control Panel (LCP)
cable from drive control card.
(A)
(B)
(C)
(A)
(B)
TR1 Series VDF

14
• Lift control card cassette from bottom.
• Unplug two ribbon cables (A) and (B)
from control board.
• Unhinge cassette at top to remove.
3. Remove
Cassette
and Ribbon
Cables
NOTE
Ribbon cables will need to be
reconnected to same connec-tions
from which removed.
4. Chassis
Ground
Connections
• Location of holes to mount grounding
strips can vary with drive configuration.
When applicable, remove mounting
screws located in chassis using Torx
T-20 screw driver and save for
reassembly. Otherwise, grounding strips
attach with screws provided as, shown
in step 5.
NOTE
Ground strips are used on 208 V
drives of 30 HP (22 kW) or less and
on 460 V drives of 60 HP (45 kW)
or less. For all other drives, go to
step 6.
(A)
(B)

15
5. Install
Chassis
Ground
Connections
Ground
Strips
• Attach ribbon cables between
LonWorks control card and memory
card.
• Be sure exposed wire portion of ribbon
cable (A) is facing front of socket (B).
Do not remove blue insulation covering
end of ribbon cable.
• Pull up collar (C) of ribbon cable socket,
insert cable and push collar closed.
• Repeat procedure for all ribbon cables.
• Remove terminal connector from
terminal block (D) and connect to
terminal block (E) at this time for ease
of access.
6. Install
Ribbon
Cables
between
Option
Cards
(D)
(E)
• Align ground strips over pre-tapped
screw holes provided. Tabs on
grounding strips point toward outside of
chassis.
• Replace screws removed in step 4 and
add additional screws and washers
provided, as necessary. Tighten to
8 in-lbs using Torx T-20 screw driver.
NOTE
Layout of control card cassette for
attaching grounding strips will
vary somewhat depending upon
unit size.

16
• Insert edge of LonWorks cards into slot
in side of cassette and align screw
holes.
9. Insert
LonWorks
Card
• Route ribbon cables from LonWorks
memory card through slot at side of
control board cassette.
8. Ribbon
Cable
Routing
7. Remove
LCP Cradle
NEMA 1
• Carefully push in tabs at corners of LCP
cradle to release clips. Pull out to
disengage clips and lift cradle free.

17
11. Install
Ribbon
Cable on
TR1 Control
Board
• Be sure not to twist or crimp ribbon
cables.
• Insert cables into corresponding sockets
and fasten in accordance with directions
in step 5.
NEMA 1
• Insert cradle clips into holes in cassette.
• Push down on cradle to snap it into
place.
12. Install
LCP Cradle
10. Secure
LonWorks
Card
• Secure LonWorks card with 3
self-tapping screws and washers
provided using Torx T-10 screw driver.
Tighten to 8 in-lbs.

18
• Connect ribbon cables.
• Connect control card cassette to hinge
at top of drive and fit into chassis.
14. Install
Ribbon
Cables
NOTE
Ribbon cables must be recon-
nected to same connections from
which removed.
• Spring tension clip (A) is used as a cable
strain relief.
• Insert clip through inner wall of chassis
at slot provided.
• Compress spring into clip at outer wall
of chassis.
13. Install
Spring
Tension
Clip
(A)

19
15. Install
Control Card
Cassette
16. Plug in
Terminal
Connector
NOTE
Shielded cable is recommended.
Ground shielded cable at spring
tension clip location or ground at
cable clamp by removing cable
insulation at contact point. Do not
use connector terminal 61.
• Fasten control card cassette by
alternately tightening two captive
screws (A). Tighten to 8 in-lbs.
• Route control wires through clamp
fasteners (B) and secure clamps with
two screws.
• Connect control terminals (C) by firmly
pressing them into connector
receptacles.
• Connect signal wire NET A to terminal
79 and NET B to 80 of terminal
connector. (In free topology model,
connections can be reversed.)
• Plug network connector into terminal
block at side of control card cassette.
• Insert LonWorks cable between inner
wall of chassis and spring tension clip.
Shield 61
NET B 80
NET A 79
79
80
61
(A)
(B)
(C)

20
Network
Initialization
of LonWorks
Option Card
LonMark
Drive Profile
A LonMark external interface file (.XIF
extension) provides the host processor with
device information. With this, it is possible
to design a LonWorks network without the
drive being physically present. The resource
file is available for downloading from the
Trane website at
, or contact Trane GCC Product
Support.
The drive may also be added to the network
upon initialization.
The LonWorks option card contains a NEURON
chip with a unique address. After hardware
installation, initialize the LonWorks option card
by using a Tracer Summit BCU or Rover
running in active mode. Addressing nodes on
the LonWorks network is performed at
installation time by an installation tool or
network management tool. Addressing
requires the retrieval of a node’s NEURON ID.
The NEURON ID is a 48 bit number that identifies
every manufactured NEURON chip. There are
several methods by which the network
software will initialize the drive automatically.
The network can recognize the drive without
action beyond proper installation. The card is
then ready to be programmed for network
operation. The TR1 LonWorks option supports
three additional methods of addressing a node:
1. Service Pin - There are two
momentary-contact service switches that
send the NEURON ID over the network. If the
network software prompts the action, press
either service pin (SW1 or SW3) to transmit
the NEURON ID over the network. The service
pin locations are shown in the illustration in
Terminator and Service Switch Locations in
this manual.
2. Query and Wink - The LonWorks option
card is shipped with a domain of “0” and
subnet of “1.” Upon receiving the wink
command, the on-board green status LED
flashes so that the installer can locate the node.
The chip sends out its Neuron ID over the
network in response to the query command.
3. NEURON ID Label - The TR1 LonWorks
option card has a NEURON ID label that displays
the NEURON ID as a 12 digit hexadecimal
number. The installer can manually enter the
NEURON ID during installation.
The TR1 LonWorks network interface consists
only of SNVTs. The SNVTs support the
LonMark Controller Profile along with TR1
configuration, control and monitoring
capabilities. Any combination of SNVTs can be
used to operate the TR1.
Also supported is the functional profile for variable
speed drives from the LonMark Interoperability
Association at
. This profile defines a
set of network variables (SNVTs) and
configuration properties (SCPTs).
/