Page is loading ...

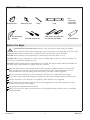
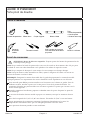
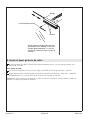
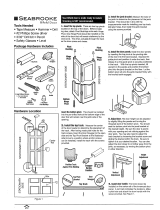
Tools and Materials
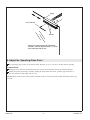
Before You Begin
CAUTION: Risk of personal injury. Always wear safety glasses while cutting or drilling.
NOTICE: Do not touch the edge of the tempered glass panel with tools or any hard objects. Do not set the
unframed tempered glass edge directly on the floor. This will reduce the risk of shattering.
NOTICE: Do not attempt to cut tempered glass. Tempered glass shatters when it is cut.
NOTICE: When using a retractable case tape measure, add the length of the case to the measurement or
measure in a manner that excludes the case.
NOTE: Record the model number on the Homeowners Guide. The proper model number will enable our
customer service representatives to quickly help you if needed.
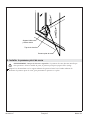
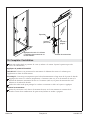
Your new Kohler door can be installed with the door opening to either the right or left. Install the
door with the pivot side away from the showerhead for best results. These instructions show the
door installed with a left side swing. Doors that swing to the right would be opposite.
Before starting the installation, lay out and identify all of the parts. Inspect them for damage.
The shower receptor should be installed and prepared at this time, including finished wall materials.
Two hex wrenches, 5/32″ and 5/64″ are supplied. A 7/64″ drill bit is also supplied.
Closely follow the instructions pertaining to the sealant application on the door. Sealing areas other
than those shown may cause leaking.
Two people should perform this installation.
Kohler Co. reserves the right to make revisions to the design of products without notice, as specified
in the Price Book.
Silicone Sealant
Measuring Tape PencilSafety Glasses Level
Assorted Screwdrivers
Plus:
• Drop cloth
• Fine flat file
• Utility knife
Drill & Assorted
Drill Bits
Miter Saw or Hack Saw with
32-teeth Per Inch Blade
1011451-2-F 2 Kohler Co.

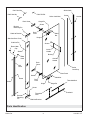
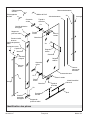
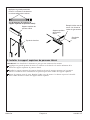
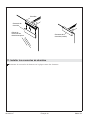
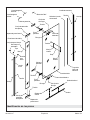
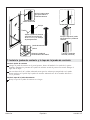
Parts Identification
Strike Jamb
Strike Jamb Seal
Threshold Seal
Threshold
Back Cover
Screw
Hinge Pin
Screw
Bushing
Screw
Weld Nut
Hinge Pin
Glass Panel
Screw
Anchor
Threshold
Filler
Inside
Handle
Weld
Nut
Outside
Handle
Strike
Jamb Cap
Hinge
Hinge
Back
Plate
Screw
Cap
Side Lite Bracket
Side Lite Glass Panel
Side Lite Bracket
5/32" Hex Key
7/64" Drill Bit
Screw
Sleeve
Anchor
5/64" Hex Key
Bracket
Retaining
Pin
Robe
Hook
Razor Hook
Side Lite Pin
Back
Cover
Bracket
Retaining Pin
Back
Plate
Wall
Jamb
Kohler Co. 3 1011451-2-F

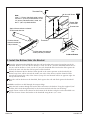
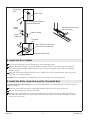
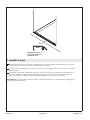
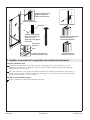
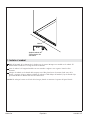
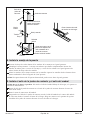
1. Install the Threshold
Measure the length of the shower opening for the door. Mark this measurement on the threshold.
The threshold should run the entire length of the opening.
Cut the threshold to the measured length with a miter saw or hacksaw. File the rough edges.
Locate the threshold on the receptor ledge with the flat edge towards the outside (dry side) of the
shower and mark the location. Apply silicone sealant to the edge underneath the threshold and
attach to the ledge. Temporarily secure the threshold with masking tape.
NOTE: Do not locate tape on the hinge side, where the side lite bracket will be mounted.
Threshold
Apply silicone sealant
under threshold edge.
1011451-2-F 4 Kohler Co.

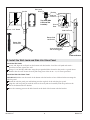
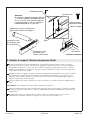
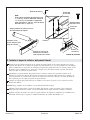
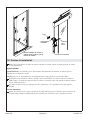
2. Install the Bottom Side Lite Bracket
Insert the appropriate threshold filler into the side lite bracket in the groove located on top of the
threshold. If the 7″ (17.8 cm) side lite bracket is used, use the 11″ (27.9 cm) threshold filler. If the 13″
(33 cm) side lite bracket is used, use the 17″ (43.2 cm) threshold filler. Position the filler against the
wall on the same side that the side lite panel will be installed.
Identify the bottom side lite bracket. When placed in the correct position on the threshold, the
bracket weep slots will be towards the inside (wet side) of the shower, and the channel will be
towards the outside (dry side) of the shower (weep slots and channel will be on opposite edges for
the top side lite bracket).
Place the side lite bracket on the threshold, flush against the wall and flush against the threshold
filler.
NOTE: Be careful not to drill through the receptor ledge.
Mark the hole location through the bracket hole and remove the bracket. Using the supplied 7/64″
drill bit, drill a hole through threshold at the location marked and clean out the filings.
Apply silicone sealant to the channel on the bottom of the bracket and place on the threshold at its
previous location. Secure the bracket to the threshold using #6-20 x 3/8″ screw.
#6-20 x 3/8" Screw
Threshold
Threshold Filler
Inside of Shower
Bracket Hole
Note:
Position weep slots towards
inside (wet side) of shower.
Position channel
towards outside (dry
side) of shower.
Bottom Side
Lite Bracket
If the 7" (17.8 cm) side lite bracket is used,
use the 11" (27.9 cm) threshold filler. If the
13" (33 cm) side lite bracket is used, use
the 17" (43.2 cm) threshold filler.
Weep
Slot
Apply silicone sealant to channel
located under bracket.
Kohler Co. 5 1011451-2-F

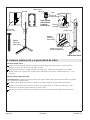
3. Install the Wall Jamb and Side Lite Glass Panel
Install the Wall Jamb
Locate and align the wall jamb on the bottom side lite bracket. Level the wall jamb and mark a
pencil line location against the wall.
Using a 5/16″ drill bit, drill holes using the pre-punched holes located in the jamb as a guide. Insert
anchors into the wall. Secure the wall jamb using four of the #8-18 x 1-1/2″ screws provided.
Install the Side Lite Glass Panel
IMPORTANT! Make sure the inside of the bottom side lite bracket is free of debris before inserting the
side lite panel.
Install the side lite panel pin and bushing into the top hole of the side lite glass panel.
Align the side lite panel pin with the track in the wall jamb and carefully slide the panel into the
slot in the bottom side lite bracket.
Press the retaining pin into the hole located on the back of the bottom side lite bracket.
Wall Jamb
Inside of Shower
Glass
Wall Jamb
Wall Jamb
#8-18 x 1-1/2" Screw
Bushing
Anchor
Glass
Door
Top View (Side
Lite Panel Pin
Location)
Bottom Side
Lite Bracket
Insert retaining pin
after installing glass.
Bottom Side
Lite Bracket
Side Lite
Panel Pin
Side Lite Panel
1011451-2-F 6 Kohler Co.

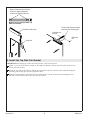
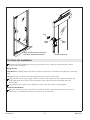
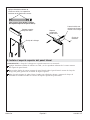
4. Install the Operating Glass Panel
WARNING: Risk of personal injury. The glass panel should be installed with two people.
Depending on the door model, the panel may weigh as much as 85 lbs (39 kg).
Align the hinge pin in the bottom side lite bracket with the hole in the operating glass panel bottom
hinge and set the panel into place.
Hinge Pin
Operating Glass Panel
Bottom Side Lite Bracket
Kohler Co. 7 1011451-2-F

5. Install the Top Side Lite Bracket
IMPORTANT! The hinge pin cannot be removed once it has been inserted.
Apply a heavy bead of silicone sealant to the edge and bottom surfaces located on the inside slot of
the top side lite bracket.
Install the top side lite bracket by sliding the top bracket onto the side lite panel while inserting the
operating panel hinge pin into the top bracket hole.
Open the operating glass panel. Fill the hole with silicone sealant and press the retaining pin into
the hole located on the back of the top side lite bracket.
Top Side Lite Bracket
Hinge Pin
Retaining
Pin
Fill hole with silicone sealant
and insert the retaining pin.
Top Side Lite
Bracket
Bottom View (Looking Inside Top
Side Lite Bracket)
Apply a heavy bead of silicone
sealant to edge and bottom
surfaces on inside of the slot.
1011451-2-F 8 Kohler Co.

6. Adjust the Operating Glass Panel
The operating glass panel can be horizontally adjusted up to 3″ (7.6 cm) to fit the shower opening.
To Adjust Panel
Using the 5/32″ hex key provided, loosen the screws located in both the top and bottom hinges.
Adjust the panel position by carefully sliding the panel back and forth - position approximately 1″
(2.5 cm) from the strike jamb side of wall.
NOTE: Allow room for the strike jamb installation (refer to ″Install the Strike Jamb and Strike Jamb Cap″
section).
5/32" Hex Key
Screws
Hinge
Adjust glass panel position by sliding back
and forth – position approximately 1" (2.5 cm)
from strike jamb side of wall.
Kohler Co. 9 1011451-2-F

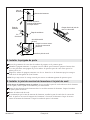
7. Install the Strike Jamb and Strike Jamb Cap
Install Strike Jamb
Locate the strike jamb on the opposite wall, behind the threshold. Use the installed door to
determine the position of the strike jamb when the door is closed. Mark the location with a pencil.
Using a 5/16″ drill bit, drill holes using the pre-punched holes located in the jamb as a guide. Insert
anchors into wall. Secure the strike jamb using three of the #8-18 x 1-1/2″ screws provided.
Install Strike Jamb Cap
Snap the strike jamb cap into place.
Strike Jamb
Strike Jamb
Threshold
Screw
Anchor
Use door as a guide to
position strike jamb.
Install strike jamb using
three #8-18 x 1-1/2" screws
and wall anchors provided.
Locate strike jamb
behind threshold.
Snap strike jamb
cap into strike jamb.
Strike Jamb Cap
(Installed)
1011451-2-F 10 Kohler Co.

8. Install the Door Handle
Press the glass bushings into the handle holes in the operating panel.
Identify the interior handle - the handle with holes going all the way through. Insert two flathead
screws through this handle and through the holes in the operating glass panel. Slide the bushings
onto the screws.
Align the exterior handle holes with the screws. Tighten the screws from the inside until snug using
the 5/64″ hex wrench provided.
NOTICE: Do not overtighten. Overtightening can cause damage to the operating panel.
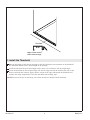
9. Install the Strike Jamb Seal and the Threshold Seal
NOTICE: Risk of product damage. Do not install the threshold seal under the hinge or the door will not
operate properly.
Insert the strike jamb seal into the strike jamb channel. Trim the excess seal from the top.
Remove the masking tape from the threshold.
Starting at the strike jamb side, install the threshold seal into the groove on the threshold. The seal
runs from the end to the front of the hinge. Notch the foam portion around the strike jamb. Trim the
excess seal at the hinge.
Screw
Bushing
Exterior Handle
Strike Jamb
Threshold
Install the strike jamb seal,
and trim the excess.
Strike Jamb
Seal
Interior
Handle
Threshold
Seal
Install the threshold seal.
Notch the foam portion of the
seal around the strike jamb.
Trim the excess threshold
seal at the hinge.
Kohler Co. 11 1011451-2-F

10. Finish the Installation
Perform any final adjustments to the glass panel (refer to the ″Adjust the Operating Glass Panel″
section of this document).
Apply Sealant
IMPORTANT! Carefully follow the silicone sealant manufacturer’s instructions for application and curing
time.
NOTE: This step is critical to the long term performance of your shower door.
Using silicone sealant (only), apply a bead of sealant to the outside (dry side) where wall jamb and
strike jamb meet the wall and to the outside (dry side) where the bottom threshold meets the
shower ledge.
Use masking tape to protect areas adjacent to those where the sealant is being applied.
Attach the Accessories
Insert the accessories into the top of the wall jamb on both the interior and exterior of the shower.
Choose any two combinations of the razor hook, cap, or robe hook.
Cap
Apply silicone sealant to outside of
the jambs and bottom threshold.
Attach accessories.
Robe
Hook
Razor
Hook
1011451-2-F 12 Kohler Co.

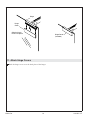
11. Attach Hinge Covers
Slide the hinge covers over the back plate of the hinges.
Hinge
Hinge
Cover
Slide the hinge
covers into place.
Hinge Cover
(Installed)
Kohler Co. 13 1011451-2-F
Page is loading ...
Page is loading ...
Page is loading ...
Page is loading ...
Page is loading ...
Page is loading ...
Page is loading ...
Page is loading ...
Page is loading ...
Page is loading ...
Page is loading ...
Page is loading ...
Page is loading ...
Page is loading ...
Page is loading ...
Page is loading ...
Page is loading ...
Page is loading ...
Page is loading ...
Page is loading ...
Page is loading ...
Page is loading ...
Page is loading ...
Page is loading ...
Page is loading ...
Page is loading ...
Page is loading ...
-
 1
1
-
 2
2
-
 3
3
-
 4
4
-
 5
5
-
 6
6
-
 7
7
-
 8
8
-
 9
9
-
 10
10
-
 11
11
-
 12
12
-
 13
13
-
 14
14
-
 15
15
-
 16
16
-
 17
17
-
 18
18
-
 19
19
-
 20
20
-
 21
21
-
 22
22
-
 23
23
-
 24
24
-
 25
25
-
 26
26
-
 27
27
-
 28
28
-
 29
29
-
 30
30
-
 31
31
-
 32
32
-
 33
33
-
 34
34
-
 35
35
-
 36
36
-
 37
37
-
 38
38
-
 39
39
-
 40
40


Kohler K-706000-L-SH Installation guide
- Type
- Installation guide
- This manual is also suitable for
Ask a question and I''ll find the answer in the document
Finding information in a document is now easier with AI
in other languages
Related papers
-
Kohler K-702412-L-MX Installation guide
-
-
-
-
-
-
-
Sterling 572096-59S-G05 Installation guide
-
-
Other documents
-
Everbilt 14409 Installation guide
-
Sterling 6305-30DR-G05 Installation guide
-
 Pinecroft SEALL24 Installation guide
-
 Pinecroft SEALL24 Installation guide
-
-
-
-
-
-
Sterling Plumbing Finesse™ Peak® Installation guide

