Page is loading ...

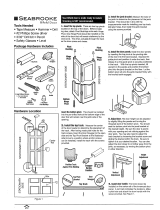
Tools and Materials
Before You Begin
CAUTION: Risk of personal injury. Always wear safety glasses while cutting or drilling.
CAUTION: Risk of injury or product damage. Unframed tempered glass should not contact hard
surfaces or it may shatter. Do not touch the edge of the tempered glass panel with tools or any hard
objects. Do not set the unframed tempered glass edge directly on the floor.
CAUTION: Risk of injury or product damage. Do not attempt to cut tempered glass. Tempered
glass shatters when it is cut.
CAUTION: Risk of product damage and property damage. This shower door is very heavy. Do not
install it to plastic shower modules or drywall unless additional support is provided behind the
wall.
NOTICE: When using a retractable case tape measure, add the length of the case to the measurement or
measure in a manner that excludes the case.
IMPORTANT! Record the model numbers from each box and the master model number on the
Homeowners Guide if you intend to save it, or in your records for later use. The numbers can be found on
the label, starting with a ″K-″. The proper model number will enable our customer service representatives
to quickly help you if needed.
Your new Kohler door can be installed with the door opening to either the right or left. Install the
door with the pivot side away from the showerhead for best results. These instructions show the
door installed with a left side swing. Doors that swing to the right would be opposite.
Handles are purchased separately. Install the handles following the installation instructions provided
with them.
These instructions cover both 30″ (76.2 cm) to 48″ (121.9 cm) and 60″ (152.4 cm) models. Some steps
may pertain to only one model. Make sure to follow the steps for your model of door only.
Before starting the installation, lay out and identify all of the parts. Inspect them for damage.
Some steps in these instructions are specific to a right or left side hinge installation. Follow the
instructions which pertain to your installation configuration.
Closely follow the instructions pertaining to the sealant application on the door. Sealing areas other
than those shown may cause leaking.
Two people should perform this installation.
Safety Glasses
Caulk Gun
Silicone
Sealant
Tape
Measure
Claw
Hammer
Pencil or Felt
Tip Marker
Masking
Tape
• Drop Cloth
• Tile or Masonry Bit
(if installing onto tile walls)
Plus:
Center
Punch
File
Knife
Assorted
Screwdrivers
Miter Saw or Hack Saw with
32 Teeth Per Inch Blade
Pliers
Miter Box
1/4" and 5/32"
Hex Wrenches
Drill and
Assorted
Bits
Level [4' (1.2 m)
to 6' (1.8 m)]
1064866-2-B 2 Kohler Co.

Before You Begin (cont.)
Kohler Co. reserves the right to make revisions to the design of products without notice, as specified
in the Price Book.
Kohler Co. 3 1064866-2-B

Parts Identification
Cover
Side Lite Filler
Bottom Track
Threshold Seal
Cover
Wall
Jamb
Glass
Panel
Back
Plate
Side Lite
Glass Panel
Movable Hinge
Bottom Left/
Top Right
Back
Plate
Wall Bracket
Top Left/
Bottom Right
Wall Bracket
Bottom Left/
Top Right
Movable Hinge
Top Left/
Bottom Right
Glass Door
Panel
Fixed Hinge
Bottom Left/
Top Right
Fixed Hinge
Top Left/
Bottom Right
Glass To Glass Seal
Strike Lite Glass Panel
Wall
Jamb
Wall Bracket
Top Right/
Bottom Left
Wall Bracket
Bottom Right/
Top Left
Gasket
Gasket
VHB Foam
Tape
60" (152.4 cm) Models
Shim
(if needed)
Gasket
Strike Lite
Filler
Gasket
Gasket
Shim
(if needed)
Screw
Screw
Bushing
Weld Nut
Screw
Shim
(if needed)
1064866-2-B 4 Kohler Co.

Parts Identification (cont.)
48" (121.9 cm) Models and Smaller
Wall Bracket
Bottom Left/
Top Right
Fixed Hinge
Bottom Left/
Top Right
Gasket
Shim
(if needed)
Screw
Screw
Side Lite
Glass Panel
Wall Bracket
Top Left/
Bottom Right
Fixed Hinge
Top Left/
Bottom Right
Gasket
Gasket
Screw
Shim
(if needed)
Cover
Back
Plate
Cover
Back
Plate
Movable Hinge
Top Left/
Bottom Right
Bushing
Weld Nut
Bottom Track
Threshold Seal
Wall
Jamb
Glass
Panel
Movable Hinge
Bottom Left/
Top Right
Screw
Strike Jamb Seal
Anchor
Strike Jamb
Strike Jamb Cap
Glass Door
Panel
Side Lite Filler
VHB Foam
Tape
Kohler Co. 5 1064866-2-B

1. Determine the Door Configuration
IMPORTANT! Install the pivot side of the door on the side opposite the showerhead for easy access to
shower controls.
Determine whether the door will pivot on the right or left side.
Make sure the door can swing freely in the chosen configuration.
Top View
Swing open toward left
Swing open toward right
Images are for reference only.
Not actual product.
Top View
Note:
1064866-2-B 6 Kohler Co.

2. Measure and Cut the Bottom Track
CAUTION: Risk of personal injury. Always wear safety glasses while cutting.
NOTE: When using a retractable case tape measure, add the length of the case to the measurement or
measure in a manner that excludes the case.
Measure from wall to wall at the bottom of the shower door opening. This is distance ″D″.
Subtract 1/16″ (2 mm) from distance ″D.″ The resulting dimension is the bottom track cut length.
Mark the bottom track at the determined distance.
NOTE: For best results use a miter box and 32-tooth per inch hacksaw to make the cut.
Cut the bottom track at the mark.
File the rough edges smooth where the bottom track was cut, taking care to avoid damaging
finished surfaces.
The cut bottom track should sit flush on the threshold without hand pressure or tape to hold it
down.
D
Angled
Base
Curved
Base
Measure carefully. If your walls
are curved or angled, measure above the curve or
angle. Failure to do so can result in an improperly cut
bottom track and can void the warranty.
Measure distance
"D" above curves in
the corners.
Measure
here.
Measure
here.
Warning:
Kohler Co. 7 1064866-2-B

3. Locate the Bottom Track
NOTE: When installing a 60″ (152.4 cm) door, the hinge side lite is the narrow piece of glass with 4 holes
in it.
Cut length of the supplied VHB foam tape to match the width of the hinge side lite (if necessary).
Remove the backing from the tape and, starting adjacent with the end of the track on the hinge side,
apply the tape to the flat top of the bottom track. Position the tape about 3/8″ (1 cm) from the
groove in the bottom track, centered on the flat portion of the bottom track.
NOTE: Position the bottom track far enough toward the outside (dry side) of the shower threshold to
allow the strike jamb or strike lite filler to sit behind the bottom track. The back edge of the bottom track
should be at least 1″ (2.5 cm) from the inside edge of the shower threshold to allow the rest of the door to
sit on the threshold.
Position the bottom track on the threshold with the slanted section toward the inside (wet side) of
the shower.
Make sure the front edge of the bottom track is an equal distance from the front edge of the shower
ledge at all points.
Temporarily secure the bottom track to the ledge with masking tape (do not apply the tape over the
VHB foam tape).
Mark the location of the bottom track with a soft pencil.
Position the side lite filler over the VHB foam tape and install it into the groove in the bottom
track.
3/8"
(1 cm)
Bottom Track
VHB Foam Tape
Side Lite Filler
1" (2.5 cm) Min
VHB Foam Tape
Groove
Slanted
Section
Inside of
Shower
1064866-2-B 8 Kohler Co.

4. Install the Hinge-Side L-Brackets
IMPORTANT! The L-brackets are installed against the hinge-side wall on 30″ (76.2 cm) to 48″ (121.9 cm)
models. 60″ (152.4 cm) models have an additional set of L-brackets on the strike side. Their proper
installation is critical to the rest of the installation.
Choose the correct L-bracket based on the door swing configuration (see ″Parts Identification″) and
position the bottom of the L-bracket on top of the bottom track. Make sure the L-bracket is aligned
with the side lite filler.
Use a level to align the L-bracket vertically. Mark the center of the slotted hole locations.
Remove the bracket and set it aside. Drill the holes following the ″Drilling Instructions″ below.
Place the hinge side wall jamb on top of the bottom L-bracket.
Use a level to align the hinge side wall jamb vertically.
Temporarily secure the hinge side wall jamb to the wall with masking tape.
Position the top L-bracket on top of the hinge-side wall jamb.
Use a level to align the L-bracket vertically and mark the hole locations with a pencil.
Remove the hinge-side wall jamb and bracket from the wall and set aside. Drill the holes following
the ″Drilling Instructions″ below.
Drilling Instructions
NOTE: When the installation is on ceramic tile, use the center punch to nick the surface glaze or drill a
very small pilot hole. Tap the punch lightly with the hammer to avoid cracking the ceramic tile.
Lightly center punch the hole locations or drill very small pilot holes.
NOTE: Start drilling slowly to prevent damage.
Use a 9/64″ bit to drill a hole at each of the marks, and thoroughly clean the shower ledge.
Position a level vertically against the hinge-side wall. Hold the level in a plumb position.
If the wall is out of plumb, use a provided shim behind the L-bracket to bring it plumb.
Attach the L-bracket to the wall with the supplied #8-18 x 2″ screws. Use shims as necessary.
Drilled
Holes
Shim
(if necessary)
Mark the location
of four "L" bracket
mounting holes.
"L" Bracket for
Bottom Left or
Top Right
Stud
Screw
"L" Bracket for
Top Left or
Bottom Right
Stud
Draw a line
up the level.
6' (1.8 m) Level
Pencil
Pencil
Shim
(if necessary)
Side Lite
Filler
Pencil
Kohler Co. 9 1064866-2-B

5. Install the Bottom Bracket
NOTE: There is a label on the side lite panel identifying the ″non-coated side″ of the panel. The
non-coated side of the panel should face the outside of the shower when bottom bracket is being installed.
Place a bushing in the lower hole in the side lite panel where the bottom fixed hinge will be
installed.
Place the gasket on the lower corner of the glass, aligning the hole in the gasket with the hole in the
glass.
Gently slide the bottom fixed hinge over the gasket, aligning the hole in the bracket with the hole in
the glass.
Insert the supplied screw into the side of the bottom fixed hinge and fasten.
Tighten the screw until is it snug and/or flush with the surface. Do not overtighten.
Side Lite
Screw
Bottom Fixed Hinge
Gasket
To Inside
of Shower
Bushing
1064866-2-B 10 Kohler Co.

6. Install the Side Lite Glass Panel
CAUTION: Risk of injury or product damage. Unframed tempered glass should not contact hard
surfaces or it may shatter. Do not touch the edge of the tempered glass panel with tools or any hard
objects. Do not set the unframed tempered glass edge directly on the floor.
Place a bushing in the remaining bottom hole of the side lite glass panel.
Place the gaskets over the edges of the side lite panel.
Using your hands, place the wall jamb on the edge of the side lite glass panel, opposite the attached
hinge and exactly in the middle of the vertical edge of the side lite.
Important! Apply a bead of silicone sealant to the groove of the side lite filler.
Place the side lite glass panel onto the pins of the L-brackets.
IMPORTANT! Make sure the glass panel is as close to the wall as possible while still remaining plumb.
Place the outside plates onto the pins of each of the L-brackets and securely fasten with the
supplied screws.
Wipe off excess silicone sealant.
Position the bottom hinge bracket parallel with the bottom track. Use a level to align the front face
of the bracket with the front face of the bottom track.
Temporarily attach the bracket with masking tape or a clamp, making sure there is no gap.
Insert the self-tapping screw into the hole of the bottom hinge bracket and carefully thread the
screw into the bottom track (do not overtighten or it may strip the screw.)
Remove any visible aluminium chips.
Insert one of the hinge pins completely into the bottom hinge bracket.
Side Lite
Filler
Screw
Bushing
Outside Plate
Gasket
"L" Bracket
Apply Silicone Sealant.
Wall Jamb
Kohler Co. 11 1064866-2-B

7. Assemble and Attach the Hinge Jamb
CAUTION: Risk of injury or product damage. Unframed tempered glass should not contact hard
surfaces or it may shatter. Do not touch the edge of the tempered glass panel with tools or any hard
objects. Do not set the unframed tempered glass directly on the floor.
NOTE: Make sure you choose the correct hinge bracket. The weld nut groove should point towards the
near edge of the glass.
Slide two weld nuts into the groove of the lower hinge bracket and space them so that they align
with the holes in the door panel.
Insert a bushing onto each weld nut.
NOTE: There is a label on the door panel identifying the ″non-coated side″ of the panel. The bracket
should be located on the non-coated side of the door panel.
Position the bracket on the door panel so that the weld nuts pass through the two holes in the door
panel.
Position the back plate on the opposite side of the door panel, so that it hooks into the bottom of
the bracket.
Insert a screw into each of the two weld nuts through the slot in the back plate and tighten firmly.
Do not overtighten.
Repeat this procedure to install the top hinge bracket on the door panel.
Weld Nut
Lower Hinge Bracket
(groove aligns with
edge of glass panel)
Back Plate
Screw
Glass Door Panel
Inside of Shower
Bushing
Screw
1064866-2-B 12 Kohler Co.

8. Install the Strike Jamb - 30″ (76.2 cm) - 48″ (121.9 cm) Models
Position the strike jamb on the opposite wall, tight to the inside edge of the bottom track, resting
directly on the threshold.
Use a level to align the strike jamb vertically.
Temporarily secure the strike jamb to the wall with masking tape.
Mark the hole locations with a pencil.
Remove the strike jamb and set aside.
NOTE: When the installation is on ceramic tile, use the center punch to nick the surface glaze or drill a
very small pilot hole. Tap the punch lightly with the hammer to avoid cracking the ceramic tile.
Lightly center punch the hole locations or drill very small pilot holes.
NOTE: Start drilling slowly to prevent damage.
Use a 9/64″ bit to drill a hole at each of the marks.
Thoroughly clean the shower ledge.
Attach the strike jamb to the wall with the supplied #8-18 x 1-1/2″ screws.
Insert the strike jamb cap into the strike jamb from the top.
Insert the bulb seal into the strike jamb from the top.
Screw
Anchor
Strike
Jamb
Threshold
Strike Jamb
Strike Jamb
Strike
Jamb
Cap
Strike Jamb
Strike
Jamb
Cap
Bulb Seal
Kohler Co. 13 1064866-2-B

9. Install the Strike Side Glass Panel - 60″ (152.4 cm) Models
CAUTION: Risk of injury or product damage. Unframed tempered glass should not contact hard
surfaces or it may shatter. Do not touch the edge of the tempered glass panel with tools or any hard
objects. Do not set the unframed tempered glass directly on the floor.
Insert the strike lite filler into the bottom track.
Install wall brackets following the steps in the ″Install the Hinge-Side L-Brackets″ section, using the
strike lite filler to position the lower wall bracket.
NOTE: There is a label on the strike side panel identifying the ″non-coated side″ of the panel. If the strike
panel is coated glass, the side of the glass with the ″Non-coated side,″ label should face towards the
outside of the shower.
Carefully place the wall jamb on the edge of the strike lite glass panel, opposite the attached hinge
and exactly in the middle of the vertical edge of the strike lite glass panel.
Place a bushing in the bottom hole of the strike lite glass panel.
Position the gasket over the edges of the strike lite glass panel, with the top holes aligned with the
bushing.
Apply a bead of silicone sealant to the groove of the strike lite filler.
Align the bushing with the pin on the ″L″ brackets and position the strike lite glass panel on the
strike lite filler with the pins of the L-brackets through the bushings.
IMPORTANT! Make sure the glass panel is as close to the wall as possible while still remaining plumb.
Place the outside plates onto the pins of each of the L-brackets and securely fasten with the
supplied screws.
Wipe off excess silicone sealant.
Install the glass to glass seal on the edge of the strike lite glass panel. Position the triangular
protrusion on the back side of the seal so it is aligned with the edge of the glass.
Strike
Lite Filler
Screw
Bushing
Outside Plate
Gasket
Apply Silicone Sealant.
Wall Jamb
Strike Lite Filler
Strike Lite
Glass Panel
"L" Bracket
Glass To
Glass Seal
Top View
1064866-2-B 14 Kohler Co.

10. Install the Door
CAUTION: Risk of injury or product damage. Unframed tempered glass should not contact hard
surfaces or it may shatter. Do not touch the edge of the tempered glass panel with tools or any hard
objects. Do not set the unframed tempered glass directly on the floor.
IMPORTANT! Perform the following steps with two installers.
Place a bushing in the upper hole in the side lite glass panel where the top fixed hinge will be
installed.
Place the gasket over the top corner of the side lite glass panel so that the hole in the gasket aligns
with the hole in the glass.
Installer #1
Lift the door into a position so that the hinge pin is above the fixed hinge.
Carefully lower the door so the hinge pin fits into the bottom hinge. Hold the door in place while
installer #2 installs the top fixed hinge.
Installer #2
Place the top fixed hinge over the gasket of the side lite glass panel and hinge pin.
Align the hole in the top fixed hinge with the bushing and carefully position the top fixed hinge on
pin.
Insert the large diameter screw through the bracket into the bushing and tighten until flush with the
surface. Do not overtighten.
Top Fixed Hinge
Hinge Pin
Gasket
Bushing
Screw
Kohler Co. 15 1064866-2-B

11. Adjust and Secure the Door
CAUTION: Risk of injury or product damage. Unframed tempered glass should not contact hard
surfaces or it may shatter. Do not touch the edge of the tempered glass panel with tools or any hard
objects. Do not set the unframed tempered glass directly on the floor.
CAUTION: Do not allow the edges of the glass panel to contact the bottom track, or the seals. Contact
may shatter the glass or tear the seals.
Install the handles following the instructions packed with them.
Align the door with the strike lite glass panel.
IMPORTANT! Only loosen the screws enough for the door panel to move. If the screws are loosened too
much the weight of the door may pull the hinge and back plate apart. (If the hinge and back plate pull
apart, lift the door to remove stress and re-tighten the screws.)
If the door needs adjusting, loosen the screws located in the hinges (do not remove) one bracket at a
time and adjust the panel as needed.
When the door is properly aligned the bottom edge of the glass should be parallel with the bottom
track.
When the door is properly aligned, fully tighten the screws. Do not overtighten.
Hinge
Screws
5/32"
Hex Key
1064866-2-B 16 Kohler Co.

12. Install the Bottom Track Seal
CAUTION: Risk of product damage. Do not install the threshold seal under the hinge or the door
will not operate properly.
NOTE: If needed, apply a small amount of water or petroleum jelly to lubricate the seal when sliding it
into place.
Starting at the strike jamb side, install the threshold seal into the groove of the bottom track.
Position the seal so it is even with the end of the track.
Notch the foam portion around the strike jamb on 30″ (76.2 cm) - 48″ (121.9 cm) models or the glass
to glass seal on 60″ (152.4 cm) doors.
Carefully trim the excess seal at the door hinge with a scissors or knife, confirming that when the
panel is opened/closed the hinge does not snag the seal.
Threshold Seal
Bottom
Track
Trim the seal at the
hinge bracket so door
opens without snagging
the seal.
Strike
Jamb Seal
Trim around strike seal.
Kohler Co. 17 1064866-2-B

13. Finish the Installation
Slide the hinge covers over the back plate of the top and bottom door panel hinges.
Remove all temporary masking tape from the bottom track.
IMPORTANT! Carefully follow the silicone sealant manufacturer’s instructions for application and curing
time.
NOTE: Thoroughly clean and dry all dust, dirt, and grease from the bottom track and shower ledge
surfaces where silicone sealant will be applied.
NOTE: Placing a small weight on the bottom track to hold it flush to the track while the sealant cures can
help.
Use masking tape to protect areas adjacent to those where the sealant is being applied.
Apply sealant to the outside of the shower where the bottom track meets the threshold.
Apply sealant to the outside of the area where the wall jambs and brackets meet the walls.
Allow the sealant to fully dry before operating the door. Refer to the sealant manufacturers
instructions for recommended curing time.
Hinge
Hinge Cover
1064866-2-B 18 Kohler Co.
/