Page is loading ...

1
How to use your robot.

4
8
10
11
12
14
16
18
20
21
22
24
25
26
28
Getting started
Important safety instructions
Quick start
Dyson Link app
Getting connected: Part 1
Getting connected: Part 2 iOS
Getting connected: Part 2 Android
Cleaning modes
Understanding and optimising your robot.
Important information
Troubleshooting
Additional information
Maintenance
Emptying the clear bin
Brush bar and track maintenance
Washing and drying the filters
Cleaning optics
Software updates
Contents

3
Thank you for choosing to buy
the Dyson 360 Eye™ robot.
Navigational
camera
Sensors
Tracks
Power button
Cyclone pack
(cyclone, cyclone
shroud and
clear bin)
Finger hold
Cyclone pack
release button
USB port
(behind post filter cover)
Robot
In the box
Plug
Dock
Charging
contacts
Docking
targets
‘Power on’
indicator
Power
socket
Power
socket
Cable tidy
We’re here to help:
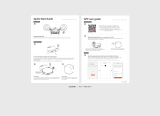
Download the Dyson Link app
The Dyson Link app allows you to control, monitor and get automatic
updates for the Dyson 360 Eye™ robot via your mobile device.
Search for the latest Dyson Link app on the App store or Google Play.
Online
Support site:
www.dyson.co.uk/support/robots
Robot owner's site:
www.dyson.co.uk/robot-owners
Ask Dyson:
www.youtube.com/AskDyson
Support Centre
Call: 08002980298 between Monday to Friday 8am-8pm
& Saturday and Sunday 8am-6pm
Email: ukhelpline@dyson.co.uk
Chat: www.dyson.co.uk/support/robots

4
TO REDUCE THE RISK OF FIRE,
ELECTRIC SHOCK, OR INJURY:
1. This Dyson appliance can be used
by children aged from 8 years and
above and persons with reduced
physical, sensory or reasoning
capabilities, or lack of experience and
knowledge, only if they have been
given supervision or instruction by a
responsible person concerning use
of the appliance in a safe way and
understand the hazards involved.
Cleaning and user maintenance
shall not be made by children
without supervision.
2. Do not allow to be used as a toy.
Close attention is necessary when
used by, or near, children and pets.
Children should be supervised to
ensure that they do not play with the
appliance. Do not allow children or
pets to sit on the appliance.
3. Use only as described in this Dyson
Operating Manual. Do not carry out
any maintenance other than that
shown in this manual, on the Dyson
Link app, on the Dyson website, or as
advised by the Dyson Helpline.
4. If the appliance is not working as it
should, has received a sharp blow,
has been dropped, damaged,
left outdoors, or dropped into
water, do not use and contact the
Dyson Helpline.
5. If there is a problem with your Dyson
appliance, refer to the diagnostic
information in this manual, on the
Dyson website, and on the Dyson Link
app. If service or repair is needed,
contact the Dyson Helpline so we can
discuss the available options. Do not
disassemble the appliance as incorrect
reassembly may result in an electric
shock or fire.
6. Suitable for dry locations ONLY.
Do not use outdoors or on wet
surfaces or where contact with, or
immersion in, water is a possibility.
IMPORTANT SAFETY INSTRUCTIONS
BEFORE USING THIS APPLIANCE READ ALL INSTRUCTIONS
AND CAUTIONARY MARKINGS IN THIS MANUAL AND ON THE
APPLIANCE
When using an electrical appliance, basic precautions should always
be followed, including the following:
WARNING
These warnings apply to the appliance, charging dock and charger.

5
7. Do not install, charge or use this
appliance outdoors, in a bathroom
or within 3 metres (10 feet) of a pool.
Do not use on wet surfaces and do not
expose to moisture, rain or snow.
8. Do not operate the appliance where it
can pick up any water.
9. Do not spill water on the appliance.
10. Do not handle any part of the charger,
charging dock or appliance with
wet hands.
11. Do not use with a damaged cable or
plug. If the supply cable is damaged it
must be replaced by Dyson, its service
agent or similarly qualified person in
order to avoid a hazard.
12. Make sure the cable is located so that
it will not be stepped on, tripped over,
run over by the appliance or otherwise
subjected to damage or stress.
13. Do not unplug the charger by pulling
on the cable. To unplug, grasp the
charger, not the cable. The use of an
extension cable is not recommended.
14. Unplug the charging dock when not in
use for extended periods and before
maintenance or servicing.
15. Do not operate the appliance where it
can pick up flammable or combustible
liquids, such as petrol, or use in areas
where they or their vapours may
be present.
16. Do not operate the appliance where it
can pick up anything that is burning or
smoking, such as cigarettes, matches,
or hot ashes.
17. Do not operate the appliance in an
area where there are open fireplaces,
lit candles or fragile objects on the
floor to be cleaned or where there are
candles on candlesticks, tables, etc.
that the appliance may accidentally hit
or bump into.
18. Remove all electrical cables and other
items that could get tangled in the
appliance from the area to be cleaned
before use.
19. Ensure that everyone in the household
is aware of the machine when it is
in use, particularly when using the
scheduled clean function available via
the Dyson Link app.
20. Do not operate the appliance in a
room where an infant or child is
present and unattended.
21. Risk of falling: Do not use the
appliance in any area where it can
access a down stairway or balcony,
etc. Do not use in high or narrow
spaces such as a shelf or stairs.
22. Keep hair, loose clothing, fingers,
and all parts of the body away from
openings and moving parts such as
the tracks and the brush bar.
23. Do not put any object into openings.
Do not use with any opening blocked;
keep free of dust, lint, hair, and
anything that may reduce airflow.
24. Do not touch the charging points on
the appliance or the charging dock
with any object.
25. Do not use without the clear bin and
filters in place.
26. Do not obscure the sensors or
vision system.
27. Do not put anything on top of
the appliance.
28. Carry the appliance only by the finger
holds on each side.

6
29. The appliance and charging dock
must be supplied at their rated Safety
Extra Low Voltage, use only the Dyson
power adaptor and battery supplied
with the product, other types of
batteries may burst causing injury to
persons and damage.
30. Use only Dyson recommended
accessories and replacement parts.
31. FIRE WARNING – Do not place
this product on or near a cooker or
any other hot surface and do not
incinerate this appliance even if it is
severely damaged. The battery might
catch fire or explode.
32. FIRE WARNING – Do not apply
any fragrance or scented product
to the filter(s) of this appliance. The
chemicals in such products are known
to be flammable and can cause the
appliance to catch fire.
READ AND SAVE
THESE INSTRUCTIONS
THIS DYSON APPLIANCE IS INTENDED
FOR HOUSEHOLD USE ONLY

7

8
Setting Up
Charging
Preparing the room
Open the dock fully to 90° and
place it against the wall.
Plug the charging lead into either
side of the dock.
Ensure the dock is powered,
indicated by a blue light on
the dock.
Tidy any surplus cable by wrapping
it around the plug.
Ensure no objects are within
approximately a 50cm radius of
the dock.
1 2 3
Place the robot on the dock with the
clear bin facing the wall.
The battery light, located on the power
button will pulsate, turning solid when
fully charged.
Your robot cleans using powerful
suction, please:
– Remove thin rugs or loose items
that may be sucked up, limiting
movement.
– Tidy obstacles such as shoe laces
or thin cables that may become
entangled in the brush bar.
– Clean any liquid spills or sharp items
that may cause damage to the robot.
Your robot uses infra-red sensors to
detect drops, please:
– Ensure there is no clutter such as
bags or shoes within 10cm of any
drops in the room.
Your robot uses a camera to navigate,
please:
– Provide adequate illumination for
the robot to navigate throughout
the clean.
Plug
Cable
Dock
Cables
Magazines
Bag
Shoes
Remotes
Spills
Quick start
‘Power
on’indicator

9
Cleaning
Update your robot
Get the Dyson
Link App
4 5 6
Press the power button. The robot will
begin cleaning all accessible space,
recharging at its dock when required.
To ensure you get the best out of your
robot update to the latest software.
To register for automatic updates
connect your robot using the Dyson
Link app.
To update without using the app,
download the latest software from:
www.dyson.com/support/robots
To schedule cleans, view maps of
previous cleaning sessions, diagnose
faults and automatically update
software on your robot, please
download the Dyson Link app for free
on the App Store or Google Play.
See the 'setting up Dyson Link app'
page in this user guide for setup
instructions.
No
cables
Clear floors
Clear
edges
Go to
www.dyson.co.uk/support/robots

10
Dyson Link app
Review data from your robot's last
five completed cleans, including a
cleaning map of the areas covered
in your home.
Choose when your robot cleans
by scheduling the time and day
of cleaning sessions.
Explore key technologies
inside Dyson 360 Eye™
robot, and access
troubleshooting support.
*Featured content based on version
1 of the app. Visit our website for
further assistance:
www.dyson.co.uk/support/robots
Give your robot a name,
control notifications, configure
settings and check your robot's
software version.
Functionality
The Dyson Link app allows you to control, schedule and monitor
your Dyson 360 Eye™ robot even when you’re not at home.

11
Make a note of the robot’s serial
number – you will need this to identify
your robot’s Wi-Fi network during
connection. This can be found either on
the back of this user guide or behind the
clear bin on the robot.
Make a note of the robot's code - you
will need this to connect your robot. This
can be found either on the back of this
user guide or behind the clear bin on
the robot.
Search for the latest Dyson Link app
on the App Store or Google Play.
Getting connected: Part 1
Before you begin
Home Wi-Fi
password
Robot's serial
number
Robot's code
Download the app Check your Wi-Fi
Ensure you have the
following information:
1 2 3
Check that your dock is set up only a
short distance from your Wi-Fi router
and that it is powered.
Make sure that your device is on the
same network that you want to connect
your robot to.
The robot connects to 2.4GHz
networks, which includes most modern
routers.
Check your router documentation
for compatibility.
Supported Wi-Fi protocols
– IEEE802.11b (Not recommeded)
– IEEE802.11g
– IEEE802.11n (Support only
for 2.4GHz)
Check that your device’s Wi-Fi is
enabled and that it has a strong Wi-Fi
signal, for example try visiting your
favourite web site.
Further information is available at
www.dyson.co.uk/support/robots
If you require any assistance please
contact the Dyson Helpine on
08002980298

12
Need a little help?
Wi-Fi light
Register your account
Confirm your home
Wi-Fi network
Make your robot
discoverable
1 2 3
Getting connected: Part 2 iOS
Connect robot to your iOS device and home Wi-Fi.
The app will recommend a Wi-Fi
network to connect the robot to.
This will be the network your mobile
device is already connected to.
If this is the Wi-Fi network you would
like to connect your robot to, enter your
Wi-Fi password.
Pick up and replace the robot on a
powered dock. After a short while the
Wi-Fi light will illuminate, the robot is
now discoverable.
Launch the app on your mobile device.
Select your country.
If you already have a Dyson account
select ‘Sign in’ and enter your
username and password.
If you are new, select ‘Register’.
To create an account,
complete all fields.
Not sure you have an account?
This is the account you set-up to purchase your robot
on dyson.co.uk
Can’t download the app on to your mobile device?
The Dyson Link app is currently only available to iOS
and Android phones. We will keep adding devices,
so please check the
app store in the country you bought your robot in.
Can’t see your home network?
– Check that you are setting up close to your home
Wi-Fi router.
– Check that your home router is switched on.
– Check that your mobile device is connected to
Wi-Fi, indicated by a Wi-Fi signal icon in the top
left corner of the screen.
– Check that your home network is not hidden.
Want to connect your robot to a different
network?
Leave the Dyson Link app, open the settings app
on your mobile device and choose Wi-Fi. Connect
to your preferred network and return to the Dyson
Link app.
Check that you aren't connected to a 5GHz network.
Your robot will only connect to a 2.4GHz network.
Can’t see the Wi-Fi light?
– The robot will remain discoverable for
30 minutes after being placed on the powered
dock.
– Check that the dock is powered – a blue power
light will be showing on the dock.
– Pick up and replace the robot on the dock.
– Check that your robot is charging, indicated by
the battery light on the robot.

13
Connecting
(Wi-Fi light
pulses)
Connect your robot
to your home Wi-Fi
network and to
Dyson
Name your robot
and get started!
4 5 6
Can’t see your robot in the list of available
networks?
– Check that your robot’s Wi-Fi light is illuminated,
see step 3 in this guide.
– Check that your mobile device’s Wi-Fi is enabled
and that you are only a short distance from your
robot.
– Your robot’s Wi-Fi starts with ‘360EYE’.
Can’t connect your app to your robot?
– Make sure that you are only a short distance
from your robot.
– To reconnect your phone to your robot, repeat
step 4 in this guide.
Can’t connect your robot to your Wi-Fi?
– Your Wi-Fi might not be responding.
– If you’ve hidden your Wi-Fi, unhide it.
– Check that you haven’t set your Wi-Fi to 5GHz.
Your Wi-Fi needs to be set to 2.4GHz.
Can’t connect your robot to the Dyson network?
– The Dyson cloud might not have been able to
complete your connection, please try again.
The Wi-Fi light on your robot will pulse
while connecting.
When connected the light will turn off;
if the robot fails to connect the light will
become solid again.
Once you have registered your
ownership and named your robot
you can get started.
Leave the app, go to your mobile
device settings and select Wi-Fi:
Choose your 360 Eye network
(this will contain ‘360EYE’ and
the robot’s serial number).
When prompted, enter the robot’s code.
This can be found either on the back of
the user guide or behind your robot’s
clear bin.
Now, return to the Dyson Link app.
Connect your mobile
device to your robot’s
Wi-Fi network
*Featured content based on version 1 of the app.
Visit our website for further assistance:
www.dyson.co.uk/support/robots

14
1 2 3
Getting connected: Part 2 Android
Connect robot to your Android device and home Wi-Fi.
Wi-Fi light
Register your account
Confirm your home
Wi-Fi network
Make your robot
discoverable
Not sure you have an account?
This is the account you set-up to purchase your robot
on dyson.co.uk
Can’t download the app on to your mobile device?
The Dyson Link app is currently only available to iOS
and Android phones. We will keep adding devices,
so please check the
app store in the country you bought your robot in.
Can’t see your home network?
– Check that you are setting up close to your home
Wi-Fi router.
– Check that your home router is switched on.
– Check that your mobile device is connected to
Wi-Fi, indicated by a Wi-Fi signal icon in the top
left corner of the screen.
– Check that your home network is not hidden.
Want to connect your robot to a different network?
– You can select a different network from within
the app.
Can’t see the Wi-Fi light?
– The robot will remain discoverable for
30 minutes after being placed on the
powered dock.
– Check that the dock is powered – a blue
power light will be showing on the dock.
– Pick up and replace the robot on the dock.
– Check that your robot is charging, indicated
by the battery light on the robot.
The app will recommend a Wi-Fi
network to connect the robot to.
This will be the network your mobile
device is already connected to.
If this is the Wi-Fi network you would
like to connect your robot to, enter your
Wi-Fi password.
Pick up and replace the robot on a
powered dock. After a short while the
Wi-Fi light will illuminate, the robot is
now discoverable.
Launch the app on your mobile device.
Select your country.
If you already have a Dyson account
select ‘Sign in’ and enter your
username and password.
If you are new, select ‘Register’.
To create an account,
complete all fields.
Need a little help?

15
4 5 6
Connecting
(Wi-Fi light
pulses)
Connect your robot
to your home Wi-Fi
network and to
Dyson
Name your robot
and get started!
Can’t see your robot?
Check that your robot’s Wi-Fi light is illuminated, see
step 2 in this guide.
Check that your mobile device’s Wi-Fi is enabled
and that you are only a short distance from your
robot.
Can’t connect your app to your robot?
– Make sure that you are only a short distance
from your robot.
– Check that the robot’s Wi-Fi light is illuminated.
Can’t connect your robot to your Wi-Fi?
– Your Wi-Fi might not be responding.
– If you’ve hidden your Wi-Fi, unhide it.
– Check that you haven’t set your Wi-Fi to 5GHz.
– Your Wi-Fi needs to be set to 2.4GHz.
Can’t connect your robot to the Dyson network?
The Dyson cloud might not have been able to
complete your connection, please try again.
The Wi-Fi light on your robot will pulse
while connecting.
When connected the light will turn off;
if the robot fails to connect the light will
become solid again.
Once you have registered your
ownership and named your robot
you can get started.
When prompted, enter the robot’s code.
This can be found either on the back of
the user guide or behind your robot’s
clear bin.
Connect your mobile
device to your robot’s
Wi-Fi network
*Featured content based on version 1 of the app.
Visit our website for further assistance:
www.dyson.co.uk/support/robots

16
Press the power button
and the robot will begin
cleaning all accessible space.
Place the robot on the dock.
Ensure the dock is powered
and the robot is charging.
The robot will return to the dock to
recharge when the battery is low.
Cleaning modes
Once recharged,
the robot will
automatically
continue with the
cleaning session.
To switch ‘ON’, press the power button
until the blue lights come on.
To switch ‘OFF’, press the power
button until the lights go out.
To pause, press the power button.
The pause light will flash.
Press again to continue cleaning.
Lights
On/off/pause
Automatic recharging mode
Robot cleans all accessible space,
recharging at its dock when required.
1 2 3
Charging

17
Press the power button and the robot
will begin cleaning the accessible space
it can reach on a single charge only.
Place the robot on the floor, not on
the dock.
The robot will not recharge when the
battery is low, but return to its starting
point and switch ‘OFF’.
Performing
a clean.
Heading back
to charge.
Charging (during
a clean).
CleaningStandby
Charged.
Charging.
Single charge mode:
Robot cleans the accessible space
it can reach on a single charge only.
321
Go to
www.dyson.co.uk/support/robots

18
Understanding and
optimising your robot.
Suction Navigation Cleaning behaviour
Your robot uses a Dyson digital motor
and full width brushbar to deliver
powerful cleaning.
Your robot uses a 360° vision system
to take a full panoramic image of
the room.
Your robot maps out your home into a
grid of squares, and cleans it using a
systematic cleaning pattern.
Tidy thin, lightweight or loose
items that may be sucked up and
impair movement.
Should a blockage occur, the robot
will attempt to clear the blockage by
reducing suction for a short period.
If the robot becomes stuck on an
obstacle: clear the obstacle, replace
the robot as close as possible to where
you picked it up (ideally somewhere the
robot has already cleaned) and press
the pause button to continue cleaning.
The robot navigates by identifying
features in its field of view and tracking
these as it moves.
To improve the robot’s ability to navigate,
please provide adequate and consistent
illumination throughout the duration of
the clean.
In low light the robot will supplement
ambient illumination with infra-
red headlights.
To maintain navigation performance
clean the camera and headlights
regularly. See the ‘Cleaning Optics’
section in this manual.
For safety reasons the drop sensors are
very sensitive. Your robot may mistake
dark surfaces as drops and consequently
will not clean over them.
The grid does not always line up with
the edges of the room, the robot
may clean into another room before
returning to clean areas it has missed.
If your robot had trouble navigating
into an area, or if it is taking a long
time to clean, next time try moving the
dock. This will realign the boundaries
of the grid to you home and may
improve performance.
To visualise the robot’s cleaning
behaviour and see maps of completed
cleans, connect your robot using the
Dyson Link app.

19
Your robot uses infra-red sensors
to identify obstacles, drops and the
boundaries of the cleaning space. It
then records these on its map.
When started from the dock your robot
will return to recharge mid-clean before
automatically resuming and completing
the clean.
If you do not want the robot to access an
area, provide a physical barrier, such as
closing a door.
Remove all clutter within 10cm
of drops as this may interfere
with the drop sensors.
The robot will occasionally detect some
obstacles by nudging them: please tidy
any fragile items from the floor space.
Your robot identifies the dock location
using the 360° camera: please make
sure that the dock is well lit and is
placed in an open, uncluttered area.
Your robot aligns its map to its start
orientation on the dock: place the dock
on a firm, level surface, flat against
a wall.
If your robot has trouble getting back to
the dock, try moving the dock’s location
before the next clean.
Your robot is powered using a lithium-
ion battery pack.
Charge time: 2hrs 45mins
Run time: 45mins
Your robot’s charge and run times are
approximate, as they depend on many
factors including charge remaining in
the battery, operating temperature and
the age of the battery.
Run time will also be influenced by the
layout of your home and type of floor
surface being cleaned.
To optimise the time it spends cleaning,
your robot's charge time will be less
when recharging at its dock mid-clean.
You do not have to wait for the robot’s
battery to be fully charged before
starting a clean, however if you request
a clean when the robot’s battery is too
low it will display a ‘Return to the dock’
light.
Go to
www.dyson.co.uk/support/robots

20
Emptying the clear bin
To empty the bin during a clean press the power button to pause
the robot. Once you've finished, return the robot to the same point
on the floor, press the power button again to resume cleaning.
When dirt reaches the MAX mark
it’s time to empty the clear bin.
Make sure that the clear bin is emptied
before each use.
Press the cyclone pack release button. Lift the cyclone out of the clear bin.
Empty the contents into a bin.
To minimise dust/allergen contact when
emptying, encase the clear bin tightly in
a plastic bag and empty.
1 2 3
Cleaning the
clear bin
Clean the clear bin with cold water only.
Clean the cyclone shroud with a cloth or
dry brush to remove any lint and dust.
Ensure the clear bin is completely dry
before replacing.
Do not immerse the whole cyclone in
water or pour water into the cyclones.
Clear bin
Cyclone
Cyclone
shroud
/