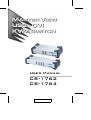
ATEN Technology Power Supply CS-1764 User manual
- Category
- KVM switches
- Type
- User manual
This manual is also suitable for

User Manual
CS-1762
CS-1764
2004-06-04

NOTE: This equipment has been tested and found to comply with the
limits for a Class B digital device pursuant to Subpart J of Part 15 of the
FCC Rules. These limits are designed to provide reasonable protection
against harmful interference in a residential installation. This equipment
generates, uses and can radiate radio frequency energy and, if not
installed and used in accordance with the instructions, may cause
harmful interference to radio communications. However, there is no
guarantee that interference will not occur in a particular installation. If
this equipment does cause harmful interference to radio or television
reception, which can be determined by turning the equipment off and on,
the user is encouraged to try to correct the interference by one or more
of the following measures:
M Reorient or relocate the receiving antenna.
M Increase the separation between the equipment and receiver.
M Connect the equipment into an outlet on a circuit different from that
which the receiver is connected.
M Consult the dealer or an experienced radio/television technician for
help.
2004-06-04

Packing List
The complete Master View CS-1762 / CS-1764 package consists of:
M 1 CS-1762 or CS-1764 KVMP Switch
M 2 CS Custom KVM Cables (CS-1762)
M 4 CS Custom KVM Cables (CS-1764)
M 1 Firmware Upgrade Cable
M 1 Power Adapter
M 1 User Manual
M 1 Quick Start Guide
Check to make sure that all the components are present and that nothing was damaged in
shipping. If you encounter a problem, contact your dealer.
Read this manual thoroughly and follow the installation and operation procedures
carefully to prevent any damage to the unit, and/or any of the devices that connect to it.
©Copyright 2004 ATEN
®
International Co., Ltd.
Manual Part No. PAPE-0231-1AT
Printed in Taiwan 06/2004
All brand names and trademarks are the registered property of their respective owners.
2004-06-04
CS-1762 / CS-1764 User Manual
iii

Contents
1. Introduction
Overview . . . . . . . . . . . . . . . . . . . . . . . . . . . . . . . . . 1
Features . . . . . . . . . . . . . . . . . . . . . . . . . . . . . . . . . . 2
Hardware Requirements . . . . . . . . . . . . . . . . . . . . . . . . . 3
Console . . . . . . . . . . . . . . . . . . . . . . . . . . . . . . . 3
Computer . . . . . . . . . . . . . . . . . . . . . . . . . . . . . . 3
Cables . . . . . . . . . . . . . . . . . . . . . . . . . . . . . . . . 3
CS-1762 Front View . . . . . . . . . . . . . . . . . . . . . . . . . . . 4
CS-1764 Front View . . . . . . . . . . . . . . . . . . . . . . . . . . . 5
CS-1762 / CS-1764 Rear View . . . . . . . . . . . . . . . . . . . . . 6
2. Installation
Before you Begin . . . . . . . . . . . . . . . . . . . . . . . . . . . . . 8
Cable Connection . . . . . . . . . . . . . . . . . . . . . . . . . . . . . 8
3. Basic Operation
Manual Switching . . . . . . . . . . . . . . . . . . . . . . . . . . . 11
Hot Plugging . . . . . . . . . . . . . . . . . . . . . . . . . . . . . . 11
Powering Off and Restarting . . . . . . . . . . . . . . . . . . . . . . 12
Port ID Numbering . . . . . . . . . . . . . . . . . . . . . . . . . . . 12
4. Hotkey Operation
Port Switching . . . . . . . . . . . . . . . . . . . . . . . . . . . . . 13
Cycling Through the Ports . . . . . . . . . . . . . . . . . . . . 13
Going Directly to a Port . . . . . . . . . . . . . . . . . . . . . . 14
Auto Scanning . . . . . . . . . . . . . . . . . . . . . . . . . . 15
Hotkey Setting Mode . . . . . . . . . . . . . . . . . . . . . . . . . . 16
Invoking HSM . . . . . . . . . . . . . . . . . . . . . . . . . . 16
Alternate HSM Invocation Keys . . . . . . . . . . . . . . . . . 16
Alternate Port Switching Keys . . . . . . . . . . . . . . . . . . 17
Keyboard Operating Platform . . . . . . . . . . . . . . . . . . 17
List Hotkey Settings . . . . . . . . . . . . . . . . . . . . . . . 18
USB Reset . . . . . . . . . . . . . . . . . . . . . . . . . . . . . 18
Hotkey Beeper Control . . . . . . . . . . . . . . . . . . . . . . 18
Disable Port Switching Keys . . . . . . . . . . . . . . . . . . . 18
Firmware Upgrade Mode . . . . . . . . . . . . . . . . . . . . . 19
Restore Default Settings . . . . . . . . . . . . . . . . . . . . . 19
HSM Summary Table . . . . . . . . . . . . . . . . . . . . . . . 19
Mac Keyboard Emulation . . . . . . . . . . . . . . . . . . . . . . . 20
2004-06-04
CS-1762 / CS-1764 User Manual
iv

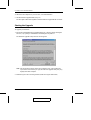
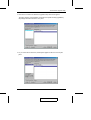
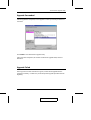
5. The Firmware Upgrade Utility
Before You Begin . . . . . . . . . . . . . . . . . . . . . . . . . . . 21
Starting the Upgrade . . . . . . . . . . . . . . . . . . . . . . . . . . 22
Upgrade Succeeded . . . . . . . . . . . . . . . . . . . . . . . . . . . 25
Upgrade Failed . . . . . . . . . . . . . . . . . . . . . . . . . . . . . 25
Appendix
Specifications . . . . . . . . . . . . . . . . . . . . . . . . . . . . . . 27
Troubleshooting . . . . . . . . . . . . . . . . . . . . . . . . . . . . 28
Hotkey Default Settings . . . . . . . . . . . . . . . . . . . . . . . . 29
Limited Warranty . . . . . . . . . . . . . . . . . . . . . . . . . . . . 29
2004-06-04
CS-1762 / CS-1764 User Manual
v

Conventions
This manual uses the following conventions:
Courier Indicates text that you should key in.
[ ] Indicates keys you should press. For example, [Enter] means to
press the Enter key. If keys need to be chorded, they appear
together in the same bracket with a plus sign between them:
[Ctrl+Alt].
1. Numbered lists represent procedures with sequential steps.
M Bullet lists provide information, but do not involve sequential
steps.
> Indicates selecting an option on a menu. For example, Start > Run
means to open the Start menu, and then select Run.
Indicates critical information.
2004-06-04
CS-1762 / CS-1764 User Manual
vi

Chapter 1.
Introduction
Overview
The Master View CS-1762 or CS-1764 DVI KVM Switch charts a revolutionary new
direction in KVM (Keyboard, Video, Mouse) switch functionality by combining a 2 port
(CS-1762) or 4 port (CS-1764) KVM switch with a 2 port USB hub at the same time as
it provides an interface for a digital monitor (DVI).
As a KVM switch, it allows users to access two or four computers from a single USB
keyboard, USB mouse, and monitor console. As a USB hub, it permits each computer to
access any peripherals connected to the hub on a ‘one computer at a time’ basis.
The CS-1762 / CS-1764’s independent (asynchronous) switching feature, allows the
KVM focus to be on one computer while the USB peripheral focus is on another. This
eliminate the need to purchase a separate USB hub as well as the need to purchase
separate stand-alone peripheral sharers - such as print servers, modem splitters, etc.
The CS-1762 / CS-1764 further improves on previous designs with DVI (Digital Visual
Interface) connectors, and the transfer of keyboard and mouse data to the computers via
a fast, reliable USB connection. DVI supports both digital video input (flat panel
displays, data projectors, plasma displays, digital TVs and set-top boxes) and analog
video input (traditional monitors and TVs).
The CS-1762 / CS-1764 is audio enabled. A single microphone can provide audio input
to each of the computers, and you can listen to the audio output of each computer on a
single set of speakers (on a one-at-a-time basis). As with the USB peripherals, the audio
focus can be independent of the KVMfocus.
Setup is fast and easy; simply plug cables into their appropriate ports. There is no
software to configure, no installation routines, and no incompatibility problems. Since
the CS-1762 / CS-1764 intercepts keyboard input directly, it works on multiple
operating platforms (PC compatible and Mac). There are two convenient methods to
access the computers: push button port selection switches located on the unit’s front
panel; and hotkey combinations entered from the keyboard.
There is no better way to save time and money than with a Master View CS-1762 /
CS-1764 installation. Since a single console manages all of the computers, the CS-1762
/ CS-1764 setup: eliminates the expense of having to purchase separate console
components for each computer; saves all the space those extra components would take
up; saves on energy costs; and eliminates the inconvenience and wasted effort involved
in constantly moving from one computer to another.
2004-06-04
1

Features
M Dual function KVMP-USB switch
M One console controls 2 (CS-1762) or 4 (CS-1764) computers
M Independent (asynchronous) switching of KVM and peripheral USB/Audio ports
M Fully compliant with the USB 1.1 specification - supports transfer rates of 1.5/12
Mbps
M DVI digital and analog monitor support - fully compliant with the DVI specifications
M Computer selection via front panel switches and hotkeys
M LED display for easy status monitoring
M Auto Scan Mode for monitoring all computers
M Complete keyboard emulation for error free booting
M Superior video quality - 1600 x 1200; DDC2B
M Easy installation
M Hot pluggable - add or remove computers for maintenance without powering down
the switch
M Supports Windows and Mac host systems
2004-06-04
CS-1762 / CS-1764 User Manual
2

Hardware Requirements
Console
M A DVI monitor capable of the highest resolution that you will be using on any
computer in the installation.
M A USB style mouse
M A USB style keyboard
M Microphone and speakers (optional)
Computer
The following equipment must be installed on each computer:
M A DVI port
Note: The quality of the display is affected by the quality of the DVI display card.
For best results, we recommend you purchase a high quality product.
M Type A USB port
M Audio ports (optional)
Cables
Only CS Custom cable sets specifically designed to work with this switch may be used
to link to the computers. Two (CS-1762) or four (CS-1764) cable sets are provided with
this package.
Note: The quality of the display is affected by the quality and length of the cables. If
you need additional cable sets, contact your dealer to purchase the correct ones
for your switch.
2004-06-04
Introduction
3

CS-1762 Front View
1. Port Selection Switches
M Press a switch for longer than two seconds to bring the KVM, USB hub, and
audio focus to the computer attached to its corresponding port.
M Press a switch for less than two seconds to bring only the KVM focus to the
computer attached to its corresponding port.
M Press switches 1 and 2 simultaneously for 2 seconds to start Auto Scan Mode. See
p. 15 for details.
2. Port LEDs
The Port LEDs are built into the Port Selection Switches. The upper ones are the
KVM Port LEDs; the lower ones are the USB LEDs:
KVM: M Lights DIM ORANGE to indicate that the computer attached to the
corresponding port is up and running (On Line).
M Changes to BRIGHT ORANGE to indicate that the computer attached to
its corresponding port is the one that has the KVM focus (Selected).
M Flashes to indicate that the computer attached to its corresponding port is
being accessed under Auto Scan mode.
USB: M Lights GREEN to indicate that the computer attached to its corresponding
port is the one that has access to the USB peripherals.
3. USB Console Ports
Your USB keyboard and USB mouse plug in here.
1&2
3
2004-06-04
CS-1762 / CS-1764 User Manual
4

CS-1764 Front View
1. Port Selection Switches
M Press a switch for longer than two seconds to bring the KVM, USB hub, and
audio focus to the computer attached to its corresponding port.
M Press a switch for less than two seconds to bring only the KVM focus to the
computer attached to its corresponding port.
M Press switches 1 and 2 simultaneously for 2 seconds to start Auto Scan Mode. See
p. 15 for details.
2. Port LEDs
The Port LEDs are built into the Port Selection Switches. The upper ones are the
KVM Port LEDs; the lower ones are the USB LEDs:
KVM: M Lights DIM ORANGE to indicate that the computer attached to the
corresponding port is up and running (On Line).
M Changes to BRIGHT ORANGE to indicate that the computer attached to
its corresponding port is the one that has the KVM focus (Selected).
M Flashes to indicate that the computer attached to its corresponding port is
being accessed under Auto Scan mode.
USB: M Lights GREEN to indicate that the computer attached to its corresponding
port is the one that has access to the USB peripherals.
3. USB Console Ports
Your USB keyboard and USB mouse plug in here.
1&2
3
2004-06-04
Introduction
5

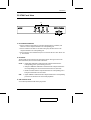
CS-1762 / CS-1764 Rear View
1 23 4
5
1 23 4
5
2004-06-04
CS-1762 / CS-1764 User Manual
6

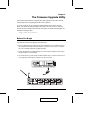
1. Firmware Upgrade Port
The Firmware Upgrade Cable that transfers the firmware upgrade data from the
administrator’s computer to the CS-1762 / CS-1764 plugs into this connector. See p.
21 for firmware upgrading details.
2. USB Hub Section
USB peripherals (printers, scanners, etc.) can plug into any available port.
3. Console Port Section
The cables from your monitor, microphone, and speakers plug in here. Each
connector is marked with an appropriate icon to indicate itself.
4. CPU Port Section
The cables that link the switch to your computers plug in here. Each CPU port is
comprised of a microphone jack, speaker jack, USB type B socket and a DVI
connector.
5. Power Jack
The power adapter cable plugs into this jack.
2004-06-04
Introduction
7

Chapter 2.
Installation
Before you Begin
Cable Connection
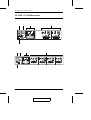
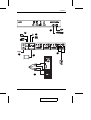
To set up your Master View CS-1762 / CS-1764 installation, refer to the installation
diagrams on the following pages (the numbers in the diagrams correspond to the steps,
below), and do the following:
1. Plug your USB keyboard and USB mouse into the USB Console Ports located on the
unit’s front panel.
2. Plug your microphone, speakers, and monitor into the Console ports located on the
unit’s rear panel.
3. Using a KVM cable set (provided with this package), plug the DVI connector into
any available DVI socket in the CPU Port section of the switch, and plug the
accompanying USB, microphone and speaker connectors into the corresponding
USB, microphone, and speaker sockets.
Note:1. Be sure that all the plugs are in the same CPU Port sockets (all in Port 1, all
in Port 2, etc.).
2. Each socket is marked with an appropriate icon to indicate itself.
4. At the other end of the cable, plug the USB, video, microphone and speaker cables
into their respective ports on the computer.
5. Plug your USB peripherals into the type A sockets in the USB hub section.
6. Plug the the power adapter that came with your switch into an AC power source, then
plug power adapter cable into the switch’s Power Jack.
7. Turn on the power to the computers.
Make sure that all devices on the installation are properly grounded.
2004-06-04
8

1
2
2
3
5
6
4
2004-06-04
Installation
9

Notes:
2004-06-04
CS-1762 / CS-1764 User Manual
10

Chapter 3.
Basic Operation
Manual Switching
There are two convenient methods to access the computers: Manual - which involves
pressing the pushbutton port selection switches located on the unit’s front panel; and
Hotkey - which involves entering combinations from the keyboard. Hotkey port
selection is discussed in the next chapter.
For manual port selection:
M Press and release a port selection switch to bring the KVM focus to the computer
attached to its corresponding port. The USB and Audio focus does not change - they
stay with the port that they are already on.
M Press and hold a port selection switch for more than 2 seconds to bring the KVM
focus, plus the USB and Audio focus to the computer attached to its corresponding
port.
M Press and hold port selection switches 1 and 2 for more than 2 seconds to start Auto
Scan Mode (see p. 15 for Auto Scan Mode details).
M Press and release either port selection switch to stop Auto Scan Mode. The KVM
focus goes to the computer attached to the corresponding port of the switch you
pressed.
Hot Plugging
The Master View CS-1762 / CS-1764 supports USB hot plugging - components can be
removed and added back into the installation by unplugging their cables from the USB
hub ports without the need to shut the unit down.
2004-06-04
11

Powering Off and Restarting
If it becomes necessary to Power Off the Master View unit, before starting it back up
you must do the following:
1. Shut down all the computers that are attached to the switch.
2. Unplug the switch’s power adapter cable.
3. Wait 10 seconds, then plug the switch’s power adapter cable back in.
4. After the switch is up, Power On the computers.
Port ID Numbering
Each CPU port on the CS-1762 / CS-1764 switch is assigned a port number (1 or 2 for
the CS-1762; 1 to 4 for the CS-1764). The port numbers are marked on the rear panel of
the switch (see p. 6).
The Port ID of a computer is derived from the CPU port number it is connected to. For
example, a computer connected to CPU port 2 has a Port ID of 2.
The Port ID is used to specify which computer gets the KVM USB peripheral, and audio
focus with the Hotkey port selection method (see Going Directly to a Port, p. 14, for
details).
2004-06-04
CS-1762 / CS-1764 User Manual
12

Chapter 4.
Hotkey Operation
The CS-1762 / CS-1764 provides an extensive, easy-to-use, hotkey function that makes
it convenient to control and configure your KVM installation from the keyboard.
Hotkeys provide asynchronous (independent) switching of the KVM, USB hub and
audio focus. If you wish, you can give one computer the KVM console focus, another
the USB hub focus, while a third has the audio focus.
Port Switching
All port switches begin with tapping the Scroll Lock key twice. The tables below
describe the actions that each combination performs.
Note: If using the Scroll Lock key conflicts with other programs running on the
computer, the Ctrl key can be used, instead. See Alternate Port Switching Keys,
p. 17 for details.
Cycling Through the Ports
Hotkey Action
[Scroll Lock] [Scroll Lock]
[Enter]
Brings the KVM, USB hub, and audio focus from the
port that currently has the KVM focus to the next port
on the installation (1 to 2; 2 to 1 for the CS-1762; 1 to
2; 2 to 3; 3 to 4; 4 to 1 for the CS-1764).
Note that the KVM, USB hub, and audio focus all go
to this port even if they were on different ports to
begin with.
[Scroll Lock] [Scroll Lock] [K]
[Enter]
Brings only the KVM focus from the port that
currently has it to the next port on the installation.
The USB hub and audio focus remain where they are.
[Scroll Lock] [Scroll Lock] [U]
[Enter]
Brings only the USB hub focus from the port that
currently has it to the next port on the installation.
The KVM and audio focus remain where they are.
[Scroll Lock] [Scroll Lock] [S]
[Enter]
Brings only the audio focus from the port that
currently has it to the next port on the installation.
The KVM and USB hub focus remain where they are.
2004-06-04
13

Going Directly to a Port
Hotkey Action
[Scroll Lock] [Scroll Lock] [n]
[Enter]
Brings the KVM, USB hub, and audio focus to the
computer attached to the port corresponding to the
specified Port ID.
Note that the KVM, USB hub, and audio focus all
go to this port even if they were on different ports
to begin with.
[Scroll Lock] [Scroll Lock] [n] [K]
[Enter]
Brings only the KVM focus to the computer
attached to the specified port. The USB hub and
audio focus remain where they are.
[Scroll Lock] [Scroll Lock] [n] [U]
[Enter]
Brings only the USB hub focus to the computer
attached to the specified port. The KVM and audio
focus remain where they are.
[Scroll Lock] [Scroll Lock] [n] [S]
[Enter]
Brings only the audio focus to the computer
attached to the specified port. The KVM and USB
hub focus remain where they are.
[Scroll Lock] [Scroll Lock] [n] [K]
[U] [Enter]
Brings the KVM and USB hub focus to the
computer attached to the specified port. The audio
focus remains where it is.
[Scroll Lock] [Scroll Lock] [n] [K]
[S] [Enter]
Brings the KVM and audio focus to the computer
attached to the specified port. The USB hub focus
remains where it is.
[Scroll Lock] [Scroll Lock] [n] [U]
[S] [Enter]
Brings the USB hub and audio focus to the
computer attached to the specified port. The KVM
focus remains where it is.
Note: The n stands for the computer’s Port ID number (1, 2, 3, or 4 - see Port
Numbering, p. 12). Replace the n with the appropriate Port ID when entering
hotkey combinations.
2004-06-04
CS-1762 / CS-1764 User Manual
14
Page is loading ...
Page is loading ...
Page is loading ...
Page is loading ...
Page is loading ...
Page is loading ...
Page is loading ...
Page is loading ...
Page is loading ...
Page is loading ...
Page is loading ...
Page is loading ...
Page is loading ...
Page is loading ...
Page is loading ...
-
 1
1
-
 2
2
-
 3
3
-
 4
4
-
 5
5
-
 6
6
-
 7
7
-
 8
8
-
 9
9
-
 10
10
-
 11
11
-
 12
12
-
 13
13
-
 14
14
-
 15
15
-
 16
16
-
 17
17
-
 18
18
-
 19
19
-
 20
20
-
 21
21
-
 22
22
-
 23
23
-
 24
24
-
 25
25
-
 26
26
-
 27
27
-
 28
28
-
 29
29
-
 30
30
-
 31
31
-
 32
32
-
 33
33
-
 34
34
-
 35
35


ATEN Technology Power Supply CS-1764 User manual
- Category
- KVM switches
- Type
- User manual
- This manual is also suitable for
Ask a question and I''ll find the answer in the document
Finding information in a document is now easier with AI