Page is loading ...

PA680160E
BATTERY OPERATED
TOUCHLESS SOAP
DISPENSER XL
ALL PRODUCT DIMENSIONS DETAILED IN THIS INSTALLATION AND
MAINTENANCE MANUAL ARE APPROXIMATE
ALL ILLUSTRATIONS OF THE PRODUCT ARE FOR REFERENCE ONLY.
COMPONENTS SUPPLIED WITH INDIVIDUAL PRODUCTS MAY DIFFER
CONTACT DETAILS
Croydex
Central Way
Andover
Hampshire
SP10 5AW
UK
Tel: +44 (0)1264 365881
Email: info@croydex.co.uk
www.croydex.com
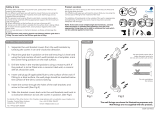
SOAP CAP
INDICATOR
LIGHT
SPOUT
SENSOR
SOAP
CHAMBER
BASE
WALL MOUNT
SCREW SLOT
BATTERY
COMPARTMENT
ON/OFF SWITCH
VOLUME CONTROL
SECTION 1 - INTRODUCTION
Please follow all assembly and product care instructions to
ensure that your product is assembled safely and retains its high
quality finish.
Before attempting to fit or use this product. Ensure that it can be
properly installed in the desired location.
PLEASE RETAIN THIS MANUAL FOR FUTURE REFERENCE
x1
SAFETY & PRODUCT CARE
1. ALWAYS take care when using power tools, particularly if
there is any water in the working area.
2. ALWAYS wear eye protection when using power tools.
3. ALWAYS check for pipes and cables before drilling into
walls.
4. NEVER use a hammer drill when drilling into tiled surfaces.
5. ALWAYS use a drill bit that is suitable for the surface that is
being drilled.
6. The wall plug supplied is for use on solid walls only. For
cavity walls or plasterboard ALWAYS use specialist fixings
that are suitable for the type of wall construction.
7. DO NOT use abrasive or chemical cleaners as these may
damage the product.
WALL FIXING PACK
x1 wall screw x1 wall plug
TOOLS REQUIRED
6
mm
S&H 085 R01
1
SECTION 2 - INSTALLATION
DO NOT immerse in water or rinse under a stream of water.
Keep dispenser upright at all times once liquid is added. If
pouring out contents, pour from the side of the dispenser.
Protect sensor area and battery compartment from liquids.
Wipe with a damp soft cloth to clean. DO NOT get water or
other liquid into the battery compartment as this will damage
the unit.
7. Ensure your dispenser is turned on and
scrolled down to the highest volume setting.
To begin priming, place your hand below the
dispenser within the sensing range. When
the sensor is activated, the pump can be
heard running and a blue light will illuminate.
Repeatedly activate sensor until liquid
dispenses steadily. Some thicker liquids may
require 6 or more repeated activations.
(See Fig. 3)
8. To use: Position hand directly beneath the
spout within the sensing area. A blue light will
be on while the pump is dispensing. Wait for
the cycle to finish or lower hand away from
sensor and wait for fluid to stop flowing. Once
dispensing is complete the light will turn o.
The dispenser is ready to dispense again.
Change the volume (step 6) if required.
(See Fig. 3)
fig. 1
MAXIUMUM
FILL
MINIMUM
FILL
1. Remove the 2 fastening screws and lift the
cover o the battery compartment. Insert
4 new and identical AA alkaline (1.5 volt)
batteries. Close the battery compartment and
secure using the 2 screws.
2. Turn the chamber cap counterclockwise
and lift to open the liquid chamber. Add your
desired liquid and fill at least 1/4 full. Wipe up
any spills. Do not overfill container. Insert the
cap and turn clockwise to seal. (See Fig. 1)
fig. 2
SECTION 3 - PRODUCT CARE
TURN OFF prior to handling.
BE AWARE of sensor area to avoid unnecessary dispensing.
CLEAN with a soft damp cloth, do not immerse or rinse under flowing water.
NOT SUITABLE for high trac public areas.
IF SPLUTTERING add more liquid to the dispenser.
IF CLOGGED empty the liquid from the chamber, carefully fill with warm water
and pour out by pouring from the side of the dispenser. Keep liquids away
from the sensor and battery compartment. Continue to the priming process
using only water to clear out the clog. Switch to a liquid gel soap or add a
small amount of water to reduce clogging. Note: depending on the liquid
being used the dispenser may clog overtime, when not used frequently.
DO NOT FILL WITH liquid that contains any abrasives, exfoliants or
microbeads. Substances that are high viscocity such as creams, or other non-
suitable fluids like foaming soap or mouthwash should not be used.
3. For countertop use: Place onto a flat, leveled surface where it will be used.
4. For wall mounted use: Using the dispenser as a reference - mark a hole
center then check that the dispenser is in the correct position when the screw
slot on the unit is lined up with the marked hole. Then, drill a 6mm hole and
insert the supplied wall plug. Screw the supplied screw into the wall plug and
hang the dispenser from it. Ensure it is securely mounted.
5. To turn the unit on, scroll the on/o dial downwards. Hearing a click will
indicate the dispenser is on and is now ready to dispense. (See Fig. 2)
6. To adjust the dispensing volume, scroll the on/o dial to the desired level. To
turn the dispenser o completely, scroll the on/o dial upwards until a click is
produced.
fig. 3

Page 1 of 1 Rev 0 - May 2018
Croydex is a division of Norcros Group (Holdings) Limited
EU DECLARATION OF CONFORMITY
To the Electromagnetic Compatibility (EMC) Directive
2014/30/EU
1. Description of products:-
PA680150E Battery Operated Infrared Dispenser
PA680160E Battery Operated Infrared Dispenser
2. Directives complied with:-
European Parliament/Council Directive 2014/30/EU on the harmonisation of the laws of
the Member States relating to electromagnetic compatibility (EMC) Directive (recast).
3. Declaration
The products listed above in section 1 conform to the following harmonised standards:
EMC
BS EN 55014-1:2017
BS EN 55014-2:2015
For and on behalf of CROYDEX
P. Pegden
Product and Procurement Director
Date: 16-07-2020
Page 1 of 1 Rev 1 - July 2019
Croydex is a division of Norcros Group (Holdings) Limited
EU DECLARATION OF CONFORMITY
To the Restriction of Hazardous Substances (RoHS) Directive
2011/65/EU as amended by Commission Delegated Directive
(EU) 2015/863
1. Description of products:-
PA680150E Battery Operated Infrared Dispenser
PA680160E Battery Operated Infrared Dispenser
2. Directives complied with:-
European Council Directive 2011/65/EU of 8 June 2011 on the restriction of the use of
certain hazardous substances in electrical and electronic equipment (recast).
3. Declaration
It is hereby certified that the concentration by weight of the restricted substances in the
homogenous materials in the products described above at section 1 do not exceed the
maximum allowed concentrations listed in European Council Directive 2011/65/EU
Annex II Restricted substances referred to in Article 4(1) and maximum concentration
values tolerated by weight in homogeneous materials, as detailed below:
Substance
Concentration
Lead
0.1%
Mercury
0.1%
Cadmium
0.01%
Hexavalent Chromium
0.1%
PBB (Polybrominated Biphenyls)
0.1%
PBDE ( Polybrominated Diphenyl Ethers)
0.1%
Bis(2-ethylhexyl) phthalate (DEHP)
0.1%
Butyl benzyl phthalate (BBP)
0.1%
Dibutyl phthalate (DBP)
0.1%
Diisobutyl phthalate (DIBP)
0.1%
For and on behalf of CROYDEX
P. Pegden
Product and Procurement Director
Date: 16-07-2020
/