Page is loading ...

Automatic Hands Free Soap Dispenser
421-GRY, 421-WHI, 422-GRY, 422-WHI
User’s Instructions:
1. Place your hand below the dispenser spout within the sensing range. The dispenser will automatically release the preset amount of liquid or foam soap from the
nozzle spout.
2. Obtain additional soap by withdrawing hand and then again placing your hand below the
dispenser spout within the sensing range.
Installation
1. Please choose a vertical, clean and smooth mounting surface.
2. Make sure there is enough room above dispenser to access cover lock key.
3. Ensure there are no obstructions till at least 5’’ (127mm) below unit in sensor zone.
4. Unlock the front cover and take out the soap tank (Fig. 1).
5. Use the back plate for the drill marks and mark the 5 drill locations (Fig. 2).
6. Drill 5 holes at marked locations and insert 5 plastic anchors into drilled holes (Fig. 3).
7. Insert 4 screws into the 4 corner plastic anchors and leave 1/8’’ space from the wall under head
for hanging dispenser (Fig. 4).
8. Hang the dispenser on the screws through the keyhole slots at back plate.
9. Insert anti theft screw (Fig. 5).
10. Insert batteries (Fig. 6)
11. Replace the soap tank and fill it up.
Figure 1 Figure 2 Figure 3
Figure 4 Figure 5 Figures 6

Operation
1. Insert 4pcs ‘’C’’ size battery into the battery chamber with the correct direction.
2. Please choose soap with the right viscosity level (see specifications)
3. Fill the soap into the tank please do not overfill.
4. Turn on the power switch by sliding it to the ‘’l’’ position, if you want a double dose slide the switch to the ‘’ll’’ position.
5. For first time use or after refilling the dispenser will need to be primed. First ensure your dispenser has been filled and then turn the unit on. To begin priming,
position your hands directly beneath the spout and press the PRIM button. This will trigger the dispensing cycle. Repeat pressing the PRIM button until a smooth
stream of soap begins to come out. Due to various thicknesses of soaps, it will be necessary for you to repeat this step 6-12 times until soap begins to dispense.
6. The LED light will blink frequently to remind user to change the batteries.
Maintenance
1. Please clean the dispenser by dry towel only. Do not immerse the soap dispenser in water or clean it under running water, this will lead to short circuit.
2. Use only fresh new liquid or foam soap and clean the soap container properly before each re-fill. Deposits of old soap will lead to malfunction and jamming
3. This is an indoor product do not expose under the sunlight.
4. Please take out battery and pour out soap when not in use for a long time.
5. Should the dispenser be out of order, and the batteries have been replaced do not attempt any repair work. Call your dealer for professional assistance.
6. Ensure no bright source is aimed or reflected at the sensor from below.
Warranty
Automatic liquid or foam soap dispenser is warranted to be free from defects in workmanship and material under normal usage from the date of purchase for a
period of 1 year.
Specifications
Soap Tank Capacity {fl. oz. (ml)}: 33 (1000)
Battery Life Estimated: 90,000 cycles or 1 year
Applicable Viscosity Range liquid soap dispenser: 100 cps to 2000 cps. Foam soap dispenser: 50 cps to 1000 cps.
Troubleshooting
Problem Symptom
Solution Diagnostic
No soap dispensed on hands
• Check soap qualities, properties and level in reservoir.
• Check sensor cover for dirt obscuring the lens.
• Check battery charge level.
• Check for reflected sensor signals jamming detector.
• Check spout nozzle, cap air hole and valve tube for clogs.
Low Volume soap dispensed
• Remove soap container and wash out spout nozzle, cap air hole and
valve tube and replace with fresh new soap.
Battery LED indicator flashes
• Replace batteries
Soap leaks at bottom of housing
• Contact seller
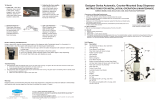
1. Lock
2. Liquid visible window
3. Indication LED light
4. Soap tank lid
5. Soap tank
6. Soap pump
7. Anti theft hole
8. Mounted holes
9. Battery chamber
10. Multifunction switch
a. Power on/off
b. Liquid does adjust
11. Sensor area
12. Liquid outlet
13. AC/DC Adaptor connector
14. PRIM button
/