
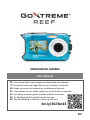
EN
UNDERWATER CAMERA
User Manual
FR : Un manuel dans votre langue est disponible sur Internet:
IT: Il manuale nella sua lingua può essere trovato su Internet:
ES: Puede encontrar un manual en su idioma en Internet:
PT: Um manual em seu idioma pode ser encontrado na Internet:
PL: Instrukcję w swoim języku możesz znaleźć na stronie:
SV: En handbok på ditt språk finns på Internet:
NL: Een handleiding in uw taal vindt u op internet:
bit.ly/3G7Gn43

EN
1
Table of content
General instructions.............................................................................. 3
Explanation of symbols ......................................................................... 3
Product introduction............................................................................. 4
Declaration and proven safety .............................................................. 4
Intended use ......................................................................................... 4
Restrictions ........................................................................................... 5
Safety instructions ................................................................................ 6
Operating environment ........................................................................ 8
Storage environment .......................................................................... 10
Camera description ............................................................................. 11
First use ............................................................................................... 13
Step 1: Install battery and memory card ..................................... 13
Steo 2: Charge the battery ........................................................... 14
Step 3: Format the memory card ................................................. 15
Camera functions ................................................................................ 16
Photo mode ........................................................................................ 18
Video mode ......................................................................................... 20
Switching between the displays ......................................................... 21
Playback mode .................................................................................... 22
Other menu settings ........................................................................... 23
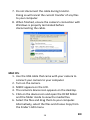
File transfer to PC ................................................................................ 28
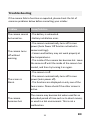
Troubleshooting .................................................................................. 31
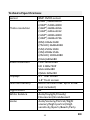
Technical Specifications ...................................................................... 32
Box contents ....................................................................................... 33
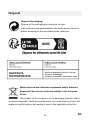
Disposal ............................................................................................... 34
Declaration of conformity ................................................................... 36

EN
2
Disclaimer
Easypix makes no representations or warranties with respect to this
manual and, to the maximum extent permitted by law, expressly
limits its liability for breach of any warranty that may be implied to
the replacement of this manual with another. Furthermore, Easypix
reserves the right to revise this publication at any time without
incurring an obligation to notify any person of the revision.
Easypix is not responsible or liable for misuse of the information that
is contained herein. If you have any suggestions for improvements or
amendments or have found errors in this publication, please notify
us.
All pertinent state, regional, and local safety regulations must be
observed when installing and using this product. For reasons of safety
and to help ensure compliance with documented system data, only
the manufacturer shall perform repairs to components.
Failure to observe this information can result in injury or equipment
damage.
Copyright © by Easypix GmbH
All rights reserved. No part of this publication may be reproduced,
distributed, or transmitted in any form or by any means, including
photocopying, recording, or other electronic or mechanical methods,
without the prior written permission of the publisher. For permission
requests, please write to the publisher below.
Easypix GmbH, Em Parkveedel 11, 50733 Köln, Germany
support@easypix.com • www.easypix.com

EN
3
General instructions
Read this manual and its safety instructions before using
this product.
Follow all the instructions. This will avoid fire, explosions,
electric shocks or other hazards that may result in damage
to property and/or severe or fatal injuries.
The product shall only be used by persons who have fully
read and understand the contents of this user manual.
Ensure that each person who uses the product has read
these warnings and instructions and follows them.
Keep all safety information and instructions for future
reference and pass them on to subsequent users of the
product.
The manufacturer is not liable for cases of material damage
or personal injury caused by incorrect handling or non-
compliance with the safety instructions.
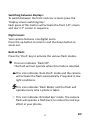
Explanation of symbols
Warning indicates a hazard with a medium level of risk
which, if not avoided, could result in serious injury.
Indicates information considered important, but not
hazard-related.
WARNING
NOTICE

EN
4
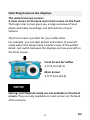
Product introduction
The GoXtreme ‘Reef’ is a high quality digital still and video
camera.
Waterproof to 3M and featuring a 8MP sensor, it captures
photos up to 24MP resolution and records video up to
1080P Full HD.
Powered by rechargeable battery, ‘Reef’ utilizes 2 full
colour displays and 4x digital zoom to ensure your selfies,
photos and videos are framed and captured perfectly.
Declaration and proven safety
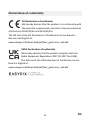
The product has been verified in accordance with the
essential requirements and other relevant provisions of
Directives 2014/30/EU, 2011/65/EU and in accordance with
the Radio Equipment Regulations 2017 (SI 2017 No. 1206).
Its safety complies with the requirements of the relevant
national regulations.
Intended use
This product is intended for use anywhere selfies, photos or
videos are taken.
It’s 3m waterproof rating means it can also be completely
submerged and used under water.
NOTICE

EN
5
WATERPROOF AND DUSTPROOF PERFORMANCE
The waterproof and dustproof performance described do
not guarantee that the camera will remain completely
waterproof or free from damage and trouble under all
conditions.
Do not subject the camera to excessive shock, vibration or
pressure by dropping it, hitting it or placing a heavy object
on it.
Failure to observe this precaution could deform the
camera, cause water to seep inside, or damage the airtight
seals, resulting in camera malfunction.
Restrictions
The product is not suitable for children under 3 years
because of choking hazard.
• Contains small parts, in order to avoid swallowing,
please ensure any use by children is undertaken with
adult supervision.
• The camera is suitable for use underwater to a
maximum depth of
3 metres. Do not use the camera at depths exceeding
3 metres.
• Do not use your camera in hot springs, hot tubs or
jacuzzis where it can be exposed to extreme water
temperature.
WARNING

EN
6
Safety instructions
This product is only suitable for the purpose described,
the manufacturer is not liable for damage caused by
abnormal use.
Please read this instruction manual carefully before use,
and ensure the batteries are installed correctly.
• Do not leave the camera in a high or low
temperature environment for a prolonged period of
time.
• Keep the camera out of the reach of small children.
• No special maintenance is required during use.
Please contact the seller or manufacturer if your
device displays a fault.
• Please dispose of the waste and residues at the end
of the service life of the product according to local
laws and regulations.
• If you think this product is damaged in any way,
please do not use the product.
WARNING
WARNING
WARNING

EN
7
• Do not open this product without permission.
• Contains small parts, in order to avoid swallowing,
please ensure any use by children is undertaken with
adult supervision.
BATTERY
• Use only rechargeable batteries approved for use
with this product
• Do not short-circuit the battery terminals.
• Avoid battery terminal contact with jewellery,
hairpins or other metal objects.
• The battery should only be recharged in the camera.
• Insert the battery and memory card before using the
camera underwater. Take care to ensure that all flaps
and covers are closed and that no water can
penetrate the camera. If this happens, turn off the
camera and do not use it underwater.
• Never open the battery compartment under water. If
moisture appears on the lens during use, it may be
leaking. Remove the battery and the memory card
and return the camera to your dealer for repair.
• Please remove the battery if the camera is not going
to be used for an extended period of time.
• To avoid the risk of electric shock, do not insert the
WARNING
WARNING

EN
8
power cord with wet hands. The battery
compartment should only be opened with clean, dry
hands to also ensure that no dirt enters the camera
when inserting, changing or removing the batteries
or SD card.
• In order to prevent product damage or negatively
affecting the sound or image quality, please ensure a
sufficient distance is maintained from objects that
generate strong magnetic fields or radio waves, such
as electrical appliances.
• In the unlikely event of overheating, smokes or
unpleasant odors coming from the unit, disconnect it
immediately from the charging cable and remove the
battery to avoid a fire.
Operating environment
• Do not expose the device to abnormally high or low
temperatures.
• Store the device cool (at room temperature) in a dry
and dust-free location and never expose the product
to high temperatures or direct sunlight.
• Always protect your camera from falls, shock and
impact.
Precautions for waterproof use
As your camera is waterproof, it can be used under water
while playing and swimming etc.

EN
9
To prevent it from sinking or getting lost in the water, you
can attach the included wrist strap to the camera before
entering the water.
To prevent damage please ensure that you do not open the
camera while in the water.
After use in swimming pool water or sea or lake salt water,
please rinse it with clean tap water and wipe dry before
opening the battery compartment.
The cameras default settings are optimised for most
circumstances enabling you to take photos or videos
immediately after inserting a memory card and switching it
on.

EN
10
Cleaning
After use in water, turn off the camera, ensure the battery
compartment is tightly closed, and rinse the camera with
fresh water within 30 minutes.
• The best cleaning method is to immerse the camera
in a basin of fresh water for 10 minutes.
When the camera is immersed in water, air bubbles
may be seen coming from the water drain holes of
the camera such as openings in the microphone or
speakers. This is not a malfunction.
• Do not use soap or detergents, as they could
negatively affect the integrity of the waterproof seals
on the camera.
• Allow the camera to dry at room temperature after
rinsing.
Storage environment
Store the product in a cool place (at room temperature) in a
dry and dust-free environment and never expose it to high
temperatures or prolonged exposure to direct sunlight.

EN
11
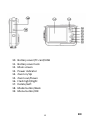
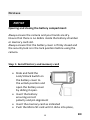
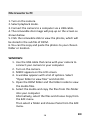
Camera description
1. Rope hole
2. Shuttle button
3. Power button
4. Switch between the two screens
5. Selfie screen
6. Flash light
7. Selfie indicator
8. Lens
9. Zoom switch

EN
12
10. Battery cover/TF card/USB
11. Battery cover lock
12. Main screen
13. Power indicator
14. Zoom in/Up
15. Zoom out/Down
16. Flash light/Right
17. Delete/Left
18. Mode button/Back
19. Menu button/OK

EN
13
First use
Opening and closing the battery compartment:
Always ensure the camera and your hands are dry.
Ensure that there is no debris inside the battery-chamber
or memory card slot.
Always ensure that the battery cover is firmly closed and
the security lock is in the lock position before using the
camera.
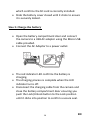
Step 1: Install battery and memory card
• Slide and hold the
Lock/Unlock Switch on
the battery cover to
the unlock position and
open the battery cover
by sliding it open.
• Insert the battery
ensuring correct
polarity and pin alignment
• Insert the memory card as indicated
• Push the Micro SD card until it clicks into place,
NOTICE

EN
14
which confirms the SD card is correctly installed.
• Slide the battery cover closed until it clicks to ensure
it is securely locked.
Steo 2: Charge the battery
• Open the battery compartment door and connect
the camera to a USB AC adaptor using the Micro USB
cable provided.
• Connect the AC Adaptor to a power outlet.
• The red indicator LED confirms the battery is
charging.
• The charging process is complete when the LED
indicator turns off.
• Disconnect the charging cable from the camera and
close the battery compartment door ensuring you
push the Lock/Unlock button to the Lock position
until it clicks into position to confirm a secure seal.

EN
15
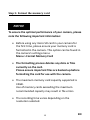
Step 3: Format the memory card
To ensure the optimal performance of your camera, please
note the following important information:
• Before using any micro SD card in your camera for
the first time, please ensure your memory card is
formatted in the camera. This option can be found in
the camera’s settings menu:
Menu > Format Memory Card
• The formatting process deletes any data or files
currently on the card.
Please ensure important files are backed up before
formatting the card for use with the camera.
• The maximum memory card capacity supported is
32GB.
Use of memory cards exceeding the maximum
recommended capacity may result in file errors.
• The recording time varies depending on the
resolution selected.
NOTICE

EN
16
• Memory cards with a speed class rating of 6 or faster
are recommended for recording videos. When using
a memory card with a lower speed class rating, video
recording may stop unexpectedly.
Camera functions
Turning on the camera:
Press the power key on the top of camera to turn on the
camera.
The LCD screen will activate to confirm the camera is
working.
Photo capture mode:
After turning the camera on, the photo icon will be
displayed on the LCD screen to confirm the camera is in
photo mode
To capture a photo press the shutter key.
After taking a photo, the number displayed on the screen
indicates how many more photos can be taken considering
the current settings and the size of the memory card
currently installed in the camera.
A message will be displayed on the screen when the SD
card is full.
To continue, please transfer all data on the SD card to your
computer or insert a new memory card.

EN
17
Switching between displays:
To switch between the front and rear screens press the
‘Display screen switching Key’.
Each press of this button will activate the front 1.8” screen
and rear 2.7” screen in sequence.
Digital zoom:
Your camera features a 4x digital zoom.
Press the up button to zoom in and the down button to
zoom out.
Built-in flash:
Press the ‘Flash’ key to activate the various flash modes.
This icon indicates ‘Flash Off’.
The flash will not operate when this mode is selected.
This icon indicates ‘Auto Flash’ mode and the camera
will activate the flash automatically if required in low
light conditions.
This icon indicates ‘Flash Mode’ and the flash will
operate every time a photo is taken.
This icon indicates ‘Anti-Red Eye’ mode. The camera
flash will operate a flash burst to reduce the red eye
effect in your photos.

EN
18
Photo mode
While in Photo mode press the menu key to access the
various settings menu items as follows:
Scenes
Several scene modes are available to facilitate photo
capture in different environments.
If required, you can select a mode that matches the
condition best that you are shooting in.
Press the power key to turn on camera.
1. Press the menu key
2. Press the left/right keys to choose ‘Scene’.
3. Press up/down key to select your preferred scene.
4. Press OK to confirm.
Photo resolution
1. Press the menu key.
2. Press left/right key to select photo size.
3. Press the up/down key to highlight a resolution option.
4. Press the OK key to confirm your selection.
The photo size icon will be displayed on the LCD screen.
Self Timer
Use the self timer to set a delay between pressing the
shutter button and the camera taking a photo.
1. Press the Menu key.
2. Press the left/right keys to select the self-timer function.

EN
19
3. Press the up/down keys to review the self-timer options.
4. Press the OK key to confirm your selection.
Anti-shake
Your camera features an anti shake function to deliver
better photo quality when a tripod is not being used.
1. Press the menu key.
2. Press the left/right keys to select anti shake function.
3. Press the up/down key to select anti shake on/off.
4. Press OK to confirm your selection.
5. This icon will be displayed on the LCD screen to
confirm anti-shake is activated.
Face detection
To activate the face detection function.
1. Press the menu key.
2. Press the left/right keys to select the face detection
function.
3. Press the up/down keys to select face detection on/off.
4. Press OK key to confirm your selection.
Multi snapshot (Burst photo)
The continuous shooting function allows you to capture 6
individual photos in rapid succession with just one press of
the shutter button.
1. Press the menu key
2. Press the left/right keys to select continuous shooting
function.
3. Press the up/down keys to select continuous shooting
Page is loading ...
Page is loading ...
Page is loading ...
Page is loading ...
Page is loading ...
Page is loading ...
Page is loading ...
Page is loading ...
Page is loading ...
Page is loading ...
Page is loading ...
Page is loading ...
Page is loading ...
Page is loading ...
Page is loading ...
Page is loading ...
Page is loading ...
-
 1
1
-
 2
2
-
 3
3
-
 4
4
-
 5
5
-
 6
6
-
 7
7
-
 8
8
-
 9
9
-
 10
10
-
 11
11
-
 12
12
-
 13
13
-
 14
14
-
 15
15
-
 16
16
-
 17
17
-
 18
18
-
 19
19
-
 20
20
-
 21
21
-
 22
22
-
 23
23
-
 24
24
-
 25
25
-
 26
26
-
 27
27
-
 28
28
-
 29
29
-
 30
30
-
 31
31
-
 32
32
-
 33
33
-
 34
34
-
 35
35
-
 36
36
-
 37
37


Ask a question and I''ll find the answer in the document
Finding information in a document is now easier with AI
Related papers
-
Easypix W3027 Wave User manual
-
-
-
 AquaPix W5012 Splash Owner's manual
-
-
-
Easypix GoXtreme Race Mini Operating instructions
-
-

Other documents
-
Rollei Sportsline 100 User guide
-
Praktica Luxmedia WP240 Camera User manual
-
Sealife DC2000 User manual
-
Panasonic HXWA10EB Operating instructions
-
Philips DSC150BL/94 User manual
-
AEE S50+ Series User manual
-
-
GE ACTIVE series G5WP User manual
-
 AquaPix W1024 Splash User manual
-
Kodak PixPro WPZ-2 User manual
