


1Congratulations
Congratulations
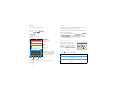
MOTOROLA i1
The MOTOROLA i1 brings the convenience of
walkie-talkie calls together with a premium browsing
and messaging experience, all in a touchscreen device.
• Walkie-Talkie Calls. Stay in touch with your family,
friends and colleagues with the simple touch of a
button.
• Organization. Check your email, calendar, and
contacts wherever you are.
•Browsing. Get more from the Web with a huge
screen for an improved browser experience. Search,
browse, everything you want to do, all made easier.
• Maps and more. The latest technology and apps.
Google Maps™ to find your way. Easy access to
Google™ and thousands of Android applications to
expand your world.
• Tough and durable. Built to military specification to
survive the harshest environments.
Caution: Before assembling, charging or using your
phone for the first time, please read the important
legal and safety information packaged with your
phone.
More information
On your computer—Go to
www.motorola.com/support/.
So, whether you want to read, watch, or play, we can
help.
2 Contents
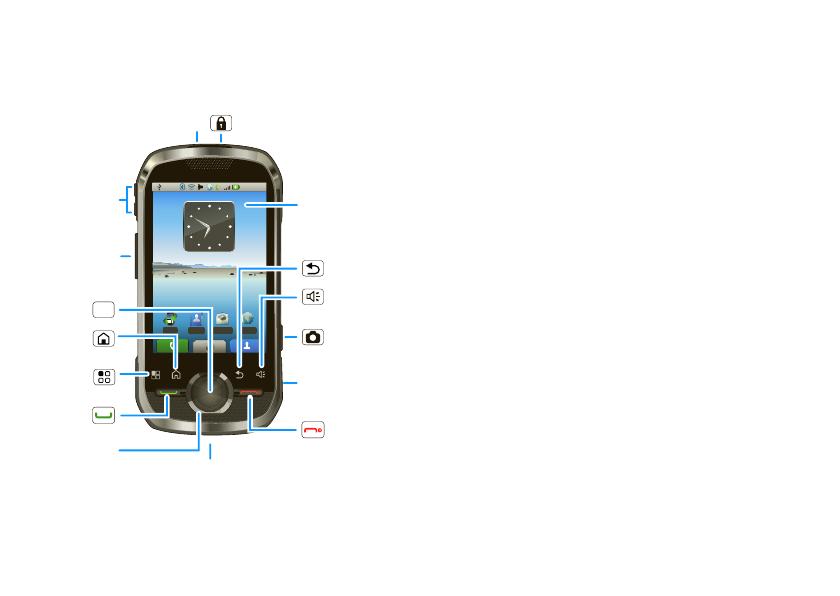
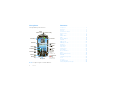
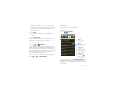
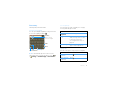
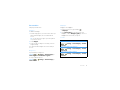
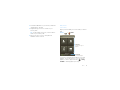
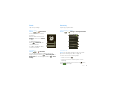
Your phone
the important keys & connectors
Note: Your phone might look a little different.
6:50 PM
Browser
MessagingCall log
Contacts
Press & hold
to turn on/off.
2.5mm
Headset Jack
Home Key
Back Key
Microphone
Menu Key
Micro USB
Connector
Charge or
connect to PC.
WT Button
To u chscreen
Camera
Key
Speaker
Key
Volume Keys
Talk Key
End/Power
Key
Screen Lock Key
Navigation
Key
OK Key
OK
Contents
Your phone . . . . . . . . . . . . . . . . . . . . . . . . . . . . . . . . . 2
Contents . . . . . . . . . . . . . . . . . . . . . . . . . . . . . . . . . . 2
Let’s go . . . . . . . . . . . . . . . . . . . . . . . . . . . . . . . . . . . 3
Touchscreen & keys . . . . . . . . . . . . . . . . . . . . . . . . . . 4
Home screen . . . . . . . . . . . . . . . . . . . . . . . . . . . . . . . 7
Calls . . . . . . . . . . . . . . . . . . . . . . . . . . . . . . . . . . . . . 10
Walkie-Talkie . . . . . . . . . . . . . . . . . . . . . . . . . . . . . . 14
Web . . . . . . . . . . . . . . . . . . . . . . . . . . . . . . . . . . . . . 16
Google Maps™ . . . . . . . . . . . . . . . . . . . . . . . . . . . . 17
Latitude . . . . . . . . . . . . . . . . . . . . . . . . . . . . . . . . . . 19
Apps for all . . . . . . . . . . . . . . . . . . . . . . . . . . . . . . . . 20
Manage your life . . . . . . . . . . . . . . . . . . . . . . . . . . . 21
Contacts. . . . . . . . . . . . . . . . . . . . . . . . . . . . . . . . . . 23
Messaging . . . . . . . . . . . . . . . . . . . . . . . . . . . . . . . . 25
Text entry . . . . . . . . . . . . . . . . . . . . . . . . . . . . . . . . . 27
Tips & tricks . . . . . . . . . . . . . . . . . . . . . . . . . . . . . . . 29
Personalize . . . . . . . . . . . . . . . . . . . . . . . . . . . . . . . . 31
Photos & videos. . . . . . . . . . . . . . . . . . . . . . . . . . . . 32
Music . . . . . . . . . . . . . . . . . . . . . . . . . . . . . . . . . . . . 35
Bluetooth™ wireless . . . . . . . . . . . . . . . . . . . . . . . . 39
Wi-Fi® . . . . . . . . . . . . . . . . . . . . . . . . . . . . . . . . . . . 41
USB & memory card . . . . . . . . . . . . . . . . . . . . . . . . 42
Tools. . . . . . . . . . . . . . . . . . . . . . . . . . . . . . . . . . . . . 43
Security . . . . . . . . . . . . . . . . . . . . . . . . . . . . . . . . . . 43
Troubleshooting . . . . . . . . . . . . . . . . . . . . . . . . . . . . 45
Safety, Regulatory & Legal. . . . . . . . . . . . . . . . . . . . 46
3Let’s go
Let’s go
let’s get you up and running
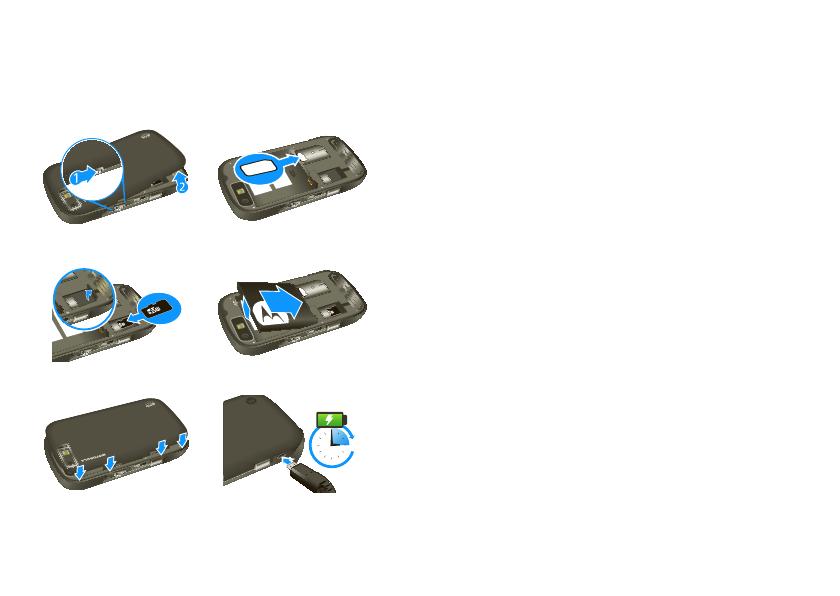
Assemble & charge
1 Remove cover 2 SIM in
3 MicroSD in 4 Battery in
5 Cover on 6 Charge up
3H
Caution: Please read “Battery Use & Safety” on
page 46.
Note: To ensure your phone survives exposure to the
elements, make sure the battery cover is secured
correctly, and all connector covers are tightly sealed.
Set up & go
The first time you turn on your phone, a setup wizard
guides you through:
• Setting up your Wi-Fi® connection.
• Signing in to your existing Google™ account.
Note: If you don’t have a Google account, you can
create one using the wizard.
Tip: Remember to write down your user name and
password, and keep them in a safe place.
• Setting up additional email accounts, such as POP3,
IMAP, or Microsoft™ Exchange.
• Loading contacts from your SIM card.
• Loading apps from your microSD card.
• Selecting your keyboard type.
Note: This phone supports data-intensive apps and
services. It is strongly recommended that you
purchase a data plan that meets your needs. Contact
your service provider for details.
4 Touchscreen & keys
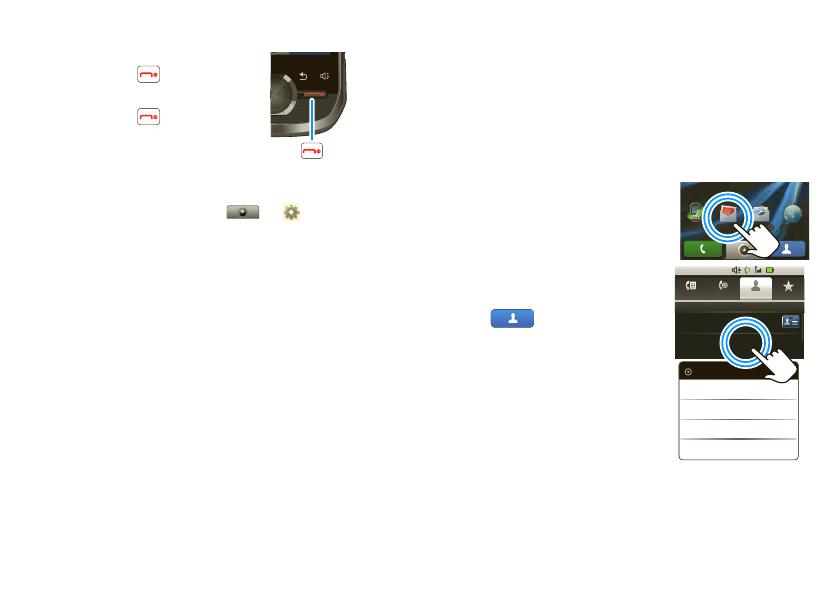
Turn it on & off
To turn on your phone, press and
hold End/Power .
To turn off your phone, press and
hold End/Power , then touch
Power off.
Wi-Fi connect
If you want to use a Wi-Fi computer network for even
faster Internet access, touch > Settings >
Wireless controls > Wi-Fi settings.
Cool content & more
Browse and download thousands of the coolest apps
on the planet from Android Market™. See “Apps for
all” on page 20.
Note: It’s strongly recommended you use a Wi-Fi
connection when downloading apps from Android
Market.
Your phone comes with a microSD memory card
slot—you can load it up with photos, videos, and
music from your computer using “USB drag & drop”
on page 42.
End/Power
Key
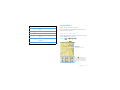
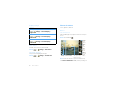
Touchscreen & keys
a few essentials
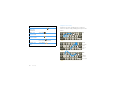
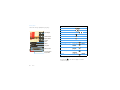
Touch tips
Here are some tips on how to navigate around your
phone.
To u ch
To choose an icon or option, touch
it.
Touch & hold
To open special options, touch
and hold an icon or other item.
Try it: In the home screen,
touch Contacts, then
touch and hold a contact to
open options.
To use MySign, touch the
screen twice with two fingers.
See “MySign” on page 5.
Email Messaging BrowserCall log
All contacts
Me
Ashley Grover
Home
PTT
Dialer Call log Contacts Favorites
Dialer
Call
l
og
g
g
g
Co
nt
ac
ts
Favorites
1:22 PM
Push to Talk
Ashley Grover
View contact
Call Mobilr
Send SMS/MMS

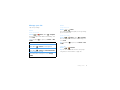
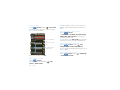
5Touchscreen & keys
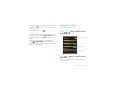
Drag
To scroll through a list or
move slowly, drag up or
down the touchscreen. Try
it: In the home screen,
touch Contacts,
then drag your Contacts
list up or down.
Tip: When you drag or flick
a list, a scroll bar appears
on the right. Drag the
scroll bar to move the list
to a letter A - Z.
Flick
To scroll through a list or move quickly, flick across the
touchscreen (drag quickly and release).
Tip: When you flick a long list, touch the screen to stop
it from scrolling.
All contacts
Me
Ashley Grover
Bomi Kim
Book Club
Chris Boomer
Mobile
PTT
Chris Hunter
Work
PTT
Home
PTT
PTT
3 Members
Dialer Call log Contacts Favorites
Dialer
Call
l
og
g
g
g
Co
Co
nt
nt
ac
ac
ts
ts
Favorites
1:22 PM
Zoom
In maps, touch or at the
bottom of the screen to zoom
in or out. When viewing Web
pages, touch the screen once
to zoom in. To zoom out touch
the screen twice, or touch
at the bottom of the screen.
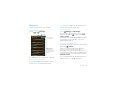
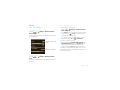
MySign
Draw on your screen to get to
your favorite apps. To open
MySign, touch >
MySign.
Draw the sign for the action you
want. For example, draw a “V”
to go to voicemail.
To see which actions are already
assigned to gestures, press
Menu > List Gestures.
You’ll also see several gestures
that are unassigned.
To assign an action to a gesture,
press Menu > List
Gestures, touch an unassigned
gesture, then touch an app from
the list.
1:22 PM
Call Voicemail
1-555-555-5555
6 Touchscreen & keys
To create a new gesture, press Menu > New
Gesture, select an action from the list, and draw a
gesture to assign to the action.
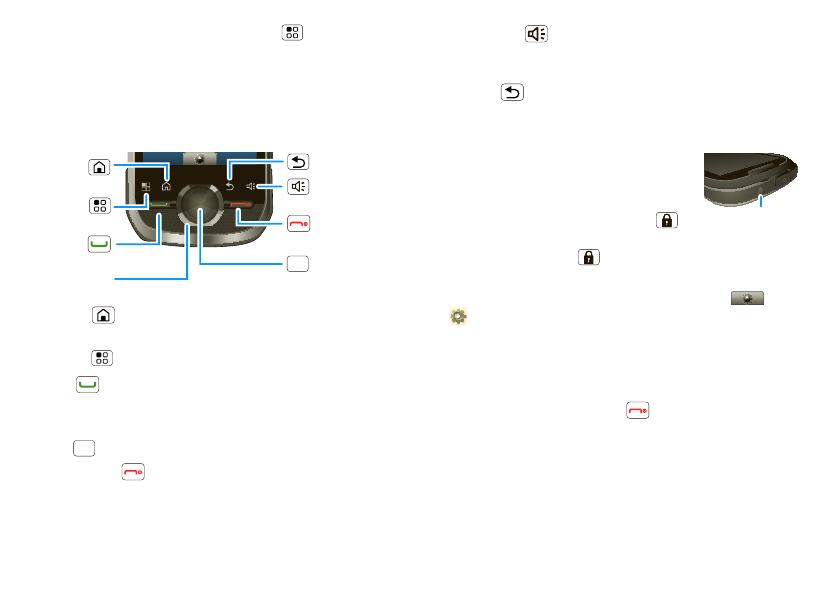
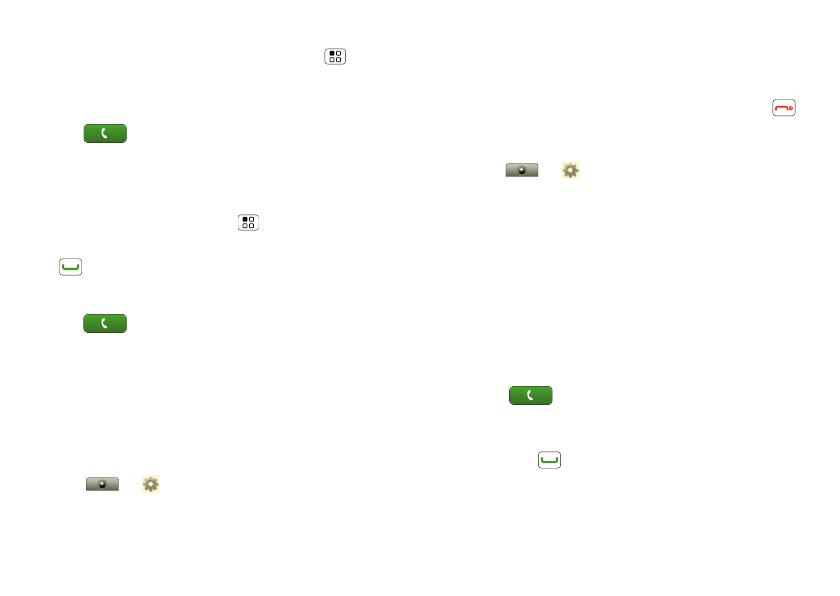
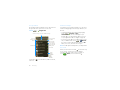
Key tips
Front keys
• Home – Press to return to the home screen.
Press and hold to see recently used apps.
• Menu – Open menu options.
• Talk – Press to start a call.
• Navigation Key – Navigate through menus, apps,
and Web pages.
• OK – Select menu options.
• End/Power – Press to end a call or press and
hold to turn phone on/off.
Home
Key
Back Key
Menu
Key
Speaker Key
Talk Key
End/Power
Key
Navigation
Key
OK Key
OK
OK
• Speaker – Press to turn walkie-talkie speaker
on/off. Press during a phone call to turn speaker
on/off.
• Back – Go back to the previous screen.
Sleep & wake up
To save your battery, prevent
accidental touches, or when you
want to wipe smudges off your
touchscreen, put the touchscreen to
sleep by pressing Screen Lock .
To wake up the touchscreen, just
press Screen Lock again.
To change how long your phone waits before the
screen goes to sleep automatically, touch >
Settings > Sound & display > Screen timeout.
Tip: To make the screen lock when it goes to sleep,
use “Screen lock” on page 43.
Power key menu
Press and hold End/Power to open the power key
menu, where you can turn off the phone (Power off),
or turn Airplane mode or Silent mode on or off.
Screen Lock Key

7Home screen
Adjust volume
Press the volume keys to change
the ring volume (in the home
screen), or the earpiece volume
(during a call).
Rotate the screen
The touchscreen can rotate 90 degrees to stay
right-side up when you rotate your phone:
Find it: > Settings > Sound & display >
Orientation
Note: Not all applications are designed to rotate.
Volume
Keys
Home screen
quick access to the things you need most
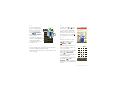
Quick start: Home screen
The home screen gives you all your latest information
in one place. It’s what you see when you turn on the
phone or press Home . It’s basically like this:
Note: Your home screen might look a little different.
Contacts
Launch PTT
Email Messaging BrowserCall log
1:22 PM
Notifications Bar
Touch & drag this bar down
to check notifications.
Status Indicators
Shortcuts
Touch to open.
Drag up to see
all your apps.
Applications Tab
Widgets
Touch to open, or touch &
hold to move or delete.
Flick left or right to open
more panels.
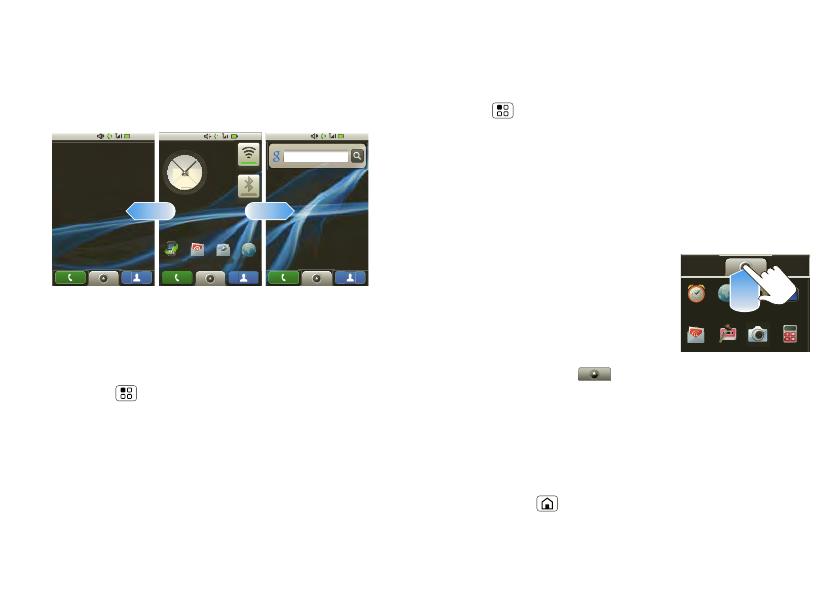
8 Home screen
The home screen extends beyond what you see on
the screen to give you more room for adding
shortcuts, widgets, and more. Flick the home screen
left and right to see more panels or to add widgets or
shortcuts.
Widgets
Add a widget, such as a clock, music player, or a
calendar that shows upcoming appointments.
To open a widget, touch it. To add widgets,
press Menu > Add > Widgets.
Note: If you install apps from Android Market that
have widgets, touch and hold the home screen, then
select a widget to add to the home screen.
1:22 PM
Email Messaging BrowserCall log
1:22 PM
Google search
1:22 PM
Shortcuts
To add shortcuts to the home screen, open the
Applications tab, then touch and hold the shortcut you
want. It will be added to the home screen. Or, press
Menu > Add > Shortcuts.
Apps
Your phone comes with some apps already, and you
can download and install more. To open an app, touch
it.
Applications tab
All the apps on your phone,
including the apps that came
with your phone, and the ones
you download and install, are
listed in alphabetical order in
your Applications menu.
Touch the app tab, , in the home screen to open
the app menu.
Running multiple apps
No need to close an app before opening another one.
Your phone runs multiple apps, all at once.
You can open a new app while already running another.
Press Home to return to the home screen. Open
the Applications tab, and touch the app you want. To
E-mail
Voice Mail Camera Calculator
Alarm Clock
Browser Settings Video Player
C
9Home screen
switch from one running app to another, press and
hold Home to see what apps are already open,
then touch the one you want. You can view up to the
last six apps that you ran.
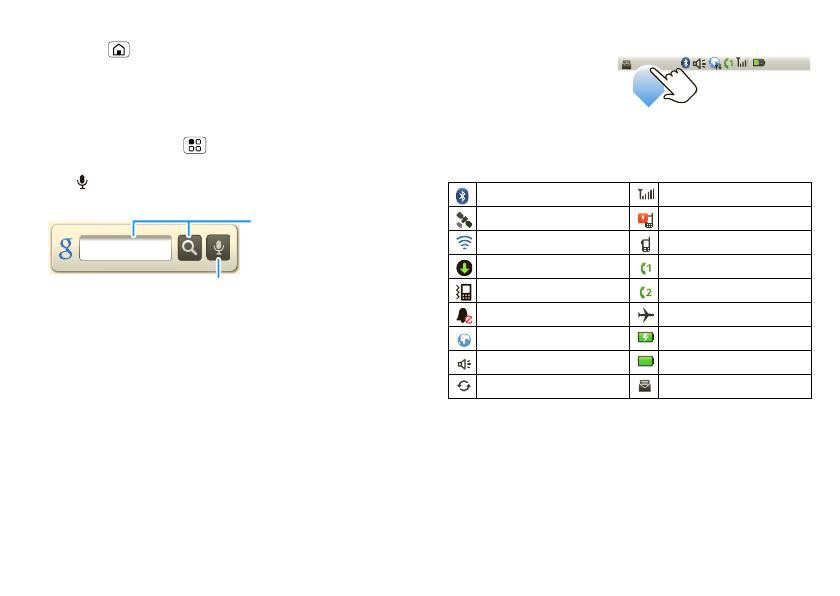
Search
To search, press Menu > Search, and touch the
text field to bring up the keypad. To use voice search,
touch and say a search topic, such as “pizza.”
Google search
Touch for voice
search.
Type, then touch the
icon for a text search.
Phone status & notifications
The status bar at the
top of the screen
contains icons that tell
you about messages
and phone status. To
view your notifications, touch the status bar and drag it
down. Icons on the right tell you about phone status:
Tip: To see today’s date, touch and hold the status bar
at the top of the screen.
Bluetooth™ active network (full signal)
GPS active call alert
Wi-Fi active walkie-talkie call
downloading line 1 active
vibrate line 2 active
silent flight mode
data active battery (charging)
speakerphone active battery (full charge)
data sync text message
1:22 PM

10 Calls
Calls
it’s good to talk
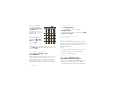
Quick start: Calls
Dialing options
Find it: Dialer
Dialer Call log Contacts Favorites
1:22 PM
555-555-5555555-555-5555
TUVPQRS WXY
8
7
9
*
+
#
0
GHI MNO
465
JKL
ABC DEF
123
Di
al
er
Call
l
og
g
g
g
Contacts
Favorites
Contacts
Touch to open, then touch
an entry to call.
Call Log
Touch to open, then touch
the icon to the left of an
entry to call.
Delete
Touch to delete a digit you
entered.
Call
Enter a number and press
Talk .
In-call options
Press Menu to show your
in-call options.
Tip: You can press Home or
Back to leave the active call
display. To reopen it, press
Talk .
Make & answer calls
To make a call, touch
Dialer, enter a number,
then press Talk .
To answer a call, press Talk .
To end a call, press End/Power .
Handsfree
Note: Using a mobile device or accessory while
driving may cause distraction and may be illegal.
Always obey the laws and drive safely.
During a call:
• To use the speakerphone, press Menu >
Speaker or press Speaker .
• To disconnect a Bluetooth™ device, press
Menu > Bluetooth.
Heather Jones
555.123.4567
Current call 00:12
Show Dialpad
Swap call Merge call Add call End call
Hold Mute Speaker Bluetooth
1:22 PM
11Calls
Enter numbers during a call
To enter numbers during a call, press Menu >
Dialpad.
Recent calls
Find it: Dialer > Call log
• To call a number, touch the icon on the left.
• To send a text message, create a contact, view a
contact, or other options, touch and hold an entry.
• To clear the list, press Menu > Delete All.
Tip: When you’re in the home screen, you can press
Talk to go to the Call log.
Frequent calls
Find it: Dialer > Favorites
• To call a number, touch it to open the contact entry,
then touch the phone number or WT number you
want to call.
• To send a text message, view a contact, or other
options, touch and hold an entry.
Your phone number
Find it: > Settings > About phone >
Status > My phone number
Tip: The first contact in Contacts contains your mobile
phone number.
Unanswered calls
If you receive a phone call and press End/Power
before it goes to voicemail, you can send an automatic
text message to the other caller.
Find it: > Settings> Call settings > Auto
Text reply > Incoming call or Outgoing call
Emergency calls
Note: Your service provider programs one or more
emergency phone numbers (such as 911) that you can
call under any circumstances, even when your phone
is locked. Emergency numbers vary by country. Your
pre-programmed emergency numbers) may not work
in all locations, and sometimes an emergency call
cannot be placed due to network, environmental, or
interference issues.
1 To u ch Dialer. If your phone is locked, touch
Emergency Call on the unlock screen.
2 Enter the emergency number.
3 Press Talk to call the emergency number.
Note: Your mobile device can use AGPS satellite
signals to help emergency services find you (see “GPS
& AGPS” on page 48).
12 Calls
Cool down
In very limited circumstances, such as where your
phone has been exposed to extreme heat, “Cool
Down” message screens will appear. To avoid possible
damage to your battery and phone, you should follow
these instructions until the phone is within its
recommended temperature range. When your phone
is in “Cool Down” mode, only emergency calls can be
made.
Dual microphone noise cancellation
Dual microphone noise cancellation improves call
audio quality by removing the ambient noise around
you, and providing a cleaner, clearer sound to the
person you’re calling.
Note: Dual microphone noise cancellation is turned on
by default.
To turn off dual microphone noise cancellation, touch
> Settings> Call settings > Additional
call settings > Noise cancellation.
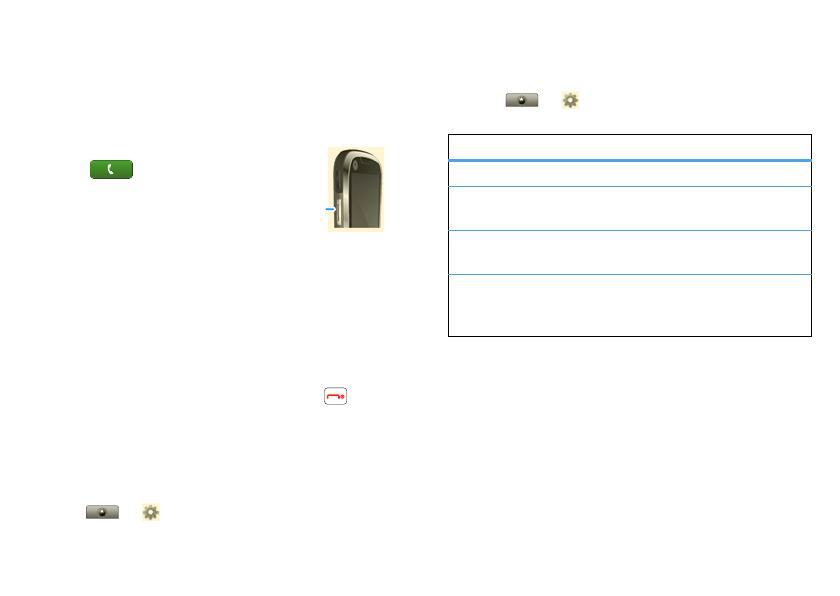
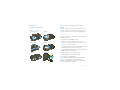
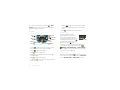
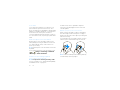
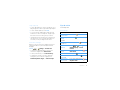
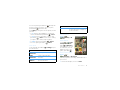
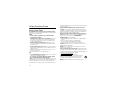
Features for the hearing impaired
Use your phone with a hearing aid
Note: Your phone has a hearing aid rating of M3.
For more information, see “Hearing Aid Compatibility
with Mobile Phones” on page 55.
For best results, use the optimization and phone
setting. They generally apply as well for users with
cochlear implants.
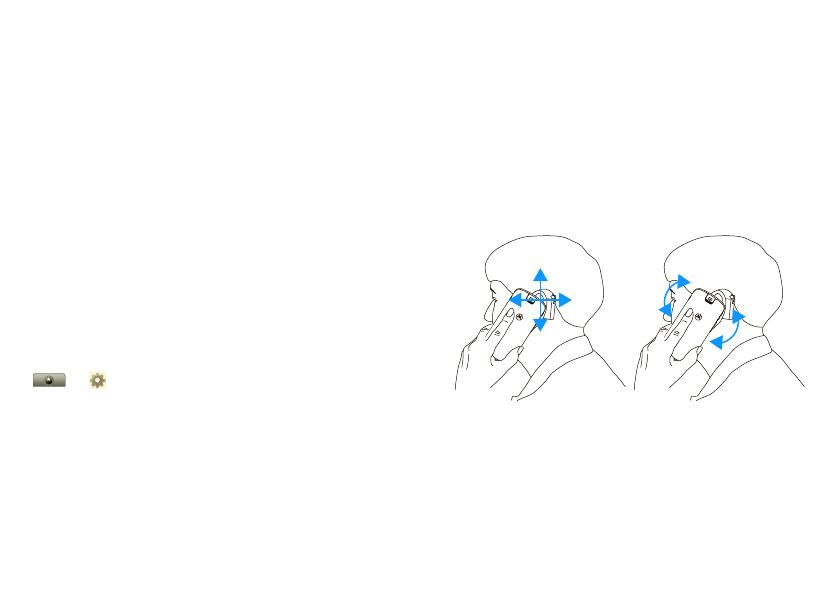
Optimize your phone position and orientation
While on a phone call slide your phone up and down,
then left and right until best microphone coupling is
obtained. You also may need to adjust your hearing aid
(HA) volume setting.
If your HA has a telecoil, activate its switch, then also
rotate the phone as illustrated to align the telecoils.
Note: Some automatically switched hearing aids may
need an auxiliary switching magnet.

13Calls
If you are unsure whether your HA is telecoil equipped
or needs an auxiliary magnet, please refer to your HA
user guide or contact a hearing aid professional or
supplier.
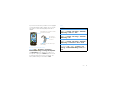
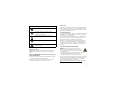
Choose your hearing aid setting
Find it: > Settings> Call settings >
Additional call settings > Hearing aid compatible
The Microphone option optimizes your phone for
microphone coupling. The Telecoil option meets the
US federal requirements for telecoil coupling. The
factory default setting for this feature is Off.
6:50 PM
Browser
Messaging
Call log Contacts
Approximate telecoil location is within
6-13 mm of this location
Approximate telecoil location is just
above battery
Off - Shut off
M - Microphone
T - Telecoil
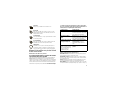
TTY
features
turn on TTY feature
> Settings> Call settings > Additional
call settings > HCO, TTY or VCO.
turn off TTY feature
> Settings> Call settings > Additional
call settings > Off.
change the TTY baud rate
> Settings> Call settings > Additional
call settings > TTY baudrate > 45.45 or 50.00.
change TTY mode during a call
Press Home > > Settings> Call
settings > Additional call settings >HCO, TTY or
VCO.
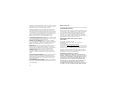
14 Walkie-Talkie
Walkie-Talkie
one or more, talk to them all
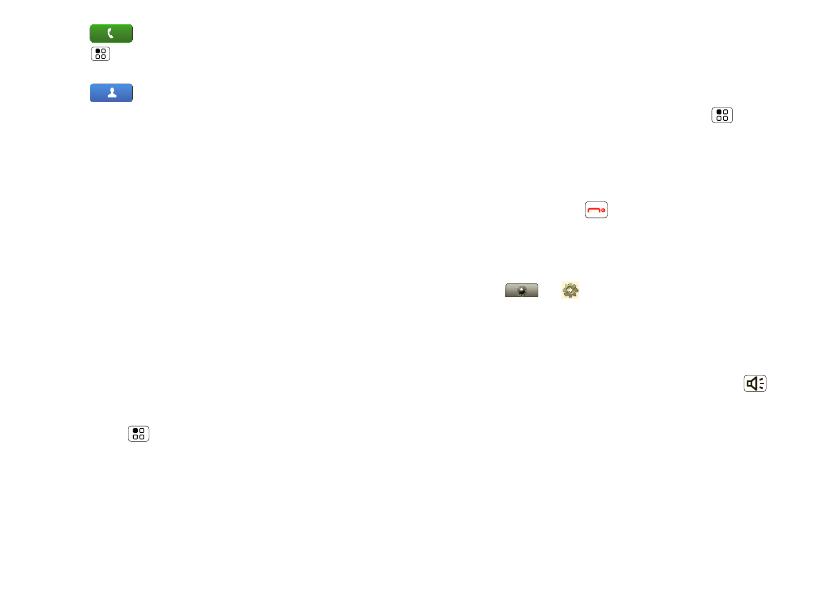
Walkie-Talkie calls
Make and answer walkie-talkie calls
To make a walkie-talkie call:
• Tou ch Dialer, and enter
the recipient’s WT number.
Tip: The first contact in
Contacts contains your WT
number.
• Tou ch Contacts, and select a contact that has a WT
number.
To talk, press and hold the WT Button. To listen,
release the WT Button.
To answer a walkie-talkie call, press the WT Button
after the caller has stopped talking.
To end a walkie-talkie call, press End/Power or do
nothing. The call will end after a few seconds.
WT timeout
You can extend the automatic timeout of a WT call by
about 30 seconds using the Resume WT setting.
Find it: > Settings > Call settings >
Walkie-Talkie settings > Resume WT
WT
Button
One touch WT
You can customize the WT Button for quick access to
walkie-talkie functions.
Find it: > Settings > Call settings >
Walkie-Talkie settings > One Touch WT
Tip: You can also add the One Touch WT widget to
your home screen. See “Widgets” on page 8.
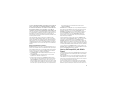
Call alerts
Use call alerts to tell someone you want to speak to
them.
To send a call alert:
options
Off Tur n o ff One Touch WT.
Launch WT
Contacts List
Open a list of walkie-talkie
contacts on your phone.
WT a selected
contact
Start a walkie-talkie call with the
selected contact.
WT the most
recent
number
Start a walkie-talkie call with the
most recent WT number in the
Call log.
15Walkie-Talkie
• Touch Dialer, enter a WT ID, and press
Menu > Send Alert. When prompted, press the
WT Button.
• Touch Contacts, and select a contact
containing a WT ID. Touch Send Alert, and press
the WT Button when prompted.
When you receive a call alert, you can:
• Answer: Push WT Button to begin a walkie-talkie
call with the sender.
• Later: Store the call alert to Notifications.
• Dismiss: Dismiss the call alert.
Note: Call alerts will automatically be moved to
Notifications after a few minutes of inactivity. You
won’t be able to make phone calls or walkie-talkie
calls until the call alert is moved, or you’ve chosen
one of these options.
Share via WT
During a walkie-talkie call, you can send contacts,
photos, events, or your contact info.
Find it: Menu > Share contact, Share picture,
Share event, or Share my info
Switch from a walkie-talkie call to a phone call
For longer calls, you can switch from a walkie-talkie call
to a phone call if the walkie-talkie call recipient has a
phone number stored in Contacts.
During a walkie-talkie call, press Menu > Call
contact.
Unanswered calls
If you receive an error when making a walkie-talkie call,
or press End/Power to end an incoming or
outgoing walkie-talkie call before it’s answered, you
can send an automatic text message to the other
caller.
Find it: > Settings> Call settings > Auto
Text reply > Incoming call or Outgoing call
Set walkie-talkie speaker
You can listen to walkie-talkie calls through your
phone’s speaker or earpiece. Press Speaker to
turn the speaker on or off.
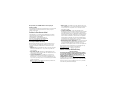
16 Web
Web
you don’t need a PC to surf
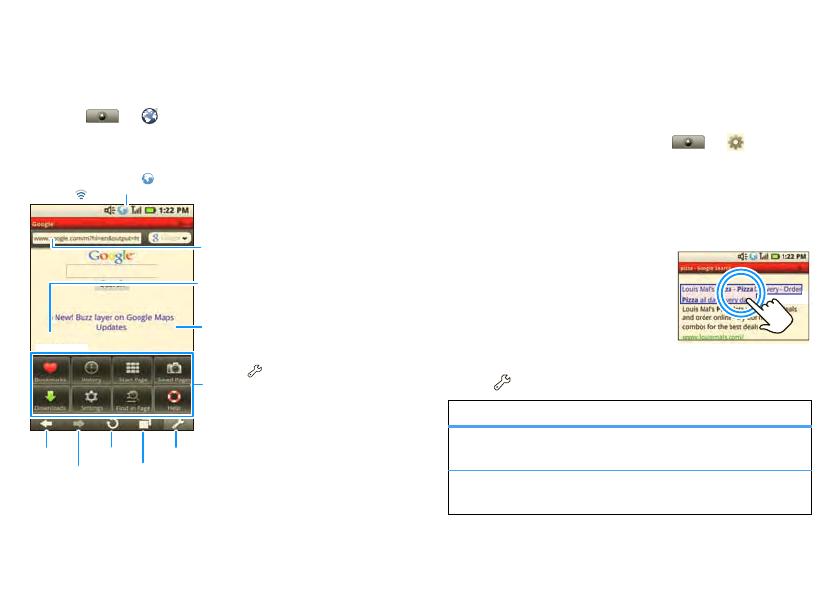
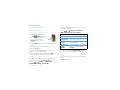
Quick start: Browser
Find it: > Browser
Note: If you can’t connect, contact your service
provider.
Image Search
Connection
Over the air:
Mobile Network:
Wi-Fi:
Links
Tap to open.
Web Address
To go to a URL,
touch Go.
Press to open a menu
where you can open a Web
page, your bookmarks, a
new window, and more.
Drag or flick
to scroll.
Back
Forward
Reload
Tabs
Tools
Connect
Your phone uses the mobile phone network (over the
air) to automatically connect to the Web.
Note: Your service provider may charge to surf the
Web or download data.
To use a wireless network, touch > Settings
> Wireless controls. Touch Wi-Fi to turn it on and
touch Wi-Fi settings to search for nearby wireless
networks. Touch a network to connect.
Select web links
When you touch a link, your
phone outlines it and goes to
that page. If you touch and hold
the link, your phone shows
options, like Open in new tab.
Browser options
Touch to see browser options:
options
Bookmarks Add, delete and manage
bookmarks.
History View and clear your browser’s
history.
17Google Maps™
Start Page Takes you to your browser’s start
page.
Saved Pages Save Web pages.
Downloads View your downloads.
Settings Open your browser’s settings
menu.
Find in Page Search Web pages for words or
phrases.
Help Open your browser’s help menu.
options
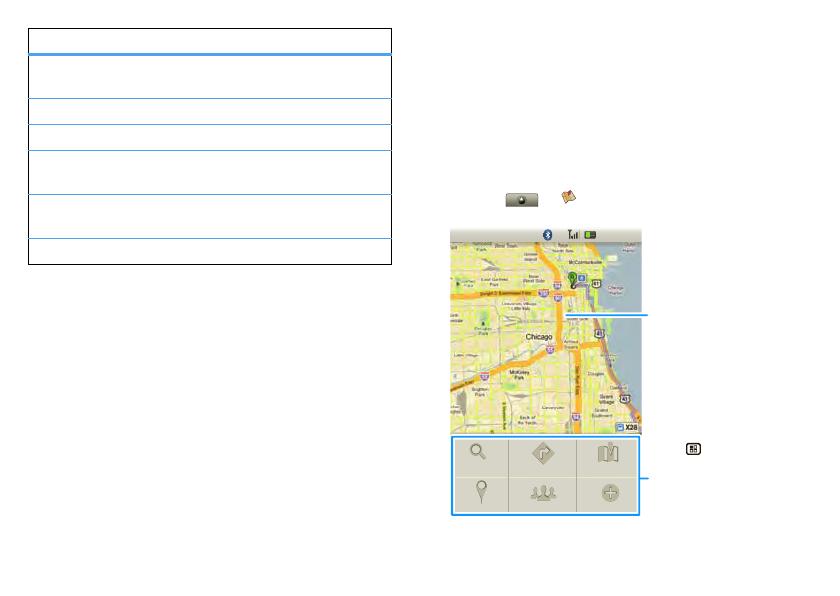
Google Maps™
where you are, where you’re going
Note: This feature is not available in all areas. Check
with your service provider.
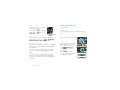
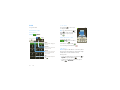
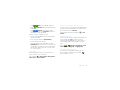
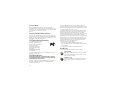
Quick start: Google Maps
Where am I? Where do I want to go? Don’t worry—let
Google Maps™ find out for you.
Find it: > Google Maps
1:22 PM
Search
My location
Directions
Join latitude More
Map mode
Press to open a menu
where you can search, show
your location, change map
modes, get directions, and
more.
Map View
Drag or flick to scroll.

18 Google Maps™
Google Maps™ opens in “Map mode”. To learn more
about the different map modes, see “Select map
mode” on page 18.
Set your location sources
Set your phone to determine your location using GPS
satellite signals (highly accurate, but uses battery
power) or using the mobile network (less accurate, but
conserves battery power).
To set your location source, touch >
Settings > Security & location > Use GPS
satellites and/or Use wireless networks.
Find your location
Note: Don’t forget to set your location sources.
From the Map screen, press Menu > My
Location. Your location shows on the map as . The
bigger the circle, the less accurate the location.
Find any location
1 Press Menu > Search.
2 Enter text in the search box, like an address,
business, or city, then touch .
Tip: If it’s an address you have visited before, select
from the list shown.
3 Touch the search box, in the lower left-hand corner,
to view all the results, then touch the one you want.
Select Show on map, Get directions, Call or Add
as a contact.
Get directions
1 Press Menu > Directions.
2 Enter a starting point address, or touch and
select My current location, Contacts, or Points
on map.
3 Enter an end point address, or touch and select
Contacts or Points on map.
4 Select your mode of transport (car, public transport
or walk), then touch Go. Your directions are shown
as a list. To view your directions on a map, press
Menu > Show on map.
5 When you have finished, press Menu > More >
Clear map.
Select map mode
Press Menu > Map Mode to select from Map
(standard map view), Satellite (map with photos),
Traffic (map with traffic conditions).
Press Menu > More > Clear Map to clear your
selections.
Page is loading ...
Page is loading ...
Page is loading ...
Page is loading ...
Page is loading ...
Page is loading ...
Page is loading ...
Page is loading ...
Page is loading ...
Page is loading ...
Page is loading ...
Page is loading ...
Page is loading ...
Page is loading ...
Page is loading ...
Page is loading ...
Page is loading ...
Page is loading ...
Page is loading ...
Page is loading ...
Page is loading ...
Page is loading ...
Page is loading ...
Page is loading ...
Page is loading ...
Page is loading ...
Page is loading ...
Page is loading ...
Page is loading ...
Page is loading ...
Page is loading ...
Page is loading ...
Page is loading ...
Page is loading ...
Page is loading ...
Page is loading ...
Page is loading ...
Page is loading ...
Page is loading ...
Page is loading ...
Page is loading ...
Page is loading ...
Page is loading ...
-
 1
1
-
 2
2
-
 3
3
-
 4
4
-
 5
5
-
 6
6
-
 7
7
-
 8
8
-
 9
9
-
 10
10
-
 11
11
-
 12
12
-
 13
13
-
 14
14
-
 15
15
-
 16
16
-
 17
17
-
 18
18
-
 19
19
-
 20
20
-
 21
21
-
 22
22
-
 23
23
-
 24
24
-
 25
25
-
 26
26
-
 27
27
-
 28
28
-
 29
29
-
 30
30
-
 31
31
-
 32
32
-
 33
33
-
 34
34
-
 35
35
-
 36
36
-
 37
37
-
 38
38
-
 39
39
-
 40
40
-
 41
41
-
 42
42
-
 43
43
-
 44
44
-
 45
45
-
 46
46
-
 47
47
-
 48
48
-
 49
49
-
 50
50
-
 51
51
-
 52
52
-
 53
53
-
 54
54
-
 55
55
-
 56
56
-
 57
57
-
 58
58
-
 59
59
-
 60
60
-
 61
61
-
 62
62
-
 63
63


Ask a question and I''ll find the answer in the document
Finding information in a document is now easier with AI
Related papers
-
Motorola i1 User manual
-
Motorola Motoluxe User manual
-
-
 Motorola XT XT611 Quick start guide
-
Motorola BACKFLIP User guide
-
-
Nikon moto VE 240 User manual
-
-
-

Other documents
-
Vortex 2ADLJBEAT20 User manual
-
Nikon QA4 User manual
-
STYLE 2SVSK1990 User manual
-
Alcatel OneTouch 4052Z Metro PCS Quick start guide
-
Retevis RT53 User manual
-
KYOCERA Jet User manual
-
Ectaco English/French SpeechGuard TLX User manual
-
-
 Nextel comm i760 User manual
-
