Page is loading ...

1.
CODA
®
TARANTULA
TM
COMPETITION AND EXPERT CRANKSETS
CODA CF2 CRANKSET
Congratulations and thanks for your purchase of a CODA crankset. You
have invested in componentry which offers light weight, high strength, and
stiffness for increased performance. In the case of the Tarantula cranksets,
you also have the ability to interchange the spiders, allowing you to use the
same crankset for 5 bolt compact mountain chainrings, traditional moun-
tain rings, or a single downhill chainring.
This owner’s manual contains important and useful information regarding
the proper installation, operation, care, and maintenance of your CODA
crankset. Please read and carefully follow these instructions for miles of
safe, high performance riding. If you have any questions about the con-
tents of this manual, or about this or any other CODA or Cannondale
product, don’t hesitate to contact us. See the back page for phone
numbers and E-mail contacts.
REQUIRED TOOLS:
8mm Allen wrench
5mm Allen wrench
Loctite 242 (Blue)
Tarantula tool (Cannondale part # 107142)
Cotterless crank remover (Tarantula Expert and CF2 cranksets only)
Bicycle Grease
'99 Tarantula Instructions 8/25/98 3:35 PM Page 9

TARANTULA COMPETITION CRANKS
The CODA Tarantula Competition crankset has CNC milled aluminum
arms and is designed to work with a Shimano XTR or similar bottom brack-
et which uses a splined hollow spindle for increased rigidity and decreased
weight. Most bikes including Cannondales will use a 112.5mm XTR bottom
bracket. However, some bikes with a 50mm chainline or 34.9mm seat tube
may require a 116mm bottom bracket. The CODA chainrings use shifting
pins and ramps for better shifting performance and are built to be light
weight and durable. The Competition model comes stock with an 8 and 9
speed compatible spider using 94mm bolt circle 7075-T6 aluminum outer
and middle rings and a 58mm bolt circle titanium inner ring. Replacement
spiders are available from your CODA retailer in the following configurations:
A triple chainring 8 or 9 speed spider for 94mm bolt circle outer and mid-
dle compact mountain rings and a 58mm bolt circle inner compact moun-
tain ring. Kit# QCSC9/EBO. This is the spider which comes stock with the
CODA Tarantula Competition crank.
A triple chainring 8 speed spider using 110mm bolt circle outer and middle
rings and a 74mm bolt circle inner ring. Kit# QCSS/.
A single chainring spider for a 94mm bolt circle downhill chainring or single
speed use. Kit# QCSDH/.
TARANTULA EXPERT CRANKS
The CODA Tarantula Expert crankset also has CNC milled aluminum arms
but unlike the Tarantula Competition it can be used with any 110mm long
standard bottom bracket with tapered square spindle ends. The CODA
chainrings use shifting pins and ramps for better shifting performance and
are built to be light weight and durable. The Expert model comes stock
with an 8 and 9 speed compatible spider using 94mm bolt circle 7075-T6
aluminum outer and middle rings and a 58mm bolt circle titanium inner
ring. Replacement spiders are available from your CODA retailer in the
following configurations:
A triple chainring 8 or 9 speed spider for 94mm bolt circle outer and middle
compact mountain rings and a 58mm bolt circle inner compact mountain
ring. Kit# QCSC9/EBO. This is the spider which comes stock with the CODA
Tarantula Expert crank.
2.
'99 Tarantula Instructions 8/25/98 3:35 PM Page 2

3.
A triple chainring 8 speed spider using 110mm bolt circle outer and
middle rings and a 74mm bolt circle inner ring. Kit# QCSS/.
A single chainring spider for a 94mm bolt circle downhill chainring or
single speed use. Kit# QCSDH/.
1998 CODA Tarantula Expert cranks used a silver 8 speed triple chainring
spider (94mm/58mm bolt circle) which can be identified by its non-sculpt-
ed outer edges and inner chainring bolt holes which are drilled all the way
through the spider. Kit# QCSC/. NOTE: This 8 speed only spider is not
compatible with the new 8/9 speed outer and middle chainrings.
CODA CF2 CRANKS
The CODA CF2 crankset features cold forged aluminum arms for the ulti-
mate in strength, alloy outer and middle chainrings for light weight, and
a steel inner ring for increased durability against premature wear in the
low gears. The CF2 can be used with any 110mm standard bottom brack-
et with tapered square spindle ends. It accepts 94mm bolt circle outer
and middle chainrings and a 58mm bolt circle inner chainring (compact
mountain chainring sizing.)
The CF2 is available in both 8 speed and 9 speed configurations. The 8
speed model can be identified by the numbers 170-4.4 or 175-4.4 stamp-
ed on the inside of the right crankarm. The 9 speed model can be identi-
fied by the numbers 170-395, 175-395, 170-3.9, or 175-3.9 stamped
on the inside of the right crankarm.
WARNING: DRIVETRAIN SYSTEMS ARE VERY IMPORTANT TO THE SAFETY OF ANY
BICYCLE AND CANNONDALE STRONGLY RECOMMENDS THAT ANY WORK TO THEM
BE PERFORMED BY AN AUTHORIZED CANNONDALE DEALER. THE FOLLOWING
INSTRUCTIONS ARE PROVIDED FOR PERSONS WHO HAVE A GOOD KNOWLEDGE
OF BICYCLE SPECIFIC MECHANICAL PROCEDURES AND WHO ARE EQUIPPED WITH
THE PROPER TOOLS AND EQUIPMENT. INCORRECT INSTALLATION OR SERVICE
MAY REDUCE PERFORMANCE, AND COULD RESULT IN A DANGEROUS SITUATION
LEADING TO INJURY OR DEATH. IF YOU HAVE ANY DOUBTS ABOUT YOUR ABILITY
TO PERFORM THE FOLLOWING PROCEDURES, CONTACT YOUR LOCAL AUTHORIZED
CANNONDALE DEALER.
'99 Tarantula Instructions 8/25/98 3:35 PM Page 3

4.
TARANTULA CHAINRING INSTALLATION
1) It is easiest to install the chainrings onto the spider before the spider has
been installed on the right crank arm. Begin by making sure that the rings
which you’ve selected have the same bolt circle pattern as the spider that
you will be using.
2) The outer and middle chainrings must be installed with the correct orien-
tation to provide the best shifting possible. Each ring has a countersunk bolt
hole for the five chainring bolts, and the countersunk side of each ring must
face away from the five tabs on the spider to which the rings are bolted. This
will allow the chainring bolts and nuts to sit into the recesses on each ring.
You can verify this orientation by making sure that the machined cuts and
ramps on both chainrings face towards the inside of the bike.
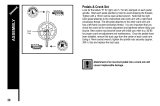
3) The large chainring has a pin on the outside which will need to be aligned
with the right crank arm to prevent a derailed chain from getting jammed
between the arm and the large chainring. Also, both the middle and large
rings have a mark which needs be aligned with the right crank arm to pro-
vide the best possible shifting. These orientations will be achieved by align-
ing the “bump” on each chainring with the “dimple” on the inside of the
spider, and then by aligning the dimple with the right crank arm when
installing the spider on the arm. See Figure 1.
NOTE: The 1998 Tarantula Expert 8 speed spider did not have a dimple,
refer to illustration at right for proper orientation of the chainrings and spider.
4) Grease the threads of the chainring bolts. Install the chainring bolts
through the outer and middle chainrings and the spider. Tighten each of the
chainring bolts to 80-100 In-Lbs (9-11.5 Nm) using a 5mm allen wrench.
5) When installing the small chainring onto the spider, it also must be
oriented correctly to ensure the best possible shifting. The chainring bolts
for the small ring screw directly into the raised threaded holes in the spider.
When looking at the spider with the small chainring side facing you, the
ring must be installed so that the “bump” on the inside of the ring both
lines up with the “dimple” on the spider, and so that the deeper side of
the cut is to the right. See Fig.1.
6) Grease the chainring bolts for the small ring. Tighten each of the chain-
ring bolts to 80-100 In-Lbs (9-11.5 Nm) using a 5mm allen wrench.
'99 Tarantula Instructions 8/25/98 3:35 PM Page 4

5.
Fig.1 ▼
Dimple
“Bump”
“Bump” with Pin
“Bump” with
deeper side of the
cut to the right
'99 Tarantula Instructions 8/25/98 3:35 PM Page 5

TARANTULA SPIDER INSTALLATION AND REPLACEMENT
1) After selecting and installing the chainrings of your choice, prepare the
right crank arm, spider, and lock ring by removing any old Loctite material
from the threaded areas and the hexagonal flats with a Scotch-Brite pad.
2) Once the interfacing parts of the right crank arm, spider, and lock ring
have been cleaned, coat the threads and all points of contact between the
arm, the spider, and the lock ring with Loctite 242 (blue).
CAUTION: The interface between these three parts must be clean for maxi-
mum adhesion of the Loctite which will help hold the spider securely to the
right crank arm.
3) Place the spider on the inside of the right crank arm so that the large
chainring will be on the outside when the crank is installed on the bottom
bracket. Also, make sure that the hexagonal flats line up and that the small
dimple on the inside of the spider lines up with the right arm. See Fig.1.
4) Using the Tarantula tool (part# 107142) tighten the lock ring onto the
threads on the right arm to 35-40 Ft-Lbs (48-55 Nm). Wipe any excess
Loctite off of the crank.
INSTALLING TARANTULA COMPETITION CRANKS TO A SPLINED
BOTTOM BRACKET
1) If the bottom bracket is not yet in the bicycle frame, install it on the bike
according to the manufacturer’s instructions.
2) Remove the threaded bolt cap, the crank arm bolt, and the washer from
each of the crank arms. Apply a little bicycle grease to the splined serrations
on the inside of each crank arm, and to the crank arm bolts and washers.
3) Place each crank arm onto the splined bottom bracket spindle so that
the splines mesh. Make sure that the arms are oriented at 180 degrees to
each other. Using only the palm of your hand, press or tap the arms onto
the bottom bracket to insure that the splines start to engage.
6.
'99 Tarantula Instructions 8/25/98 3:35 PM Page 6

4) Install the washers and crank arm bolts and tighten the bolts using an
8mm allen key to 30-35 Ft-Lbs (41-48 Nm.)
5) Lastly, attach the threaded bolt caps to 44-60 In-Lbs (5-7 Nm.)
6) Remember when installing the pedals to the crank arms that the left pedal
is left-hand threaded and is tightened by turning the pedal spindle counter-
clockwise. The right pedal has a standard thread and is tightened by turning
the pedal spindle clockwise. Always grease the pedal threads before
installing them into a crank.
NOTE: Once the bolt caps have been installed, the Competition’s crank arms
can be removed from the bottom bracket simply by turning each crank arm
bolt counter-clockwise. No additional tools are necessary.
INSTALLING CF2 AND TARANTULA EXPERT CRANKS TO A BOTTOM
BRACKET
1) If the bottom bracket is not yet in the bicycle frame, install it on the bike
according to the manufacturer’s instructions.
2) Make sure that the bottom bracket spindle flats are clean and free from
grease. Place each crank arm onto the bottom bracket spindle so that the
arms are oriented at 180 degrees to each other. Grease the threads of the
crank arm bolts, install the washers and bolts, and tighten the bolts using
an 8mm allen key to 30-35 Ft-Lbs (41-48 Nm.)
3) Remember when installing the pedals to the crank arms that the left
pedal is left-hand threaded and is tightened by turning the pedal spindle
counter-clockwise. The right pedal has a standard thread and is tightened
by turning the pedal spindle clockwise. Always grease the pedal threads
before installing them into a crank.
4) NOTE: To remove the arms, you must first unscrew the crank arm bolts
and then use a cotterless crank extractor such as the Park CCP-2 to press
the arms off of the bottom bracket.
7.
'99 Tarantula Instructions 8/25/98 3:35 PM Page 7

JCH/PCA 072898 #106395 ©Cannondale Corp. 1998, 16 Trowbridge Dr., Bethel, CT
CODA WARRANTY
All CODA components are warrantied against manufacturing defects in
materials and/or workmanship for a period of one year from the date of
original retail purchase.
Not covered under warranty is damage resulting from improper installation,
adjustment, or maintenance, lack or maintenance, alterations, crashes, or
use judged by CODA to be excessive or abusive.
For warranty related questions or for more information on this or any CODA
product, please feel free to contact us.
USA and Canada: (800) BIKE-USA
Europe (EC): (31) 5415-89898
Japan: (81) 722-99-9399
Australia: (612) 9979-5851
http://www.codausa.com
'99 Tarantula Instructions 8/25/98 3:35 PM Page 8
/