Page is loading ...

ba43110e05 01/2011
TresCon
Analyzer module NOx-N
Operating Manual
TresCon N0x-N
Ser.-Nr. 00110020
WTW 82362 Weilheim Made in Germany
TresCon NOx-N
Reinigungslösung
Cleaning Solution
Ablauf
V2
Thermoblock
Probe
Sample
V1
H O dest.
H O dest.
2
2
blau
blue
blau
blue
rot
red
Pumpschlauch Standard/Probe
blau / blau / blau
Pump Tube Standard/Sample
blue / blue / blue
rot
red
P3
P1

NOx-N
ba43110e05 01/2011
Target group This manual is intended for all persons who are familiar with the
installation, operation and maintenance of WTW analyzers.
Detailed information on the previous experience required and the
qualification of the user are given in the chapter, S
AFETY, on page 2-1
in the T
ERMINAL volume of this manual.
Copyright
© Weilheim 2004, WTW GmbH
Reprinting - even as excerpts - is only allowed with the explicit written
authorization of WTW GmbH, Weilheim.
Printed in Germany.

NOx-N List of contents
0 - 1
ba43110e05 01/2011
TresCon NOx-N - List of contents
1 Overview . . . . . . . . . . . . . . . . . . . . . . . . . . . . . . . . . . . . 3-1
1.1 Function . . . . . . . . . . . . . . . . . . . . . . . . . . . . . . . . . . . . . 3-2
1.2 Commissioning . . . . . . . . . . . . . . . . . . . . . . . . . . . . . . . . 3-5
1.2.1 Scope of delivery . . . . . . . . . . . . . . . . . . . . . . . . 3-5
1.2.2 Retrofitting the TresCon NOx-N . . . . . . . . . . . . . 3-5
1.2.3 Connecting up the TresCon NOx-N . . . . . . . . . 3-10
1.2.4 Initial commissioning . . . . . . . . . . . . . . . . . . . . . 3-13
1.3 Removal from service . . . . . . . . . . . . . . . . . . . . . . . . . 3-14
1.4 Instrument parameters . . . . . . . . . . . . . . . . . . . . . . . . . 3-15
2 Operation . . . . . . . . . . . . . . . . . . . . . . . . . . . . . . . . . . . 4-1
2.1 Measuring . . . . . . . . . . . . . . . . . . . . . . . . . . . . . . . . . . . 4-3
2.2 Triggering a zero point calibration (AutoCal) . . . . . . . . . 4-5
2.3 Displaying calibration data . . . . . . . . . . . . . . . . . . . . . . . 4-6
2.4 Service . . . . . . . . . . . . . . . . . . . . . . . . . . . . . . . . . . . . . . 4-8
2.5 Displaying/changing the AutoCal parameters . . . . . . . . 4-8
2.6 Displaying/changing AutoCleanParameters . . . . . . . . . 4-10
2.7 Manual correction . . . . . . . . . . . . . . . . . . . . . . . . . . . . . 4-12
2.8 Displaying/changing the display parameter . . . . . . . . . 4-16
2.9 Displaying/changing the attenuation parameters . . . . . 4-18
2.10 Displaying/changing the interval program parameters . 4-20
2.11 Displaying/changing the AutoAdapt parameters . . . . . 4-23
2.12 Displaying/changing the measuring interval . . . . . . . . . 4-25
2.13 Dilution parameter . . . . . . . . . . . . . . . . . . . . . . . . . . . . 4-27
3 Maintenance . . . . . . . . . . . . . . . . . . . . . . . . . . . . . . . . . 5-1
3.1 Starting the AutoClean procedure . . . . . . . . . . . . . . . . . 5-3
3.2 Filling the system . . . . . . . . . . . . . . . . . . . . . . . . . . . . . . 5-4
3.3 Replenishing the cleaning solution . . . . . . . . . . . . . . . . . 5-7
3.4 Replenishing dist. H2O . . . . . . . . . . . . . . . . . . . . . . . . . 5-9
3.5 Emptying the system . . . . . . . . . . . . . . . . . . . . . . . . . . 5-11
3.6 Displacing/replacing pump tubings . . . . . . . . . . . . . . . 5-14
3.6.1 Replacing the pump tubings . . . . . . . . . . . . . . . 5-16
3.6.2 Displacing the pump tubings . . . . . . . . . . . . . . . 5-21
3.7 Replacing the tubing system . . . . . . . . . . . . . . . . . . . . 5-25
3.8 Displaying/changing service intervals . . . . . . . . . . . . . 5-31
3.9 Viewing calibration data of the multi-point calibration . 5-33

List of contents NOx-N
0 - 2
ba43110e05 01/2011
3.10 Triggering a multi-point calibration . . . . . . . . . . . . . . . .5-35
3.11 Switching Auto Flow on/off . . . . . . . . . . . . . . . . . . . . . .5-42
4 What to do if... . . . . . . . . . . . . . . . . . . . . . . . . . . . . . . . 6-1
4.1 Error messages . . . . . . . . . . . . . . . . . . . . . . . . . . . . . . .6-1
4.2 Messages . . . . . . . . . . . . . . . . . . . . . . . . . . . . . . . . . . . .6-4
4.3 Service messages . . . . . . . . . . . . . . . . . . . . . . . . . . . . .6-5
5 Technical data . . . . . . . . . . . . . . . . . . . . . . . . . . . . . . . 7-1
6 Appendix . . . . . . . . . . . . . . . . . . . . . . . . . . . . . . . . . . . . 8-1
6.1 Accessories and material subject to wear . . . . . . . . . . .8-1
6.2 Pressure sensors and messages . . . . . . . . . . . . . . . . . .8-2
6.3 RS commands . . . . . . . . . . . . . . . . . . . . . . . . . . . . . . . .8-3
6.4 Instrument activities . . . . . . . . . . . . . . . . . . . . . . . . . . . .8-7
7 Index . . . . . . . . . . . . . . . . . . . . . . . . . . . . . . . . . . . . . . . 9-1

NOx-N Overview
1 - 1
ba43110e05 01/2011
1Overview
This operating manual has a modular structure, i. e. it contains a
separate operating manual for the individual components of the
multiparameter analyzer (see Fig. 1-1). This volume covers the
operation of the TresCon NOx-N measuring module (highlighted in
gray in Fig. 1-1).
Fig. 1-1 Structure of the operating manual (example)
Note
Please read chapter 2, S
AFETY, in volume 1, TERMINAL, of this operating
manual before starting to work with the measuring module.
Structure of the
operating manual
Volume 1
TresCon,
Terminal
Operating
manual
Volume 2
TresCon
Module 1
Volume 3
TresCon
Module 2
Volume 4
TresCon
NOx-N
Terminal
TresCon
Module 1
TresCon
Module 2
TresCon
NOx-N
TresCon analyzer

Overview NOx-N
1 - 2
ba43110e05 01/2011
1.1 Function
The TresCon NOx-N analyzing module operates according to the
photometric UV absorption procedure. This is used to detect nitrate
(NO
3
-
). As this measuring method cannot differentiate between nitrate
and nitrite ions (NO
2
-
), a cumulative value (NOx-N) is calculated if any
nitrate is present. A 4-beam photometer is used. It grants the highest
stability and absolute accuracy. A WTW background correction
procedure ensures high accuracy - even in highly colored samples.
Measurement is performed without any additional reagents.
The following points describe the fundamental features of the TresCon
NOx-N:
z AutoCal
TresCon NOx-N performs an automatic zero-point calibration
(AutoCal) so that the instrument can always maintain its high degree
of absolute accuracy.
z AutoClean
The TresCon NOx-N can clean the entire analyzer system itself so
that the user only has to perform a minimum amount of
maintenance.
z AutoFlow
The TresCon NOx-N can monitor the entire analyzer system itself so
it can measure fluid levels and provide early warnings and
instructions to the operator to replace specific chemicals.
z AutoAdapt
The TresCon NOx-N optimizes its measuring interval according to
the current change in the measured value. As a result, reagent
consumption is reduced to a minimum.
z AutoTherm
The TresCon NOx-N automatically checks and regulates the
temperature of the measuring block. This ensures that the
instrument always functions safely.
z Interfaces
The TresCon NOx-N is equipped with all the digital and analog
interfaces required by the industry. Thus, a standard connection is
possible to digital interfaces (RS232 and RS485), analog interfaces
(0/4-20 mA) and PLC interfaces (12 relay contacts).
Note
Please read chapters 2 S
AFETY and 5 OPERATIONin volume 1,
T
ERMINAL, of this operating manual. It contains basic instructions.

NOx-N Overview
1 - 3
ba43110e05 01/2011
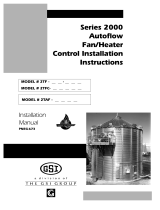
Fig. 1-2 Schematic diagram
Component (quantity) Designation
Valves (2) V1, V2
Pumps (1) P1 A
Pressure sensors (2) P1, P2
Schematic diagram
Standard/sample pump tubing: blue/blue/blue
Reinigungslösung
Cleaning solution
H2O dest.
H2O dist.
Ablauf
Outlet
V3
V2
blau
blue
blau
blue
rot
red
rot
red
Probe
Sample
Thermoblock
P1
P3
Configuration

Overview NOx-N
1 - 4
ba43110e05 01/2011
Control LED A light emitting diode located on the measuring block provides the
following information:
TresCon N0x-N
Ser.-Nr. 00110020
WTW 82362 Weilheim Made in Germany
TresCon NOx-N
Reinigungslösung
Cleaning Solution
Ablauf
V2
Thermoblock
Probe
Sample
V1
H O dest.
H O dest.
2
2
blau
blue
blau
blue
rot
red
Pumpschlauch Standard/Probe
blau / blau / blau
Pump Tube Standard/Sample
blue / blue / blue
rot
red
P3
P1
Control LED
Photometer block
P1A
V1 (back side)
V2 (back side)
View of the TresCon
NOx-N
LED illuminates Meaning
red, continuous Malfunction of any type
green, continuous A service is being performed on the
measuring module or a designation is being
given to the measuring module (terminal
software)
green, flashing System OK

NOx-N Overview
1 - 5
ba43110e05 01/2011
1.2 Commissioning
1.2.1 Scope of delivery
When the analyzer is delivered, it already has individual analyzer
modules integrated in it and is ready for operation.
The TresCon NOx-N is available as a retrofit kit with the following scope
of delivery:
z ON 210: TresCon NOx-N measuring module
z Operating manual to be added to the main folder
z Chemicals
– S/ AI - N211: 10 l standard A-I (zero standard, dist. H2O)
– C/ N211: 1.5 l cleaning solution
z 2 Wpack/ N211: set of replacement tubes
z TC/ÜB 1: overflow vessel
z 1 lid for standard A-I (zero standard, dist. H2O), red
z 1 lid for cleaning solution, blue
Safety datasheets The current safety datasheets for all chemicals and solutions used can
be found on the Internet under www.WTW.com
.
1.2.2 Retrofitting the TresCon NOx-N
This section is only necessary if the TresCon NOx-N was purchased as
a retrofit kit.
Preparatory
activities
Installing the TresCon NOx-N in a measuring system can
– depending
on the configuration
– necessitate various preparations:
z Permeate supply:
Setting up a separate permeate supply (with its own catch location)
or connecting it to an existing permeate supply (catch location with
further analyzer modules)
z Chemicals:
If necessary, a larger tray can be mounted on the mounting stand of
TresCon for the chemical containers.
Note
Read the I
NSTALLATION section in the TERMINAL volume of the operating
manual before starting the retrofit!

Overview NOx-N
1 - 6
ba43110e05 01/2011
Fig. 1-3 Remove the cover plate
1 Switch off the TresCon at the power switch (on the mounting
stand).
2 Open the door of the TresCon.
3 Undo the screws (B) of the dummy plate at the mounting
location (see Fig. 1-3). The screws and nuts are required in
step 5!
4 Remove the dummy plate at the mounting location.
Installing the analyzer
module
Pumpschlauch Standard/Probe
blau / blau / blau
Pumpschlauch Reagenz
orange / gelb / orange
PumpTube Standard/Sample
blue / blue / blue
PumpTube Reagent
orange / yellow / orange
TresCon PO4-P
Reinigungslösung
Cleaning Solution
HO dest.
HO dest.
2
2
Standard B
Standard B
Reagenz
Reagent
Ablauf
blau
blue
V3
V2 V4
Thermoblock
Probe
Sample
V1
gelb
yellow
orange
orange
grün
green
blau
blue
rot
red
grün
green
P1 P2
P3
TresCon P04-P
Ser.-Nr. 00110010
WTW82362 Weilheim Made in Germany
TresCon
10 fixing screws (B)

NOx-N Overview
1 - 7
ba43110e05 01/2011
Fig. 1-4 Installing the TresCon NOx-N measuring module
5 Place the TresCon NOx-N in the mounting frame and screw it
into place with the 10 screws (B).
6 Undo the screws (A) of the mounting frame (see Fig. 1-4).
7 Carefully tilt out the mounting frame forwards.
Pumpschlauch Standard/Probe
blau / blau / blau
Pumpschlauch Reagenz
orange / gelb / orange
PumpTube Standard/Sample
blue / blue / blue
PumpTube Reagent
orange / yellow / orange
TresCon PO4-P
Reinigungslösung
Cleaning Solution
HO dest.
HO dest.
2
2
Standard B
Standard B
Reagenz
Reagent
Ablauf
blau
blue
V3
V2 V4
Thermoblock
Probe
Sample
V1
gelb
yellow
orange
orange
grün
green
blau
blue
rot
red
grün
green
P1 P2
P3
TresCon P04-P
Ser.-Nr. 00110010
WTW82362 Weilheim Made in Germany
TresCon
AA
TresCon N0x-N
Ser.-Nr. 00110020
WTW82362 Weilheim Made in Germany
TresCon NOx-N
Reinigungslösung
Cleaning Solution
Ablauf
V2
Thermoblock
Probe
Sample
V1
HO dest.
HO dest.
2
2
blau
blue
blau
blue
rot
red
Pumpschlauch Standard/Probe
blau / blau / blau
PumpTube Standard/Sample
blue / blue / blue
rot
red
P3
P1
10 fixing screws (B)

Overview NOx-N
1 - 8
ba43110e05 01/2011
Note
The number (1...3) of the open socket must agree with the position of
the TresCon NOx-N in the frame (see Fig. 1-5).
Fig. 1-5 Numbers of the mounting slots
Fig. 1-6 Plug connector on the back of the TresCon NOx-N
8 Plug the open cable connector of the TresCon NOx-N into the
open socket with the internal number of the mounting slot.
Cable connection
Terminal
1 2
3
Internal number
Mounting slots
TresCon
Plug

NOx-N Overview
1 - 9
ba43110e05 01/2011
Inside diameter (ID) of outlet tube: 10 mm
Inside diameter (ID) of ventilation tube: 3 mm
Fig. 1-7 Outlet adapter
9 Use scissors to cut the outlet and ventilation tubes to a suitable
length for the mounting slot (see table).
Mounting slot 123
Length 0.80 m 1.00 m 1.20 m
10 Connect the open outlet tubing of the TresCon NOx-N with the
outlet adapter inside the enclosure (see Fig. 1-7).
11 Also connect the ventilation tube to the adapter.
12 Carefully swing the mounting frame back into place.
13 Fix the mounting frame in place with the two screws (A) as
shown in Fig. 1-4.
Connecting the outlet
Tube dimensions
Adapter for the outlet
(Inside enclosure floor)
Outlet tube
(1 per module)
Ventilation tube
(1 per module)

Overview NOx-N
1 - 10
ba43110e05 01/2011
1.2.3 Connecting up the TresCon NOx-N
This section describes how to connect the permeate supply, outlet and
chemicals.
Warning
Only trained personnel is allowed to work on the analyzing section.
Always take safety precautions when handling chemicals and comply
with the relevant regulations. This applies in particular to the warning
instructions on the chemical containers and in the safety datasheets.
Always use protective equipment!
Fig. 1-8 Connecting the permeate supply
Note
If the TresCon NOx-N measuring module is to be connected to an
overflow vessel that is already installed (measuring several parameters
at a single sample catch location), the overflow vessel at this position
must have 3 permeate connecting pieces. If this is not the case, replace
the overflow vessel.
If the TresCon NOx-N is to measure a new sample location, another
overflow vessel must be mounted.
1 Feed the permeate tubing of the TresCon NOx-N (black, ID =
1.5 mm) through the hole drilled in the bottom of the enclosure.
2 Stick the permeate tubing into the overflow vessel provided.
Wear protective
goggles
Wear protective
gloves
Wear protective
clothing
Connecting the
permeate supply
Enclosure base
To the overflow vessel
Drilled hole

NOx-N Overview
1 - 11
ba43110e05 01/2011
Color coding
of the consumables
The tubes of the consumables are nontransparent and are color coded:
Fig. 1-9 Color coding
3 Push the tubes for dist. H2O and cleaning solution through the
holes drilled in the bottom of the enclosure.
Connecting the supply
of consumables
red
blue
red Dist. H2O
blue Cleaning solution
Vent
Color Coding

Overview NOx-N
1 - 12
ba43110e05 01/2011
Connecting the cleaning
solution
Cleaning solution causes severe corrosion
Do not allow this substance to get into the hands of children. Wear
suitable protective gloves and goggles/face mask when working with
this substance.
If this substance gets into the eyes, rinse thoroughly with water and
consult a doctor.
Caution
Only use distilled water without any contamination (softener or similar)!
Dist. H2O is also used for zero point calibration. Contaminated dist.
H2O causes incorrect measurement results.
4 Briefly shake the closed container with cleaning solution.
5 Place a container of cleaning solution on the tray.
6 Connect the (blue) screw cap with the (blue) suction hose (see
Fig. 1-9).
7 Place a filled container for dist. H2O on the tray.
8 Attach the (red) screw cap to the (red) suction hose.
Connecting dist. H2O

NOx-N Overview
1 - 13
ba43110e05 01/2011
1.2.4 Initial commissioning
When the TresCon NOx-N is installed and connected, the initial
commissioning can start.
Note
Read the B
ASIC OPERATION section in the TERMINAL volume of this
operating manual if you are not yet familiar with the operation of the
TresCon.
1 Switch on the TresCon at the power switch (mounting stand).
The analyzer modules warm up. The TresCon NOx-N is ready
for operation after it reaches the operating temperature.
2 Measuring mode
Select TresCon NO
X-N with 68.
3 Call up the Parameters NOx-N menu with 3. The main
menu appears on the display.
4 Select the Service menu item with 68 and confirm with
3. The service menu appears.
5 Perform the Fill system service according to section 3.2, page
3-4 of this operating manual.
Switching on the
TresCon
Filling the system

Overview NOx-N
1 - 14
ba43110e05 01/2011
1.3 Removal from service
Depending on the duration of the shutdown, some precautionary
measures need to be taken when removing the analyzer module from
service.
1 Perform the Empty system service, see section 3.5, page 3-11.
1 Perform the AutoClean service, see section 3.1, page 3-3.
2 Perform the AutoClean service again using deionized water
instead of cleaning solution.
3 Perform the Empty system service, see section 3.5, page 3-11.
Shutdown of up to 7
days
Shutdown of more than
7 days

NOx-N Overview
1 - 15
ba43110e05 01/2011
1.4 Instrument parameters
You can call up the following menu items via the main menu,
Parameters NOx-N, and display or change parameters there.
z Service
Performs maintenance activities with support from the service
menu. Numerous service steps are described from page 3-1.
z AutoCal
To define the parameters of the automatic calibration function for the
zero point calibration, page 2-5.
z AutoClean
To define the parameters of the automatic cleaning function, page
2-10.
z Manual correction
To adapt the measuring device by entering a comparison measured
value, page 2-12.
z Display
Selecting the dimensions and citation form, page 2-16.
z Attenuation
To parameterize the integrated low pass filter, page 2-18.
z Interval program
To select the intervals of the interval program, page 2-20.
z AutoAdapt
To select the parameters of the AutoAdapt procedure,
page 2-23.
z AutoFlow
Selecting the individual features of the monitoring function,
page 3-42.
z Measuring interval
To select the type of function and the intervals, page 2-23.
z Dilution
To enter a dilution factor, page 2-27.

Overview NOx-N
1 - 16
ba43110e05 01/2011
/