Page is loading ...

App Guide v1.4
Welcome to Swift Command
This document will show you how to connect
the Swift Command App to your Caravan or
Motorhome and then explain the key features
and their operation.
Control the water pump and
view tank information
Manage your system power,
select the battery or enable
the current limiter
Control your lighting and
adjust dimmer levels
Control the heating, set the
timer and configure the
power source
Jump to the remote app to locate your vehicle,
review past locations, remotely view system levels
& information, view system historical data and
contact your dealer

App Guide v1.4
Connecting to your Caravan or Motorhome
Firstly, you will need a compatible Bluetooth 4.0 device. Swift Command uses the latest
Bluetooth 4.0 BLE (Bluetooth Low Energy) technology, so please check your phone or tablet
specification. Most devices produced in the last 2 years use Bluetooth 4.0.
Secondly, you need to install the Swift Command App. Head to the
Apple or Android store and search for ‘Swift Command’, or alternately
click the link on the left. Follow any onscreen advice.
Next we need to be inside your Caravan or Motorhome
with the EC600 system powered up and the control
panel over the door switched on. Please refer to the
relevant section of your handbook to familiarise yourself
with the operation of the control panel.
Now please refer to the relevant following page for your device type, Android, Apple iOS or Windows
Phone.
Using the arrow keys scroll to the system settings, press
the select button and then scroll again to Bluetooth Pair?
Press the select button to start pairing. The power
button LED will start to flash. You now have 1 minute to
complete the pairing process on your device.

App Guide v1.4
Using the App for the first time -ANDROID
If the device does not connect please check that the control panel is still in pairing mode and try again.
If at any time you leave your Caravan or Motorhome the App will automatically disconnect. When you
arrive back you will see that the connection icon has a red cross. You can simply press on the connection
icon to reconnect automatically.
You can now press the back button to return to the main App Menu screen to start using the
App.
You can now start the Swift Command App and press the
Bluetooth button to go to the connection screen. Press the
‘Search for Control Panel’ button to list available connections.
Go to your device settings and select the Bluetooth section. If Bluetooth is
turned off, turn it on. Your device should start searching for Bluetooth
devices and SWIFT_BLE should be listed in the available devices section.
Press on SWIFT_BLE to select it and your device will then connect.
The Bluetooth Paring on the Control Panel will now complete and the power
LED will stop flashing. Pairing is now finished and you can exit the Bluetooth
section.
Press on the listed SWIFT_BLE result to
select it. The App will now connect and this
will be shown on the connection icon at the
bottom of the App screen.
Not ConnectedConnected
Good signal
Poor signal
No signal

App Guide v1.4
Using the App for the first time – APPLE iOS
You can now press the back button to return to the
main App Menu screen (shown on the left) to start using the App.
You can now start the Swift Command App and press
the Bluetooth button to go to the connection screen.
Press the ‘Search for Control Panel’ button to list
available connections.
If at any time you leave your Caravan or Motorhome the App will
automatically disconnect. When you arrive back you will see that
the connection icon has a red cross. You can simply press on the
connection icon to reconnect automatically.
The App will start scanning for the control panel and will list the
results under the search button. Press on the listed result to select
it. The App will now pair and connect and this will be shown on
the connection icon at the bottom of the screen.
If the device does not connect please check that the control panel
is still in pairing mode and try again.
Not ConnectedConnected
Good signal
Poor signal
No signal

App Guide v1.4
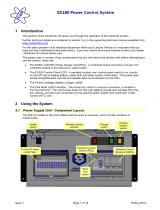
Power Control screen operation
Press the Power Control button to
go to the Power Control and
Information screen.
Use the AC
Limit button
to turn the
Mains 230V
current limiter
on / off.
Use the Battery buttons
to select which battery
you would like to use (or
charge). The selected
battery is indicated by
the lit blue button.
Under the row of buttons you will find the power
information bar graphs. These show the battery
voltages, current to / from the selected battery,
current from the solar panel and AC 230V current
being used from the site supply or generator.
Information on this screen refreshes as the screen is
opened and then about every 15 seconds. If you
would like to see a faster update you can turn on
the Live Update feature by pressing the Live
Update button. Other buttons are disabled during
live update.
Use the Power button to turn the power on or off
within your Caravan or Motorhome. This works in the
same way as the power button on the control panel.
Power on is indicated by the lit blue button.

App Guide v1.4
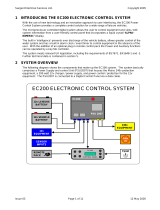
Water System operation and information screen
Press the Water System button to go to the
Water System and Information screen.
Here you will find a collection of information relating to the
water system and its operation.
Press the Pump button to turn on / off the water pump.
Pump on is indicated by the lit blue button.
Use the Tank Fill button on your Caravan to turn on / off the
automatic filling of the onboard water tank from the external
container.
Use the Tank Heater button on your Motorhome to turn on /
off the anti-frost heaters in the water tanks.
Note, Caravans have a Tank Fill button and Motorhomes have
a Tank Heater button.
Turn the Warning button on to receive a warning at the
control panel when the fresh water tank is low, or in a
Motorhome if the waste water tank is full.
See your handbook for additional information.
Temperature and Humidity information
is shown at the top of the screen.
The left box shows the Internal
temperature in degrees Celsius.
The centre box shows the Internal
Humidity as a percentage.
The right side box shows the External
Temperature.

App Guide v1.4
Lighting operation and information screen
Press the Lighting button to go to the Lighting and Information screen.
Here you will find a number of
controls for the lighting system.
The 5 buttons can be used to turn
on / of the relevant items. On is
indicated by the lit blue button.
These include the Interior lighting,
the outside Awning light, the inside
Entry light and the 2 dimmable
lighting circuits.
You can also adjust the lighting
level of the dimmable lights by
sliding either of the level controls.
Press the selection ‘dot’ and slide to
the left or right.
Please note that as the control panel only has one dimmer button
if you make a change at the control panel this will affect both
channels and set them to the same level.

App Guide v1.4
Heating System operation and information screen
Press the Heating button to go to the Heating System and Information screen.
Temperature and Humidity information is shown at the
top of the screen.
The Override feature can be used to override any existing
time / temperature for a fixed period. This is ideal if you
want to temporarily increase the temperature for a short
period without changing your main heater settings. Press
the Override button and enter the required settings in the
popup box. Press the Start button to action the changes.
To switch to manual control (if you want to use the Alde control panel) press
the Manual button so that it is lit blue. In manual mode the EC600 system
and the App do not control the heating system.
To enable the Timer and App controls for the heating system select one of
the Timer buttons. Timer x1 is the simplest mode as you have 4 timer events
during the day and these are applied every day. Timer x7 gives you more
control as you can set 4 timer events for each day of the week. The Gas and
Electric buttons are used in conjunction with the timers to set the energy
source and power level. Continues on next page >>

App Guide v1.4
Heating System operation and information screen
Timer Settings and Energy
Selection
The final step is to set or adjust the Energy Selection.
Press the Gas button to turn Gas usage on / off.
Press the Electric button to turn Electric on at 1KW,
press the button again to change to 2KW, press the
button again to change to 3KW and press the button a
final time to turn Electric off. Note that the selected
KW setting is shown within the Electric button.
Press the Timer x1 button to set times for all
days. Press Timer x7 to set times for each day
of the week. The information in the lower half
of the screen will change depending on which
Timer setting you choose.
Press the select arrow to set the hour,
minute, heating temperature and water heater
mode for each timer event.
You can also use the additional buttons to copy
the current day to the next, copy the current
day to all days, reload the setting from your
vehicle, or save the setting back to your vehicle.

App Guide v1.4
Location and Remote features
Press the Remote Features button to go to the Location and Remote features screen.
Features on this screen need an internet connection so please ensure a network
connection is available on your device. You need to enter your Swift Command account
email and password on the account page before these features will be enabled.
– Locate your vehicle and view
historical locations.
– Remotely view system levels &
information.
– View historical vehicle system data in
graphical format. Includes battery voltages,
temperatures and water tank levels.
– View your dealer contact details, with
links to their website, phone & email.
l – Access your account on the Swift
Command Portal.
– The other buttons are used
to control the EC600 system remotely when
away from the vehicle. Press the power
button to start remote control.
Note: If you use the remote features part of the App whilst
connected via Bluetooth in your caravan or motorhome
the Bluetooth connection will be disconnected and
disabled for 5 minutes to avoid any conflicting signals.

App Guide v1.4
Location and Remote features -Locate
Press the Locate button to go to locate your vehicle or review historical locations and
system data.
When you access the
Locator screen the latest
position is shown
Click on the vehicle symbol
to view the time, date and
other data.
To view historical data, first
select a date and then click
the Get History button
Click the display filter and tick the
box to enable Dealer Locations
With dealer locations enabled, click the
green map pin to show the dealer contact
details. Click the Google Map view to jump
out of the App and view on Google Maps.

App Guide v1.4
Location and Remote features – Levels
Press the Levels button to remotely view system levels & information.
Press the Download Vehicle Levels button to retrieve the latest data from your vehicle.
The information is shown on one
long page, scroll down to view all of
the data.

App Guide v1.4
Location and Remote features -History
Press the History button to select and view vehicle system data.
The first step is to press the Download
Vehicle History button to download your
vehicles data.
Next press the Select Date button to select
a date range. You can use the preset
selections or set a from and to date from
the calendar picker. Press Apply to set the
date range.
Finally, press the Create Graphs button to
generate the graphs. At any point you can
change the date selection range and then
press Create Graphs again.
Press the (+) button to expand the required graph. When the
graph is open click the (-) button to collapse the graph.
On a touch screen device you can ‘pinch to zoom’ in the chart
area.

App Guide v1.4
Location and Remote features -Dealer
Press the Dealer button to show your dealer contact details.
On the Dealer Info page you can click on the links provided to
go to the dealer website, call the dealer or send an email.
Click the Locate Dealer button to show a map view of the dealer
location.

App Guide v1.4
Location and Remote features – Remote Control
On the remote control screen you can use
buttons shown here to control the related
features in your vehicle.
To connect to your vehicle press the Power
button.
Please note that if you are using the remote
control feature but are also still connected via
Bluetooth within your vehicle, the Bluetooth
connection will be switched off to prevent
control conflicts.
The App will communicate with your vehicle
and then show the current on / off state of
each item. You can now use the buttons to
control the related items (which work in the
same way as they do in the main part of the
app).
Note: If you use the remote features part of the App whilst
connected via Bluetooth in your caravan or motorhome
the Bluetooth connection will be disconnected and
disabled for 5 minutes to avoid any conflicting signals.

App Guide v1.4
Settings and information
There are a number of other screens used to support the App and these are detailed here.
Here you can access your account details.
[1] Enter your Swift Command email account and
password so that you can access your vehicles
information and location data. [2] Press the save
button top right when complete.
Here you can access your vehicles handbook along with any other relevant documents.
These documents are selected automatically based on your vehicles serial number and are
loaded to your device on first use. Please ensure you have an internet connection when first
accessing these documents.
Note; your mobile number and email address for notification must be entered on the Swift Command
portal, they can’t currently be entered via the app.
[3] Press the Get Vehicle Details
button to retrieve your vehicle
details. If you have more than one
vehicle they will appear in a list.
[4] Press on the required vehicle to select it. It will then jump to the top of
the page to confirm selection. [5] Press the save button to complete.

App Guide v1.4
Alert Settings (1 of 2)
On this screen you can set and configure system alerts so that the system can email or text
message you when certain events occur. To use the features on this page your device will
need an internet connection.
The first step is to load the current system alerts by pressing the the load button. The alerts will
be loaded and displayed as shown below.
The first item in the list is used to enable or disable any alerts you have
set. This acts as a master on / off for all of the alerts. Please enable
the alerts before adjusting the individual settings.
This first alert relates to the alarm system in caravans. It can also be
used with aftermarket alarms in motorhomes when suitably wired.
Press the alert to adjust the settings.
All of the alerts work in a similar way.
To enable the alert select the maximum number of
emails and / or SMS text messages you would like per
day. These limits allow you to control how often you
will be contacted / disturbed by the alert. To disable
the alert set both items to off.
Note that the Alarm trigger and Leisure battery voltage alerts work even if the EC600 system is shutdown.
The other alerts need the EC600 system powered up to operate.

App Guide v1.4
Alert Settings (2 of 2)
The external temperature alert and the external temperature with water
in the onboard tanks alert have an additional temperature parameter
that can be set.
To enable the alert select the maximum number of
emails and / or SMS text messages you would like per
day. Then select the required trigger temperature (2° C
through to -10° C).
Temperature alert example: if set at -1° the system will
alert you if the external temperature falls below -1° C.
Water tank temperature alert example: if set at -2° the
system will alert you if the external temperature falls
below -2° C when there is water in either or both of the
onboard water tanks.
The leisure battery and vehicle battery voltage alerts are enabled in the same way
as the other alerts by setting the maximum number of emails and / or SMS text
messages you would like per day. These alerts work from fixed system settings. If
the battery voltage falls below 11.3V or rises above 15.4V the alert will be
triggered.
Finally, when you have finished adjusting / setting the
alerts, press the save button to save the alert settings.

App Guide v1.4
Other Links and Information
The Smart Command App also provides direct links to the following websites. Your device will require an
internet connection to use these links.
Here you can access the Swift Group website. Keep up to date with new and exciting
news from Swift.
Click this link to go direct to Swift TV. Relax, sit back and enjoy the latest news and
product reviews from the Swift TV channel.
Here is Swift Group's own dedicated social networking site where you can make friends,
exchange holiday stories, get tips on touring and ask Swift technical questions and advice.

App Guide v1.4
Web Portal – Register and Login
Before you can use the Swift Command portal you need to register for an account at swiftcommand.co.uk
You need to provide an email address and
password which you will then use to login to Swift
Command. For security reasons your password
must contain at least one capital letter, one number
and one lowercase letter.
We also ask for your home address and phone
number should we need to contact you.
Finally you need to read and accept the Swift
Command terms of use by ticking the box.
Click the register button to complete the process.
Swift Command will now perform a security check
by sending a message to your email address. You
need to click the link in the message to activate
your account.
When activated you can proceed to login to Swift
Command by using the Login link (top right).
Enter your email address and password, tick the
optional remember me box if required and click the
Log In button to login.
When logged in, you can view or amend your
account details by clicking the Account Details link.
Click the Details button to amend or update your
details.
Your account will normally be created at the time of
purchase with help from your dealer, but here are
the instructions for reference.
Browse to swiftcommand.co.uk and click the Register
link (top right). Enter the required information into
the form.
/