Amcor ac 12000 mobil unit Owner's manual
- Category
- Mobile air conditioners
- Type
- Owner's manual
This manual is also suitable for
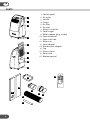
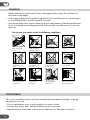
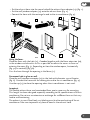
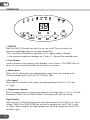
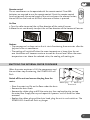
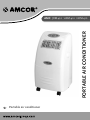
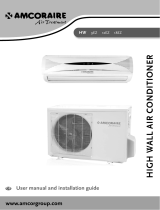
Amcor ac 12000 mobil unit is a portable and easy-to-use air conditioner that can be moved from one room to another depending on your needs. It has a cooling capacity of 12000 BTU/h and can be used to cool rooms up to 30 square meters. The unit has three operating modes: automatic, cooling, and fan, and two fan speeds: low and high. It also has a timer function that allows you to set the unit to turn off after a certain amount of time, and a remote control for easy operation from anywhere in the room.
Amcor ac 12000 mobil unit is a portable and easy-to-use air conditioner that can be moved from one room to another depending on your needs. It has a cooling capacity of 12000 BTU/h and can be used to cool rooms up to 30 square meters. The unit has three operating modes: automatic, cooling, and fan, and two fan speeds: low and high. It also has a timer function that allows you to set the unit to turn off after a certain amount of time, and a remote control for easy operation from anywhere in the room.


-
 1
1
-
 2
2
-
 3
3
-
 4
4
-
 5
5
-
 6
6
-
 7
7
-
 8
8
-
 9
9
-
 10
10
-
 11
11
-
 12
12
-
 13
13
-
 14
14
-
 15
15
-
 16
16
-
 17
17
-
 18
18
-
 19
19
-
 20
20
-
 21
21
-
 22
22
-
 23
23


Amcor ac 12000 mobil unit Owner's manual
- Category
- Mobile air conditioners
- Type
- Owner's manual
- This manual is also suitable for
Amcor ac 12000 mobil unit is a portable and easy-to-use air conditioner that can be moved from one room to another depending on your needs. It has a cooling capacity of 12000 BTU/h and can be used to cool rooms up to 30 square meters. The unit has three operating modes: automatic, cooling, and fan, and two fan speeds: low and high. It also has a timer function that allows you to set the unit to turn off after a certain amount of time, and a remote control for easy operation from anywhere in the room.
Ask a question and I''ll find the answer in the document
Finding information in a document is now easier with AI
Related papers
-
Amcor PCMA 12KE-410 User manual
-
Amcor AMC 10KM-410 User manual
-
-
Amcor Air Conditioner 15KE-410 User manual
-
-
-
-
Amcor SF12000E Owner's manual
-
-
Amcor af 8000 User manual
Other documents
-
Empire 83cm-33 Inch Tower Fan User manual
-
Argo SLIMMY Owner's manual
-
Dimplex DAC 9000 User manual
-
 Amcoraire 18EZ User manual
-
VonHaus 2300398 User manual
-
 LIXiSE ATS106 Operating instructions
-
Dareu EK807G User manual
-
Dareu LM138G User manual
-
 meitav-tec FHV-H1-PR-IR Owner's manual
-
 Dareu A81 Pro User manual


