
In English 1-10
En français 11-20
En Español 21-30
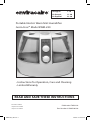
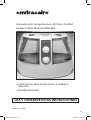
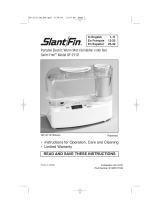
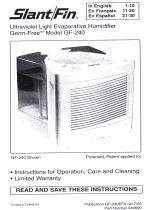
Portable Electric Warm Mist Humidier
Germ-Free™ Model EWM-220
• Instructions for Operation, Care and Cleaning
• Limited Warranty
READ AND SAVE THESE INSTRUCTIONS
Printed in CHINA
Imprimé en CHINA
Impreso en CHINA
Publication EWM-220
Part Number 31IMM220190
EWM-220_OM.indd 1 3/26/07 2:53:55 PM

2
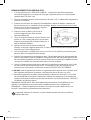
READ ALL OF THE FOLLOWING INSTRUCTIONS BEFORE
ATTEMPTING TO OPERATE YOUR HUMIDIFIER. FOLLOWING
THESE SIMPLE GUIDELINES FOR USE AND CARE WILL HELP
ENSURE YEARS OF DEPENDABLE AND EFFICIENT SERVICE.
IMPORTANT SAFEGUARDS
CAUTION: BECAUSE HIGH TEMPERATURE IS GENERATED IN THIS HUMIDIFIER,
BASIC SAFETY PRECAUTIONS SHOULD ALWAYS BE FOLLOWED ESPECIALLY
WHEN CHILDREN ARE PRESENT.
WHEN USING ELECTRICAL APPLIANCES, THESE BASIC SAFETY PRECAUTIONS MUST
BE FOLLOWED:
1.
DO NOT operate the humidier without the water tanks.
2.
ALWAYS use clean, cool tap water to ll the water tanks.
3. To avoid risk of re or shock,
DO NOT use an extension cord.
4.
DO NOT handle the unit with wet hands.
5.
NEVER tilt, move, or attempt to empty the unit while it is operating or plugged
in. Shut o, unplug and remove water tanks before moving unit.
6.
DO NOT place the unit close to heated areas, such as near stoves, heaters or in
direct sunlight.
7.
DO NOT operate OUTDOORS. This humidier is intended for indoor use only.
8.
DO NOT let water get into the air inlets on the bottom of the enclosure or on the
cord or plug.
9.
DO NOT store or use gasoline or other ammable vapors and liquids near the
humidier.
10.
ALWAYS make sure the water tank caps and gaskets are rmly in place.
11.
DO NOT touch hot surfaces.
12.
ALWAYS turn the humidier o when the water tanks are empty or when
the unit is not in use. If you turn your unit o for extended periods, ALWAYS
disconnect the power cord and empty the water tanks and base.
13.
ALWAYS place the unit on a rm at, level, water resistant surface and arrange
the power cord so that the product is unlikely to be upset.
14.
DO NOT clean the product or service the UV bulb without disconnecting the
power cord.
15. Before connecting to electric power outlet, check your electrical power supply.
It must be 120 volts A.C. (alternating current). The outlet may be 15 amp or 20
amp. The circuit must be of adequate size and must be protected by fuse or
circuit breaker.
16. This item has a polarized plug. As a safety feature, this plug will t in a polarized
electrical receptacle (outlet) only one way. If the plug does not t fully in the
outlet, reverse the plug. If it still does not t, contact a qualied electrician.
EWM-220_OM.indd 2 3/26/07 2:53:55 PM

3
17. DO NOT attempt to remove TOP HOUSING, NOZZLE OR MINERAL ABSORPTION
PAD, during operation, or within 15 minutes after the humidier is turned to the
“OFF” position and unplugged. Serious injury may result. MINERAL ABSORPTION
PAD,TOP HOUSING AND NOZZLE should only be removed for cleaning and
maintenance purposes.
DO NOT place hands or face directly over TOP HOUSING while unit is in
operation.
18.
Place unit in an area where it is not accessible to children.
19. Before using the unit, check the power cord for any signs of damage.
20. This humidier requires daily and weekly maintenance.
21. Refer to CLEANING AND MAINTENANCE instructions provided.
NEVER clean
humidier in any other manner than as instructed by this manual.
22.
WARNING – Eye damage may result from directly viewing the light produced by
UV bulb. DO NOT energize unit while lamp door is removed.
23. This product complies with Title 21 Code of Federal Regulations Chapter 1,
Subchapter J.
SAVE THESE INSTRUCTIONS
EWM-220_OM.indd 3 3/26/07 2:53:55 PM

4
WEEKLY CLEANING AND MAINTENANCE ADVISORY
At least weekly cleaning is recommended, when the unit has been in use.
Regular cleaning prevents mineral scale buildup in the hot water reservoir. It
also helps prevent buildup of bacteria, molds or other microorganisms in the
tank or system. This ensures that your humidier will operate at maximum
eciency. (See page 6 for full cleaning instructions.)
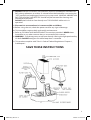
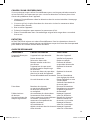
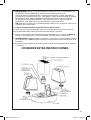
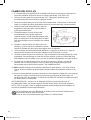
HOW YOUR ENVIRACAIRE
WARM MIST
HUMIDIFIER WORKS
The model EWM-220 humidier uses a
two-step approach to eliminate potentially
harmful microorganisms from the water
before they are spread with the mist into
the air. The rst step uses a UV bulb, located
inside the base of the humidier, that shines
on the water through a special glass tube
as it passes from the cold water reservoirs
to the hot water reservoir. The second step
is the boiling action that takes place in the
hot water reservoir just before the mist is
distributed to the air in the room.
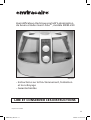
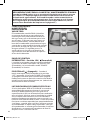
CONTROL PANEL
POWER SWITCH — ON ( ) POSITION
When the push button switch is pushed to the ON
setting and the unit is plugged in, the power is on.
The green “POWER” indicator light will be illuminated.
OFF POSITION ( ) - When the push button switch
is pushed to the “OFF” position, the “POWER” indicator
light will not be illuminated, indicating that the power
is “OFF”. This should be used (in addition to unplugging
unit) before moving, performing maintenance, etc.
REPLACE UV BULB
If the “REPLACE UV BULB WHEN LIT” signal light is
continuously illuminated during normal use (an
occasional faint glow may occur when switching power
on or other times, but this is normal), the bulb must
be replaced with the same special 3.5W bulb. See
the enclosed order form. The UV bulb will operate at
maximum output for approximately 2,000 hours. The
UV bulb may operate longer than 2,000 hours but at
a reduced output. To keep your humidier operating
at maximum eciency it is recommended that the UV
bulb be replaced after 2,000 hours of use.
Humidistat
Power Switch
EWM-220_OM.indd 4 3/26/07 2:53:56 PM

5
“REFILL WHEN LIT” INDICATOR ( ) - When illuminated, the water tanks need
relling. See the section “Filling the Water Tanks”. If still illuminated a few minutes after
full tank is placed on base, reposition water tanks. (Unit will operate with only one
water tank.) Each time you ll tanks, rinse tanks, hot water reservoir and cold water
reservoirs. Clean them according to CLEANING INSTRUCTIONS if minerals or lm are
present.
RELATIVE HUMIDITY CONTROL ( ) - This controls the humidity level. If moderate
humidity is desired, the control should be turned counterclockwise toward “ ”; and if
higher humidity is desired, clockwise toward “ ”.
NOTE: When you unpack your humidier, you may nd it has droplets of water on
some surfaces. This is normal as every unit is tested prior to shipping. Carefully unpack
humidier and remove all packing material.
OPERATING INSTRUCTIONS
1. Place the base of the unit on a rm, at, level and water resistant surface.
2. Fill the water tanks according to the instructions below and place on humidier base.
3. Plug the power cord rmly and completely into the wall outlet.
4. Push the power switch to the ON position (Lights may icker momentarily). Then
turn the relative humidity knob clockwise until you hear a faint click. It will be
normal for the humidier to take a few minutes to warm up and begin to mist.
5. When the water tanks are empty, (after approximately 24 hours running time), the
“REFILL WHEN LIT” lamp will go on, and the unit will stop heating. Refer to the
“FILLING THE WATER TANKS” section.
6. Whenever the water falls below the level of the oat switch during operation, the
heating element will shut o and stop heating, and the REFILL indicator will light.
7. The unit will operate as long as there is water in either tank and unit will operate
with either one or both tanks.
FILLING THE WATER TANKS
1. Before lling the water tanks, push the POWER switch to the “OFF” position and
unplug unit. Refer to cleaning instructions.
2. Remove water tanks from base, turn each tank upside down and remove tank cap
by turning counterclockwise. Fill tank with clean cold tap water.
Replace the tank cap by turning clockwise. Tighten rmly.
3. Carefully pick up tank, since it will be heavy when full, and slippery if wet.
4. Place water tanks on base. Make sure tanks are properly placed, otherwise, the
humidier will not work correctly.
EWM-220_OM.indd 5 3/26/07 2:53:56 PM

6
USING THE MEDICINE CUP
In order to add a medicated vapor to the “mist” output:
1. Push the POWER switch to the “OFF” position and allow the Top Housing to cool.
2. Carefully add liquid medicine to medicine cup. DO NOT ll the cup more than half full.
3. Carefully place medicine cup on top of top housing.
4. Push the POWER switch to the ON position.
5. After use, remove the cup from the unit and clean any residue from the cup with
warm water.
WARNING:
DO NOT use any liquid medicine other than those specically recommended for use
with a steam vaporizer or warm mist humidier.
DO NOT pour medicine directly into the top housing openings nor add it to the water
in the tank or tray.
MINERAL ABSORPTION PAD INSTRUCTIONS
Warm mist humidiers do not spread ne mineral dust into the air that you breathe
nor on your furniture, the way that other type humidiers do. The mineral dust remains
trapped in the humidier hot water reservoir. Use of mineral absorption pads will
play a major role in capturing and removing minerals from hot water reservoir, and
preventing a stubborn mineral buildup. The unit can run without pads, but more
frequent cleaning will be required. The mineral pad for this unit is EMP-15P.
1.
Before starting the humidier, place mineral absorption pad in the hot water
reservoir. After the humidier has been operating, the water will become HOT, and
CAUTION should be exercised when handling mineral absorption pad. It is best
to allow humidier water to cool down, and to use tongs or long tweezers when
handling pad.
2. The useful life of the mineral absorption pad will vary, depending on the mineral
content of the water used. In areas of moderate mineral content water supply,
the mineral absorption pad should be changed after approximately (3) weeks
of continuous use. If the water is “Hard Water”, the pad should be changed more
frequently. The best way to tell when the pad should be changed is to examine it
AFTER the water has cooled down, to see if it is still soft and pliable. When the pad
is near the end of its life, it becomes sti and hard and should be replaced with a
new pad. Another sign to change pad is when scale begins to buildup on interior of
hot water reservoir. If pad appears to disintegrate (normally due to use of softened
water) discontinue use of pads.
CLEANING AND MAINTENANCE
Water contains minerals and other particles. During operation most of these minerals
will remain in the water reservoir. Gradual buildup of deposits will coat the hot water
reservoir and reduce its eciency. The importance of routine cleaning and care cannot
be over-emphasized. Hard water contains more minerals and other particles.
EWM-220_OM.indd 6 3/26/07 2:53:56 PM

7
CLEANING INSTRUCTIONS
Failure to perform the necessary cleaning steps will damage unit.
1. Before cleaning, set CONTROLS to “OFF” position and unplug unit.
2. Remove water tanks from humidier base, and drain water from tanks.
3. Allow at least 15 minutes for the hot water to cool after shutting unit “OFF” before
moving base. Remove top housing by rotating (2) lock wheels and lifting up top
housing. Remove nozzle by rotating it counterclockwise and lifting up. Remove
mineral absorption pad from hot water reservoir using tweezers or tongs to
prevent burns from hot water. When the cleaning procedure is completed, replace
mineral absorption pad. To drain water from humidier base, grasp with both
hands and tilt to the side, draining water into the sink.
BE CAREFUL NOT TO HAVE DRAINING WATER FALL INTO CONTROLS OR VENT
OPENINGS. DO NOT drain in any manner other than indicated.
WARNING: DO NOT place directly under running faucet.
4. Pour about 1 cup of white vinegar into either reservoir and allow it to soak for only
20 to 30 minutes.
5. Hold the base of the humidier over the sink and tilt it on its side to empty the
vinegar. Fill the cold and hot water reservoirs with clean, warm water to remove all
traces of the vinegar. Remove any buildup of minerals in the hot water reservoir
using a small brush, such as a toothbrush.
NOTE: The buildup is due to water hardness. The harder your water, the more
often this maintenance will be needed. Empty all of this water by turning the
unit on its side. If minerals remain in the metal (stainless steel) boiler cup, a metal
scraper can be used to scrape o the mineral deposits. Be careful not to use any
metal blade on any plastic parts.
DO NOT ALLOW WATER TO ENTER THE BOTTOM OF THE HUMIDIFIER BASE OR ANY
OTHER OPENINGS, OR IMMERSE THE CORD AND PLUG.
6. Disinfect the water tanks using a solution of one teaspoon of household chlorine
bleach in 1 gallon of water. Let the solution sit for 20 minutes, swishing every few
minutes to wet all surfaces. Empty the tanks completely; rinse thoroughly until all
of the bleach smell is gone. Fill the tanks with fresh, cool water and replace them
onto the humidier base.
7. NEVER use any metal or hard objects to clean plastic parts which may cause
scratching of the plastic parts. The only exception to this is the metal part of the
hot water reservoir. A metal scraper can be used to clean this part only. NEVER use
gasoline, kerosene, glass cleaner, furniture polish, paint thinner or other household
solvents to clean any part of the humidier.
8. Each day the reservoirs and tanks should be drained, rinsed and relled with fresh
tap water.
9. To clean exterior surfaces, use a solution of water and mild detergent with a wrung-
out damp cloth. Rinse and wring out the cloth and wipe the exterior surfaces again.
Finally, wipe with a dry cloth. Allow sucient time to dry before plugging the
electrical cord into the outlet.
10. If it is noticed that the accumulated residue on the oat switch aects the oating
action, clean carefully with a soft brush.
11. After base is totally cleaned and dried, replace mineral absorption pad. Place nozzle
on base and rotate clockwise until it locks. Place Top Housing on Main Housing
and rotate lock wheels until it locks in place.
12. Replace tanks. Plug in the unit and resume normal use.
EWM-220_OM.indd 7 3/26/07 2:53:56 PM

8
CHANGING THE UV BULB
1. If the “REPLACE UV BULB” indicator illuminates during normal use, it is time to
change the UV bulb, which is a special 3.5W bulb, EUV-13B.
2. Turn the POWER switch to the “OFF” position, unplug it and allow it to cool.
3. Remove the water tanks from the base of the humidier. Remove Top Housing by
rotating (2) lock wheels. Remove nozzle by rotating it counterclockwise and lifting up.
4. Place the base of the humidier over the sink and tilt the unit to remove any
remaining water.
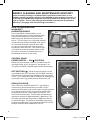
5. Carefully turn the base of the humidier
over and place it upside down on a at level
surface. You will see a door at back of unit
that is closed with two Phillips head screws.
6. Using a Phillips head screwdriver, carefully
turn the screws counterclockwise until the
screws separate from the door.
7. Open the door, by pulling forward. The UV
light bulb will be visible. Pull the door out the
minimum amount to have access to unscrew bulb from socket.
8. Take a replacement 3.5W UV bulb that you purchased from Kaz Incorporated or
another supplier and change the bulb. To prolong the life of the bulb, limit your
direct contact with the glass of the bulb by using a cloth or tissue to screw it into
place.
9. When the new bulb is in place, close the door and replace the screws by using your
Phillips head screwdriver and rotating them clockwise until they are just tight. DO
NOT OVER TIGHTEN.
10.
DO NOT turn power on, while UV lamp door is open, and DO NOT view illuminated
bulb directly because eye damage may occur.
11. Turn the unit upright, place the top housing, nozzle and water tanks on top of the
base of the humidier, plug the unit in, and push the POWER switch to the ON
position. The “REPLACE UV BULB” indicator should no longer be lit.
IMPORTANT NOTE: Even though you will not receive maximum germicidal eects, you
can still use your humidier until the replacement bulb arrives.
NOTE: You will hear a rattling sound and notice a small round object inside your bulb.
This is normal. Your bulb is fully operational.
Lamp contains mercury. Manage in accordance with disposal laws.
See www.lamprecycle.org or call 1-800-895-8842
EWM-220_OM.indd 8 3/26/07 2:53:57 PM

9
STORAGE TIPS
If you do not plan to use your humidier for an extended period of time, such as
during the summer months, it is important that you follow these instructions to help
prevent problems from developing in the unit.
1. Clean your humidier as instructed in the section titled, “Cleaning and
Maintenance”.
2. Make sure all water is emptied from the tanks and the hot and cold water
reservoirs.
3. Dry your unit thoroughly.
4. Leave the tank caps o to expose the tanks to air.
5. Pack your humidier in its original carton and store it in a cool, dry place.
SERVICE
DO NOT attempt to repair this humidier yourself. For repairs covered under the
warranty, contact Kaz Incorporated by telephone or mail for a Return Authorization
Number.
TROUBLESHOOTING
TROUBLE POSSIBLE CAUSES SOLUTION
Unit does not mist Unit is not plugged in Plug in unit
Power failure Check circuit breaker
Water tanks empty Remove and rell
Power switch not turned on Push switch to ON
Unit not reset after relling tanks Reposition water tanks
Water tank not properly Reposition water tanks
located on base unit
Humidity level set is achieved Turn Relative Humidity
Control to higher setting
Only one tank empties Move unit to level surface.
Raise end with full tank.
Water leaks from unit Tank cap or tank cap Tighten cap.
gasket is missing or Replace tank cap
improperly positioned or reposition cap gasket.
Moist air output low Mineral buildup in hot water Clean unit as per
reservoir instructions.
Rell indicator light on Water level is below water Rell water tanks
level oat and mount tanks on base
Water level oat Clean oat per
is covered with lm cleaning instructions
Mineral buildup in hot water Clean unit per
reservoir cleaning instructions
EWM-220_OM.indd 9 3/26/07 2:53:57 PM

10
LIMITED WARRANTY
IMPORTANT NOTICE
PLEASE CLEAN THIS GERM-FREE HUMIDIFIER AT LEAST ONCE A WEEK BY FOLLOWING
THE CLEANING INSTRUCTIONS IN THE OWNER’S MANUAL. FAILURE TO REGULARLY
CLEAN THIS GERM-FREE HUMIDIFIER WILL RESULT IN A BUILDUP OF MINERAL
DEPOSITS WHICH WILL CAUSE THE UNIT TO CEASE TO OPERATE. IF THE UNIT FAILS TO
FUNCTION BECAUSE IT HAS NOT BEEN CLEANED, THIS WILL VOID THE WARRANTY.
To the original purchaser or gift recipient of this humidier.
1. If your ENVIRACAIRE humidier fails in normal use because of a manufacturing
defect within 90 days from the date of original purchase, Kaz Incorporated will
repair the humidier at no charge for parts, labor or shipment back to you (see
instructions for returning unit below).
2. After the rst 90 days, if a component part fails because of a manufacturing defect,
Kaz Incorporated will repair or replace that component part up to 3 years from
purchase date. There will be no charge for the component part or shipment back
to you, but Kaz Incorporated reserves the right to charge for installation labor.
3. For cracked, chipped or broken water tanks, see item 4 below.
4. This warranty does not cover any product which in Kaz Incorporated’s judgment
has been (1) damaged as a result of accident, misuse or abuse (2) used for a
purpose for which it was not designed, or (3) repaired or altered in any way that
adversely aected its performance or reliability. This warranty does not cover
scratches and wear of surfaces.
5. UV bulb replacement is a normal maintenance procedure and is therefore not
covered under this warranty unless the bulb is found to be defective.
6. For repairs, call customer service at 1-800-477-0457 to request a return
authorization number. Returned units will not be accepted at Kaz Incorporated
without a return authorization number. Return humidier to address shown below
with dated sales receipt. The cost of shipment to Kaz Incorporated must be paid by
the consumer. We suggest having tracking or delivery conrmation. Return to: Kaz
Incorporated, Attn: Returns Dept., 4755 Southpoint Drive, Memphis, TN 38118.
In Canada: Kaz Canada, Inc., Attn: Returns Dept., 510 Bronte Street South, Milton,
Ontario L9T 2X6.
7. This warranty gives you specic legal rights and you may also have other rights
which vary from state to state.
8. Kaz Incorporated makes no express warranties other than the warranties contained
herein. Kaz Incorporated’s sole obligation in the event of a breach of any implied
warranty (including, but not limited to, implied warranties of merchantability and
tness for a particular purpose) is limited to repair or replacement, and all such
warranties are limited in duration to the time periods after the date of original
purchase as stated above. The warranty does not cover claims for incidental or
consequential damages resulting from a breach of any express or implied warranty
or any other reason including damages due to accident, abuse, lack of responsible
care, the axing of any unauthorized attachment, loss of parts, or use at a voltage
other than specied.
CUSTOMER SERVICE #: 1-800-477-0457
EWM-220_OM.indd 10 3/26/07 2:53:57 PM
Page is loading ...
Page is loading ...
Page is loading ...
Page is loading ...
Page is loading ...
Page is loading ...
Page is loading ...
Page is loading ...
Page is loading ...
Page is loading ...
Page is loading ...
Page is loading ...
Page is loading ...
Page is loading ...
Page is loading ...
Page is loading ...
Page is loading ...
Page is loading ...
Page is loading ...
Page is loading ...

31
EWM-220_OM.indd 31 3/26/07 2:54:01 PM

Kaz Incorporated · 250 Turnpike Road · Southborough, MA 01772
EWM-220_OM.indd 32 3/26/07 2:54:01 PM
-
 1
1
-
 2
2
-
 3
3
-
 4
4
-
 5
5
-
 6
6
-
 7
7
-
 8
8
-
 9
9
-
 10
10
-
 11
11
-
 12
12
-
 13
13
-
 14
14
-
 15
15
-
 16
16
-
 17
17
-
 18
18
-
 19
19
-
 20
20
-
 21
21
-
 22
22
-
 23
23
-
 24
24
-
 25
25
-
 26
26
-
 27
27
-
 28
28
-
 29
29
-
 30
30
-
 31
31
-
 32
32


Honeywell GF220 Owner's manual
- Category
- Humidifiers
- Type
- Owner's manual
Ask a question and I''ll find the answer in the document
Finding information in a document is now easier with AI
in other languages
Related papers
-
Honeywell EWM-300W Owner's manual
-
Honeywell GF210W User manual
-
-
-
 Slant Fin GF-211D User manual
-
Slant Fin Germ-Free GF-350 Owner's manual
-
-
-
Honeywell HUL585 Owner's manual
-
Honeywell HEV685B User manual

Other documents
-
Kaz V790 Owner's manual
-
Hamilton Beach 04700 User guide
-
Slant/Fin GF-210W User manual
-
 Slant Fin GF240 Owner's manual
-
Brookstone BWM-2110 User manual
-
-
-
Bionaire W15 User manual
-
-
