Honeywell HEV685B User manual

Category
Humidifiers
Type
User manual

This manual is also suitable for

GETTING TO KNOW
YOUR COOL MOISTURE
EVAPORATIVE HUMIDIFIER
Invisible moisture
Evaporative humidification
means you will NOT see
the moisture output.
With evaporative humidification, a fan pulls
dry air from the room through the saturated
wicking filter. Moisture from the wicking
filter evaporates and is pushed into the
room with the help of the fan.
Evaporative humidification adjusts moisture
output to the amount of moisture the air can hold. The drier (less humid) the air in the room,
the more moisture the humidifier will add to the air. An evaporative humidifier cannot add
more moisture to the room than the air can hold. The amount of moisture the air can hold
depends on many factors including relative humidity level, temperature and size of room.
Instruction Manual
HONEYWELL TOP FILL
COOL MOISTURE HUMIDIFIER
MODEL HEV680 SERIES
REPLACEMENT FILTER: HONEYWELL HC-14 SERIES FILTER E
Humidity Level
• The ideal indoor humidity level is 40-60%
Use a Honeywell humidity monitor
(HHM10 or H10C) to check your indoor
humidity level (not included)
Filter
A wicking filter is required for this
unit to operate (one included)
The wicking filter will help to capture minerals
from your water and will help to prevent white
dust (calcium deposits from hard water)
If you have hard water, you will need to
replace your filter more frequently
See “Caring for your Filter” section for tips
on prolonging the life of your wicking filter
Visit www.honeywellcomfort.com (in US) or www.honeywellcomfort.ca (in Canada)
Call 800-477-0457 for questions and information about this humidifier
2 3
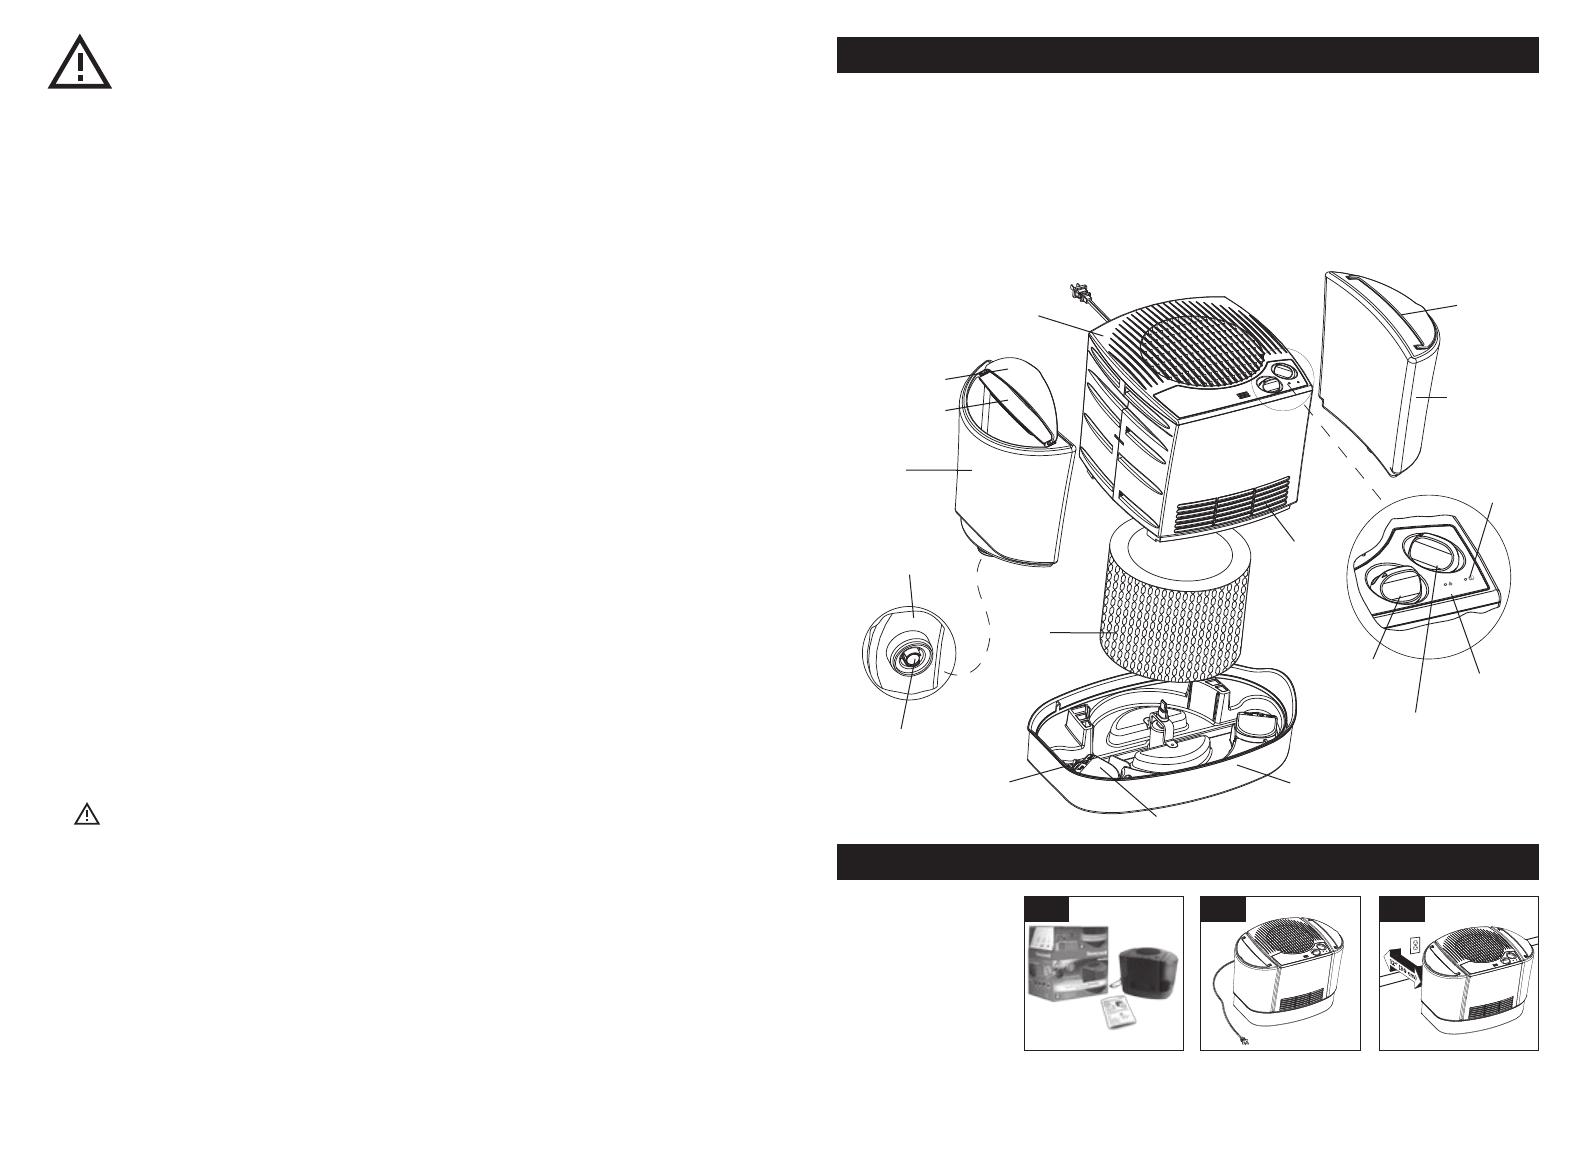
HEV680 Series HUMIDIFIER COMPONENTS
1. Remove packaging
material. Keep this
Instruction Manual
for future reference.
2. Remove twist tie and
extend power cord.
3. Place the humidifier
on a firm, level, water resistant surface at least 12" (30 cm) from any walls.
Do not
block
Intake Grill on base of unit.
Do not
place on surfaces that can be damaged by water.
Step 2 Step 1
SETTING UP YOUR HUMIDIFIER
Step 3
How Evaporative Humidification Works:
A Wicking Filter inside the humidifier absorbs water from the Reservoir. A fan pulls dry air from
the room into the humidifier where it passes through the saturated Wicking Filter. The Filter
captures minerals and other impurities from the water, before the moisture is evaporated back
into the dry room with the help of the fan. The amount of moisture output depends on many
factors, including the current room humidity and temperature. As the humidity level in the
room increases, the moisture output decreases, which prevents over humidification.
SAFETY
INSTRUCTIONS
READ AND SAVE THESE SAFETY
INSTRUCTIONS BEFORE USING
THIS HUMIDIFIER
When using electrical appliances, basic
precautions should always be followed to
reduce the risk of fire, electrical shock and
injury to persons, including the following:
1. The humidifier should always be placed on a
firm, flat, waterproof surface at least four feet
(1.2 m) away from bedside, twelve inches
(30 cm) from the wall, and out of reach of
patients, children and pets.
2. Be sure the humidifier is in a stable position
and the power cord is away from heated
surfaces and out of the way to prevent the
humidifier from being tipped over.
3. Before using the humidifier extend the cord
and inspect for any signs of damage. Do not
use the unit if the cord has been damaged.
4. The humidifier has a polarized plug (one blade
is wider than the other) as a safety feature.
This plug will fit into a polarized outlet only
one way. If the plug does not fit fully into the
outlet, reverse the plug. If it still does not fit,
contact a qualified electrician. Do not attempt
to defeat this safety feature.
5. CAUTION: To avoid fire or shock hazard,
plug the humidifier directly into a 120V AC
electrical outlet. To avoid risk of fire, shock or
personal injury do not use an extension cord.
6. Shut off and unplug humidifier before moving.
The humidifier should always be unplugged
and emptied when not in operation or while
being cleaned. Do not move or tilt humidifier
while it is in operation. Plug and unplug
humidifier with dry hands. Never pull by cord.
7. When moving or lifting the full Water Tank,
use two hands; one hand on the Tank
Handle and the other on the bottom of
the Tank.
8. Do not add any medications, inhalants,
scented products or essential oils into
Base, Water Reservoir or Water Tank.
9. Do not cover or insert objects into any
openings on the humidifier.
10. Do not block intake or output vents.
11. Do not operate the humidifier without
water. Turn off and unplug unit when Tank
is empty.
12. Humidifier requires regular cleaning. Refer
to, and follow, cleaning instructions.
13. Do not operate outdoors; this appliance is
intended for indoor use.
14. Do not attempt to repair or adjust any
electrical or mechanical functions on
this humidifier. Doing so will void your
warranty.
15. For residential use only.
SAVE THESE INSTRUCTIONS
Float
Tank Cover
Water
Tank
Water
Tank
Plunger
Housing
Water
Reservoir
Base
Motor
Housing
Power/Output
Knob
Humidity
Level Knob
Wicking
Filter
Plunger
Tank Cover
Tank Handle
Intake
Grill
Humidity
Reached
Indicator
Refill
Indicator
4 5
Step 2
Step 2
Step 2
FILLING/REFILLING WATER TANKS
FILLING/REFILLING WATER TANKS (Continued)
PREPARING THE WICKING FILTER
1. Flip Tank Cover open.
2. Pour cool tap water into Water Tank through the Tank Cover opening.
Do not use warm or hot water.
3. Close Tank Cover to keep objects and debris out of water.
Repeat for second Water Tank.
1. Flip Tank Cover open. Grasp Tank Handle and lift Water Tank to remove from Base. Carry
Tank to sink or tub. NOTE: Do not use the Tank Cover to carry Water Tank.
2. Fill Tank through the Tank Cover opening. When filling, allow enough space at the top to
minimize splashing when carrying. Use cool tap water; Do not use warm or hot water.
NOTE: Do not attempt to unscrew Plunger Housing from underside of Tank.
This is not meant to be removed.
$
Step 1
$
Step 1
$
Step 1
$
$
Step 3
Step 4
Step 3
Step 3
Step 4 Step 5
1. Remove Water Tanks and lay aside. Grip housing and lift up to expose Wicking Filter.
2. Carry Wicking Filter and Base to sink or tub.
3. Remove Filter from Base and run under cool water until saturated.
4. Carefully place wet Filter back in base; do not squeeze out excess water.
The Tanks can be filled in two ways.
Power Control
1. With Power Knob in the OFF position, plug humidifier into a polarized 120V outlet.
CAUTION: To avoid electric shock, do not plug humidifier into outlet with wet hands.
2. Turn the Power/Output knob to desired fan setting.
High ( ): Fast humidifying
Medium ( ): Everyday moisture control
Low ( ): Quiet setting
Humidity Control
3. Turn the Humidity Level Knob to the highest setting and run for at least an hour or until a
comfortable humidity level is reached.
4. Then turn the Humidity Level Knob to the left until the green Humidity Reached Indicator
light turns on ( ) and the humidifier turns off. This is your desired humidity level. Now
that your desired humidity level is set, the humidifier will automatically turn back on when
your room drops below this comfort setting and will automatically turn off again when the
comfort setting is reached.
NOTE: For continuous operation, set to high ( ).
Water Tanks
5. When both Water Tanks are empty, the humidifier will automatically shut off and the orange
Refill Indicator ( ) will light up. Turn off the humidifier and refill the Tanks. See Filling/
Refilling Water Tanks on previous page.
NOTE: If the humidifier will not be used for more than a few days, empty the water from the
Water Tanks and Water Reservoir and dry out the Filter to prevent growth of bacteria or mold.
To fill at the sink or tub by removing Water Tanks:
Step 3 Step 2
$
Step 4
$
Step 1
USING YOUR HUMIDIFIER
3. Carry Water Tank back to humidifier using two hands; one hand on Tank Handle at the top
of the Tank and other hand supporting the bottom of the Tank. Take care not to push the
Plunger on the bottom of the Water Tank or leaking may occur.
4. Place the Water Tank on the humidifier Base. Close Tank Cover. You may hear the water
draining into the Reservoir.
Repeat with second Water Tank.
To fill without removing Water Tanks:
6 7
NOTE: While the humidifier is operating, you will hear the fan
running but will not see the moisture output. This is normal for
an evaporative humidifier.
To check the humidity level in the room, use a humidity
monitor like the Honeywell HHM10 or H10C, available
at retailers or online at www.honeywellcomfort.com
To keep your humidifier running efficiently, clean it regularly. Weekly cleaning is
recommended. All maintenance should be done in the kitchen or bathroom on a water
resistant surface near a faucet. Do not wash any components of this humidifier in a
dishwasher.
To properly clean your humidifier we recommend the separate processes of Scale Removal
and Disinfecting. These two processes must be done separately.
CARING FOR YOUR HUMIDIFIER
Step 2
$
$
Step 1
1. Turn off and unplug humidifier. Never clean the humidifier when it is running.
2. Empty water from Water Tanks.
3. Remove Motor Housing, Wicking Filter and any other accessories from humidifier
and set aside.
Follow steps 1-3 under Before Cleaning, then follow the additional steps below.
NOTE: Filter must be removed from humidifier during cleaning; do not clean Filter with
vinegar.
1. Pour up to 2 cups of undiluted distilled white vinegar into each Water Tank. Swish vinegar
around in Tank to wet entire inside of Tank.
2. Place Tanks on Base. Vinegar solution will drain into Water Reservoir and loosen mineral
buildup (Scale) in Base, Reservoir and bottom of the two Water Tanks. Allow vinegar to
remain in the Tanks and Base for 15-20 minutes.
3. Empty vinegar from Tanks and Base and use a cloth or soft brush to help remove scale.
4. Rinse Base and Reservoir with clean water until the smell of vinegar is gone.
USING YOUR HUMIDIFIER (Continued)
To prolong the life of your Wicking Filter, turn it over each time you fill the
Water Tank. This will keep the top of the Filter from drying out and will
help the Filter to age more evenly.
If you notice the Filter getting hard, you may soak it in cool water to
loosen mineral buildup. This will temporarily improve performance of the
Wicking Filter until a replacement Filter is purchased.
Do not attempt to clean the Wicking Filter with vinegar, soap or any chemical solutions. Doing
so may damage the Filter.
Protec antimicrobial layers in the Wicking Filter help to prevent growth of mold on the Filter.
However, the Filter still needs to be replaced regularly. Humidifier Filters and accessories
require replacement and are not covered under warranty.
CARING FOR YOUR FILTER
Step 3 Step 4 Step 2
V
2C
Step 1
Scale Removal
Before Cleaning
It is recommended you change your Wicking Filter every 30-60
days depending on water quality and usage. If you have hard
water you may need to replace your Filter more frequently.
Change your Filter if you notice:
• The Filter is hard and crusty
• The Filter starts to give off an odor
• Moisture output is decreased
Be sure to use only genuine Honeywell Replacement Filters
which are Protec
®
antimicrobially treated. It helps prevent
the migration of mold, algae and bacteria on the filter.
Replacement Wicking Filter
Honeywell HC-14 Series, Filter E
Step 3
$
$
MINUTES
8 9
CARING FOR YOUR HUMIDIFIER (Continued)
1 gal. (3,8 l)
(1 c. à thé)
Step 1
$
$
Step 2
Follow steps 1-3 under Before Cleaning, then follow the additional steps below.
NOTE: Filter must be removed from humidifier during cleaning.
Do not clean Filter with bleach solution.
1. Mix 1 gallon (3.8L) of water with 1 teaspoon of bleach. Pour half of the bleach solution
into first Water Tank. Lift Tank and swish bleach solution around to wet entire inside of
Tank. Repeat for second Water Tank.
NOTE: Using more than 1 teaspoon of bleach to 1 gallon (3.8L) of water may result in
damage to the humidifier.
2. Place both Tanks on Base. Bleach solution will drain into Water Reservoir.
3. Allow bleach solution to remain in the Tanks and Base for 15-20 minutes.
4. Empty bleach solution from Tanks and Base. Rinse with clean water until the smell
of bleach is gone
TROUBLESHOOTING
Problem Possible Cause Solution
Power Knob is turned
to high (
) med ( ) or
low( ) and the Refill
light ( ) is off but the
unit is not running
Unit is not plugged in
No power at outlet
Set humidity level has been
reached ( ) (green light
is on)
Plug unit in
Check home circuits, fuses;
test outlet
Turn Humidity Control Knob to
a higher setting
Power Knob is turned to
high, med or low and the
Refill light ( ) is on
Water level may be low
Motor Housing not properly
seated on Base
Check water level and fill
if necessary
Set Motor Housing properly
on Base
Water leaking from Base Plunger Housing is damaged Contact Consumer Relations
for a new Tank
Plunger is sticking Push and release Plunger to
be sure it is moving freely
Tank is cracked
Float is not installed properly
Plunger Housing has
become loose
Inspect Tank for damage;
contact Consumer Relations
for a new Tank if necessary
Check to make sure Float
is snapped properly in place
and moves freely
Tighten Plunger Housing by
turning clockwise (to right)
Tank and Base are slimy Need to clean See “Caring for
your Humidifier
Fan is running but water
level is not going down
Filter is clogged with
mineral deposits
See instructions for
“Caring for your Filter”;
purchase a new Honeywell
Replacement Filter
Water is not draining
into reservoir
Plunger may be stuck Push and release Plunger to
be sure it is moving freely
Tank Cover snapped off Used as a handle to carry full
Water Tank
Snap Tank Cover
back in place
MINUTES
Step 3 Step 4
Disinfecting
End of Season Cleaning
Follow cleaning instructions above when the humidifier will not be used for at least one week,
or it is the end of the season. Remove any accessories, including the Wicking Filter, and allow
the humidifier to dry completely before storing.
Do not store humidifier with water inside the Base, Water Reservoir or Water Tanks.
At end of season, remove and throw away filter. Do not store humidifier with a used
Wicking Filter.
PC-1, PC-2
or PC-1C
NOTE: Consider using a Protec
®
Cleaning Cartridge to keep your
humidifier cleaner longer. It will continuously clean and protect
against bacteria and mold. It will also help prevent the buildup of
slime in the water and on humidifier surfaces. The Protec Cartridge
will keep your humidifier cleaner longer between cleanings. However,
your humidifier still needs to be cleaned regularly.
10 11
SPECIFICATIONS
CONSUMER RELATIONS
Electrical rating: 120V, 60 Hz
Capacity: 3 Gallons (11.4L)
If you experience a problem, please contact Consumer Relations first or check your warranty.
Do not return the humidifier to the original place of purchase. Do not attempt to open the
motor housing or tamper with the Power Knob yourself. Doing so may void your warranty and
cause personal injury or damage to the product.
For questions, technical support or to order replacement parts contact Consumer Relations.
Be sure to specify model number HEV680.
Kaz USA, Inc.
Consumer Relations Department
250 Turnpike Road
Southborough, MA 01772
800-477-0457
consumerrelations@kaz.com
www.honeywellcomfort.com
3 YEAR LIMITED WARRANTY
You should first read all instructions before
attempting to use this product.
A. This 3 year limited warranty applies to
repair or replacement of product found to
be defective in material or workmanship.
This warranty does not apply to damage
resulting from commercial, abusive,
unreasonable use or supplemental damage.
It also does not apply to the filter or Protec
Cartridge. Defects that are the result of
normal wear and tear will not be considered
manufacturing defects under this warranty.
KAZ USA, INC. IS NOT LIABLE FOR
INCIDENTAL OR CONSEQUENTIAL
DAMAGES OF ANY NATURE. ANY IMPLIED
WARRANTY OF MERCHANTABILITY OR
FITNESS FOR A PARTICULAR PURPOSE ON
THIS PRODUCT IS LIMITED IN DURATION
TO THE DURATION OF THIS WARRANTY.
Some jurisdictions do not allow the exclusion
or limitation of incidental or consequential
damages or limitations on how long an
implied warranty lasts, so the above
limitations or exclusions may not apply to
you. This warranty gives you specific legal
rights, and you also may have other rights
which vary from jurisdiction to jurisdiction.
This warranty applies only to the original
purchaser of this product from the original
date of purchase.
B. At its option, Kaz USA, Inc. will repair or
replace this product if it is found to be
defective in material or workmanship.
C. This warranty does not cover damage
resulting from any unauthorized attempts
to repair or from any use not in accordance
with the instruction manual.
D. Return defective product to Kaz USA, Inc.
with a brief description of the problem.
Include proof of purchase and a $10
US/$15.50 CAN check or money order
for handling, return packing and shipping
charges. Please include your name, address
and a daytime phone number.
You must prepay shipping charges.
We suggest having tracking or delivery
confirmation. Send to:
In U.S.A.:
Kaz/ Helen of Troy
Attn: Returns Department
1 Helen of Troy Plaza
El Paso, TX 79912
USA
In Canada:
Kaz Canada, Inc.
Attn: Returns Department
510 Bronte Street South
Milton, ON L9T 2X6
Canada
Please go to www.honeywellcomfort.com
and register your product under the
Customer Support section and receive
product information updates and new
promotional offers.
Brand:
Honeywell
Category: Humidifier
Model:
HEV680
Oracle Desc. : OM, HEV680 SERIES, US/CAN,
ENG/FR/SP, 2014
Subject:
Owners Manual
Artwork Part #: 31IMHV68190
Die Line Part #: N/A
Region: US
Flat Size:
IN: W11 x H8.5
MM: W279.4 x H215.9
Folded Size:
IN: W5.5 x H8.5
MM: W139.7 x H215.9
Material:
Page count: 36 (English, French, Spanish)
50# gloss or matte text
(inside pages) Minimum 80#
gloss or matte text (cover)
Revision:
8
Release Date:
Date:
24APR15
Scale: 1/1
Re-release Date:
Colors:
Special Instructions:
Black
100%
Kaz USA, Inc.
Creative Services, 250 Turnpike Road
Southborough, 01772 MA, USA
+1 508 490 7000
CREATIVE DEPARTMENT
ARTWORK SPECIFICATIONS
Quality Requirement of Artwork and Quality
Clarification Process of Artwork Printing:
Meet Eng-QS-06&02
24APR15
  • Page 1 1
  • Page 2 2
  • Page 3 3
  • Page 4 4
  • Page 5 5
  • Page 6 6
  • Page 7 7
  • Page 8 8
  • Page 9 9
  • Page 10 10
  • Page 11 11
  • Page 12 12
  • Page 13 13
  • Page 14 14
  • Page 15 15
  • Page 16 16
  • Page 17 17
  • Page 18 18
  • Page 19 19
  • Page 20 20

Honeywell HEV685B User manual

Category
Humidifiers
Type
User manual
This manual is also suitable for

Ask a question and I''ll find the answer in the document

Finding information in a document is now easier with AI