Page is loading ...

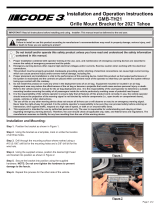
Installation and Operation Instructions
CW2440 & CW2441 LED WORKLAMPS
Read all instructions and warnings before installing and using.
INSTALLER: This manual must be delivered to the end user of this equipment.
SHOWN IN THE NEW 2016
FORD PI UTILITY
IMPORTANT:
INSTALLATION PROCEDURE:
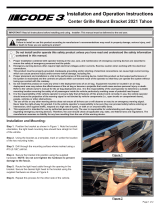
1. Open rear hatch and disengage ceiling from trim gasket along rear edge of
vehicle. (SEE FIG. 1)
Installation and Operation Instructions
COMMAND STIK MAGNETIC MOUNT
FIG. 1
2. Locate two magnetic headliner fasteners at both ends of rear opening. (SEE
FIG. 2 & 3)
3. Command stik mounting magnets will be located at the outside edges of the exist-
ing ceiling mounts and plastic holders.
FIG. 2
FIG. 3
Driver
Side
Passenger
Side

4. Mark headliner with two dots - located 24.5 Inches apart and centered on the
headliner across the rear area of the hatch opening.
(Marks should be approx. 2 Inches back from the rear edge of the headliner.)
5. Drill (2) .250 Dia. Holes through plastic headliner only - (not into metal ceiling
material.)
6. Insert #10 1 inch machine screw through back side of magnet housing
7. Insert screw through back side of hole in headliner so the threads are pointing
down into the vehicle through the holes just drilled.
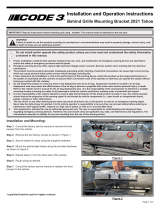
8. Place command stik “L” bracket onto machine screw threaded shaft.
(The spacing should be correct for using the center square hole in the bracket on
both driver and passenger sides of the installation.)
(HEADLINER NOT SHOWN)
Driver Side Passenger Side
NOTE: (THE HORIZONTAL LEG OF THE L BRACKET SHOULD BE FACING THE
CENTERLINE OF THE VEHICLE. )
VIEWS FROM REAR OF VEHICLE - ON DRIVER SIDE.
HEADLINER

PARTS LIST:
NO: PART NO: DESCRIPTION: QTY:
1. T01587 magnet 2
2. T01642 foam pad 2
3. T01109 split washer 2
4. T00142 #10 X1 fender washer 2
5. T05221 10-24 X1 phillips machine screw 2
6. T06145 10-24 hex head nut 2
9. Place fender washer, split locking washer and nut onto machine screw.
10. Using a stubby phillips screwdriver or wrench with phillips bit, tighten the #10
screw until l bracket is secure on headliner on both driver and passenger sides of
the installation.
11. Re-seat the headliner up to the ceiling, making sure the two product magnets and
the two headliner magnets seat against the ceiling metal frame and reseating the rear
trim gasket around the trailing edge of the headliner material.
12. Place command stik product up between bracket slots and install (2) star face
washers and (2) black phillips screws into each end of the command stik - leaving
them loose for leveling.
13. Place level onto bottom edge of command stik and level the product on the vehi-
cle, side-to-side and front-to-rear. Tighten screws when level.

WARRANTY
This product was tested and found to be operational at the time of manufacture. Provided
this product is installed and operated in accordance with the manufacturer’s recommendations,
CODE3, Inc. guarantees this product for a period of 5 years from the date of purchase or delivery,
whichever is later (does not apply to lamps). Units demonstrated to be defective within the war-
ranty period will be repaired or replaced at the factory service center at no cost.
Use of a lamp or other electrical load of a wattage higher than installed or recommended by
the factory, or use of inappropriate or inadequate wiring or circuit protection causes this warranty
to become void. Failure or destruction of the product resulting from abuse or unusual use and/or
accidents is not covered by this warranty. Use of non-CODE 3 components and assemblies may
cause damage to the system and/or personal injury, and voids all warranties.
CODE 3, Inc. shall in no way be liable for other damages including consequential, indirect or
special damages whether loss is due to negligence or breach of warranty.
CODE 3, INC. MAKES NO OTHER EXPRESS OR IMPLIED WARRANTY INCLUDING,
WITHOUT LIMITATION, WARRANTIES OF FITNESS OR MERCHANTABILITY, WITH RE‑
SPECT TO THIS PRODUCT.
Code 3 is a registered trademark of Code 3, Inc. a subsidiary of Public Safety Equipment, Inc.
Revision 0, 05/2015 - Instruction Book Part No. T56226 ©2015
CODE 3, Inc. Printed in USA
PRODUCT RETURNS
In order to provide you with faster service, if you are going to return a product for repair or re-
placement*, please contact our factory to obtain a Return Goods Authorization Number (RGA number)
before you ship the product to Code 3. Write the RGA number clearly on the package near the mailing
label. Be sure you use sufcient packing materials to avoid damage to the product being returned while
in transit.
*Code 3, Inc. reserves the right to repair or replace product at its discretion and assumes no responsibility or liability for
expenses incurred for the removal and/or reinstallation of products requiring service and/or repair.
NEED HELP? Call our Technical Assistance HOTLINE ‑ (314) 996‑2800
10986 North Warson Road
St. Louis, MO 63114
Customer Service
(314) 426-2700
www.code3esg.com
A Division of ESG
|
www.eccogroup.com
/