Page is loading ...

©2012 Georgia-Pacific Gypsum LLC. All rights reserved.
Printed in the U.S.A. 6/12 GP-TM Lit. Item #532245.
INSTALLATION INSTRUCTIONS

INSTALLATION INSTRUCTIONS
2
Dramatically Outperforms
Other Tile Substrates
D
ensShield
®
Tile Backer has a long history of successful
performance, with hundreds of millions of square feet
installed. DensShield Tile Backer is a substrate that, when
properly installed, resists the effects of water or moisture,
making it excellent for protecting both tile installations and
stud cavities. DensShield Tile Backer is composed of a water-
resistant treated core that is covered front and back with
figerglass mats. The coated fiberglass mats are permanently
integrated with the core during manufacturing to help prevent
delamination problems. On the face side of DensShield Tile
Backer is a heat-cured acrylic coating which stops moisture
at the surface and retards vapor transmission, protecting the
wall cavity and floor substrate from moisture intrusion. Unlike
cementitious backer boards, DensShield Tile Backer does not
require an additional moisture barrier.
Excellent substrate
for floors,walls and countertops
Built in moisture barrier
—
stops
moisture at the surface
Mold-resistant
—
when tested, as
manufactured, per ASTM D 3273
Scores and snaps easily with a
standard utility knife
Lifetime Limited Warranty when used
in residential tile installations and a
20-year limited warranty when used
in commercial applications*.
1
2
3
4
5

DensShield
®
Tile Backer is lighter and easier to install than leading
cement and fiber cement board brands (
1
⁄29 [12.7 mm] comparison).
DensShield Tile Backer provides excellent dimensional stability
and strength so it can be installed parallel or perpendicular to
the framing in walls and ceilings.
DensShield Tile Backer was the first tile backer listed as a
GREENGUARD microbial resistant product by a leading third-
party organization, GREENGUARD Environmental Institute. This
listing means DensShield Tile Backer, which features fiberglass
mats instead of the paper facings used on the surface of
traditional gypsum tile backers, resists mold growth. The microbial
resistant test is based on ASTM Standard D 6329-98, a testing
standard set by ASTM International, which develops testing
guidelines and procedures for building materials, products,
systems, and services.
* See warranty for complete terms, conditions and limitations.
Visit our web site at www.densshield.com for complete DensShield
information or product warranty information.
Reasons to
use DensShield
®
Tile Backer
5

INSTALLATION INSTRUCTIONS
4
Primary Uses
DensShield
®
Tile Backer is excellent for tile and non-tile
installations in wet and non-wet applications and in areas of
high humidity.
5
⁄89 (15.9 mm) DensShield Fireguard
®
Tile Backer
is also classified for use in appropriate fire-rated assemblies. It
is ideal for tile walls, ceilings, countertops and residential and
light commercial floor applications in high moisture areas.
DensShield Tile Backer panels provide an excellent backer for
sidewalls and ceilings in bathtubs and shower installations,
where it provides an even, solid substrate for tile. DensShield
Tile Backer may also be finished with paint or wall textures for
non-tile areas that require superior fire and moisture resistance.
Both
1
⁄49 (6.4 mm) and
1
⁄29 (12.7 mm) DensShield Tile Backer
can be used in floor applications. Both of these thicknesses
passed the Robinson Floor Test, the industry standard floor
test for light commercial ratings. The Robinson Floor Test
(ASTM C 627) is designed to determine how a tile assembly
holds up under extreme wear and weight conditions. DensShield
Tile Backer achieves the same light commercial rating as cement
and fiber cement backers. DensShield Tile Backer is for
interior applications ONLY.
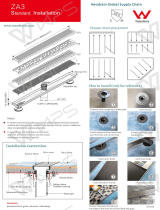
Materials Needed
DensShield Tile Backer panels come in a variety of sizes
•forwallsandceilings,use
1
⁄29 (12.7 mm) or
5
⁄89 (15.9 mm) thickness
•forcountertopsandoorings,use
1
⁄49 (6.4 mm) or
1
⁄29 (12.7 mm) thickness
•noadditionalmoisturebarrierneeded
•29 (51 mm) fiberglass mesh tape
•exiblesealant/caulk
•latexportlandcementmortar(ANSIA118.4)orTypeI
Mastic (ANSI A136.1).

DensShield Tile Backer Installation Instructions 5
Tub/Shower Sidewalls or Ceilings
Walls or Ceilings
Position DensShield
®
Tile Backer panel next to framing with the
coated (grey) face away from studs. Cut panel to required size
and make cutouts. Fit ends and edges closely.
DensShield Tile Backer may be cut by scoring and snapping with
a utility knife, working from the grey face side. Board may be
installed either parallel or perpendicular to framing for both wall
and ceiling applications.
•Steelorwoodframingforwallsshouldbespacednogreater
than 169 (406 mm) o.c. without blocking, 249 (610 mm) o.c.
with blocking when using
1
⁄29 (12.7 mm) DensShield Tile
Backer, or 249 (610 mm) o.c. with
5
⁄89 (15.9 mm) DensShield
®
Fireguard
®
(20 gauge [33 mils] steel studs are required for
tile applications).
Application Fastener Min. Length Spacing
Walls & Galvanized 69 (152 mm) o.c.
Ceilings roofing nail
1
1
⁄29 (38 mm)
along framing
Walls &
Buglehead, rust
Ceilings
resistant, coarse
69
(152 mm)
o.c.
(wood frame)
thread, sharp
1
1
⁄49 (32 mm)
along framing
point screw
Buglehead, rust
Walls & thread, sharp
69 (152 mm) o.c.
Ceilings point rust 1
1
⁄49 (32 mm)
along framing
(metal frame) resistant drywall
screw
Floors
Galvanized
1
1
⁄49 (32 mm)
89 (203 mm) o.c.
roofing nail in both directions
Buglehead, rust
Floors
resistant, coarse
1
1
⁄49 (32 mm)
89 (203 mm) o.c.
thread, sharp in both directions
point screw
1
⁄49 (6.4 mm) 29 (51 mm) o.c.
Floors
crown,corrosive onedges/
(
1
⁄49 [6.4 mm]
resistant chisel
7
⁄89 (22 mm)
49 (102 mm) o.c.
only)
point staples in field
Note: For walls, fasteners should penetrate at least
3
⁄49 (19 mm) into wood
framing. Contact fastener manufacturer for proper selection of corrosion
resistance.
Fastener Guide Chart

INSTALLATION INSTRUCTIONS
•Fastenersshouldbespaced69 (152 mm) o.c. for walls and
ceilings. Drive fasteners flush with coated surface.
Do not
countersink. See Fastener Guide Chart on previous page.
•DensShield
®
Tile Backer has a built-in moisture barrier.
Does not require an additional moisture barrier.
•29 (51 mm) fiberglass mesh tape–embed in a skim coat of
material used to set tiles on all joints and corners that are
to receive tile; caulk corners and edges prior to addition of
fiberglass mesh tape. Seal penetrations and abutments to
dissimilar materials.
Shower Pan
Install DensShield Tile Backer on walls according to assembly
DS001.
Note: Shower pan or rubber membrane must be adequately
sloped to the open drain or weep hole detail to permit proper
water drainage. Leave a
1
⁄89 (3 mm) gap between DensShield
Tile Backer and the shower pan.
•DensShieldTile Backer is not to be used in shower curbs.
•DensShieldTile Backer panels can be installed in the shower
pan if part of an approved system.
6
DS001
DensShield
®
Tile Backer
DensShield Tile Backer
Tile Mastic or Thin Set
Tiles
Wood or Minimum 20-Gauge
(33 mils) Metal Framing
Fiberglass Mesh Tape
Flexible Sealant
Flexible Sealant
Bathtub
DS002
DensShield
®
Tile Backer
Tiles
Flexible Sealant
Sloped Mortar Bed
Sloped Rubber Membrane
Crushed Stone
Weep Holes

Bathtub or Shower Receptor
Apply DensShield
®
Tile Backer either horizontally or vertically
on walls as shown in DS001.
Leave a
1
⁄89 (3 mm) gap between DensShield Tile Backer and the
tub deck and completely fill the space between tile and tub with
a flexible sealant.
Pre-Formed Shower Pan
Leave a
1
⁄89 (3 mm) gap between DensShield Tile Backer and the
tub deck and completely fill the space between tile and tub with
a flexible sealant.
DensShield Tile Backer Installation Instructions 7
DS003
Tiles
Tile Adhesive (Latex Thinset Mortar or Mastic)
Flexible Sealant into
1
⁄89 (3 mm) min. gap
Bathtub
Fireproofing when required (by other trades)
DensShield
®
Tile Backer
Wood or Minimum 20-Gauge
(33 mils) Metal Framing
DS004
DensShield
®
Tile Backer
Tile Mastic or Thin-Set
Tiles
Flexible Sealant into
1
⁄89 (3 mm) min. gap
Shower Pan
Wood or Minimum 20-Gauge
(33 mils) Metal Framing

INSTALLATION INSTRUCTIONS
8
Floors Residential & Light Commercial
Tiles
DensShield
®
Tile Backer
Floor Joists 169 (406 mm) o.c.
Latex Portland Cement Mortar per ANSI A118.4
Base Min.
5
⁄89 (15.9 mm) Plywood
DS005
Residential & Light Commercial Floors
1
⁄49 (6.4 mm) and
1
⁄29 (12.7 mm) DensShield
®
Tile Backer can be
used as a tile substrate in floor tile applications for residential and
light commercial use as defined in the
Handbook for Ceramic
Tile Installation,
published by the Tile Council of North America.
Laminate DensShield Tile Backer panels, coated grey side up, to
subfloor using a latex portland cement mortar liberally applied
with a
1
⁄49 (6 mm) square-tooth notched trowel.
•EmbedDensShieldTileBackerintomortarwhilestillpliant
(do not exceed open time)
•ButtDensShieldTileBackerpanelstightlytogether
•StaggerDensShieldTileBackerjointsoversuboorjoints
•FastenDensShieldTileBackerpanelstosuboor
(see Fastener Guide Chart on page 5)
•Avoidnailingintooorjoistsonnewconstructionto
prevent nail pop-ups
•Spacefastenersnogreaterthan89 (203 mm) o.c.
in both directions
•Drivefastenersushwiththesurface
—
do not countersink
•Apply29 (51 mm) fiberglass mesh tape over joints.
Embed with latex portland cement mortar.
Apply flooring-grade tile with latex portland cement mortar.
Full-thickness thresholds should be used and butted against
the DensShield Tile Backer panels flush with the tile surface.
Important: For residential applications, use a 29 x 29
(51 mm x 51 mm) or larger floor-grade tile.
•Uselatexportlandcementoorgrout(ANSIA118.6).
•DensShieldTileBackerisnottobeusedinconjunctionwith
passive solar heat systems or in heated flooring systems that
are consistently over 120˚ F (48.8° C).

DensShield Tile Backer Installation Instructions 9
Countertops
Plywood must be installed flat and level. Framing spacing should
not exceed 249 (610 mm) o.c. Install minimum
1
⁄29 (12.7 mm)
exposure 1 plywood on top of supports spaced a maximum of
249 (610 mm) o.c. Provide support on overhangs on cantilever
counters to prevent movement.
Apply leveling bed of latex portland cement mortar to plywood
using
1
⁄49 (6.4 mm) notched trowel.
Laminate clean, dry DensShield
®
Tile Backer to base (grey side
up) and fasten every 69 (152 mm) to 89 (203 mm) o.c. in both
directions into plywood while leveling bed is still fluid. Use either
1
1
⁄49 (32 mm) galvanized roofing nails or 1
1
⁄49 (32 mm rust-
resistant drywall screws. Stagger joints of DensShield Tile Backer
panels with those of the plywood base.
Butt DensShield Tile Backer joints tightly. Tape all joints and
corners using 29 (51 mm) wide self-adhering fiberglass mesh tape.
Embed tape with latex portland cement mortar (ANSI A118.4).
Install tile, expansion and control joints and grout in accordance
with ANSI A108. Use latex portland cement mortar to set tile.
Countertops Residential
Minimum Minimum
Subfloor Thickness Joist Spacing
5
⁄89 (15.9 mm) Plywood Sturd-I-Floor
®
* 169 (406 mm) o.c. joists
5
⁄89 (15.9 mm) Plywood Sturd-I-Floor
®
*
19.29 (488 mm) o.c.
engineered lumber
7
⁄89 (22 mm) APA Rated Sturd-I-Floor
®
249 (610 mm) o.c.
engineered lumber
*
3
⁄49 (19 mm) OSB is acceptable.
Subfloor & Joist Spacing Recommendations
DS006
Latex Portland Cement Mortar
Tiles
DensShield
®
Tile Backer
Base Min.
1
⁄29
(12.7 mm) Plywood
Framing Support

INSTALLATION INSTRUCTIONS
10
One Coat Float Tile Assembly
DensShield
®
Tile Backer can be installed as a baseboard for a
traditional reinforced floated wall tile system attached to the
framing. DensShield Tile Backer panels may be hung either
vertically or horizontally for wall applications.
•Greycoatedsideshouldalwaysfaceout,awayfromthestuds.
•Framingshouldbespacednogreaterthan169 (406 mm) o.c.
•AttachDensShieldTile Backer panels spacing fasteners 69
(152 mm) o.c. along studs for wood or metal framing.
•Forshowerpanreceptorswithmembranes,thelathmembrane
shall be installed in a weather board fashion over the pan
membrane.
•Attachmembraneandlathperlathandmembranemanufac-
turers’ guidelines. Apply mortar bed per TCNA assembly
W231. Membrane (ANSI A-2.1.8) shall be installed such that
water is continually sloped toward the drain.
Tile Adhesive (latex thinset mortar or mastic)
Sloped Underlay Mortar Bed, reinforced
Tile
Shower Pan Liner
Crushed Stone or Tile
Subfloor
Drain
One Coat Float System
1
⁄49 (6 mm) gap & Flexible Sealant
1
⁄29 (12.7 mm) or
5
⁄89 (15.9 mm) DensShield Tile Backer
1
⁄29 (12.7 mm) or
5
⁄89 (15.9 mm) DensShield
®
Tile Backer
Tile Adhesive (latex thinset mortar or mastic)
Sloped Underlay Mortar Bed, reinforced
Tile
Crushed Stone or Tile
Drain
One Coat Float System
Hydro-Guard ONE
®
Membrane with
Fabric at 90
o
angle and drain
DS007
Subfloor
1
⁄49 (6 mm) gap & Flexible Sealant


INSTALLATION INSTRUCTIONS
INSTruccIONeSdeINSTALAcIóN
TRADEMARKS
DENSSHIELD, BUILDING REPUTATIONS TOGETHER and the GEORGIA-PACIFIC logo are
trademarks owned by or licensed to Georgia-Pacific Gypsum LLC. HYDRO-GUARD ONE is
a trademark owned by Mer-Kote Products, Inc. STURD-I-FLOOR is a trademark owned by
APA-The Engineered Wood Association. TCNA Logo is a trademark of Tile Council of North
America. USGBC and related logo is a trademark owned by the U.S. Green Building
Council and is used by permission.
GREENGUARD is used under license through the
GREENGUARD Environmental Institute.
UPDATES AND CURRENT INFORMATION
The information in this document may change without notice. Visit our website at
www.gpgypsum.com for updates and current information.
WARRANTIES, REMEDIES AND TERMS OF SALE
For current warranty information for this product, please go to www.gpgypsum.com and
select the product for warranty information. All sales of this product by Georgia-Pacific are
subject to our Terms of Sale available at www.gpgypsum.com.
CAUTION: For product fire, safety and use information, go to gp.com/safetyinfo.
HANDLING AND USE
CAUTION: This product contains fiberglass facings which may cause skin irritation. Dust
and fibers produced during the handling and installation of the product may cause skin,
eye and respiratory tract irritation. Avoid breathing dust and minimize contact with skin
and eyes. Wear long sleeve shirts, long pants and eye protection. Always maintain
adequateventilation.UseadustmaskorNIOSH/MSHAapprovedrespiratorasappropriate
in dusty or poorly ventilated areas. For additional product fire, safety and use information
gotowww.gp.com/safetyinfoorcall1-800-225-6119.
FIRE SAFETY CAUTION
Passingaretestinacontrolledlaboratorysettingand/orcertifyingorlabelingaproduct
as having a one-hour, two-hour, or any other fire resistance or protection rating and,
therefore,asacceptableforuseincertainreratedassemblies/systems,doesnotmean
thateitheraparticularassembly/systemincorporatingtheproduct,oranygivenpieceof
the product itself, will necessarily provide one-hour fire resistance, two-hour fire resistance,
or any other specified fire resistance or protection in an actual fire. In the event of an
actual fire, you should immediately take any and all actions necessary for your safety and
thesafetyofotherswithoutregardforanyreratingofanyproductorassembly/system.
U.S.A.– Georgia-Pacific Gypsum LLC
Canada – Georgia-Pacific Canada LP
Sales Information & Order Placement
U.S.A.
Midwest: 1-800-876-4746
West: 1-800-824-7503
South: 1-800-327-2344
Northeast: 1-800-947-4497
CANADA Canada Toll Free: 1-800-387-6823
Quebec Toll Free: 1-800-361-0486
Technical Information
Georgia-Pacific Gypsum Technical Hotline
U.S.A. and Canada: 1-800-225-6119
www.gpgypsum.com


©2012 Georgia-Pacific Gypsum LLC. Todos los derechos reservados.
ImpresoenEE.UU.6/12GP-TMLit.ArtículoN°532245
INSTruccIONeSdeINSTALAcIóN
/