Page is loading ...

Pulse
™
Smartpen
Version 1.2
User Manual
This device complies with Part 15 of the FCC Rules. Operation is subject to the following two
conditions: (1) this device may not cause harmful interference, and (2) this device must accept
any interference received, including interference that may cause undesired operation.

page ii Pulse
TM
Smartpen User Manual
Copyright and Trademark
LIVESCRIBE, PULSE, PAPER REPLAY, and NEVER MISS A WORD are trademarks or
registered trademarks of Livescribe, Inc. All other brand and product names are trademarks of
their respective owners.
Copyright © 2008 Livescribe, Inc. All rights reserved.
This product or its use may be covered by the following United States Patent: 6,529,920, and
other pending patent applications.
IMPORTANT: Please read the End User License Agreement with this product before using the
accompanying software program(s). You accept the terms of the End User License Agreement
by using any part of the software. Using any non-authorized charging accessories or ink
cartridges may damage your Pulse smartpen and voids your Pulse smartpen’s warranty.
Software Download Available
Livescribe® Desktop software, updates and new versions of the software are available from
www.livescribe.com/support.
Agency Compliance Information
Product, regulatory, and compliance information can be found in Chapter 13: Regulatory
Information.
205-00002-000-A--PSUM-01.00-PS-01.20

Table of Contents
CHAPTER 1: INTRODUCING THE PULSE™ SMARTPEN 7
WHAT’S IN THE BOX 7
SYSTEM REQUIREMENTS 7
THE PULSE SMARTPEN 8
USB MOBILE CHARGING CRADLE 8
3D RECORDING HEADSET WITH NECKSTRAP 9
WHAT’S NEW IN VERSION 1.2? 10
CHAPTER 2: USING YOUR PULSE SMARTPEN 11
ORIENTING YOUR DISPLAY 11
SETTING TIME AND DATE 12
CHARGING YOUR PULSE SMARTPEN 13
CHECKING STATUS 13
LIVESCRIBE DOT PAPER 14
MANAGING AND ARCHIVING PAPER PRODUCTS 15
CHAPTER 3: NAVIGATING YOUR PULSE SMARTPEN 18
THE NAV PLUS 18
CHAPTER 4: USING PAPER REPLAY™ 23
PAPER REPLAY CONTROLS 23
RECORDING 23
STOP RECORDING OR PLAYBACK 25
PAUSE AND RESUME 25
AUDIO PLAYBACK 26
CONTROLLING AUDIO PLAYBACK 28
AUDIO BOOKMARKS 29
PAPER REPLAY SESSIONS 30
LINKING NOTES TO PREVIOUSLY RECORDED AUDIO 31
BROWSING PAPER REPLAY SESSIONS 31
DELETING PAPER REPLAY SESSIONS 33
BACKGROUND RECORDING 35
SHARING YOUR NOTES 36

Page iv Pulse
TM
Smartpen User Manual
CHAPTER 5: PULSE SMARTPEN SETTINGS 37
TIME AND DATE 37
DISPLAY SETTINGS 38
ADVANCED AUDIO SETTINGS 38
CHAPTER 6: ADDITIONAL PULSE SMARTPEN APPLICATIONS 41
PAPER REPLAY AND SETTINGS 41
CALCULATOR 41
QUICK COMMANDS 47
MOVIES 56
TRANSLATOR DEMO 57
PIANO 60
CHAPTER 7: LIVESCRIBE DESKTOP 65
LIVESCRIBE DESKTOP FEATURES 65
RUNNING LIVESCRIBE DESKTOP 66
REGISTERING YOUR PULSE SMARTPEN 66
CHAPTER 8: LIVESCRIBE ONLINE 67
LIVESCRIBE COMMUNITY 67
LIVESCRIBE STORE 70
CHAPTER 9: ACCESSORIES & SUPPLIES 71
INCLUDED ACCESSORIES 71
CARRY ALL SOFT CASE 73
CHAPTER 10: PRODUCT SAFETY AND MAINTENANCE 77
PRODUCT SAFETY INFORMATION 77
MAINTAINING YOUR PULSE SMARTPEN 78
RESETTING YOUR PULSE SMARTPEN 78
CLEANING YOUR PULSE SMARTPEN 79
DISPOSAL 79
HEARING NOTICE 79
CHAPTER 11: GETTING HELP 81
CONTACTING CUSTOMER SERVICE 81
RETURNS 82
CHAPTER 12: REGULATORY INFORMATION 83
US FCC STATEMENT 83
CANADIAN, INDUSTRIE CANADA ICES-003 STATEMENT 84


Page vi Pulse
TM
Smartpen User Manual
About This Guide
This Pulse smartpen User Manual contains detailed descriptions of the Pulse smartpen,
applications that run on the Pulse smartpen platform, and the Livescribe Desktop application
used for transferring notes to your computer where you can store and search them. You’ll also
find information about the Livescribe Online community, and how to upload and share interactive
movies of your notes and drawings.
Throughout this Manual, you will be instructed to “tap” on paper controls to perform certain
functions. When you see this instruction, use the ink tip of your Pulse smartpen to tap on the
printed buttons within the included notebook and Getting Started Guide.

Chapter 1: Introducing the Pulse™ Smartpen
Congratulations on the purchase of your new Pulse™ smartpen. Soon you’ll be able to
personalize your Pulse smartpen settings, use your Pulse smartpen applications, share your
notes at Livescribe Online, and download new applications as they become available. To get set
up, follow the easy steps in Chapter 2:.Using Your Pulse Smartpen.
What’s in the Box
• Pulse smartpen
• 3D Recording Headset and neckstrap
• USB mobile charging cradle
• Single-subject, college-ruled notebook
• Carry-all soft case
• Ink cartridges and stylus
• Getting Started Guide
• Interactive controls sticker sheet
• Demo card
System Requirements
• Windows XP SP2* or Windows
Vista operating system
*.Net Framework 2.0 included
with the Livescribe Desktop
installation software.
• 600 MHz CPU or higher
• 512 MB RAM
• 100MB of free hard disk space
• 1 available powered USB Port
• Internet connection

Page 8 Pulse
TM
Smartpen User Manual
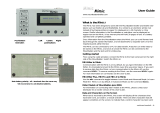
The Pulse Smartpen
1. Power button
2. Headset jack
3. Built-in microphone
4. Organic Light-Emitting Diode
(OLED) display
5. Built-in speaker
6. USB connector
7. Infrared camera
8. Removable ink cartridge
9. Rechargeable lithium battery
(non-removable)
USB Mobile Charging Cradle
The Pulse smartpen USB mobile charging cradle serves several important functions. Once you
dock your Pulse smartpen into the cradle, your written and recorded data will be automatically
transferred to your computer after the Livescribe Desktop application is opened. The cradle will
also allow you to charge your Pulse smartpen through the USB port on your computer.
1. Nav Plus (navigation control)- If
you have no Livescribe dot
paper available, you can use
this label to navigate your
Pulse smartpen menu and
applications.
2. USB connector- A magnet
helps your Pulse smartpen lock
snugly into place.
3. Ink cartridge removal ring- To
replace ink cartridges see
Chapter 9: Accessories &
Supplies.

Chapter 1: 0BIntroducing the Pulse™ Smartpen Page 9
3D Recording Headset with Neckstrap
With your Pulse smartpen, you can record audio with either the built-in microphones or the 3D
Recording Headset. The built-in microphones provide monaural recordings and are designed for
smaller recording environments, such as a conference room. When recording in larger spaces,
we recommend the use of the included 3D Recording Headset, which contains a microphone in
each earbud. The dual microphones enable binaural recordings, which accurately recreate the
spatial audio environment.
To learn more about using the 3D Recording Headset with the neckstrap, refer to Chapter 9:
Accessories & Supplies.
1. Left and right speakers
2. Left and right microphones
3. Neckstrap connection stem
TIP: Make sure the “L” earbud is in your left ear and the “R” earbud is in your right ear.
How do binaural recordings work?
Binaural recording is a special type of stereo recording that uses two microphones, one placed
in each ear. This type of recording provides the most accurate spatial sound quality because the
microphones effectively mimic your ears—when you play a binaural recording back, it sounds
like you are actually in the location where the sound was recorded.
Once recorded, the binaural effect can be played back only using stereo earphones. It can also
be played back as a regular stereo recording over any type of headphones or speakers.
TIP: The included 3D Recording Headset and Pulse smartpen have a custom jack, required to
enable binaural recordings. If you want to use your own 3.5mm stereo headphone for playback, you
can purchase a standard 2.5mm to 3.5mm adaptor which will enable your current headphone to be
used in conjunction with your Pulse smartpen.

Page 10 Pulse
TM
Smartpen User Manual
What’s New in Version 1.2?
Version 1.2 of your Pulse smartpen introduces new features. With this release, you can:
• Archive notebooks, journals, and other paper products using Livescribe Desktop Version
1.2. Archiving frees up storage space on your Pulse smartpen, and enables you to use
another paper product that has the same dot pattern as the one you archived. Your
notes and audio remain interactive in Livescribe Desktop, just like non-archived paper
products. To use this feature you must update your Pulse smartpen to Version 1.2 or
later. To learn how to archive a paper product, see Managing and Archiving Paper
Products in this document, and the Livescribe Desktop User Manual located in the
Livescribe Desktop Help menu and in your computer’s start menu.
• Use the Notebook Status Label on a new Livescribe dot paper product to see if you are
currently using a paper product of the same kind. See Checking Paper Product Usage
with the Notebook Status Label.
• Remove Paper Replay sessions from your Pulse smartpen using Livescribe Desktop.
Removing a session frees up storage space on your Pulse smartpen. To use this feature
you must update your Pulse smartpen to Version 1.2 or later. See the Livescribe Desk-
top User Manual for more information.
• Write using cursive in the Translator Demo and Quick Commands.

Chapter 2: Using Your Pulse Smartpen
Orienting Your Display
1. Turn your Pulse smartpen on
by pressing the Power button.
2. Open the inside cover of your
notebook.
3. Under Settings, tap on the Left
or Right button to orient your
display for left- or right-handed
use.
NOTE: To learn about Scroll Speed and Brightness settings refer to Chapter 5:
Pulse Smartpen Settings.

Page 12 Pulse
TM
Smartpen User Manual
Setting Time and Date
1. Turn your Pulse smartpen on
by pressing the Power button.
2. Open the inside cover of your
notebook.
3. Under Settings, tap the Set
Date button and use the printed
keypad to enter the date.
a. Example: Tapping
061208 sets the date to
Thursday, June 12, 2008.
4. Tap the Set Time button and
use the printed keypad to enter
the time.
a. Example: Tapping
1201PM sets the time to
12:01PM.

Chapter 2: 1BUsing Your Pulse Smartpen Page 13
NOTE: Setting the correct time and date on your Pulse smartpen is important
because files you create with your Pulse smartpen are named using the time and
date they are created. To learn about additional settings, refer to Chapter 5: Pulse
Smartpen Settings.
Charging your Pulse Smartpen
1. Plug your USB mobile charging
cradle into the USB port on
your computer.
2. Place your Pulse smartpen in
your USB mobile charging
cradle.
a. If your computer displays
a Found New Hardware
message, dismiss it and
follow the steps in
Chapter 7: Livescribe
Desktop.
IMPORTANT: A full charge can take up to 2.5 hours. To determine if your Pulse smartpen is fully
charged, tap on the Battery button referred to in the section below, Checking Status.
Checking Status
Check the status of your Pulse smartpen using the buttons in the printed Status box located on
the inside covers of your notebook.

Page 14 Pulse
TM
Smartpen User Manual
Tap the Time button to check the current time.
Tap the Date button to check the current date.
Tap the Battery button to see the current battery charge.
Tap the Storage button once to see amount of remaining storage in megabytes
and tap a second time to see the remaining recording time based on the current
audio quality settings. Refer to Advanced Audio Settings in Chapter 5: Pulse
Smartpen Settings to customize your audio quality settings.
Livescribe Dot Paper
To perform its many operations, the Pulse smartpen requires Livescribe dot paper. This paper is
standard paper with printed microdots on its surface. These dots are nearly invisible to the
human eye. However, the Pulse smartpen can easily see these dots and uses them to know
which page you are writing on and the exact location on that page. The Pulse smartpen can
even see these dots through the ink you write on your pages.
The microdots are printed on each page in a special pattern based on technology from Anoto
AB. This dot pattern consists of small dots (100 micrometers in diameter) arranged with a
spacing of approximately 0.3 mm. The dot pattern overlays an imaginary square grid. The dots
are slightly displaced from the grid, with each dot in one of four possible positions, forming the
proprietary Anoto dot pattern.
The dot pattern identifies the specific page and locations on the page of the notes you write. The
Pulse smartpen uses the dot pattern in a way similar to a geographical positioning system
(GPS). But, instead of identifying locations on land, it finds locations on paper and stores your
writing as digital ink using those locations. Using this patented dot-positioning system (DPS), the

Chapter 2: 1BUsing Your Pulse Smartpen Page 15
Pulse smartpen precisely tracks its own movement on paper. As a result, anything you write –
words, numbers or drawings – can be stored, recognized, and intelligently responded to.
The area of the entire Anoto dot pattern is huge, and represents a piece of paper the combined
size of Europe and Asia. Livescribe dot paper is based on a subset of the entire Anoto dot
pattern.
How the Pulse Smartpen Works
When you power on the Pulse smartpen and begin writing on Livescribe paper, the Pulse
smartpen captures and stores the notes you write. To capture your writing, the Pulse smartpen
uses its built-in infrared camera to take digital snapshots of the dot pattern as the tip moves over
the paper as you write.
When recording audio in Paper Replay, the Pulse smartpen links the recorded audio to your
notes based on the dot pattern on the page. With this information, the Pulse smartpen can play
back the audio that was recorded at the exact time you were writing your notes. Specifically,
when you tap on your notes with the Pulse smartpen, it locates the position where you are
tapping and starts to play back the audio at the position linked to that paper location.
Managing and Archiving Paper Products
Livescribe prints notebooks, journals, and other Livescribe dot paper products for your Pulse
smartpen. There is nothing special about the composition of the paper used for Livescribe dot
paper products. However, each page of Livescribe dot paper is printed with thousands of nearly-
invisible microdots arranged in a special pattern. Your Pulse smartpen reads these dots to
determine which page you are using and where on that page you are tapping or writing. With this
information, your Pulse smartpen can capture your notes, link audio to them, and perform other
paper-based operations.
Livescribe dot paper products sometimes re-use dot pattern. As a general rule, do not use
Livescribe dot paper products with the same dot pattern at the same time. This prevents a
potential problem that can happen when viewing your notebooks in Livescribe Desktop: when
you write in two notebooks with the same pattern, your notes from the second notebook will be
superimposed on your notes from the first notebook when you view them in Livescribe Desktop.
Because Livescribe dot paper products are important to working with your Pulse smartpen, you
should learn to manage and archive them.

Page 16 Pulse
TM
Smartpen User Manual
Three Simple Steps for Managing Paper Products
There are three simple steps for managing Livescribe dot paper products. Follow these steps
before using a new Livescribe dot paper notebook or journal:
1. When purchasing Livescribe dot paper, buy notebooks or journals that have different
numbers from the ones you are currently using. For example, if you are already using
Lined Notebook numbered 1 through 4, you should purchase Lined Notebooks number 5
through 8.
2. Before using the new paper product, tap on the Notebook Status Label. If it says you are
already using a notebook with the same number, be sure to archive your old notebooks
on Livescribe Desktop first.
3. Archive your notebooks and journals after you have finished with them before using an-
other paper product of the same kind and number. After archiving, set aside your old
notebook. You will still have a digital copy on the Livescribe Desktop, but you no longer
can tap and play paper replay sessions on your previous notebook. To learn how to ar-
chive a paper product, see the Livescribe Desktop User Manual located in the Livescribe
Desktop Help menu and in your computer’s start menu.
Checking Paper Product Usage with the Notebook Status Label
Each Livescribe dot paper product has a Notebook Status Label on its cover. Using the
Notebook Status Label is the best way to tell if you are currently using a Livescribe dot paper
product that has the same dot pattern.
To use the Notebook Status Label:
1. When you open a new Livescribe dot paper product, tap on its Notebook Status Label
with your Pulse smartpen.

Chapter 2: 1BUsing Your Pulse Smartpen Page 17
2. Your Pulse smartpen display will show whether you are using another Livescribe dot pa-
per product with the same dot pattern. If you are, archive the older Livescribe dot paper
product before using the new one.

Page 18 Pulse
TM
Smartpen User Manual
Chapter 3: Navigating Your Pulse Smartpen
The Nav Plus
The Nav Plus is a paper-based 5-way navigator that enables you to navigate through the Pulse
smartpen Main Menu and application menus.
Using a pre-printed Nav Plus
You can use any Nav Plus you see printed on any Livescribe dot paper product, such as the
included notebook. To use a printed Nav Plus:
1. Double-tap the center of the Nav
Plus. A double-tap is two taps in
quick succession.
TIP: Double-tapping on the center of a Nav Plus will exit the current application or
sub-menu and take you to the Main Menu. The one exception to this rule is that if
you are recording with Paper Replay, double-tapping the center will take you to the
Main Menu but background recording will continue.
2. Main Menu will be displayed on
your Pulse smartpen.

Chapter 3: 2BNavigating Your Pulse Smartpen Page 19
3. Tap down on the directional arrow
of the Nav Plus to scroll through a
list of applications on your Pulse
smartpen.
4. When the desired application name
is displayed, tap right to select that
application.
5. Tap down to scroll through the
application menu.
6. Tap right to select an item in the
application menu list.
7. Tap left to return to the previous
menu.

Page 20 Pulse
TM
Smartpen User Manual
8. To return to the Main Menu, tap a
series of lefts OR double-tap on the
center of the Nav Plus to jump to
the Main Menu.
NOTE: Your Pulse smartpen will display small directional arrows to indicate you
can scroll through the menu in that direction.
Drawing a Nav Plus
If a pre-printed Nav Plus is not easily accessible, create your own simply by drawing one.
To draw a Nav Plus:
1. Using any Livescribe dot
paper product, such as the
included notebook, draw
intersecting vertical and
horizontal lines.
2. Promptly double-tap in the
center of the Nav Plus. This
will complete the process of
creating a Nav Plus.
TIP: Once drawn, the Nav Plus
is always accessible for future
use.
/