Page is loading ...

Installation / Instalación
Maintenance / Mantenimiento
Accessories / Accesorios
Warranty / Garantía
Please read this manual completely prior to installation.
It has been designed to enhance your experience of installing & maintaining
the new resilient flooring TrafficMASTER allure ULTRA Locking Tile.
Por favor lee el manual en su totalidad, antes de proceder con la instalación.
Diseñado para facilitar el proceso de instalación y mantenimiento del nuevo
piso resistente
TrafficMASTER allure ULTRA.
▲
▲
▲▲
RESILIENT TILE FLOORING
PISO DE LOSA FLOTANTE Y FLEXIBLE
TM ALLURE ULTRA Locking Tile HOM
ENGLISH / SPANISH 9/8/14
Owners Manual
Manual del Usuario

introduction
TrafficMASTER allure ULTRA Locking Tile is the
ultimate “do it yourself” flooring product. No
messy adhesives or glue is necessary.
allure’s flexibility allows the tiles to be installed
over uneven subfloors (see subfloor preparation on
page 4) or existing floors such as natural wood,
concrete, vinyl, linoleum, and even ceramic,
saving you time and money!
TrafficMASTER allure ULTRA Locking Tile looks
and feels like real ceramic or stone, it’s WATER-
PROOF, so it can be installed in moisture prone
areas that traditionally have been “off limits” for tra-
ditional wood flooring and laminate products, like
basements and bathrooms. See subfloor prepara-
tion section on page 4.
TrafficMASTER allure ULTRA Locking Tile
has a CBT (Ceramic Bead Technology)
coating for added wear and durability!
Each TrafficMASTER allure ULTRA Locking Tile
locks to another tile not glued to your subfloor,
using the interlocking strip. It’s free floating. To cut
a tile, simply score and snap.
TrafficMASTER allure ULTRA Locking Tile is quiet
and warm under foot.
Follow the instructions for installation in the next
section and you will be enjoying your beautiful
new floor in just a few hours.
introducción
La losa entralazable TrafficMASTER allure ULTRA
es lo último en productos de pisos “hazlo tú mismo”.
No se necesita pegamento o adhesivos
problemáticos.
La flexibilidad de allure permite que las losas se
puedan instalar sobre pisos desnivelados (consulta la
preparación del contrapiso en la página 4) o exis-
tentes, como los de madera natural, concreto, vinilo,
linóleo e incluso cerámica,
¡ahorrándote
tiempo y dinero!
La losa entralazable TrafficMASTER allure ULTRA
luce y se siente como piedra o cerámica real; es IM-
PERMEABLE, de manera que puede instalarse en
áreas propensas a la humedad que tradicionalmente
han estado “prohibidas” para pisos de madera tradi-
cionales y productos laminados, como sótanos y
baños. Consulta la sección sobre la preparación del
contrapiso en la página 4.
¡La losa entralazable TrafficMASTER allure
ULTRA tiene un recubrimiento con Tec-
nología de Cuentas de Cerámica (CBT, por
sus siglas en inglés) para mayor resistencia
al desgaste y durabilidad!
Cada losa entralazable TrafficMASTER allure
ULTRA se ajusta a otra losa que no está pegada al
contrapiso gracias a un sistema de bandas inter-
conectables. Flota libremente. Para cortar una losa,
simplemente marca y parte de un golpe.
La losa entralazable TrafficMASTER allure ULTRA
no hace ruido ni es fría al caminar sobre ella.
Sigue las instrucciones de instalación de la siguiente
sección y disfrutarás de un bello piso nuevo en
cuestión de horas.
E
NGLISH
E
SPAÑOL
2

Tr
afficMAS
TER
allure
U
LTR
A
Locking
Tile
ins
tal
la
tio
n ins
tructio
ns
Tools
ne
e
d
e
d
• U
ti
l
i
ty
k
n
i
f
e
&
stra
i
gh
t
e
d
ge
•
M
e
a
suri
n
g
ta
p
e
•
S
h
e
a
rs
f
o
r
c
utti
n
g
a
ro
un
d
i
rre
gul
a
r
sha
p
e
d
ob
j
e
cts
(
p
i
p
e
s)
•
6
m
m
(
1/4
i
n.
)
sp
a
ce
rs
Tiles needed to complete your project
Me
a
sure
th
e
le
n
gth
&
wi
d
th
of
your
room
.
If
the
room
h
a
s
a
lcove
s
or
of
f
se
ts,
m
e
a
sure
th
e
se
se
p
a
ra
te
ly.
Thi
s
wi
ll
gi
ve
you
the
sq
ua
re
f
oota
ge
of
th
e
room
.
Purch
a
se
a
m
i
ni
m
um
of
10%
e
xtra
to
cove
r
m
i
sta
k
e
s,
tri
m
m
i
ng
a
nd
f
or
f
uture
n
e
e
d
s
a
n
d
or
re
p
la
ce
m
e
nt.
Most
i
n
sta
lla
ti
ons
re
q
ui
re
a
b
out
10%
ove
ra
ge
.
Howe
ve
r
th
i
s
ca
n
va
ry
d
e
p
e
nd
i
n
g
up
on
th
e
room
si
ze
a
nd
la
yout.
Tra
f
f
i
cMA
S
TER
allur
e ULTR
A
Lock
i
ng
T
i
le
com
e
s
i
n
23.
82"
x
12"
(
60.
5
cm
x
30.
5
cm
)
ti
le
s
or
1.
98
sq
ua
re
f
e
e
t
p
e
r
ti
le
.
10
ti
le
s
p
e
r
ca
se
=
19.
8
sq
ua
re
f
e
e
t
p
e
r
ca
se
.
S
o,
i
f
your
room
i
s
10'
x
10'
or 100 sq.ft., w
e w
oul
d rec
ommend you purc
hase
6 c
ases (120 sq.ft).
HEL
PFUL
HINT
#1: For best r
esults it is im
por
-
tant to pur
c
hase pr
o
duc
t (
cases)
fr
o
m
the sam
e
R
U
N # (
dye lot)
. Diff
er
ent r
un #’s c
an have shade
variat
io
ns. Every c
ase of
a
llure
has the r
un #
pr
inted o
n the ends of
the case. Run # example:
30.08.2009. If you do have more than one run #
we highly recommend you install tiles from 4 or 5
different cases from different run #’s at one time
and randomly mix them into the installation as you
go. This will insure a more natural looking floor.
Instrucciones de instalación
para las losas entralazables
TrafficMASTER allure
ULTRA
Herramientas necesarias
• Cuchillo multiuso y borde recto
• Cinta de medir
• Tijeras para cortar alrededor de objetos
con forma irregular (tuberías)
• Espaciadores de 6 mm
Losas necesarias para completar tu proyecto
Mide el largo y el ancho de tu habitación. Si la
habitación tiene nichos o salientes, mídelos por sep-
arado. Esto te dará los pies cuadrados de la
habitación. Compra al menos 10% de más para
cubrir errores, para recortes y para necesidades
futuras y/o reemplazos. En la mayoría de los casos,
la instalación requiere un 10% de material
excedente. Sin embargo, esto puede variar según
el tamaño y la distribución de la habitación.
El tamaño de las losas entralazables TrafficMASTER
allure ULTRA es de 60.5 cm x 30.5 cm o 1.98
pies cuadrados (0.18 m²) por losa. 10 losas por
caja = 1.84 m² por caja. O sea, si tu habitación
mide 3.05 m x 3.05 m o 9.29 m², te recomen-
daríamos que compres 6 cajas (11.15 m²).
CONSEJO ÚTIL NÚM. 1: Para mejores resulta-
dos es importante que compres el producto (las
cajas) del mismo Núm. de LOTE (lote de teñido).
Núms. de lote distintos pueden tener variaciones de
tonalidad. Cada caja de allure tiene el núm. de
lote impreso en los extremos de la caja. Ejemplo de
un núm. de lote: 30.08.2009. Si tienes más de un
núm. de lote, recomendamos especialmente que in-
stales losas de 4 ó 5 cajas diferentes de lotes con
núm. distintos y que las mezcles aleatoriamente a
medida que avances con la instalación. Esto garanti-
zará un piso de aspecto más natural.
E
NGLISH
3
E
SPAÑOL

CA
U
TI
O
N:
D
o
not
instal
l
a
l
l
u
re
ove
r
carpe
t
or
any
f
oam
u
nde
rl
aym
e
nt.
T
his
produ
ct
is
not
su
itabl
e
f
or
any
ou
tside
u
se
,
su
nroom
s/
sol
ariu
m
s,
sau
nas,
or
room
s
that
have
the
pote
ntial
of
f
l
ooding
.
W
e
al
so
hig
hl
y
re
com
m
e
nd
you
do
not
instal
l
in
room
s
or
hom
e
s
that
are
not
te
m
pe
ratu
re
control
l
e
d.
E
x
posu
re
to
l
ong
te
r
m
dire
ct
su
nl
ig
ht
can
cau
se
dam
ag
e
to
you
r
f
l
oor.
For
m
ore
inf
or
m
ation
on
instal
l
ation
spe
cif
ications
pl
e
ase
se
e
the
char
t
on
pag
e
5
.
C
ond
i
ti
on
allu
r
e
p
r
i
or
to i
nsta
l
l
a
ti
on
Y
o
u
M
US
T s
to
re
a
l
l
u
re
ho
r
i
zo
nta
l
l
y
i
n the
ro
o
m
o
f
i
ns
ta
l
l
a
ti
o
n f
o
r 48 ho
u
r
s
p
ri
o
r to
i
ns
ta
l
l
a
ti
o
n. Be
s
u
re
the
ro
o
m te
mp
e
ra
ture
i
s
b
e
tw
e
e
n 65º & 85º F
(
18° C a
nd
30° F)
. D
o
no
t re
mo
v
e
the
ti
le
s
f
ro
m the
ca
s
e
d
uri
ng
thi
s
a
ccla
ma
ti
o
n p
e
ri
o
d
! Ma
i
nta
i
n thi
s
te
mp
e
ra
tur
e
d
ur
i
ng
a
nd
a
f
te
r i
ns
ta
lla
ti
o
n (
2 d
a
y
s
mi
ni
mum)
.
Subfloor preparation:
The
sub
f
loor
surf
a
ce
m
ust
b
e
sm
ooth,
f
la
t,
d
ry,
cle
a
n
a
nd
soli
d
.
C
a
rp
e
t
sta
p
le
s
or
a
d
h
e
si
ve
re
si
d
ue
m
ust
b
e
re
m
ove
d
to
i
nsure
p
rop
e
r
i
nsta
lla
ti
on.
S
ub
f
loors
should
b
e
f
la
t
wi
thi
n
a
tole
ra
nce
of
3/16"
(
5m
m
)
ove
r
a
sp
a
n
of
10
f
e
e
t.
A
n
y
une
ve
n
-
ne
ss
ove
r
3/16"
(
5m
m
)
m
ust
b
e
sa
nd
e
d
d
own
or
f
i
lle
d
wi
th
a
f
loor
le
ve
le
r
.
V
oi
d
s
or
h
um
p
s
i
n
the
sub
f
loor
wi
ll
p
re
ve
n
t
allur
e
f
rom
lock
i
n
g
p
rop
e
rly.
S
ub
f
loors
m
ust
b
e
ca
re
f
ully
che
ck
e
d
f
or
m
oi
sture
p
rob
le
m
s.
Tra
f
f
i
cMA
S
TER
allur
e ULTR
A
Lock
i
n
g
T
i
le
i
s
wa
te
rp
roof
.
It
i
s
N
OT
a
wa
te
r-
p
roof
e
r
.
A
ny
moisture problems need to be addressed prior to
installation. New
concrete floors need to cure for
a minimum of 90 days. For more information, see
the chart o
n page 5.
HELPFUL
HIN
T
#2:
If l
aying
a
llure
over exis
ting
c
eramic
til
e, it will be nec
es
s
ary to s
k
im c
oat the
grout li
nes
with a floor leveler. If you install
a
llure
over an existing floor that has an embossing or grout
line on it, you must s
kim coat with a floor leveler if the
embossing or grout line is greater than 1/8" — (3 mm).
If you have old, ugly vinyl and don’t want to pay for
an expensive removal and remediating job,
allure
is the perfect answer. Any loose or damaged tiles
should be patched prior to installing
allure
over the
old floor. Never sand old vinyl floors from any floor
manufacturer, if you think the floor may be over 20
years old.
PRECAUCIÓN: No instalar allure sobre alfombras ni
contrapisos de espuma de cualquier tipo. Este producto
no es adecuado para uso en exteriores, terrazas
interiores/solárium, saunas y cuartos donde haya riesgo
d
e inundación. También recomendamos especialmente
q
ue no lo instales en habitaciones o viviendas sin control
de la temperatura. La exposición directa al sol a largo
plazo puede causar daños a tu piso. Para obtener más
información sobre las especificaciones de instalación,
por favor consulte la tabla en la página 5.
Acondiciona allure antes de instalar
DEBES almacenar el piso allure de manera horizontal en
la habitación donde va a instalarse 48 horas antes de la
instalación. Asegúrate de que la temperatura de la
habitación esté entre 65 ºF y 85 ºF (18 ºC y 30 ºC). ¡No
saques las losas de la caja durante este período de acli-
matación! Mantén esta temperatura durante y después de
la instalación (dos días como mínimo).
Preparar el contrapiso:
La superficie del contrapiso debe estar, lisa, plana, seca,
limpia y firme. Se deben quitar los residuos de adhesivo y
las grapas de alfombra para garantizar una instalación
apropiada.
Los contrapisos deben ser planos con un margen de toler-
ancia de 3/16" (5mm) a lo largo de 10 pies. Cualquier
desnivel superior a 3/16" (5mm) debe lijarse o rellenarse
con un nivelador de pisos. Hundimientos o levantamientos
en el contrapiso impedirán el ajuste apropiado de allure.
El contrapiso debe revisarse con cuidado para
garantizar que no tenga problemas de humedad.
TrafficMASTER allure ULTRA es impermeable. Pero NO
es un impermeabilizante. Cualquier problema relacionado
con la humedad debe resolverse antes de proceder con
la instalación. Los pisos nuevos de concreto, deben
curarse por un mínimo de 90 días. Para obtener más
información sobre las especificaciones de instalación,
por favor consulte la tabla en la página 5.
CONSEJO ÚTIL NÚM. 2: Si vas a colocar allure
sobre losas de cerámica, se deberá nivelar las líneas de
lechada con un nivelador de pisos. Si vas a instalar
allure sobre otro piso ya instalado que tenga relieves o
líneas de lechada, debes emparejar con un nivelador de
piso si el relieve o la línea de lechada sobrepasan 1/8”—
(3 mm).
Si tienes pisos de vinilo feos o viejos, y no deseas pagar
mucho dinero para quitarlos o renovarlos, allure es la
solución perfecta. Cualquier losa floja o dañada debe
repararse antes de instalar allure sobre el piso viejo.
Nunca lijes ningún piso de vinilo de cualquier fabricante,
si sospechas que puede tener más de 20 años.
E
NGLISH
4
E
SPAÑOL

E
NGLISH
E
SPAÑOL
Las losas entralazables
allure ULTRA
ESPECIFICACIONES
DE LA INSTALACIÓN:
allure ULTRA
LOCKING TILE
INSTALLATION
SPECIFICATIONS:
5
HD Installable Yes
Connection Type Click
Free Floating Floor Yes. DO NOT screw or nail moldings, transitions, cabinetry
or vents through ANY allure flooring
Acclimation Period 48 hours minimum required in room prior to installation
Temperature Range 65°F to 85°F required in room of installation
After installation temps should stay between 55F to 85F
Interior Product Only Yes. See limitations/exclusions below
Storage Horizontally
Dye Lots Yes. Install from a minimum of 3 to 4 different boxes and dye lots
at one time. See page 3 of Owner's Manual for more information
Expansion Space Yes. For room perimeters and fixed objects please leave
1/4" minimum space
Floor Flatness Tolerances 3/16" over 10', Use floor leveler when exceeding tolerance
Hand Roller Required No
75 lb min. Floor Roller No
Moisture Reading Guidelines; Based on Tramex Concrete Moisture Encounter Plus Meter
OVER CONCRETE (scale 0 to 6%)
Scale 0 to 5% No moisture barrier
Scale 5% to 6% 6 mil poly barrier necessary; over 6% recommend Dricore
Moisture Reading Guidelines; Never use 6 mil poly over wooden subfloors
OVER WOOD
Scale 0 to 13% OK to install. Do not install above 13% moisture levels
Primer Over Wooden Subfloors No
Basement Proofer over Concrete No
Moisture Barrier (6 mil poly) Yes above 5% only
Installs Over Radiant Flooring Yes. Electric or hydronic approved — best practice recessed
min 1/2" below finished floor. Do not turn thermostat above 85°F
Suspended Wood Floors Yes. 18" minimum well ventilated crawl space
Use moisture barrier over ground/dirt
Especially for mobile home installations
Foam/Cushioned Underlayment No. Voids warranty if used in any application
Approved Subfloors - See Below Must be smooth, solid, dry and no deflection
Wood Yes. Solid, engineered, parquet
Plywood Yes. OSB & particleboard are approved for allure products only
Luan is approved for all products
Vinyl Yes. Linoleum, VCT, LVT, peel & stick
Concrete Yes. Sealed, unsealed, poured in place gypsum.
On grade or below grade (see moisture guidelines)
Tile (Stone) Yes. Ceramic, Terrazzo, stone tile
(grout lines of less than 1/4" is optimum)
Dricore Yes
Subfloors Not Approved Carpet (any type), foam underlayment, cushioned back vinyl,
rubber, cork, laminates
Subfloor Approved Products Primer - Henry 336, Basement Proofer - Custom Building Products
RedGard or TM Basement Proofer, Floor Leveler - Henry 554 &
555 Level Pro
Limitations/Exclusions These types of installations will NOT be covered under warranty:
All exterior installations & seasonal porches, boats/campers/RV's,
sunrooms/solariums, non-temperature controlled rooms or homes
Steam Cleaner DO NOT USE
Vertical Surfaces & Staircases Not covered under warranty. Can be done using high quality
construction adhesive. Product not intended for this usage
Limited Warranties Lifetime residential, 10-year commercial
During Acclimation & Install
I
nstalable por Home Depot Sí
Tipo de conexión Clic
Piso flotante libre Sí. Productos flotantes libres. NO tornillo o clavo molduras, transiciones,
g
abinetes o rejillas de ventilación a través de todos los pisos allure
Período de Aclimatación 48 horas requeridas en la habitación de la instalación
65°F a 85°F es necesario en la sala de instalación.
D
espués de la
instalación, las temperaturas deben mantenerse entre 55F a 85F
Sólo Producto Interior Sí. Ver las limitaciones y exclusiones a continuación
A
lmacenamiento Horizontalmente
L
otes de teñido Sí. Instalar desde un mínimo de 3 a 4 diferentes cajas y un montón
de tinte simultáneamente. Consulte la página 3 de este manual
para obtener más información
Espacio de expansión Si. Para perímetro de las habitaciones y los objetos fijos por favor
deje 1/4 "mínimo espacio
P
iso tolerancias planeidad 3/16" sobre una sección de 10', uso nivelador de piso
c
uando se excede la tolerancia
Rodillo de mano requerido No
75 Lb. /min. rodillo de piso No
Pautas de lectura de humedad; Basado en Tramex Concrete Encounter Plus Medidor de humedad
SOBRE HORMIGÓN (Escala 0 ta 6%)
Escala 0 a 5% No hay barrera de humedad
Escala 5% a 6% 6 Mil poli barrera es necesario; el 6% recomendar Dricore
Pautas de lectura de humedad; Nunca use 6 Mil poli sobre contrapisos de madera
SOBRE MADERA
Escala 0 a 13% OK para instalar. No instale superior al 13% los niveles de humedad
Cartilla sobre contrapisos de madera
No
Sótano armario de fermentación
No
Barrera de humedad (6 mil poly) Sí encima del 5% sólo
Instala sobre suelo radiante Sí. Eléctrico o hydronic aprobado - mejores prácticas rebajado
min 1/2" a continuación piso terminado. No gire el termostato
por encima de 85 °F
Pisos de madera suspendido Sí. 18' Mínimo bien ventilada. Utilizar barrera de humedad sobre
la tierra o suciedad. Especialmente para las instalaciones en
casas rodantes
Espuma/amortiguado contrapiso NO anula la garantía si se utiliza en cualquier aplicación
Contrapisos aprobados - ver abajo Debe ser suave, sólido, seco y sin desviación
Madera Sí. Sólida, diseñada, parquet
Contrachapada Sí. Tableros OSB y son aprobados para allure productos
Luan es aprobado para todos los productos
Vinilo Sí, instalar más de 1 capa de vinilo sólo. Linóleo, VCT, LVT, piel y palo
Hormigón Sí. Sellado, abierta, derramó en su lugar el yeso. De grado o
por debajo del nivel de humedad (ver instrucciones)
Baldosa (piedra) Sí. Cerámica, terrazo, baldosa de piedra (todos con lechada l
íneas menos de 1/4 ")
Dricore Sí
Contrapisos no aprobado Alfombra (de cualquier tipo), deambulan por base acolchada y
vinilo, caucho, corcho, laminados
Contrapisos aprobado Pintura base - Henry 336, Basement Proofer - Custom Building
Products RedGard oTM Basement Proofer, Floor Leveler - Henry
554 y 555 Level Pro
Limitaciones/exclusiones Este tipo de instalaciones no estará cubierto por la garantía: todas las
instalaciones exteriores y porches estacionales, barcos/campistas /RVs,
solarios, no climatizada habitaciones o casas
Limpiadora de vapor NO UTILICE
Escaleras y superficies verticales No cubre la garantía. Puede hacerse utilizando adhesivo de
construcción de alta calidad. Producto no destinado a este uso
Garantías limitadas Vida residencial, comercial de 10 años
Rango de temperatura durante
l
a aclimatación e instalar
sobre hormigón

Ins
t
a
lling
allur
e
:
H
ELPF
U
L H
I
NT
#
3
:
Bef
o
re
l
a
y
in
g
o
u
t
th
e
f
l
o
o
r,
c
h
ec
k
th
e
w
a
l
l
y
o
u
a
re
sta
r
tin
g
f
ro
m
a
n
d
m
a
ke
su
re
it
is
s
q
u
a
re
to
th
e
o
p
p
o
s
ite
w
a
l
l
.
S
im
p
l
y
m
ea
s
u
re
th
e
ro
o
m
f
ro
m
o
p
p
o
s
ite
en
d
s
o
f
th
e
w
a
l
l
to
th
e
f
a
r
w
a
l
l
.
I
f
th
e
m
ea
su
re
-
m
en
ts
a
re
d
if
f
eren
t,
y
o
u
c
a
n
m
a
ke
a
d
ju
s
tm
en
ts
o
n
th
e
f
irst
ro
w
o
f
a
llu
re
b
y
s
c
rib
in
g
th
e
til
e.
1. L
ay a r
ow of loos
e t
iles
wit
hou
t
secu
r
ing t
hem
to
e
a
ch
oth
e
r
f
i
rst
to
d
e
te
rm
i
ne
i
f
you
n
e
e
d
to
a
d
-
j
ust
th
e
le
ngth
of
th
e
f
i
rst
ti
le
to
a
voi
d
a
sm
a
ll
p
i
e
ce
of
le
ss
th
a
n
12"
on
th
e
op
p
osi
te
wa
ll
f
rom
whe
re
you
sta
rte
d
,
or
m
e
a
sure
the
le
ngth
of
th
e
room
a
n
d
d
i
vi
d
e
b
y
24"
(
le
ngth
of one t
ile). If
t
he r
emainder
is
les
s
t
han 12"
,
ca
lcula
te
½
of
the
re
m
a
i
nd
e
r
a
nd
tri
m
thi
s
a
m
ount
of
f
the
f
i
rst
ti
le
.
The
la
st
ti
le
sh
ould
b
e
th
e
sa
m
e
le
ngth
a
s
the
f
i
rst
on
e
.
To
cut
a
t
ile, simply meas
u
r
e and mar
k t
he
t
ile, t
hen usi
ng
a
stra
i
ght
e
d
ge
a
n
d
uti
li
ty
k
n
i
f
e
,
si
m
p
ly
score
th
e
ti
le
a
nd
sna
p
.
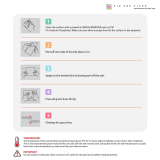
2.
In
sta
lla
ti
on
sh
ould
sta
rt
i
n
a
corn
e
r
(
le
f
t
h
a
n
d
)
a
n
d
p
roce
e
d
f
rom
th
e
wa
ll
wi
th
th
e
ton
gue
f
a
ci
ng
the
wa
ll (F
igure 1
)
.
A
llow
a
m
i
ni
m
um
ga
p
of
1/4"
(
6m
m
)
f
or
sub
f
loor
m
ove
m
e
nt
or
p
rod
uct
e
xp
a
nsi
on
,
wh
i
ch
sh
ould
b
e
cove
re
d
by molding.
3. When l
aying
the first row
in a straig
ht l
ine,
interloc
k the short ends by inserting the tongue
into the groov
es at an ang
l
e of approx.10 to
20 degrees. Install eac
h sequential til
e on the
short end (12" (30.5 cm)) and be sure to
l
ine up evenl
y
. This is v
ery impor
tant for a
g
ood install
ation.
4. Be sure to keep the seams tight. There should
be no gap visible between tiles.
Cómo instalar el piso allure:
CONSEJO ÚTIL NÚM. 3: Antes de comenzar a
colocar el piso, verifica que la pared desde la que
empezarás la instalación esté a escuadra en
relación con la pared opuesta. Simplemente mide la
habitación desde los extremos opuestos de la pared
hasta la pared del otro lado. Si las medidas son
diferentes, puedes hacer ajustes en la primera fila
del piso allure contorneando la losa.
1. Primero coloca una fila de losas sueltas, sin ajus-
tarlas entre sí, para determinar si necesitas ajustar
el largo de la primera losa, de modo que la
tabla en la pared opuesta a la de inicio, no mida
menos de 30.5 cm, o mide la longitud de la
habitación y divide por 61 cm (longitud de una
losa). Si queda menos de 30.5 cm, calcula la
mitad de lo que sobra y corta esa medida de la
primera losa. La última losa debe tener el mismo
largo que la primera. Para cortar una losa, sim-
plemente mide y marca la losa; luego usa un
borde recto y una cuchilla multiuso para marcar y
partir de un golpe.
2. La instalación debe empezar por una esquina (ex-
tremo izquierdo) y continuar desde la pared con
la lengüeta mirando en la dirección a la pared
(Figura 1). Deja un espacio de 6 mm como mínimo
para que el contrapiso se mueva o el producto se
expanda; este espacio debe quedar oculto al
colocar las molduras.
3. Al colocar la primera fila en línea recta, engan-
cha los extremos cortos insertando la lengüeta en
las ranuras en un ángulo de aproximadamente
10 a 20 grados. Instala cada losa contigua en el
extremo corto (30.5 cm) y asegúrate de alinear-
las uniformemente. Esto es muy importante para
una instalación correcta.
4. Asegúrate de que las uniones queden bien
ajustadas. No debe haber ningún espacio visible
entre las losas.
E
NGLISH
6
E
SPAÑOL

If
yo
ur
se
a
m
a
p
p
e
a
rs
n
o
t
to
b
e
ti
gh
t,
yo
u
c
a
n
i
m
m
e
d
i
a
te
l
y
p
ul
l
a
p
a
r
t
th
e
ti
l
e
s
a
n
d
re
a
p
p
l
y
th
e
m
.
S
l
o
wl
y
l
i
f
t
th
e
to
p
ti
l
e
a
wa
y
f
ro
m
th
e
b
o
tto
m
ti
l
e
a
n
d
si
m
p
l
y
re
a
p
p
l
y
th
e
m
—
re
p
e
a
ti
n
g
S
te
p
#
3
.
B
e
c
a
re
f
ul
n
o
t
to
p
ul
l
th
e
ti
l
e
s
a
p
a
r
t
to
o
f
a
st
o
r
yo
u
c
o
ul
d
ri
p
o
r
d
a
m
a
ge
th
e
l
o
c
k
i
n
g
stri
p
.
5
.
W
h
e
n
i
n
sta
l
l
i
n
g
a
llu
r
e
,
i
t
i
s
stro
n
gl
y
re
c
o
m
m
e
n
d
e
d
to
sta
gge
r
th
e
ro
ws
so
th
a
t
th
e
sh
o
r
t
e
d
ge
(
1
2
"
(
3
0
.
5
c
m
)
)
se
a
m
s
a
re
n
o
t
i
n
a
stra
i
gh
t
un
i
f
o
r
m
l
i
n
e
.
W
e
re
c
o
m
m
e
n
d
th
e
sta
gge
re
d
ra
nd
om
m
e
thod
(F
igure 2
)
.
Howe
ve
r
you
m
a
y
wa
n
t
to
try
oth
e
r
“p
a
tte
rn
s”
of
ti
le
s
to
sui
t
your
ta
ste
.
allur
e
ca
n
b
e
i
n
sta
lle
d
wi
th
e
nd
le
ss
p
ossi
b
i
li
ti
e
s
—
your
on
ly
li
m
i
ta
ti
on
i
s
your
own
i
m
a
gi
n
a
ti
on!
6.
S
ta
rt
th
e
se
cond
row
wi
th
the
ti
le
cut
a
t
a
b
out
2/3
le
ngth
(
16"
(
40.
6
cm
)
)
.
Me
a
sure
a
nd
m
a
rk
the
ti
le
,
th
e
n
usi
n
g
a
stra
i
ght
e
d
ge
a
nd
uti
li
ty
k
n
i
f
e
,
score
the
ti
le
a
n
d
sna
p
.
7.
In
te
rlock
the
ti
le
ti
gh
tly
a
ga
i
nst
th
e
f
i
rst
row
(
lon
g
si
d
e
)
a
ga
i
n
a
t
a
10-
20
d
e
gre
e
a
n
gle
.
For
the
ne
xt
ti
le
,
i
n
te
rlock
th
e
sh
ort
si
d
e
f
i
rst,
le
a
vi
ng
i
t
sli
gh
tly
a
wa
y
f
rom
th
e
lon
g
si
d
e
a
n
d
then slide into the long side.
HE
LPFUL
HINT #4:
Wh
en
cuttin
g
allure
for len
gth
, be sure to always cut
the sh
o
rt side o
f the tile with th
e gro
o
ve edg
e.
T
h
e remain
in
g piece can th
en be used o
n th
e
o
ppo
site side o
f th
e ro
o
m, at th
e en
d o
f th
at row
(Figure 3)
if layo
ut permits.
8
. Start th
e th
ird row with
th
e tile cut at 1
/3
of
a length (8" (20.3 cm)). Again the remaining
piece can be used at the opposite end of the
row, if the layout of the room permits.
9. Continue this pattern for the remainder of the
rows to be installed. Always place the cut end
of the first tile against the wall
(Figure 4)
.
Si las uniones no quedan ajustadas,
p
uedes separar inmediatamente las tablas
y volverlas a colocar. Separa lentamente
la losa superior de la inferior y simple-
mente vuélvelas a instalar - repitiendo el
Paso núm. 3. Ten cuidado de no halar las
losas muy rápidamente al separarlas ya
que podrías romper o dañar la banda de
cierre.
5. Al instalar allure, se recomienda
enfáticamente escalonar las filas de modo
que las uniones de los bordes cortos
(30.5 cm) no queden en línea recta y
continua. Recomendamos el método de
escalonado aleatorio (Figura 2). No
obstante, puedes seguir otros “patrones”
de colocación de las losas, según desees.
allure se puede instalar en un sinfín de
maneras — ¡tu imaginación es el único
límite!
6. Comienza la segunda fila con la losa
cortada cerca de 2/3 del largo (40.6 cm).
Mide y marca la losa; luego usa un borde
recto y una cuchilla multiuso para marcar y
partir de un golpe.
7. Acopla la losa ajustándola bien contra
la primera fila (lado largo) nuevamente en
un ángulo de 10 a 20 grados. Para la
siguiente losa, acopla primero el lado corto
dejando un espacio pequeño con respecto
al lado largo y luego deslízalo en el mismo.
CONSEJO ÚTIL NÚM. 4: Al cortar
allure al largo pertinente, siempre corta el
lado corto de la losa que tiene el borde ra-
nurado. Lo que sobre de la losa puede usarse en el
lado opuesto de la habitación, al final de esa fila,
(Figura 3) si la distribución lo permite.
8. Comienza la tercera fila con la losa cortada a
1/3 de su largo (20.3 cm). Una vez más, lo que
sobre de la losa puede usarse en el extremo op-
uesto de la fila si la distribución así lo permite.
9. Continúa con este patrón para el resto de las filas
que instalarás. Siempre coloca contra la pared el
extremo cortado de la primera losa (Figura 4).
E
NGLISH
7
E
SPAÑOL

1
0
.
Fi
t
t
i
n
g
a
ro
u
n
d
i
rre
g
u
l
a
r
o
b
j
e
c
t
s
i
s
n
o
p
ro
b
l
e
m
.
S
i
m
p
l
y
m
a
ke
a
p
a
t
t
e
r
n
o
u
t
o
f
h
e
a
v
y
p
a
p
e
r
t
o
fi
t
a
ro
u
n
d
p
i
p
e
s
o
r
i
rre
g
u
l
a
r
o
b
j
e
c
t
s
.
P
l
a
c
e
t
h
e
p
a
t
t
e
r
n
u
p
o
n
t
h
e
t
i
l
e
a
n
d
t
ra
c
e
.
Cu
t
a
l
o
n
g
t
ra
c
e
l
i
n
e
s
u
s
i
n
g
a
u
t
i
l
i
t
y
kn
i
fe
o
r
h
e
a
v
y
d
u
t
y
s
c
i
s
s
o
rs
,
a
n
d
l
a
y
t
i
l
e
.
B
e
s
u
re
t
o
l
e
a
v
e
a
m
i
n
i
m
u
m
o
f
1
/
4
"
e
xp
a
n
s
i
o
n
s
p
a
c
e
a
ro
u
n
d
a
l
l
fi
xe
d
o
b
j
e
c
t
s
,
fl
o
o
r
v
e
n
t
s
a
n
d
d
o
o
r
fra
m
e
s
.
1
1
.
T
he b
ea
ut
y
of
T
r
a
f
f
ic
MAST
ER
a
l
l
u
r
e
U
L
T
R
A
Loc
k
ing Til
e is
t
he ea
s
e of
ins
t
a
l
l
ing t
he op
p
os
it
e
wa
y. Y
ou c
a
n ins
t
a
l
l
f
r
om
b
ot
h s
id
es
of
t
he t
il
e.
T
his
a
l
l
ows
y
ou t
o s
t
a
r
t
in one r
oom
a
nd
c
ont
inue
t
hr
ough a
d
oor
wa
y
int
o a
not
her
r
oom
wit
h t
he
s
a
me p
a
t
t
ern a
nd
c
ont
inue ins
t
a
l
l
ing t
he fl
oor
forwa
rd
s
or b
a
c
kwa
rd
s
.
H
ELPFUL HINT #
5: Be
s
ure
t
o
keep
s
om
e
s
p
a
re
allure
t
il
es
in
c
a
s
e
t
here
is
a
n
unfores
een
need
for
rep
l
a
c
em
ent
.
If
you
need
t
o
rep
l
a
c
e
a
t
il
e
of
Tra
ffic
MAST
ER
allure ULTRA Loc
king
Til
e,
s
im
p
l
y
t
a
ke
a
ut
il
it
y
knife
a
nd
c
ut
t
he
b
a
d
t
il
e
out
a
l
ong
t
he
l
ong
s
id
e
of
t
he
t
il
e
onl
y
a
nd
l
ift
out
of
p
l
a
c
e.
T
hen
t
a
ke
a
s
p
a
re
t
il
e
a
nd
c
ut
t
he
t
ongue
a
nd
groove
off
of
t
he
l
ong
s
id
e
of
t
he
rep
l
a
c
em
ent
t
il
e
onl
y.
Lea
ve
t
he
t
ongue
a
nd
groove
on
t
he
s
hort
s
id
e
of
t
he
t
il
e.
T
hen
s
im
p
l
y
fit
int
o
p
l
a
c
e
a
nd
l
oc
k
t
he
t
wo
s
hort
end
s
int
o
p
l
a
c
e.
If
you
have
any
pro
bl
em
s
o
r
quest
i
ons,
cal
l
our
Cust
o
m
er
H
el
p
L
i
ne
at
1
-
8
6
6
-
8
4
3
-
8
4
5
3
IMPORTANT
NOT
E:
Install allure
at room
temperature. Please make sure your thermostat
is set above 18°C to 30°C (65°F - 85°F)
when ins
talling
allure
. Room temperature
is important!
10. La instalación alrededor de objetos irregulares
no constituye un problema. Sencillamente, haz
una plantilla con papel grueso alrededor de tu-
berías u objetos con forma irregular. Coloca la
plantilla sobre la losa y marca. Corta siguiendo
las líneas trazadas con la ayuda de una cuchilla
multiuso o tijeras resistentes, y luego coloca la
losa. Asegúrate de dejar un espacio de expan-
sión de 6 mm como mínimo debajo de los obje-
tos fijos, los ductos de ventilación de pisos y los
marcos de las puertas.
11. La belleza de las losas entralazables TrafficMas-
ter allure ULTRA consiste en la facilidad de in-
stalarlas en direcciones opuestas. Puedes
instalarlas desde ambos extremos de la losa.
Esto te permite comenzar en una habitación y
continuar a través del umbral de la puerta hacia
otra habitación con el mismo diseño, y seguir in-
stalando el piso hacia adelante o hacia atrás.
CONSEJO ÚTIL NÚM. 5: Asegúrate de tener
disponibles algunas losas allure en caso de al-
guna necesidad imprevista de reemplazo. Si nece-
sitas reemplazar una losa de cierre TrafficMASTER
allure ULTRA, simplemente, con una cuchilla
multiuso, corta la losa defectuosa sólo por su lado
largo y levántala para sacarla de su sitio. Entonces
toma una losa disponible y corta sólo la lengüeta y
ranura de su lado largo. Deja la lengüeta y ranura
del lado corto de la losa. Luego, simplemente coló-
cala en su sitio y ajusta los dos extremos cortos en
su lugar.
Si tienes problemas o preguntas, llama a nuestra
línea de Servicio al Cliente al
1-866-843-8453.
NOTA IMPORTANTE: Instale allure a
temperatura ambiente. Por favor, al instalar allure,
asegúrate de que tu termostato esté programado
para una temperatura mayor a los 60º F y por
debajo de los 85º F. ¡La temperatura de la
habitación es importante!
E
NGLISH
8
E
SPAÑOL

care &
maintenance
C
ongr
a
t
ul
a
t
ions
!
Y
ou ha
v
e jus
t
ins
t
a
l
l
ed
T
r
a
f
f
ic
MAST
ER allure ULTRA L
o
c
ki
n
g
T
i
l
e
fro
m
T
h
e
H
o
m
e
D
e
p
o
t
.
Y
o
u
r
n
e
w
re
s
i
l
i
e
n
t
fl
o
o
r
w
a
s
p
ro
d
u
c
e
d
u
n
d
e
r
t
h
e
h
i
g
h
e
s
t
q
u
a
l
i
t
y
s
t
a
n
d
a
rd
s
a
n
d
w
i
l
l
p
ro
v
i
d
e
yo
u
w
i
t
h
a
l
i
fe
t
i
m
e
o
f
e
n
j
o
ym
e
n
t
.
A
l
t
h
o
u
g
h
allure
i
s
o
n
e
o
f
t
h
e
e
a
s
i
e
s
t
fl
o
o
rs
t
o
m
a
i
n
t
a
i
n
,
p
l
e
a
s
e
fo
l
l
o
w
t
h
e
re
c
o
m
m
e
n
d
a
t
i
o
n
s
i
n
t
his
guid
e
t
o
ret
a
in
t
he
fres
h
l
ook
a
nd
p
rot
ec
t
t
he
fa
c
t
ory
finis
h.
Preventive maintenance:
1.
U
s
e
NON-
RU
BBER
p
rot
ec
t
ive
m
a
t
s
in
front
of
a
ny
d
oors
l
ea
d
ing
t
o
t
he
out
s
id
e.
T
his
hel
p
s
keep
t
he
s
a
nd
a
nd
grit
from
get
t
ing
on
t
o
your
fl
oors
.
Grit
t
y
s
a
nd
is
a
ny
fl
oor
c
overing's
wors
t
enem
y.
2.
Ins
t
a
l
l
p
rop
er
fl
oor
p
rot
ec
t
ors
(fel
t
p
referred
)
on
a
l
l
furnit
ure
l
egs
us
ed
on
res
il
ient
fl
ooring.
Prot
ec
t
ors
wil
l
a
l
l
ow
c
ha
irs
t
o
m
ove
ea
s
il
y
over
t
he
fl
oor
wit
hout
s
c
uffing
or
s
c
ra
t
c
hing.
Cl
ea
n
p
rot
ec
t
ors
on
a
regul
a
r
b
a
s
is
t
o
rem
ove
a
ny
grit
t
ha
t
m
a
y
ha
ve
b
ec
om
e
em
b
ed
d
ed
on
t
he
b
ot
t
om
of
t
he
furnit
ure
l
eg.
For
a
ny
s
wivel
ed
type office chai
rs and other rolling fur
ni
ture,
please install 2" wide non-stai
ning flat casters.
Do not use rubber casters.
3. T
o keep your floor looki
ng
i
ts best, dust mop or
vacuum your floor at least tw
ice a week. Do it
more often on floors w
ith heavy
traffic. Do not
use a household dust cleaner of any kind as this
may
cause the floor to become slick or damage
the finish. Simply sweep the floor as often as
needed.
4. Do not allow pets with unclipped nails to
damage your
allure
floor. It may result in
severe scratching to the surface. The same is
true for any high heeled shoes that do not have
proper tips on the heels.
cuidado y
mantenimiento
¡Felicitaciones! Has instalado las losas entralazables
TrafficMaster allure ULTRA de The Home Depot. Tu
nuevo piso resistente fue fabricado según los están-
dares más altos de calidad para que lo disfrutes du-
rante toda la vida. Aunque allure es uno de los
pisos más fáciles de cuidar, por favor sigue las re-
comendaciones de esta guía para que mantenga
esa apariencia nueva y proteger el acabado de
fábrica.
Mantenimiento preventivo:
1. NO usar TAPETES DE GOMA delante de puertas
que lleven al exterior. Así evitarás que la arena
o arenilla se metan en tus pisos. La arena gruesa
es el peor enemigo de cualquier revestimiento
de piso.
2. Instala protectores de piso adecuados (se
recomienda el fieltro) en las patas de muebles
usados en habitaciones con piso resistente. Los
protectores ayudarán a mover fácilmente las sillas
sobre el piso sin rayarlo o dejar marcas. Limpia
los protectores con frecuencia para eliminar la
arenilla que pueda haberse pegado a la base
de las patas de los muebles. En el caso de sillas
giratorias de oficina y otros muebles rodantes, por
favor instala ruedas planas de 2", que no dejen
marcas. No usar ruedas de goma.
3. Si deseas una apariencia óptima de tu piso, quita el
polvo con un trapeador o aspiradora, al menos dos
veces por semana. En pisos expuestos a mucho
tráfico, haz lo anterior con más frecuencia. No usar
ningún limpiador doméstico contra el polvo, ya que
el piso puede volverse resbaloso o puede dañarse
el acabado. Simplemente, barre el piso tan seguido
como sea necesario.
4. No permitas que las uñas largas de las mascotas
dañen tu piso allure. Ello podría rayar
seriamente la superficie. Lo mismo puede pasar
en el caso de zapatos de tacón alto sin la tapa
adecuada en los tacones.
E
NGLISH
9
E
SPAÑOL

5
.
A
v
o
i
d
e
xp
o
s
u
re
t
o
d
i
re
c
t
s
u
n
l
i
g
h
t
fo
r
p
ro
l
o
n
g
e
d
p
e
ri
o
d
s
o
f
t
i
m
e
.
D
u
ri
n
g
p
e
a
k
s
u
n
l
i
g
h
t
h
o
u
rs
,
u
s
e
d
ra
p
e
s
o
r
b
l
i
n
d
s
t
o
m
i
n
i
m
i
ze
t
h
e
d
i
re
c
t
s
u
n
l
i
g
h
t
o
n
t
h
e
allure
fl
o
o
r
.
M
o
s
t
t
yp
e
s
o
f
fl
o
o
ri
n
g
w
i
l
l
b
e
a
ffe
c
t
e
d
b
y
c
o
n
t
i
n
u
o
u
s
s
t
ro
n
g
s
u
n
l
i
g
h
t
.
To
a
v
o
i
d
a
n
u
n
e
v
e
n
a
p
p
e
a
ra
n
c
e
,
p
l
e
a
s
e
c
o
n
s
i
d
e
r
re
l
o
c
a
t
i
o
n
s
o
f
a
n
y
a
re
a
ru
g
s
fro
m
t
i
m
e
t
o
t
i
m
e
.
I
n
a
d
d
i
t
i
o
n
,
e
xc
e
s
s
i
v
e
t
e
m
p
e
ra
t
u
re
s
a
re
n
o
t
g
o
o
d
fo
r
re
s
i
l
i
e
n
t
fl
o
o
rs
.
S
o
m
e
n
a
t
u
ra
l
v
e
n
t
i
l
a
t
i
o
n
o
r
i
n
t
e
r
m
i
t
t
e
n
t
a
i
r
c
o
n
d
i
t
i
o
n
i
n
g
i
n
v
a
c
a
n
t
h
o
m
e
s
s
h
o
u
l
d
b
e
c
o
n
s
i
d
e
re
d
.
L
o
n
g
t
e
r
m
c
o
n
t
i
n
u
o
u
s
i
n
s
i
d
e
t
e
m
p
e
ra
t
u
re
s
o
v
e
r
9
5
º
F
d
e
g
re
e
s
c
o
m
b
i
n
e
d
w
i
t
h
s
t
ro
n
g
d
i
re
c
t
s
u
n
l
i
g
h
t
w
i
l
l
d
a
m
a
ge
your
allure
fl
oor
a
nd
c
a
us
e
t
he
ins
t
a
l
l
a
t
ion
t
o
fa
il
.
6.
D
o
NOT
us
e
a
s
t
ea
m
c
l
ea
ner
on
allure
fl
ooring
a
s
it
m
a
y
res
ul
t
in
p
erm
a
nent
d
a
m
a
ge
t
o
your
fl
oor
a
nd
wil
l
void
t
he
wa
rra
nt
y.
H
ELPFUL HINT #
6
: To
a
void
yel
l
owing
from
a
s
p
ha
l
t
d
rivewa
ys
or
p
a
rking
l
ot
s
,
a
l
wa
ys
us
e
d
oorm
a
t
s
a
t
ent
ra
nc
ewa
ys
.
It
’s
a
good
id
ea
t
o
us
e
a
ha
rd
s
urfa
c
e
fl
oor
a
t
t
a
c
hm
ent
when
va
c
uum
ing
your
allure
fl
oor.
Regular maintenance:
1.
Food
s
p
il
l
s
s
houl
d
b
e
c
l
ea
ned
up
a
s
ra
p
id
l
y
a
s
p
os
s
ib
l
e
wit
h
a
q
ua
l
it
y
l
iq
uid
vinyl
c
l
ea
ner.
Ma
ke
s
ure
t
he
c
l
ea
ner
you
c
hoos
e
is
a
n
a
l
l
-
p
urp
os
e
l
iq
uid
c
l
ea
ner
t
ha
t
is
NO
N-
ABRASIVE.
We do not recommend powdered cleaners, oil
soaps, dishw
ashi
ng
detergents, or other dusting
products. Tr
y
to use a non-rinsi
ng, biodeg
rad-
able cleaner that leaves no resi
due or haz
e
and requires no ri
nsing after applicati
on.
2. I
f allure
Si
ng
le Step i
s not readily
av
ailable,
then you may
obtai
n i
t directly
from Halstead.
See i
nstructions on how
to purchase this cleaner,
and other helpful products from Halstead on
page 13.
3. Shoe marks and scuffs can be easily removed
using a spot application of your
allure
Single
Step and a green Scotch Brite pad.
5
.
Ev
it
a
l
a
ex
p
o
s
ic
ió
n
p
ro
l
o
n
ga
d
a
a
l
a
l
u
z
d
irect
a
d
el
s
o
l
.
En
h
o
ra
s
d
e
mu
c
h
o
s
o
l
,
u
s
a
c
o
r
t
in
a
s
o
p
ers
ia
n
a
s
p
a
ra
ev
it
a
r
ex
p
o
n
er
t
u
p
is
o
a
llu
re
d
i-
rect
a
men
t
e
a
l
s
o
l
.
L
a
ma
y
o
ría
d
e
l
o
s
p
is
o
s
s
o
n
a
f
ect
a
d
o
s
p
o
r
l
a
ex
p
o
s
ic
ió
n
c
o
n
t
in
u
a
a
l
a
l
u
z
d
el
s
o
l
.
P
a
ra
ev
it
a
r
u
n
a
a
p
a
rien
cia
d
es
igu
a
l
,
p
o
r
f
a
v
o
r
c
a
mb
ia
d
e
l
u
ga
r
l
a
s
a
l
f
o
mb
ra
s
d
e
á
rea
,
d
e
v
ez
en
c
u
a
n
d
o
.
Ad
emá
s
,
l
a
s
t
emp
era
t
u
ra
s
ex
t
rema
s
n
o
s
o
n
b
u
en
a
s
p
a
ra
p
is
o
s
res
is
t
en
t
es
.
En
v
iv
ien
d
a
s
d
es
o
cu
p
a
d
a
s
,
es
reco
men
d
a
b
l
e
v
en
t
il
a
r
d
e
ma
n
-
era
n
a
t
u
ra
l
o
u
s
a
r
el
a
ire
a
c
o
n
d
ic
io
n
a
d
o
d
e
ma
n
-
era
in
t
er
mit
en
t
e.
Temp
era
t
u
ra
s
in
t
erio
res
c
o
n
s
t
a
n
t
es
d
e
má
s
d
e
9
5
º
gra
d
o
s
F
en
co
mb
in
a
c
ió
n
c
o
n
l
a
ex
p
o
s
ic
ió
n
a
l
a
l
u
z
d
irec
t
a
d
el
s
o
l
c
a
u
s
a
rá
d
a
ñ
o
s
a
t
u
p
is
o
a
llu
re
y
h
a
rá
q
u
e
l
a
in
s
t
a
l
a
c
ió
n
f
ra
c
a
s
e.
6.
NO
us
e
un
l
impiador
de
v
apor
en
el
s
uel
o
de
allure
ya
que
puede
c
aus
ar
dañ
os
perman
en
t
es
a
s
u
pis
o
y
an
ul
ar
l
a
garan
t
ía
CONS
EIL UTILE no 6
:
Para
ev
it
ar
que
el
pis
o
s
e
v
uel
v
a
amaril
l
en
t
o
debido
al
as
fal
t
o
de
l
as
en
t
radas
de
garaje
o
es
t
ac
ion
amien
t
os
,
us
a
s
iempre
t
apet
es
en
l
as
en
t
radas
.
Es
buen
a
idea
que
us
es
el
ac
ces
orio
para
pis
os
duros
de
l
a
as
piradora
al
as
pirar
t
u
pis
o
allure
.
Mantenimiento regular:
1.
De
rra
m
e
s
d
e
com
i
d
a
;
d
e
b
e
n
li
m
p
i
a
rse
lo
m
á
s
p
ron
to
p
osi
b
le
con
un
li
m
p
i
a
d
or
lí
q
ui
d
o
d
e
ca
li
d
a
d
p
a
ra
vi
n
i
lo.
A
se
gúra
te
d
e
q
ue
e
l
li
m
p
i
a
d
or
q
ue
use
s
se
a
lí
q
ui
d
o,
m
ulti
p
rop
ósi
to
y
N
O
A
B
R
A
S
IVO.
N
o
re
com
e
n
d
a
m
os
limpiadores en polvo, jabones aceitosos,
detergentes para platos u otros productos
contra el polvo. Intenta usar un limpiador
biodegradable que no necesite enjuagarse
y que no deje residuos o capas después de
aplicarse.
2. Si
allure
Single Step no está disponible,
puedes obtenerlo directamente de Halstead.
Ver instrucciones sobre cómo comprar este
producto y otros productos de utilidad de
Halstead en la página 13.
3. Las marcas y rasponazos de zapatos pueden
limpiarse fácilmente, aplicando sobre la
mancha allure
Single Step con una esponja
verde de Scotch Brite.
E
NGLISH
10
E
SPAÑOL

4. R
e
g
u
l
ar
h
o
u
s
e
h
o
l
d dir
t
c
an
be
c
l
e
an
e
d w
it
h
y
ou
r
a
llu
re
Sin
g
l
e
St
e
p appl
ie
d as
in
dic
at
e
d on
t
h
e
pr
odu
c
t
'
s
l
abe
l
. Som
e
h
an
d w
ipin
g
m
ay
be
r
e
qu
ir
e
d t
o
r
e
m
o
v
e
t
o
u
g
h
s
pot
s
an
d s
pil
l
s
. Al
w
ay
s
sw
e
e
p
o
r
v
a
cuum
y
o
ur
al
l
ur
e
fl
o
o
r
b
e
fo
r
e
cl
e
a
n
i
n
g
so
t
h
a
t
a
l
l
l
o
o
se
d
i
r
t
a
n
d
p
a
r
t
i
cl
e
s
a
r
e
r
e
mo
v
e
d
.
Fo
r
be
s
t
r
e
s
u
l
t
s
do
n
o
t
u
s
e
c
o
m
bin
at
ion
c
l
e
an
e
r
/f
in
is
h
pr
o
du
c
t
s
.
5.
D
o
N
O
T
WA
X
YO
U
R
al
l
u
r
e FLO
O
R
!
T
h
e
s
u
r
f
ace
o
f
yo
u
r
T
r
af
f
i
cM
A
S
T
E
R
al
l
u
r
e
f
l
o
o
r
i
s
v
e
r
y de
n
s
e
an
d n
o
n
-po
r
o
u
s
;
th
i
s
pr
e
v
e
n
ts
wax f
r
o
m
pe
n
e
tr
ati
n
g
an
d th
u
s
wi
l
l
bu
i
l
d u
p
a be
d f
o
r
ye
l
l
o
wi
n
g
an
d di
r
t
co
l
l
e
cti
o
n
.
T
h
e
s
am
e
n
o
n
-po
r
o
u
s
f
e
atu
r
e
al
s
o
pr
o
-
vi
des
all the protecti
on agai
nst
wear and stai
ni
ng
that
you wi
ll need. U
se only
allure
Sin
g
l
e
St
e
p
for
heavy wear when you have
experi
enced some loss
of the ori
gi
nal appearance over ti
me. Your T
raffi
c
-
MA
S
TER
allu
re floor has
been desi
gned to be very
easy to mai
ntai
n, but you may prefer to add an oc
-
casi
onal
coat of the allure
Sin
g
l
e
St
e
p
to renew
and
protect your
floor. If
you cannot locate the
allure
Sin
g
l
e
St
e
p
,
then
please
ask
your Home
Depot
repr
e
se
n
t
a
t
iv
e
for
a
n
e
q
uiv
a
l
e
n
t
l
ow
-
g
l
os
s
p
r
od
uct
. Ad
d
it
ion
a
l
l
y, t
h
e
allu
r
e
S
i
ngle
S
tep
is
a
v
a
il
a
b
l
e
d
ir
e
ct
l
y
fr
om Ha
l
s
t
e
a
d
. Se
e
p
a
g
e
13
on
h
ow
t
o
order.
6. If y
o
ur
fl
o
o
r
h
as be
e
n
e
x
po
se
d t
o
e
x
ce
ssiv
e
amo
un
t
s o
f w
at
e
r
due
t
o
fl
o
o
din
g
, do
n
’t
pan
ic,
Tr
afficM
AST
ER allure
U
LTR
A
L
o
ckin
g
Til
e
is
w
at
e
r
pr
o
o
f! Simpl
y
r
e
mo
v
e
t
h
e
w
at
e
r
as quickl
y
as po
ssibl
e
w
it
h
a We
t
-
Vac o
r
o
t
h
e
r
de
v
ice
an
d
venti
late the room. A
dehumi
di
fi
er should be promptly
tur
ned on in the room to reduce the moisture levels
b
a
ck to norma
l. D
o not d
ry the room b
elow the
norma
l moistu
re level that exis
ted p
revious
ly.
7. If
a
cc
id
enta
l d
eep
scratches a
pp
ear on your f
loor
then it might b
e neces
s
ary to rep
la
ce such
da
maged
tiles. Rememb
er HELPFUL HI
NT #5,
plea
se refer to this section for repla
cing a
tile
of
a
l
lure
.
8. If the scratches are fine and the result of normal
household use, then it is recommended only to fill
them with one or two coats of the TrafficMASTER
Matte Floor Finish.
9. If the problem persists, contact your Home Depot
representative or Halstead’s Consumer Hot Line at
1-866-843-8453.
4
.
La
s
u
cie
dad
nor
m
al
de
l
hog
ar
pu
e
de
lim
piars
e
aplicando
tu
a
l
l
u
re
S
ing
le
S
te
p
s
e
g
ú
n
las
ins
tr
u
ccione
s
de
la
e
tiqu
e
ta.
P
u
e
de
s
e
r
ne
ce
s
ario
lim
piar
a
m
ano
las
m
anchas
y
de
r
ram
e
s
dif
ícile
s
.
S
ie
m
pre
barre
o
as
pira
tu
pis
o
a
l
l
u
re
ante
s
de
lim
piarlo,
para
e
lim
inar
e
l
polvo
y
las
par
tícu
las
.
P
ara
m
e
jore
s
r
e
s
u
ltados
no
u
s
e
s
u
na
com
binación
de
lim
piador/
pr
odu
ctos
para
acabado.
5.
¡
N
o
E
N
C
E
R
E
S
T
U
P
I
S
O
al
l
ur
e
!
L
a
su
p
e
r
f
i
c
i
e
d
e
t
u
p
i
so
T
r
a
ff
i
c
MAS
T
E
R
e
s
mu
y
d
e
nsa
y
no
p
o
r
o
sa
,
e
ll
o
e
vi
t
a
q
u
e
la
c
e
r
a
p
e
ne
t
r
e
y
,
p
o
r
e
nd
e
,
e
st
a
se
a
c
u
mu
l
a
f
o
r
ma
nd
o
u
na
c
a
p
a
a
ma
r
i
l
le
nt
a
q
u
e
r
e
t
i
e
ne
la
su
c
i
e
d
a
d
.
E
sa
mi
sma
c
o
nd
i
c
i
ó
n
no
p
o
r
o
sa
t
a
mb
i
é
n
d
a
t
o
d
a
la
p
r
o
t
e
c
c
i
ó
n
ne
c
e
sa
r
i
a
a
t
u
p
i
so
c
o
nt
r
a
e
l
d
e
sg
a
st
e
y
la
s
ma
nc
ha
s.
U
sa
só
l
o
allu
re
S
ing
le
S
te
p par
a de
s
g
as
te
fue
rte
, cuando
s
e
haya pe
r
dido alg
o de
la aparie
ncia or
ig
inal
con e
l tie
mpo. Tu pis
o T
r
afficMAS
TER allu
re
e
s
tá he
cho par
a facilitar e
n g
r
an me
dida s
u
mante
nimie
nto, pe
r
o e
n ocas
ione
s
pue
de
s
aplicar
una capa de
allu
re
S
ing
le
S
te
p par
a
re
novar
y prote
g
e
r tu pis
o. S
i no cons
ig
ue
s
allu
re
S
ing
le
S
te
p, por favor
píde
le
a tu re
pr
e
s
e
ntante
de
The
Home
De
pot un pr
oducto e
quivale
nte
de
poco br
illo. Ade
más
allu
re
S
ing
le
S
te
p pue
de
adquir
ir
s
e
dire
ctame
nte
de
Hals
te
ad. Cons
ulta
la pág
ina 1
3
par
a ve
r
cómo or
de
nar
.
6.
Si
tu
p
i
so
h
a
si
d
o
exp
u
esto
a
ca
n
ti
d
a
d
es
exc
esi
v
a
s
de
ag
ua, de
bido a una inundación, no te
as
us
te
s
, ¡las
los
as
e
ntralaz
able
s
T
rafficMas
te
r
al-
lu
re
ULTR
A e
s
impe
rme
able
!
S
imple
me
nte
s
e
ca e
l ag
ua lo más
pronto
pos
ible
con una as
piradora para us
o e
n mojado
u otro dis
pos
itivo, y ve
ntila la habitación. U
n
deshumidificador debe usarse inmediatamente
en la habitación para que los niveles de
humedad vuelvan a su punto normal. No seques
la habitación por debajo del nivel de humedad
que había anteriormente.
7. Si aparecen accidentalmente rayones profundos
en el piso, es posible que debas reemplazar las
tablas dañadas Recuerda el CONSEJO ÚTIL núm.
5, por favor consulta esa sección al reemplazar
una tabla allure
.
8. Si los rayones son finos, y son el resultado del uso
normal doméstico, se recomienda sólo rellenarlos
con una o dos capas de TrafficMASTER para
pisos de acabado mate.
9.
Si el problema continúa, contacta a un representante
de The Home Depot o a la línea de Servicio al
Cliente de Halstead al 1-866-843-8453.
E
NGLISH
11
E
SPAÑOL

Fi
rs
t
a
i
d
f
o
r
yo
u
r
allu
re
f
l
o
o
r
1
.
Y
o
u
m
a
y
re
m
o
v
e
c
h
e
w
i
n
g
g
u
m
,
a
d
h
e
s
i
v
e
,
c
ra
yo
n
,
c
a
n
d
l
e
w
a
x,
a
n
d
s
i
m
i
l
a
r
t
yp
e
s
u
b
s
t
a
n
c
e
s
b
y
a
p
p
l
yi
n
g
i
c
e
u
n
t
i
l
i
t
b
e
c
o
m
e
s
b
ri
t
t
l
e
e
n
o
u
g
h
t
o
c
ru
m
b
l
e
o
ff.
T
h
e
re
s
i
d
u
e
m
a
y
b
e
re
m
o
v
e
d
w
i
t
h
m
i
n
e
ra
l
s
p
i
ri
t
s
.
2
.
E
xt
ra
d
e
e
p
h
e
e
l
m
a
rks
,
c
a
s
t
e
r
m
a
rks
e
t
c
.
:
ru
b
w
i
t
h
g
re
e
n
S
c
o
t
c
h
B
ri
t
e
p
a
d
d
a
m
p
e
n
e
d
w
i
t
h
allure
S
i
n
g
l
e
S
t
e
p
.
3
.
Fo
r
m
o
d
e
ra
t
e
t
o
h
e
a
v
y
s
t
a
i
n
s
c
a
u
s
e
d
b
y
l
o
n
g
s
t
a
n
d
i
n
g
w
a
t
e
r
o
r
o
t
h
e
r
n
o
n
-
d
ye
l
i
q
u
i
d
s
:
R
u
b
wit
h
allure
Singl
e
St
ep
.
4.
For
d
a
rk
s
p
ot
s
c
a
us
ed
b
y
ink
or
ot
her
c
hem
ic
a
l
s
,
c
l
ea
n
s
p
ot
a
s
p
er
#2
a
b
ove.
If
not
s
uc
c
es
s
ful
,
t
hen
t
he
a
ffec
t
ed
t
il
e
s
houl
d
b
e
rep
l
a
c
ed
a
s
p
er
H
ELPFU
L
H
INT
#5
of
t
he
“Ins
t
a
l
l
ing
allure”
s
ec
t
ion.
5.
Anim
a
l
a
nd
d
ia
p
er
s
t
a
ins
s
houl
d
b
e
t
rea
t
ed
s
a
m
e
a
s
#3
a
b
ove.
6.
Ciga
ret
t
e
b
urns
if
not
d
eep
,
t
hen
p
roc
ed
ure
#2
a
b
ove
s
houl
d
work.
If,
however,
t
hey
a
re
very
d
eep
t
hen
t
he
a
ffec
t
ed
t
il
e
s
houl
d
b
e
rep
l
a
c
ed
a
s
p
er
H
ELPFUL
H
INT
#5
of
t
he
“Ins
t
a
l
l
ing
allure”
s
ec
t
ion.
If
you
ha
ve
a
ny
q
ues
t
ions
or
c
onc
erns
a
b
out
c
a
ring
for
your
Tra
ffic
MAST
ER
allure
fl
oor
p
l
ea
s
e
c
ont
a
c
t
H
om
e
D
ep
ot
or
H
a
l
s
t
ea
d
a
t
1-866-843-8453,
or check out our web site
at myDIYgenius.com. You can also e-mail us
directly at:
TrafficMASTER@halsteadintl.com
Pr
i
m
e
r
o
s
au
x
i
l
i
o
s
par
a t
u
pi
s
o
al
l
u
re
1
.
P
u
ed
es
elim
ina
r go
m
a
d
e m
a
s
ca
r, a
d
hes
ivo
s
,
crey
ó
n, cera
d
e vela
, y
s
u
s
t
a
ncia
s
s
im
ila
res
,
a
p
lica
nd
o
hielo
ha
s
t
a
q
u
e la
s
u
s
t
a
ncia
s
e
vu
elva
q
u
eb
ra
d
iza
y
s
e d
es
m
o
ro
ne. E
l res
id
u
o
p
u
ed
e rem
o
vers
e co
n a
lco
ho
les
m
inera
les
.
2.
Ma
rca
s p
ro
f
u
n
d
a
s d
e ta
co
n
es, ru
ed
a
s etc.:
f
ro
ta
co
n
u
n
a
esp
o
n
ja
verd
e Sco
tch
Brite
m
o
ja
d
a
en
allur
e Sin
g
le Step
.
3
. Par
a
man
c
h
as
mo
de
r
adas
a
di
fí
c
i
l
e
s
c
aus
adas
po
r
ag
ua
e
s
t
an
c
ada
po
r
l
ar
g
o
t
i
e
mpo
u
o
t
r
o
s
líquido
s que n
o
man
ch
en
: Fro
t
a co
n
a
llure
Sin
gle St
ep.
4
. Para manchas
o
s
curas
de t
int
a u o
t
ro
s
químico
s
,
limpia s
egún lo
indicado
en el mét
o
do
núm. 2
,
arriba. Si no
t
ienes
éxit
o
, s
e debe reemplazar
la t
abla afect
ada s
egún el CONSEJO ÚTIL núm.
5
de la s
ecció
n “Ins
t
alar
a
llu
re”.
5
. Manchas
caus
adas
po
r animales
o
pañales
deben t
rat
ars
e co
n el mét
o
do
núm. 3
, arriba.
6
. E
n el cas
o
de quemaduras
de cigarrillo
, no
pro
fundas
, el pro
cedimient
o
núm. 2
. arriba,
debería funcio
nar. Si la quemadura es
pro
funda, s
e debe reemplazar la t
abla
afect
ada s
egún el CONSEJO ÚTIL núm.
5
de la s
ecció
n de “Ins
t
alar
a
llu
re” .
Si t
ienes
pregunt
as
o
dudas
s
o
bre có
mo
cuidar
de tu piso TrafficMASTER
allure contacta a The
Home Depot o a Halstead al
1-866-843-8453,
o
visita nuestro sitio en Internet myDIYgenius.com.
También puedes enviarnos un email, directamente
E
NGLISH
12
E
SPAÑOL

O
r
de
r
i
n
g
addi
ti
on
al
pr
oduc
ts
If
a qu
al
it
y
n
o
-
w
ax
v
in
y
l
c
l
e
an
e
r
o
r
t
h
e
Tr
af
f
ic
M
AST
E
R
M
at
t
e
Fin
is
h
ar
e
n
o
t
av
ail
abl
e
at
t
h
e
Hom
e
D
e
po
t
f
or
an
y
r
e
as
o
n
, y
o
u
m
ay
o
bt
ain
s
u
it
abl
e
pr
odu
c
t
s
f
r
om
Hal
s
t
e
ad N
.E
. Co
r
p. by
s
e
n
din
g
a w
r
it
t
e
n
r
e
qu
e
s
t
t
o
:
Ha
l
s
t
e
a
d
N.E
. Cor
p
., 1
5
O
a
k
wood
Ave
n
u
e
Nor
wa
l
k
, CT
0
6
8
5
0
P
l
e
as
e
in
c
l
u
de
a c
h
e
c
k or
m
o
n
e
y
o
r
de
r
f
o
r
an
y
pr
odu
c
t
s
r
e
qu
ir
e
d, or
y
ou
m
ay
c
al
l
1
-
8
6
6
-
8
4
3
-
8
4
5
3
.
a
llu
re
S
i
ngl
e
S
t
e
p
S
o
ft
S
a
t
i
n
$15.99 pe
r
qu
ar
t
(
c
o
v
e
r
s
500 s
q.f
t
.)
allure
S
ingle
S
tep
Rich
Glo
ss
$15.99 pe
r
quar
t
(cov
e
r
s 500 sq.ft
.)
Addit
io
n
al
it
e
ms:
allure
Rep
a
ir
T
a
p
e
$15.99 pe
r
r
ol
l
(75’ pe
r
r
o
l
l
)
Pl
e
ase
add $5.95 fo
r
sh
ippin
g
an
d h
an
dl
in
g
.
Reminder
s!
1.
R
e
t
ain
y
o
ur
Home
De
pot
sal
e
s r
e
ce
ipt
.
2.
Ke
e
p r
e
co
r
ds o
f t
h
e
st
y
l
e
an
d r
un
n
umbe
r
of y
o
ur
allure
t
il
e
s, t
h
is appe
ar
s o
n
t
h
e
out
side
of t
h
e
car
-
t
on
al
on
g
side
t
h
e
bar
code
.
3.
Ke
e
p r
e
co
r
d o
f t
h
e
dat
e
s t
h
at
y
o
u r
e
fr
e
sh
e
d y
o
ur
fl
o
o
r
w
it
h
t
h
e
M
at
t
e
Fl
o
or
Fin
ish
. Do
n
o
t
appl
y
mor
e
t
h
an
4 coat
s t
ot
al
. If y
o
u n
e
e
d t
o
appl
y
mor
e
t
h
an
4 coat
s use
a v
in
y
l
st
r
ippe
r
t
o
r
e
mov
e
t
h
e
pr
e
v
iousl
y
appl
ie
d fl
o
or
fin
ish
.
STY
LE of
Tra
ff
ic
MASTER
all
ure
ULTRA
Loc
king Tile :
Ru
n nu
mbers:
email: T[email protected]
Orde
n
ar pro
du
ct
o
s
adicio
n
ale
s
S
i
u
n
l
imp
ia
d
o
r
d
e
c
a
l
id
a
d
,
s
in
cera
,
o
el
T
ra
ff
ic
M
AS
TER
p
a
ra
p
is
o
c
o
n
a
ca
b
a
d
o
ma
t
e
n
o
es
t
á
n
d
is
p
o
n
ib
l
es
en
Th
e
H
o
me
D
ep
o
t
,
p
o
r
c
u
a
l
q
u
ier
ra
zó
n
;
p
u
ed
es
o
b
t
en
er
p
ro
d
u
ct
o
s
a
p
ro
p
ia
d
o
s
d
e
H
a
l
s
t
ea
d
N.
E.
C
o
rp
.
,
med
ia
n
t
e
u
n
a
s
o
l
ic
it
u
d
p
o
r
es
crit
o
a
:
Ha
l
s
t
e
a
d
N
.E
. C
o
rp
.,1
5
O
a
k
w
o
o
d
A
v
e
n
ue
,
N
o
r
w
a
l
k
, C
T
0
6
8
5
0
P
o
r
f
a
v
o
r
in
c
l
u
y
e
u
n
ch
eq
u
e
o
giro
p
o
s
t
a
l
co
n
l
a
c
a
n
t
id
a
d
req
u
erid
a
p
a
ra
co
mp
ra
r
c
u
a
l
q
u
iera
d
e
l
o
s
p
ro
d
u
ct
o
s
,
o
l
l
a
ma
a
l
8
7
7
-
8
2
7
-
5
7
7
9
.
a
llu
re
S
i
n
g
l
e
S
t
epS
o
f
t
S
at
i
n
$
1
5
.
9
9
p
o
r
u
n
cuart
o
de
gal
ón
(rin
de
500
pies
c
uad.
)
allure
Si
ngl
e St
epR
i
c
h Gl
os
s
$15.
99
por
un
c
uart
o
de
gal
ón
(rin
de
500
pies
c
uad.
)
Art
ícul
os
adic
ion
al
es
:
Ci
nt
a de r
epar
ac
i
ón allure
$15.
99
por
rol
l
o
(75’
por
rol
l
o)
Por
fav
or
in
c
l
uye
$5.
95
por
en
v
ío
y
man
ejo.
¡Recuerda!
1. C
on
s
er
v
a
t
u
recibo
de
v
en
t
a
de
Th
e
H
ome
D
epot
.
2. An
ot
a
el
es
t
il
o
y
n
úmero
de
l
ot
e
de
t
us
t
abl
as
allure
,
es
t
e
aparec
e
en
el
ext
erior
de
l
a
c
aja,
al
l
ado
del
c
ódigo
de
barras
.
3.
An
ot
a
l
as
fech
as
en
que
refres
c
as
t
e
t
u
pis
o
con
el
Acabado
para
Pis
os
M
at
e.
No
apl
iques
más
de
4 capas en total. Si necesitas aplicar más de 4
capas, usa un removedor de vinilo para quitar la
capa de acabado aplicada anteriormente.
ESTILO de las losas entralazables TrafficMaster
al
-
lure
ULTRA
:
Números de lote:
email: T[email protected]
E
NGLISH
13
E
SPAÑOL

10
Life
t
ime
R
e
side
n
t
ial
L
imit
e
d War
r
an
t
y
10-
Y
e
ar
Ful
l
Comme
r
cial
Limit
e
d War
r
an
t
y
Hal
st
e
ad Ne
w
En
g
l
an
d w
il
l
fur
n
ish
r
e
pl
ace
me
n
t
fl
oo
r
in
g
fr
e
e
of ch
ar
g
e
if t
h
e
r
e
is a l
o
ss o
f or
ig
in
al
pat
t
e
r
n
or
co
l
o
r
un
de
r
n
o
r
mal
r
e
side
n
t
ial
use
of
allure
fo
r
as l
on
g
as t
h
e
pur
ch
ase
r
co
n
t
in
ue
s t
o
r
e
main
in
t
h
e
r
e
side
n
ce
of t
h
e
or
ig
in
al
in
st
al
l
at
io
n
pr
o
v
ide
d t
h
e
fl
o
or
in
g
is in
st
al
l
e
d an
d main
t
ain
e
d
acco
r
din
g
t
o t
h
e
in
st
r
uct
io
n
s in
cl
ude
d. T
h
is w
ar
r
an
t
y
is n
o
n
t
r
an
sfe
r
abl
e
an
d pr
o-
r
at
e
d.
T
h
is w
ar
r
an
t
y
doe
s n
ot
in
cl
ude
l
abo
r
o
r
t
h
e
co
st
o
f
l
abo
r
for
in
st
al
l
at
io
n
o
f t
h
e
r
e
pl
ace
me
n
t
fl
oor
in
g
n
or
do
e
s it
in
cl
ude
damag
e
due
t
o impr
o
pe
r
in
st
al
l
at
io
n
or
main
t
e
n
an
ce
, al
kal
is in
t
h
e
subfl
oo
r
o
r
co
n
dit
io
n
s
ar
isin
g
fr
om h
y
dr
o
st
at
ic pr
e
ssur
e
, bur
n
s, t
e
ar
s,
in
de
n
t
at
ion
s, st
ain
s, or
r
e
duct
ion
in
g
l
oss due
t
o
n
o
r
mal
use
an
d o
r
e
x
t
e
r
io
r
appl
icat
io
n
s.
T
h
is w
ar
r
an
t
y
sh
al
l
n
ot
in
cl
ude
l
o
ss o
f t
ime
,
in
co
n
v
e
n
ie
n
ce
, in
cide
n
t
al
e
x
pe
n
se
s (such
as
t
e
l
e
ph
o
n
e
cal
l
s) in
cl
ude
d in
t
h
e
r
e
mov
al
o
r
r
e
in
st
al
l
at
io
n
o
f t
h
e
affe
ct
e
d mat
e
r
ial
, an
d an
y
o
t
h
e
r
in
cide
n
t
al
o
r
co
n
se
que
n
t
ial
damag
e
s.
Some s
ta
tes
do not a
llow the exc
lu
s
ion of
or lim
itations
if
inc
id
enta
l or c
onseq
u
ential d
a
mages
s
o tha
t a
bove
limita
tion a
nd exc
lu
sion ma
y not a
pp
ly to you
.
This
wa
rra
nty gives
you
s
p
ec
if
ic
lega
l rights
a
nd
you
ma
y ha
ve other legal rights
, whic
h va
ries
f
rom s
tate
to state.
This
warra
nty is in lieu of
a
ny other wa
rranties
expressed or implied.
This warranty service is available only by notice to
Halstead New England through the dealer from
whom the purchase was made. Notification must be
accompanied by a copy of the original invoice and
can only be authorized by Halstead.
Halstead N.E. Corp.
15 Oakwood Avenue, Norwalk, CT 06850
E
NGLISH
14
/