Page is loading ...

Please read this manual completely prior to installation. It has been
designed to enhance your experience of installing & maintaining the new
resilient flooring
TrafficMASTER allure
®
ULTRA Locking Tile.
Por favor lee el manual en su totalidad, antes de proceder con la instalación.
Diseñado para facilitar el proceso de instalación y mantenimiento del nuevo
piso resistente
TrafficMASTER allure
®
ULTRA.
Installation / Instalación
Maintenance / Mantenimiento
Accessories / Accesorios
Warranty / Garantía
▲
▲
▲
▲
FLOATING RESILIENT TILE FLOORING
PISO DE LOSA FLOTANTE Y FLEXIBLE
TM ALLURE ULTRA
Locking Tile with SimpleFit
TM
HOM
ENGLISH / SPANISH 11/17/14
Owners Manual
Manual del Usuario
With SimpleFit™ Locking Technology
Con tecnología innovadora SimpleFit™
The Easiest Floor Ever Just Got Easier with Innovative SimpleFit™ Locking Technology
El piso más fácil se ha vuelto más fácil con la innovadora tecnología de encaje SimpleFit™
ANGLE
COLOCA EN ÁNGULO
Unique tap & lock end
joints make installation
easy and fast!
¡Uniones únicas de presión
y encaje en los extremos
hacen que la instalación
sea fácil y rápida!
PRESS
PRESIONA
TAP TO LOCK
GOLPECITO PARA ENCAJAR

introduction
TrafficMASTER allure
®
ULTRA Locking Tile
resilient vinyl flooring features innovative
SimpleFit™ Locking Edge Technology that makes
installation faster and easier than ever ... just
Angle, Press & Tap to Lock!
TrafficMASTER allure
®
ULTRA with
SimpleFit
TM
Locking Technology’s unique end joints
click together like a door latch. Angle the tile into
the long side of another tile, lay that tile down so
that the short ends are close together and press.
Then tap to lock. It's that simple.
TrafficMASTER allure
®
ULTRA is easy to put
together and fast! Tiles lock to each other, not to
your subfloor, via the interlocking strips. It's free
floating. To cut a tile, simply score and snap.
allure’s flexibility allows the tiles to be installed
over existing floors such as natural wood, concrete,
vinyl, linoleum, and even ceramic, saving you time
and money! (See subfloor preparation on page 4.)
TrafficMASTER allure
®
ULTRA Locking Tile
features 23.82" x 12" (60.5 cm x 30.5 cm) tiles
and a luxurious embossing for natural ceramic and
stone beauty and style.
TrafficMASTER allure
®
ULTRA Locking Tile
looks and feels like real ceramic or stone, it’s
WATERPROOF, so it can be installed in moisture
prone areas that traditionally have been “off limits”
for traditional wood flooring and laminate
products, like basements and bathrooms. See
subfloor preparation section on page 4.
TrafficMASTER allure
®
ULTRA Locking Tile
with SimpleFit Locking Technology has a
CBT (Ceramic Bead Technology) coating for
added wear and durability!
Follow the instructions for installation in the next
section and you will be enjoying your beautiful
new floor in just a few hours.
introducción
El piso de vinilo flexible TrafficMASTER allure
®
ULTRA presenta la tecnología innovadora
SimpleFit™ de borde de encaje que hace que la
instalación sea más fácil que nunca... ¡Simplemente
coloca en ángulo, presiona, y da un golpecito para
encajar!
Las uniones únicas de los extremos de
TrafficMASTER allure
®
ULTRA con tecnología
innovadora SimpleFit™ se unen entre sí con sistema
click como un pestillo de puerta. Coloca en ángulo el
tablón en el lado largo de otro tablón, acuesta ese
tablón de manera que los extremos cortos queden
cerca uno de otro y presiona. Luego da un golpecito
para encajar. Así de sencillo.
TrafficMASTER allure
®
ULTRA es fácil de
colocar, ¡y el más rápido! Los tablones encajan entre
sí, no a tu contrapiso, mediante las bandas
interconectables. Flota libremente. Para cortar un
tablón, simplemente marca y parte de un golpe.
La flexibilidad de allure
®
permite que las losas se
puedan instalar sobre pisos existentes, como los de
madera natural, concreto, vinilo, linóleo e incluso
cerámica, ¡ahorrándote tiempo y dinero! (Consulta la
preparación del contrapiso en la página 4).
TrafficMASTER allure
®
ULTRA es de 60.5 cm x
30.5 cm de losa con un relieve elegante que le da la
bella apariencia de piedra natural y estilo.
La losa entralazable TrafficMASTER allure
®
ULTRA luce y se siente como piedra o cerámica
real; es IMPERMEABLE, de manera que puede
instalarse en áreas propensas a la humedad que
tradicionalmente han estado “prohibidas” para pisos
de madera tradicionales y productos laminados,
como sótanos y baños. Consulta la sección sobre la
preparación del contrapiso en la página 4.
¡La losa entralazable TrafficMASTER allure
®
ULTRA tiene un recubrimiento con
Tecnología de Cuentas de Cerámica (CBT,
por sus siglas en inglés) para mayor
resistencia al desgaste y durabilidad!
Sigue las instrucciones de instalación de la siguiente
sección y disfrutarás de un bello piso nuevo en
cuestión de horas.
ENGLISH ESPAÑOL
2

Traffic
M
ASTER
allure
®
U
LTR
A
L
ocking T
ile
ins
tall
ation ins
tr
uctions
Tools
ne
e
d
e
d
•
U
til
ity
k
n
if
e
&
stra
igh
t
e
d
ge
•
M
e
a
surin
g
ta
p
e
•
S
o
f
t
f
a
c
e
d
o
r
rub
b
e
r
m
a
l
l
e
t
•
S
h
e
a
rs
f
o
r
c
uttin
g
a
ro
un
d
irre
gul
a
r
sh
a
p
e
d
obje
cts (
pipe
s)
• 1
/4
" space
rs
• T
apping block
(
optional)
Tiles needed to complete your project
Me
asure
the
le
n
gth &
w
idth of
your room
. If
the
room
h
as alcov
e
s or of
f
se
ts, m
e
asure
th
e
se
se
parate
ly. This w
ill giv
e
you the
square
f
ootage
of
th
e
room
. Purchase
a m
inim
um
of
1
0
% e
xtra to
cov
e
r m
istak
e
s, trim
m
in
g and f
or f
uture
ne
e
ds an
d
or re
place
m
e
nt. Most in
stallation
s re
quire
about
1
0
% ov
e
rage
. How
e
v
e
r th
is can
v
ary de
pe
nding
upon the
room
size
an
d layout.
T
r
afficMASTER
allur
e
®
ULTR
A Lock
in
g Tile
com
e
s in 2
3
.8
2
" x 1
2
" (
6
0
.5
cm
x 3
0
.5
cm
)
tile
s
or 1
.9
8
square
f
e
e
t pe
r tile
. 1
0
tile
s pe
r case
=
1
9
.8
square
f
e
e
t pe
r case
. S
o, if
your room
is 1
0
'
x 10' or 100 sq.ft., we would recommend you
purcha
se
6 cases
(120 sq.ft).
HEL
PFUL
HINT
#1:
For
b
est
resul
ts
i
t
i
s
i
mp
orta
nt
to
p
urcha
se
p
rod
uct
(c
a
ses)
from
the
sa
me
RUN
#
(d
ye
l
ot).
Di
fferent
run
#’s
c
a
n
have
sha
d
e
va
ri
a
ti
ons.
Every
c
a
se
of
a
llure
®
ha
s
the
run
#
p
ri
nted on the ends
of
the
c
a
se.
Run
#
examp
l
e:
30.
08.
2009.
I
f
you
d
o
ha
ve
more than
one
run
#
we hi
g
hl
y
rec
ommend
you
i
nsta
l
l
ti
les
from 4 or 5 different cases from different run #’s at
one time and randomly mix them into the
installation as you go. This will insure a more
natural looking floor.
Instrucciones de instalación
para las losas entralazables
TrafficMASTER allure
®
ULTRA
Herramientas necesarias
• Cuchillo multiuso y regla
• Cinta métrica
• Un mazo de cara suave o goma
• Tijeras para cortar objetos con forma irregular
(tuberías)
• Espaciadores de 1/4"
• Bloque para martillar (opcional)
Losas necesarias para completar tu proyecto
Mide el largo y el ancho de tu habitación. Si la
habitación tiene nichos o salientes, mídelos por
separado. Esto te dará los pies cuadrados de la
habitación. Compra al menos 10% de más para
cubrir errores, para recortes y para necesidades
futuras y/o reemplazos. En la mayoría de los casos,
la instalación requiere un 10% de material
excedente. Sin embargo, esto puede variar según
el tamaño y la distribución de la habitación.
El tamaño de las losas entralazables
TrafficMASTER allure
®
ULTRA es de 60.5 cm x
30.5 cm o 1.98 pies cuadrados (0.18 m²) por losa.
10 losas por caja = 1.84 m² por caja. O sea, si tu
habitación mide 3.05 m x 3.05 m o 9.29 m², te
recomendaríamos que compres 6 cajas (11.15 m²).
CONSEJO ÚTIL NÚM. 1: Para mejores
resultados es importante que compres el producto
(las cajas) del mismo Núm. de LOTE (lote de teñido).
Núms. de lote distintos pueden tener variaciones de
tonalidad. Cada caja de allure
®
tiene el núm. de
lote impreso en los extremos de la caja. Ejemplo de
un núm. de lote: 30.08.2009. Si tienes más de un
núm. de lote, recomendamos especialmente que
instales losas de 4 ó 5 cajas diferentes de lotes con
núm. distintos y que las mezcles aleatoriamente a
medida que avances con la instalación. Esto
garantizará un piso de aspecto más natural.
ENGLISH
3
ESPAÑOL

CA
U
TI
O
N:
D
o not i
ns
ta
l
l
a
l
l
u
re
®
ove
r ca
rp
e
t or
a
ny
f
oa
m
u
nd
e
rl
a
y
m
e
nt. Thi
s
p
rod
u
ct i
s
not s
u
i
ta
b
l
e
f
or a
ny
ou
ts
i
d
e
u
s
e
, s
u
nroom
s
/
s
ol
a
ri
u
m
s
, s
a
u
na
s
, or
room
s
tha
t ha
ve
the
p
ote
nti
a
l
of
f
l
ood
i
ng
. We
a
l
s
o
hi
g
hl
y
re
com
m
e
nd
y
ou
d
o not i
ns
ta
l
l
i
n room
s
or
hom
e
s
tha
t a
re
not te
m
p
e
ra
tu
re
control
l
e
d
. Ex
p
os
u
re
to l
ong
te
r
m
d
i
re
ct s
u
nl
i
g
ht ca
n ca
u
s
e
d
a
m
a
g
e
to y
ou
r
f
l
oor. F
or m
ore
i
nf
or
m
a
ti
on on i
ns
ta
l
l
a
ti
on
s
p
e
ci
f
i
ca
ti
ons
p
l
e
a
s
e
s
e
e
the
cha
r
t on p
a
g
e
5.
C
ond
i
ti
on
allu
r
e
®
p
r
i
or
to i
nsta
l
l
a
ti
on
Y
ou
M
US
T s
tore
a
l
l
u
re
®
hori
zonta
l
l
y
i
n the
room
of
i
ns
ta
l
l
a
ti
on f
or 48 hou
rs
p
ri
or to i
ns
ta
l
l
a
ti
on. Be
s
u
re
the
room
te
m
p
e
ra
tu
re
i
s
b
e
tw
e
e
n 65º
&
85º
F. D
o not
re
m
ove
the
ti
l
e
s
f
rom
the
ca
s
e
d
u
ri
ng
thi
s
a
ccl
a
m
a
ti
on
p
e
ri
od
! Ma
i
nta
i
n thi
s
te
mp
e
ra
ture
d
uri
ng
a
nd
a
f
te
r
i
ns
ta
lla
ti
on (
2 d
a
y
s
mi
ni
mum)
.
Subfloor preparation:
The
subf
loor surf
ace
m
ust be
sm
ooth, f
lat, dry,
cle
an
an
d solid
. C
arpe
t staple
s or adhe
siv
e
re
sidue
m
ust be
re
m
ov
e
d to in
sure
prope
r installation
.
S
ubf
loors sh
ould be
f
lat w
ith
in a tole
rance
of
3
/1
6
" (
5
m
m
)
ov
e
r a span
of
1
0
f
e
e
t. A
n
y
un
e
v
e
n
n
e
ss ov
e
r 3
/1
6
" (
5
m
m
)
m
ust be
sande
d
dow
n or f
ille
d w
ith
a f
loor le
v
e
le
r. V
oids or hum
ps
in
th
e
subf
loor w
ill pre
v
e
n
t
allur
e
®
f
rom
lock
ing
prope
rly.
S
ubf
loors m
ust be
care
f
ully ch
e
ck
e
d f
or m
oisture
proble
m
s.
T
r
afficMASTER
allur
e
®
ULTR
A
Lock
ing Tile
is w
ate
rproof
. It is N
OT a w
ate
r-
proof
e
r. A
n
y m
oisture
proble
m
s n
e
e
d to be
addre
sse
d prior to in
stallation. N
e
w
concre
te
f
loors
need to cure for a minimum of 90 days. For more
i
nfor
ma
ti
on,
see
the
cha
rt on pa
ge
5.
HELPFUL
HIN
T
#2:
If
laying
a
llure
®
over
existing
ceramic
tile, it will
be
necessary
to
skim
coat
the grout
lin
es
with
a
floor leveler
.
If
yo
u in
stall
a
llure
®
over an
existin
g floo
r
that
has
an
embossin
g or
grout
lin
e on
it,
you
must sk
im
coat
with
a
floor
leveler
if th
e
e
mb
ossing
or g
rout li
ne i
s grea
ter tha
n 1/8" — (3 mm).
If you have old, ugly vinyl and don’t want to pay for
an expensive removal and remediating job,
allure
®
is the perfect answer. Any loose or damaged tiles
should be patched prior to installing
allure
®
over the
old floor. Never sand old vinyl floors from any floor
manufacturer, if you think the floor may be over 20
years old.
P
RECAUCIÓN:
N
o instalar allure
®
s
obre alfombras ni
contrapisos de espuma de cualquier tipo. Este producto
no es adecuado para uso en exteriores, terrazas
interiores/solárium, saunas y cuartos donde haya riesgo
de inundación. También recomendamos especialmente
q
ue no lo instales en habitaciones o viviendas sin control
de la temperatura. La exposición directa al sol a largo
p
lazo puede causar daños a tu piso. Para obtener más
información sobre las especificaciones de instalación,
por favor consulte la tabla en la página 5.
Acondiciona allure
®
antes de instalar
DEBES almacenar el piso allure
®
de manera horizontal en
la habitación donde va a instalarse 48 horas antes de la
instalación. Asegúrate de que la temperatura de la
habitación esté entre 65 ºF y 85 ºF (18 ºC y 30 ºC). ¡No
saques las losas de la caja durante este período de
aclimatación! Mantén esta temperatura durante y después
de la instalación (dos días como mínimo).
Preparar el contrapiso:
La superficie del contrapiso debe estar, lisa, plana, seca,
limpia y firme. Se deben quitar los residuos de adhesivo y
las grapas de alfombra para garantizar una instalación
apropiada.
Los contrapisos deben ser planos con un margen de
tolerancia de 3/16" (5mm) a lo largo de 10 pies.
Cualquier desnivel superior a 3/16" (5mm) debe lijarse o
rellenarse con un nivelador de pisos. Hundimientos o
levantamientos en el contrapiso impedirán el ajuste
apropiado de allure
®
.
El contrapiso debe revisarse con cuidado para
garantizar que no tenga problemas de humedad.
TrafficMASTER allure
®
ULTRA es impermeable. Pero
NO es un impermeabilizante. Cualquier problema
relacionado con la humedad debe resolverse antes de
proceder con la instalación. Los pisos nuevos de concreto,
deben curarse por un mínimo de 90 días. Para obtener
más información sobre las especificaciones de
instalación, por favor consulte la tabla en la página 5.
CONSEJO ÚTIL NÚM. 2: Si vas a colocar allure
®
sobre losas de cerámica, se deberá nivelar las líneas de
lechada con un nivelador de pisos. Si vas a instalar
allure
®
sobre otro piso ya instalado que tenga relieves o
líneas de lechada, debes emparejar con un nivelador de
piso si el relieve o la línea de lechada sobrepasan 1/8”—
(3 mm).
Si tienes pisos de vinilo feos o viejos, y no deseas pagar
mucho dinero para quitarlos o renovarlos, allure
®
es la
solución perfecta. Cualquier losa floja o dañada debe
repararse antes de instalar allure
®
sobre el piso viejo.
Nunca lijes ningún piso de vinilo de cualquier fabricante,
si sospechas que puede tener más de 20 años.
ENGLISH
4
ESPAÑOL

ENGLISH ESPAÑOL
Las losas entralazables
TrafficMASTER allure
®
ULTRA ESPECIFICACIONES
DE LA INSTALACIÓN:
TrafficMASTER allure
®
ULTRA LOCKING TILE
INSTALLATION
SPECIFICATIONS:
5
H
D Installable Yes
C
onnection Type SimpleFit™ Locking End Joints (Click)
F
ree Floating Floor Yes. DO NOT screw or nail moldings, transitions, cabinetry
or vents through ANY allure
®
flooring
Acclimation Period 48 hours minimum required in room prior to installation
Temperature Range 65°F to 85°F required in room of installation
After installation temps should stay between 55F to 85F
Interior Product Only Yes. See limitations/exclusions below
Storage Horizontally
D
ye Lots Yes. Install from a minimum of 3 to 4 different boxes and dye lots
at one time. See page 3 of Owner's Manual for more information
Expansion Space Yes. For room perimeters and fixed objects please leave
1/4" minimum space
Floor Flatness Tolerances 3/16" over 10', Use floor leveler when exceeding tolerance
Hand Roller Required No
75 lb min. Floor Roller No
Moisture Reading Guidelines; Based on Tramex Concrete Moisture Encounter Plus Meter
OVER CONCRETE (scale 0 to 6%)
Scale 0 to 5% No moisture barrier
Scale 5% to 6% 6 mil poly barrier necessary; over 6% recommend Dricore
Moisture Reading Guidelines; Never use 6 mil poly over wooden subfloors
OVER WOOD
Scale 0 to 13% OK to install. Do not install above 13% moisture levels
Primer Over Wooden Subfloors No
Basement Proofer over Concrete No
Moisture Barrier (6 mil poly) Yes above 5% only
Installs Over Radiant Flooring Yes. Electric or hydronic approved — best practice recessed
min 1/2" below finished floor. Do not turn thermostat above 85°F
Suspended Wood Floors Yes. 18" minimum well ventilated crawl space
Use moisture barrier over ground/dirt
Especially for mobile home installations
Foam/Cushioned Underlayment No. Voids warranty if used in any application
Approved Subfloors - See Below Must be smooth, solid, dry and no deflection
Wood Yes. Solid, engineered, parquet
Plywood Yes. OSB & particleboard are approved for allure
®
products only
Luan is approved for all products
Vinyl Yes. Linoleum, VCT, LVT, peel & stick
Concrete Yes. Sealed, unsealed, poured in place gypsum.
On grade or below grade (see moisture guidelines)
Tile (Stone) Yes. Ceramic, Terrazzo, stone tile
(grout lines of less than 1/4" is optimum)
Dricore Yes
Subfloors Not Approved Carpet (any type), foam underlayment, cushioned back vinyl,
rubber, cork, laminates
Subfloor Approved Products Primer - Henry 336, Basement Proofer - Custom Building Products
RedGard or TM Basement Proofer, Floor Leveler - Henry 554 &
555 Level Pro
Limitations/Exclusions These types of installations will NOT be covered under warranty:
All exterior installations & seasonal porches, boats/campers/RV's,
sunrooms/solariums, non-temperature controlled rooms or homes
Steam Cleaner DO NOT USE
Vertical Surfaces & Staircases Not covered under warranty. Can be done using high quality
construction adhesive. Product not intended for this usage
Limited Warranties Lifetime residential, 10-year commercial
During Acclimation & Install
I
nstalable por Home Depot Sí
Tipo de conexión La tecnología innovadora SimpleFit™ de borde de encaje (Clic)
P
iso flotante libre Sí. Productos flotantes libres. NO tornillo o clavo molduras, transiciones,
gabinetes o rejillas de ventilación a través de todos los pisos allure
Período de Aclimatación 48 horas requeridas en la habitación de la instalación
65°F a 85°F es necesario en la sala de instalación.
D
espués de la
instalación, las temperaturas deben mantenerse entre 55F a 85F
S
ólo Producto Interior Sí. Ver las limitaciones y exclusiones a continuación
Almacenamiento Horizontalmente
L
otes de teñido Sí. Instalar desde un mínimo de 3 a 4 diferentes cajas y un montón
de tinte simultáneamente. Consulte la página 3 de este manual
para obtener más información
Espacio de expansión Si. Para perímetro de las habitaciones y los objetos fijos por favor
d
eje 1/4 "mínimo espacio
P
iso tolerancias planeidad 3/16" sobre una sección de 10', uso nivelador de piso
c
uando se excede la tolerancia
Rodillo de mano requerido No
75 Lb. /min. rodillo de piso No
Pautas de lectura de humedad; Basado en Tramex Concrete Encounter Plus Medidor de humedad
SOBRE HORMIGÓN (Escala 0 ta 6%)
Escala 0 a 5% No hay barrera de humedad
Escala 5% a 6% 6 Mil poli barrera es necesario; el 6% recomendar Dricore
Pautas de lectura de humedad; Nunca use 6 Mil poli sobre contrapisos de madera
SOBRE MADERA
Escala 0 a 13% OK para instalar. No instale superior al 13% los niveles de humedad
Cartilla sobre contrapisos de madera
No
Sótano armario de fermentación
No
Barrera de humedad (6 mil poly) Sí encima del 5% sólo
Instala sobre suelo radiante Sí. Eléctrico o hydronic aprobado - mejores prácticas rebajado
min 1/2" a continuación piso terminado. No gire el termostato
por encima de 85 °F
Pisos de madera suspendido Sí. 18' Mínimo bien ventilada. Utilizar barrera de humedad sobre
la tierra o suciedad. Especialmente para las instalaciones en
casas rodantes
Espuma/amortiguado contrapiso NO anula la garantía si se utiliza en cualquier aplicación
Contrapisos aprobados - ver abajo Debe ser suave, sólido, seco y sin desviación
Madera Sí. Sólida, diseñada, parquet
Contrachapada Sí. Tableros OSB y son aprobados para allure
®
productos
Luan es aprobado para todos los productos
Vinilo Sí, instalar más de 1 capa de vinilo sólo. Linóleo, VCT, LVT, piel y palo
Hormigón Sí. Sellado, abierta, derramó en su lugar el yeso. De grado o
por debajo del nivel de humedad (ver instrucciones)
Baldosa (piedra) Sí. Cerámica, terrazo, baldosa de piedra (todos con lechada l
íneas menos de 1/4 ")
Dricore Sí
Contrapisos no aprobado Alfombra (de cualquier tipo), deambulan por base acolchada y
vinilo, caucho, corcho, laminados
Contrapisos aprobado Pintura base - Henry 336, Basement Proofer - Custom Building
Products RedGard o TM Basement Proofer, Floor Leveler - Henry
554 y 555 Level Pro
Limitaciones/exclusiones Este tipo de instalaciones no estará cubierto por la garantía: todas las
instalaciones exteriores y porches estacionales, barcos/campistas /RVs,
solarios, no climatizada habitaciones o casas
Limpiadora de vapor NO UTILICE
Escaleras y superficies verticales No cubre la garantía. Puede hacerse utilizando adhesivo de
construcción de alta calidad. Producto no destinado a este uso
Garantías limitadas Vida residencial, comercial de 10 años
Rango de temperatura durante
l
a aclimatación e instalar
sobre hormigón

Ins
t
a
lling
allur
e
®
:
H
ELPF
U
L H
I
NT
#
3
:
B
e
f
o
re
l
a
yin
g
o
ut
th
e
f
l
o
o
r,
c
h
e
c
k
th
e
w
a
l
l
yo
u
a
re
sta
r
tin
g
f
ro
m
a
n
d
m
a
k
e
sure
it
is
sq
ua
re
to
th
e
o
p
p
o
site
w
a
l
l
.
S
im
p
l
y
m
e
a
sure
th
e
ro
o
m
f
ro
m
o
p
p
o
site
e
n
d
s
o
f
th
e
w
a
l
l
to
th
e
f
a
r
w
a
l
l
.
If
th
e
m
e
a
sure
m
e
n
ts
a
re
d
if
f
e
re
n
t,
yo
u
c
a
n
m
a
k
e
a
d
justm
e
n
ts
o
n
th
e
f
irst
ro
w
o
f
a
llu
re
®
b
y
sc
rib
in
g
th
e
til
e
.
1.
La
y
a
r
o
w
o
f
l
o
o
s
e
t
il
es
w
it
h
o
u
t
s
ec
u
r
in
g
t
h
em
to
e
a
c
h
o
th
e
r
f
irst
to
d
e
te
r
m
in
e
if
yo
u
n
e
e
d
to
adjust th
e
le
ngth
of
the
f
irst tile
to av
oid a sm
all pie
ce
of
le
ss
than 1
2
" on the
opposite
w
all
f
rom
w
he
re
you starte
d. Or,
m
e
asure
the
le
ngth of
the
room
and div
ide
by 2
4
" (
le
ngth
o
f
o
ne tile). If the remainder is less
than 12", calculate
½ of
th
e
re
m
ainde
r and trim
this am
ount of
f
th
e
f
irst tile
. T
o calculate
if
you
ne
e
d to trim
th
e
f
irst row
or last row
of
tile
s
le
n
gthw
ise
, m
e
asure
the
room
in
th
e
opposite
dire
ction
(
pe
rpe
n
dicular to the
row
)
and div
ide
by th
e
w
idth
of
a tile
(
1
2
")
to se
e
the
num
be
r of
row
s ne
e
de
d. We
re
com
m
e
n
d the
row
s again
st
the
w
alls be
in
g no le
ss than a 4
" w
ide
row
(Fi
g
u
re
1
)
. A
djust the
f
irst or last row
accordin
gly.
T
o cut a tile
, sim
ply m
e
asure
an
d m
ark
the
tile
,
th
e
n using a straigh
t e
dge
an
d utility k
nif
e
,
sim
ply score
the
tile
and snap.
HEL
PFUL
HINT
#4:
W
hen
c
utti
ng
a
llure
®
d
own the
l
ength
of the ti
l
e,
alwa
ys c
ut
the end with
the
whi
te
l
oc
ki
ng
stri
p
fi
rst
(
Figur
e 2)
.
Cut
throug
h the
l
oc
ki
ng
stri
p
comp
l
etel
y
wi
th
your
uti
l
i
ty kni
fe before
sc
ori
ng
a
nd
sna
p
p
i
ng
the
ti
l
e.
If
you da
ma
ge the
whi
te
l
ocki
ng
stri
p
, or
it b
ec
omes
di
sl
od
g
ed
and
you
c
annot
rei
nsta
l
l
i
t
i
nto
the
end
of
the
ti
l
e,
you
c
an
use a
sma
l
l
b
ea
d
of c
raz
y
g
l
ue
(cya
noa
crylate
a
d
hesi
ve)
i
n
the
groove
of
the
short
end of the
adjoining tile.
2.
allure
®
can be installed from left to right, or
right to left, starting in a corner of a room.
Though you can install in both directions, we
recommend installing from left to right. Select the
wall from which you want the tiles to run
parallel. This will become your starting wall.
Cómo instalar el piso allure
®
:
CONSEJO ÚTIL NÚM. 3: Antes de comenzar a
colocar el piso, verifica que la pared desde la que
empezarás la instalación esté a escuadra en
relación con la pared opuesta. Simplemente mide la
habitación desde los extremos opuestos de la pared
hasta la pared del otro lado. Si las medidas son
diferentes, puedes hacer ajustes en la primera fila
del piso allure
®
contorneando la losa.
1. Primero coloca una fila de losas sueltas, sin
ajustarlas entre sí, para determinar si necesitas
ajustar el largo de la primera losa, de modo que
la tabla en la pared opuesta a la de inicio, no
mida menos de 12" (30.5 cm), o mide la longitud
de la habitación y divide por 24"
(60.5 cm) (longitud de una losa). Si queda menos
de 12" (30.5 cm), calcula la mitad de lo que
sobra y corta esa medida de la primera losa. Para
calcular si necesitas cortar la primera o última fila
de losas en su ancho, mide la habitación en la
dirección opuesta (perpendicular a la línea) y
divide entre el ancho de una losa (12" ó 30.5 cm)
para conocer la cantidad de filas necesarias.
Recomendamos que las filas que se encuentran
con la pared no sean más anchas de 10.2 cm
(Figura núm. 1). Ajusta la primera o la última fila de
acuerdo con esto. La última losa debería tener el
mismo largo que la primera. Para cortar una losa,
simplemente mide y marca la losa, y usa una
escuadra y un cuchillo multiuso para marcar y
partir de un golpe.
CONSEJO ÚTIL NÚM. 4: Al cortar allure
®
Ultra
a lo largo del tablón, siempre corta primero el
extremo con la franja blanca de encaje (Figura núm. 2).
Corta completamente a través de la franja de encaje
con tu cuchilla multiuso antes de marcar y encajar el
tablón. Si dañaras la franja blanca de encaje, o ésta
se desplazara y no pudieras reinstalarla en el extremo
del tablón, puedes usar un hilo pequeño de "cola
loca" (adhesivo de cianoacrilato) en la ranura del
extremo corto del tablón adyacente.
2. TrafficMASTER allure
®
ULTRA e puede
instalar de izquierda a derecha, o de derecha a
izquierda, comenzando desde la esquina de
una habitación. Aunque puedes instalar en
ambas direcciones, recomendamos hacerlo de
izquierda a derecha. Selecciona la pared
respecto a la cual deben uedar paralelos las
losas. Esta será tu pared inicial.
ENGLISH
6
ESPAÑOL

H
ELPF
U
L H
I
NT
#
5:
In
sta
l
l
th
e
til
e
s
p
a
ra
l
l
e
l
to
th
e
so
urc
e
o
f
e
n
te
rin
g
l
igh
t
o
r
to
th
e
l
o
n
ge
st
w
a
l
l
in
th
e
ro
o
m
.
B
e
sure
to
l
e
a
v
e
a
1
/4
"
(
6
m
m
)
ga
p
a
ro
un
d
th
e
p
e
rim
e
te
r
o
f
th
e
ro
o
m
.
U
se
sp
a
c
e
rs
b
e
tw
e
e
n
th
e
w
a
l
l
a
n
d
th
e
til
e
s.
T
h
e
ga
p
w
il
l
b
e
c
o
v
e
re
d
b
y
yo
ur
b
a
se
b
o
a
rd
m
o
l
d
in
g
o
r
q
ua
r
te
r
ro
un
d
(
re
m
o
v
e
e
xistin
g
m
o
l
d
in
gs
p
rio
r
to
in
sta
l
l
a
tio
n
)
(
Fi
g
u
re
3
)
.
3
.
In
sta
l
l
a
tio
n
s
f
ro
m
l
e
f
t
to
righ
t
a
re
re
c
o
m
m
e
n
d
e
d
w
h
e
n
e
v
e
r
p
o
ssib
l
e
.
It
is
e
a
sie
r
to
l
o
c
k
in
th
e
l
o
n
g
sid
e
s
f
ro
m
th
is
d
ire
c
tio
n
.
Fo
r
in
sta
l
l
a
tio
n
s
f
rom
le
f
t to right (
re
com
m
e
nde
d)
,
the
w
hite
lock
in
g strip sh
ould be
on the
le
f
t side
of
the
tile
s. For
installs f
rom
right to le
f
t, the
w
h
ite
lock
ing strip w
ill be
on
th
e
right
side
of
the
tile
s. For both
in
stallations, you w
ill install the
f
irst and se
cond row
s at one
tim
e
. You m
ust
in
stall the
tile
s in
a stagge
re
d m
e
th
od and in
th
e
se
que
n
ce
of
tile
s as show
n
in
Fi
g
u
re
4
.
B
e
sure
to stagge
r th
e
tile
s so th
e
se
am
s are
stagge
re
d by 1
2
" or half
the
tile
.
DO N
OT IN
S
T
A
LL TILES
S
O THE S
EA
MS
A
RE IN
A
UN
IFOR
M S
TRA
IGHT LIN
E.
4
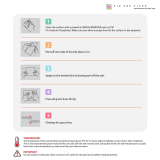
. Whe
n startin
g your f
irst tw
o row
s, lock
tile
s
#
1
&
#
2
(
N
ote
tile
#
2
h
as be
e
n
cut sh
orte
r
in
le
ngth
)
in place
by an
glin
g th
e
tile
’s tongue
an
d groov
e
at an angle
just e
nough to ge
t
your f
inge
rs unde
rn
e
ath th
e
tile
. A
nglin
g the
til
es
any
hi
gher ma
kes i
t hard to get
a g
ood
tig
ht
seam.
You
wil
l
know
when
the ti
l
es a
re
ful
ly
l
oc
ked
when
the
til
es
la
y
fla
t
on the
sub
fl
oor.
DO NOT
REMOVE THE WHITE LOCKI
NG
ST
RI
P
.
Note,
your
fi
rst
ti
l
e
on
the
fi
rst
row
can
b
e
a
ful
l
si
z
ed
ti
l
e
or
c
ut
to
d
esi
red
l
eng
th
d
ep
end
i
ng
up
on
your
room
mea
surements.
HEL
PFUL
HINT
#6:
W
hen
c
utti
ng
a
ti
l
e
of
a
llure
®
to
sta
rt
a
row.
You
wi
l
l
need to
c
ut
off
the end with the white locking strip for both left
to right or right to left installations. The
remaining piece can
then be used on the
opposite side of the room, at the end of that
row if layout permits.
CONSEJO ÚTIL NÚM. 5: Instala los tablones
e
n posición paralela a fuente de luz o la pared
más larga de la habitación. Asegúrate de dejar
un espacio de 6.3 mm alrededor del perímetro de
la habitación. Usa separadores entre los tablones
y las paredes. El espacio será cubierto por la
moldura de zócalo o de cuarto bocel (retira las
molduras existentes antes de la instalación)
(Figura núm. 3).
3. Se recomienda instalar de izquierda a derecha
siempre que sea posible. En esta dirección es
más fácil asegurar los lados largos. Para
instalaciones de izquierda a derecha, la franja
blanca de encaje debe estar del lado izquierdo
de los tablones, y en instalaciones que vayan
de derecha a izquierda debe estar del lado
derecho. Ahora instalarás dos filas a la vez.
Para ambas instalaciones, instalarás la primera
y segunda fila de una vez. Debes instalar los
tablones de manera escalonada y en la
secuencia que se muestra en la Figura núm. 4.
Asegúrate de escalonar los tablones de manera
que las uniones estén escalonadas al menos
20.3 cm. NO INSTALES TABLONES DE
MANERA QUE LAS UNIONES QUEDEN EN
LÍNEA RECTA.
4. Al comenzar con las primeras dos filas, encaja
los tablones núm. 1 y núm. 2 en su lugar
colocando la lengüeta y ranura del tablón en
suficiente ángulo para colocar tus dedos bajo
el tablón. Colocar los tablones en ángulo más
alto dificulta unirlos bien. Sabrás cuándo están
completamente encajados los tablones cuando
queden planos sobre el contrapiso. Usar un
bloque para martillar en el lado largo de los
tablones ayuda a apretar completamente las
uniones y hacer una instalación a escuadra.
Jamás uses un bloque para martillar sobre la
franja blanca de encaje del lado corto de los
tablones. NO QUITES LA FRANJA BLANCA DE ENCAJE.
Ten en cuenta que el primer tablón de la
primera fila puede ser de tamaño completo o
cortarse del tamaño deseado, dependiendo de
las medidas de tu habitación.
CONSEJO ÚTIL NÚM. 6: Al cortar el tablón de
allure
®
para comenzar una fila: Necesitarás
cortar el extremo con la franja blanca de encaje
tanto para instalaciones de izquierda a derecha
como para instalaciones de derecha a izquierda.
Lo que sobre de la tabla puede usarse en el lado
opuesto de la habitación, al final de esa fila, si la
distribución lo permite.
ENGLISH
7
ESPAÑOL

5
. Wh
en
con
n
ect
in
g b
ot
h
a
lon
g s
ea
m
a
n
d
a
s
h
or
t
s
ea
m
t
oget
h
er
(
t
ile #
3
t
o #
1
& #2
)
,
con
n
ect
t
h
e lon
g s
id
e of
t
ile #3 t
o #1 a
n
d
s
lid
e t
h
e s
h
or
t
s
id
e of
t
ile #3 u
p
f
lu
s
h
t
o t
h
e
s
h
or
t
s
id
e of
t
ile #2
. P
r
es
s
f
r
om
t
h
e in
s
id
e
f
ir
s
t
, a
n
d
t
a
p
in
t
o p
la
ce on
t
h
e s
ea
m
wit
h
a
m
a
llet
. Be s
u
r
e t
o m
a
k
e con
t
a
ct
on
t
h
e
s
ea
m
h
it
t
in
g b
ot
h
t
iles
. T
a
p
f
r
om
t
h
e in
s
id
e
cor
n
er
wh
er
e t
h
e t
h
r
ee t
iles
m
eet
ou
t
t
o t
h
e
op
p
os
it
e s
id
e. R
u
n
your
f
in
ger
ov
er
t
h
e
s
ea
m
t
o m
a
k
e s
ur
e t
h
e t
wo en
d
s
of
t
h
e t
iles
a
r
e lev
el wit
h
n
o h
igh
s
p
ot
s
. Us
in
g you
r
f
in
ger
s
, if
you
ca
n
lif
t
u
p
t
h
e t
ile you
ju
s
t
in
s
t
a
lled
, t
h
e
lock
in
g m
ech
a
n
is
m
is
n
ot
f
u
lly en
ga
ged
. T
a
p
a
s
n
eed
ed
u
n
t
il f
u
lly lock
ed
in
p
la
ce.
6
. Now in
stall tiles #
4
, 5 & 6
in
th
e same meth
od as
descr
ibed in
step #
5
an
d con
tin
u
e th
is meth
od f
or
th
e
r
emain
der
of
you
r
1
st an
d 2
n
d r
ows. Th
e r
emain
der
of
th
e in
stallation
is on
e r
ow at a time in
th
e dir
ection
you
ar
e in
stallin
g th
e f
loor. Howev
er, wh
en
th
er
e is
mor
e th
an
on
e per
son
in
stallin
g th
e f
loor, you
can
start
mu
ltiple r
ows at on
e time in
a br
ick patter
n
(
F
ig
ure
5
)
.
7
. F
ittin
g aroun
d ir
regular objects is n
o problem. S
imply
make a patter
n
out of
h
eav
y paper to f
it ar
ou
n
d pipes
or
irr
egular
objects. P
lace th
e patter
n
upon
th
e tile an
d
trace. C
ut alon
g trace lin
es usin
g a utility kn
if
e or
h
eav
y duty scissors, an
d lay tile. Be sure to leav
e a
1
/4" (
6
mm)
ex
pan
sion
space aroun
d all f
ix
ed
objects, f
loor v
en
ts an
d door f
rames.
8
. Wh
en
comin
g to a door way, we recommen
d th
e use
of
T
-moldin
gs to separate rooms an
d h
allways. Be sure
to leav
e a 1
/4" (
6mm)
ex
pan
sion
space un
der th
e
T
-moldin
gs.
I
f yo
u have
any pro
ble
ms o
r que
st
io
ns, call o
ur Customer
He
lp Line
at
1-866-843-8453.
I
MPORTANT
NOTE
:
Inst
all allure
®
at ro
o
m
t
emperat
ure
. Ple
ase
mak
e
sure
your the
rmo
st
at is se
t
abo
ve 65°F - 85°F whe
n installing
allu
re
®
. Roo
m
tempe
rat
ure
is impo
rt
ant
!
5. Al conectar entre sí una unión corta y
una larga (tablón núm. 3 a núm. 1 y núm.
2), conecta el lado largo del tablón núm. 3
al núm. 1 y desliza el lado corto del tablón
núm. 3 al ras del lado corto del tablón
núm. 2. Presiona desde el interior y da un
golpecito para que encaje en la unión
usando un mazo. Asegúrate de hacer
contacto con la unión golpeando ambos
tablones. Golpea desde la esquina donde
se encuentran los tres tablones hacia el
lado opuesto. Pasa tus dedos sobre la
unión para asegurarte de que los dos extremos
de los tablones estén nivelados sin puntos altos.
Si puedes levantar con tus dedos el tablón que
acabas de instalar, el mecanismo de encaje no
se ajustó completamente. Golpea tanto como
sea necesario hasta que encaje completamente
en su lugar.
6. Ahora instala los tablones núm. 4, 5 y 6 con el mismo
método descrito en el paso 5 y continúa con este
método hasta terminar la primera y segunda fila. El
resto de la instalación es una fila a la vez en la
dirección que instalas el piso. Sin embargo, si hay
más de una persona instalando el piso, puedes
empezar varias filas a la vez de manera escalonada
(Figura núm. 5).
7. Instalación alrededor de objetos irregulares: no hay
problema. Sencillamente coloca un patrón de papel
grueso alrededor de tuberías u objetos con forma
irregular. Coloca el patrón sobre la tabla y marca.
Corta siguiendo las líneas trazadas, con la ayuda de
un cuchillo multiuso o tijeras resistentes, y coloca la
tabla. No olvides dejar un 1/4" (6mm) de espacio
de expansión alrededor de objetos fijos, ductos de
ventilación en el piso y marcos de puertas.
8. Al llegar al umbral de una puerta, recomendamos usar
molduras en T para separar habitaciones y pasillos.
Asegúrate de dejar un espacio de expansión de
1/4" (6mm) debajo de las molduras en T.
Si tienes problemas o preguntas, llama a nuestra línea de
Servicio al Cliente al 1-866-843-8453.
NOTA IMPORTANTE: Instale allure
®
a
temperatura ambiente. Por favor, al instalar allure,
asegúrate de que tu termostato esté programado para
una temperatura mayor a los 60º F y por debajo de los
85º F. ¡La temperatura de la habitación es importante!
ENGLISH
8
ESPAÑOL

care &
maintenance
C
ongr
a
t
ul
a
t
ions
!
Y
ou
ha
ve
jus
t
ins
t
a
l
l
ed
T
r
a
f
f
i
c
M
A
S
T
E
R
a
l
l
u
r
e
®
U
L
T
R
A
L
o
c
ki
n
g
T
i
l
e
fro
m
T
h
e
H
o
m
e
D
e
p
o
t
.
Y
o
u
r
n
e
w
re
s
i
l
i
e
n
t
fl
o
o
r
w
a
s
p
ro
d
u
c
e
d
u
n
d
e
r
t
h
e
h
i
g
h
e
s
t
q
u
a
l
i
t
y
s
t
a
n
d
a
rd
s
a
n
d
w
i
l
l
p
ro
v
i
d
e
yo
u
w
i
t
h
a
l
i
fe
t
i
m
e
o
f
e
n
j
o
ym
e
n
t
.
A
l
t
h
o
u
g
h
allure
®
i
s
o
n
e
o
f
t
h
e
e
a
s
i
e
s
t
fl
o
o
rs
t
o
m
a
i
n
t
a
i
n
,
p
l
e
a
s
e
fo
l
l
o
w
t
h
e
re
c
o
m
m
e
n
d
a
t
i
o
n
s
i
n
t
h
i
s
g
u
i
d
e
t
o
re
t
a
i
n
t
h
e
fre
s
h
l
o
o
k
a
n
d
p
ro
t
e
c
t
t
h
e
fa
c
t
o
r
y
fi
n
i
s
h
.
Preventive maintenance:
1.
Us
e
NO
N-
RUBBER
p
rot
ec
t
ive
m
a
t
s
in
front
of
a
ny
d
oors
l
ea
d
ing
t
o
t
he
out
s
id
e.
This
hel
p
s
keep
t
he
s
a
nd
a
nd
grit
from
get
t
ing
on
t
o
your
fl
oors
.
Grit
t
y
s
a
nd
is
a
ny
fl
oor
c
overing's
wors
t
enem
y.
2.
Ins
t
a
l
l
p
rop
er
fl
oor
p
rot
ec
t
ors
(fel
t
p
referred
)
on
a
l
l
furnit
ure
l
egs
us
ed
on
res
il
ient
fl
ooring.
Prot
ec
t
ors
wil
l
a
l
l
ow
c
ha
irs
t
o
m
ove
ea
s
il
y
over
t
he
fl
oor
wit
hout
s
c
uffing
or
s
c
ra
t
c
hing.
Cl
ea
n
p
rot
ec
t
ors
on
a
regul
a
r
b
a
s
is
t
o
rem
ove
a
ny
grit
t
ha
t
m
a
y
ha
ve
b
ec
om
e
em
b
ed
d
ed
on
t
he
b
ot
t
om
of
t
he
furnit
ure
l
eg.
For
a
ny
s
wivel
ed
t
yp
e
offic
e
c
ha
irs
a
nd
ot
her
rol
l
ing
furnit
ure,
p
l
ea
s
e
ins
t
a
l
l
2"
wid
e
non-
s
t
a
ining
fl
a
t
c
a
s
t
ers
.
D
o
not
us
e
rub
b
er
c
a
s
t
ers
.
3. To keep your floor looking
its best, dust mop or
vacuum your floor at least twi
ce a week. Do it
more often on floors with heavy traffic. Do not
use a household dust cleaner of any kind as this
may cause the floor to become sli
ck or damage
the fini
sh. Si
mply
sw
eep the floor as often as
needed.
4. Do not allow pets wi
th unclipped nai
ls to
damag
e y
our
allure
®
floor. It may
result i
n
severe scratching to the surface. The same is
true for any high heeled shoes that do not have
proper tips on the heels.
cuidado y
mantenimiento
¡Felicitaciones! Has instalado las losas entralazables
TrafficMASTER allure
®
ULTRA de The Home
Depot. Tu nuevo piso resistente fue fabricado según
los estándares más altos de calidad para que lo
disfrutes durante toda la vida. Aunque allure
®
es
uno de los pisos más fáciles de cuidar, por favor
sigue las recomendaciones de esta guía para que
mantenga esa apariencia nueva y proteger el
acabado de fábrica.
Mantenimiento preventivo:
1. NO usar TAPETES DE GOMA delante de puertas
que lleven al exterior. Así evitarás que la arena
o arenilla se metan en tus pisos. La arena gruesa
es el peor enemigo de cualquier revestimiento
de piso.
2. Instala protectores de piso adecuados (se
recomienda el fieltro) en las patas de muebles
usados en habitaciones con piso resistente. Los
protectores ayudarán a mover fácilmente las sillas
sobre el piso sin rayarlo o dejar marcas. Limpia
los protectores con frecuencia para eliminar la
arenilla que pueda haberse pegado a la base
de las patas de los muebles. En el caso de sillas
giratorias de oficina y otros muebles rodantes, por
favor instala ruedas planas de 2", que no dejen
marcas. No usar ruedas de goma.
3. Si deseas una apariencia óptima de tu piso, quita el
polvo con un trapeador o aspiradora, al menos dos
veces por semana. En pisos expuestos a mucho
tráfico, haz lo anterior con más frecuencia. No usar
ningún limpiador doméstico contra el polvo, ya que
el piso puede volverse resbaloso o puede dañarse
el acabado. Simplemente, barre el piso tan
seguido como sea necesario.
4. No permitas que las uñas largas de las mascotas
dañen tu piso allure
®
. Ello podría rayar
seriamente la superficie. Lo mismo puede pasar
en el caso de zapatos de tacón alto sin la tapa
adecuada en los tacones.
ENGLISH
9
ESPAÑOL

5
.
A
v
o
i
d
e
xp
o
s
u
re
t
o
d
i
re
c
t
s
u
n
l
i
g
h
t
fo
r
p
ro
l
o
n
g
e
d
p
e
ri
o
d
s
o
f
t
i
m
e
.
D
u
ri
n
g
p
e
a
k
s
u
n
l
i
g
h
t
h
o
u
rs
,
u
s
e
d
ra
p
e
s
o
r
b
l
i
n
d
s
t
o
m
i
n
i
m
i
ze
t
h
e
d
i
re
c
t
s
u
n
l
i
g
h
t
o
n
t
h
e
allure
®
fl
o
o
r
.
M
o
s
t
t
yp
e
s
o
f
fl
o
o
ri
n
g
w
i
l
l
b
e
a
ffe
c
t
e
d
b
y
c
o
n
t
i
n
u
o
u
s
s
t
ro
n
g
s
u
n
l
i
g
h
t
.
To
a
v
o
i
d
a
n
u
n
e
v
e
n
a
p
p
e
a
ra
n
c
e
,
p
l
e
a
s
e
c
o
n
s
i
d
e
r
re
l
o
c
a
t
i
o
n
s
o
f
a
n
y
a
re
a
ru
g
s
fro
m
t
i
m
e
t
o
t
i
m
e
.
I
n
a
d
d
i
t
i
o
n
,
e
xc
e
s
s
i
v
e
t
e
m
p
e
ra
t
u
re
s
a
re
n
o
t
g
o
o
d
fo
r
re
s
i
l
i
e
n
t
fl
o
o
rs
.
S
o
m
e
n
a
t
u
ra
l
v
e
n
t
i
l
a
t
i
o
n
o
r
i
n
t
e
r
m
i
t
t
e
n
t
a
i
r
c
o
n
d
i
t
i
o
n
i
n
g
i
n
v
a
c
a
n
t
h
o
m
e
s
s
h
o
u
l
d
b
e
c
o
n
s
i
d
e
re
d
.
L
o
n
g
t
e
r
m
c
o
n
t
i
n
u
o
u
s
i
n
s
i
d
e
t
e
m
p
e
ra
t
u
re
s
o
v
e
r
9
5
º
F
d
e
g
re
e
s
c
o
m
b
i
n
e
d
w
i
t
h
s
t
ro
n
g
d
i
re
c
t
s
u
n
l
i
g
h
t
w
i
l
l
d
a
m
a
g
e
yo
u
r
allure
®
fl
o
o
r
a
n
d
c
a
u
s
e
t
h
e
i
n
s
t
a
l
l
a
t
i
o
n
t
o
fa
i
l
.
6.
D
o
NOT
us
e
a
s
t
ea
m
c
l
ea
ner
on
allure
®
fl
ooring
a
s
it
m
a
y
res
ul
t
in
p
erm
a
nent
d
a
m
a
ge
t
o
your
fl
oor
a
nd
wil
l
void
t
he
wa
rra
nt
y.
H
ELPFUL HINT #
7
: To
a
void
yel
l
owing
from
a
s
p
ha
l
t
d
rivewa
ys
or
p
a
rking
l
ot
s
,
a
l
wa
ys
us
e
d
oorm
a
t
s
a
t
ent
ra
nc
ewa
ys
.
It
’s
a
good
id
ea
t
o
us
e
a
ha
rd
s
urfa
c
e
fl
oor
a
t
t
a
c
hm
ent
when
va
c
uum
ing
your
allure
®
fl
oor.
Regular maintenance:
1.
Food
s
p
il
l
s
s
houl
d
b
e
c
l
ea
ned
up
a
s
ra
p
id
l
y
a
s
p
os
s
ib
l
e
wit
h
a
q
ua
l
it
y
l
iq
uid
vinyl
c
l
ea
ner.
Ma
ke
s
ure
t
he
c
l
ea
ner
you
c
hoos
e
is
a
n
a
l
l
-
p
urp
os
e
l
iq
uid
c
l
ea
ner
t
ha
t
is
NON-
ABRASIVE.
We
d
o
not
rec
om
m
end
p
owd
ered
c
l
ea
ners
,
oil
s
oa
p
s
,
d
is
hwa
s
hing
d
et
ergent
s
,
or
ot
her
d
us
t
ing
p
rod
uc
t
s
.
Tr
y
t
o
us
e
a
non-
rins
ing,
bi
odegradable cleaner that leaves no residue or
haze and requires no rinsi
ng
after application.
2. allure
®
Si
ng
le Step Cleaner/
Poli
sh i
s available
i
n most Home Depot store locati
ons and i
s also
avai
lable onli
ne at homedepot.com.
3. Shoe marks and scuffs can be easi
ly
removed
usi
ng
a spot appli
cati
on of y
our
allure
®
Single
Step and a g
reen Scotch Bri
te pad.
5
.
Ev
it
a
l
a
ex
p
o
s
ic
ió
n
p
ro
l
o
n
ga
d
a
a
l
a
l
u
z
d
irect
a
d
el
s
o
l
.
En
h
o
ra
s
d
e
mu
c
h
o
s
o
l
,
u
s
a
co
r
t
in
a
s
o
p
ers
ia
n
a
s
p
a
ra
ev
it
a
r
ex
p
o
n
er
t
u
p
is
o
a
llu
re
®
d
irec
t
a
men
t
e
a
l
s
o
l
.
L
a
ma
y
o
ría
d
e
l
o
s
p
is
o
s
s
o
n
a
f
ec
t
a
d
o
s
p
o
r
l
a
ex
p
o
s
ició
n
c
o
n
t
in
u
a
a
l
a
l
u
z
d
el
s
o
l
.
P
a
ra
ev
it
a
r
u
n
a
a
p
a
rien
c
ia
d
es
igu
a
l
,
p
o
r
f
a
v
o
r
c
a
mb
ia
d
e
l
u
ga
r
l
a
s
a
l
f
o
mb
ra
s
d
e
á
rea
,
d
e
v
ez
en
c
u
a
n
d
o
.
Ad
emá
s
,
l
a
s
t
emp
era
t
u
ra
s
ex
t
rema
s
n
o
s
o
n
b
u
en
a
s
p
a
ra
p
is
o
s
res
is
t
en
t
es
.
En
v
iv
ien
d
a
s
d
es
o
c
u
p
a
d
a
s
,
es
rec
o
men
d
a
b
l
e
v
en
t
il
a
r
d
e
ma
n
era
n
a
t
u
ra
l
o
u
s
a
r
el
a
ire
a
co
n
d
icio
n
a
d
o
d
e
ma
n
era
in
t
er
mit
en
t
e.
Temp
era
t
u
ra
s
in
t
erio
res
c
o
n
s
t
a
n
t
es
d
e
má
s
d
e
9
5
º
gra
d
o
s
F
en
c
o
mb
in
a
ció
n
c
o
n
l
a
ex
p
o
s
ic
ió
n
a
l
a
l
u
z
d
irec
t
a
d
el
s
o
l
ca
u
s
a
rá
d
a
ñ
o
s
a
t
u
p
is
o
a
llu
re
®
y
h
a
rá
que
l
a
in
s
tal
ac
ión
frac
as
e.
6
.
NO
us
e
un
l
impiador de v
apor en
el
s
uel
o de
allure
®
ya
que puede caus
ar
dañ
os
perman
en
tes
a s
u pis
o
y an
ul
ar l
a garan
tía
CONS
EJO ÚTIL nú
m
. 7
:
Para ev
itar
que
el
pis
o
s
e v
uel
v
a
amaril
l
en
to debido al
as
fal
to
de
l
as
en
tradas
de garaje
o es
tac
ion
amien
tos
,
us
a
s
iempre
tapetes
en
l
as
en
tradas
.
Es
buen
a idea
que us
es
el
acc
es
orio para pis
os
duros
de
l
a as
piradora al
as
pirar
tu pis
o allure
®
.
Mantenimiento regular:
1
. De
rram
e
s de
com
ida; de
be
n
lim
piarse
lo m
ás
pron
to posible
con un lim
piador líquido de
calidad para v
in
ilo. A
se
gúrate
de
que
e
l
lim
piador que
use
s se
a líquido, m
ultipropósito
y N
O A
B
R
A
S
IVO. N
o re
com
e
n
dam
os
limpiadores en polvo, jabones aceitosos,
detergentes para platos u otros productos
contra el polvo. Intenta usar un limpiador
biodegradable que no necesite enjuagarse
y que no deje residuos o capas después de
aplicarse.
2.
allure
®
Single Step está disponible en la
mayoría de ubicaciones de las tiendas de
Home Depot y también está disponible en línea
en homedepot.com.
3. Las marcas y rasponazos de zapatos pueden
limpiarse fácilmente, aplicando sobre la
mancha
allure
®
Single Step con una esponja
verde de Scotch Brite.
ENGLISH
10
ESPAÑOL

4. R
e
g
u
l
ar
h
o
u
s
e
h
o
l
d dir
t
c
an
be
c
l
e
an
e
d w
it
h
y
o
u
r
a
llu
re
®
Sin
g
l
e
St
e
p appl
ie
d as
in
dic
at
e
d o
n
t
h
e
pr
o
du
c
t
'
s
l
abe
l
. So
m
e
h
an
d w
ipin
g
m
ay
be
r
e
qu
ir
e
d t
o
r
e
m
o
v
e
t
o
u
g
h
s
po
t
s
an
d s
pil
l
s
. Al
w
ay
s
sw
e
e
p
o
r
va
cuum
y
o
ur
al
l
ur
e
®
fl
o
o
r
b
e
fo
re
cl
e
a
n
i
n
g
so
t
h
a
t
a
l
l
l
o
o
se
d
i
rt
a
n
d
p
a
rt
i
cl
e
s
a
re
re
mo
ve
d
.
Fo
r
be
s
t
r
e
s
u
l
t
s
do
n
o
t
u
s
e
c
o
m
bin
at
io
n
c
l
e
an
e
r
/f
in
is
h
pr
o
du
c
t
s
.
5
.
Do
N
O
T
WA
X
YO
U
R
al
l
u
re
®
FLO
O
R
!
T
h
e
s
u
r
f
ace
o
f
yo
u
r
T
r
af
f
i
cM
A
S
T
E
R
al
l
u
re
®
f
l
o
o
r
i
s
v
e
r
y
de
n
s
e
an
d
n
o
n
-po
r
o
u
s
;
th
i
s
pr
e
v
e
n
ts
wax
f
r
o
m
pe
n
e
tr
ati
n
g
an
d
th
u
s
wi
l
l
bu
i
l
d
u
p
a
be
d
f
o
r
ye
l
l
o
wi
n
g
an
d
di
r
t
co
l
l
e
cti
o
n
.
T
h
e
s
am
e
n
o
n
-po
r
o
u
s
f
e
atu
r
e
al
s
o
pr
o
v
i
de
s
al
l
th
e
pr
o
te
cti
o
n
ag
ai
n
s
t
we
ar
an
d
stai
ni
ng
that
you
wi
ll
need.
U
se
only
allure
®
Sin
g
l
e
St
e
p
for
heavy
wear
when
you
have
experi
enced
some
loss
of
the
ori
gi
nal
appearance
over
ti
me.
Your
T
raffi
cMA
S
TER
allu
re
®
floor
has
been
desi
gned
to
be
very
easy
to
mai
ntai
n,
but
you
may
prefer
to
add
an
occasi
onal
coat
of
the
allure
®
Sin
g
l
e St
e
p
to
renew
and
protect
your
floor.
6. If y
o
ur fl
o
o
r h
as bee
n
expo
sed t
o
e
xcessive
amo
un
t
s o
f w
at
er due
t
o
fl
o
o
din
g
, do
n
’
t
pan
ic,
Traff
ic
M
ASTER
allure
®
U
L
TR
A
Lo
ckin
g
Til
e is
w
at
erpro
o
f! Simpl
y
re
mo
ve
t
h
e w
at
e
r as quickl
y
as po
ssibl
e
w
it
h
a We
t
-
Vac o
r o
t
h
e
r de
vice an
d
venti
late
the
room.
A
dehumi
di
fi
er
should
be
promptly
turned
on
i
n
the
room
to
reduc
e
the
moi
sture
levels
back t
o
n
o
r
mal
. Do
n
o
t
dry
t
h
e ro
o
m be
l
o
w
t
h
e
n
o
r
mal
mo
ist
ure l
evel
t
h
at
exist
ed previo
usl
y.
7. If acciden
t
al
deep scrat
ch
e
s appear o
n
y
o
ur fl
o
o
r
t
h
e
n
it
mig
h
t
be n
ece
ssary
t
o
repl
ace such
damaged tiles.
8. If the scratches are fine and the result of normal
household use, then it is recommended only to fill
them with one or two coats of the T
r
a
fficMASTER
Matte Floor Finis
h.
9. I
f
the problem persis
ts, contact you
r Home Depot
representative or
Ha
ls
tea
d’s Consu
mer Hot Line at
1-866-843-8453.
4
.
La
s
u
cied
a
d
nor
m
a
l
d
el
hog
ar
p
u
ed
e
lim
piars
e
aplica
nd
o
tu
a
l
l
u
re
®
S
ing
le
S
tep
s
eg
ú
n
las
ins
tru
cciones
d
e
la
etiq
u
eta
.
P
u
ede
s
er
neces
ario
lim
p
ia
r
a
m
a
no
la
s
m
anchas
y
d
erra
m
es
dif
íciles
.
S
iem
p
re
b
a
rre
o
a
s
p
ira
tu
p
is
o
a
l
l
u
re
®
antes
d
e
lim
piarlo,
pa
ra
elim
ina
r
el
p
olv
o
y
la
s
p
a
r
tícu
la
s
.
P
a
ra
m
ejores
res
u
lta
dos
no
u
s
es
u
na
com
b
inación
d
e
lim
p
ia
d
or/
p
rod
u
ctos
p
ara
aca
b
ad
o.
5.
¡
N
o
E
N
C
E
R
E
S
T
U
P
I
S
O
al
l
ur
e
!
La
su
pe
r
f
ic
ie
de
t
u
piso
T
r
aff
ic
MAS
T
E
R
e
s
mu
y
de
nsa
y
no
po
r
o
sa,
e
llo
e
vit
a
qu
e
la
c
e
r
a
pe
ne
t
r
e
y
,
po
r
e
nde
,
e
st
a
se
ac
u
mu
la
f
o
r
mando
u
na
c
apa
amar
ille
nt
a
qu
e
r
e
t
ie
ne
la
su
c
ie
dad.
E
sa
misma
c
o
ndic
ió
n
no
po
r
o
sa
t
ambié
n
da
t
o
da
l
a
pr
o
t
e
c
c
ió
n
ne
c
e
sar
ia
a
t
u
piso
c
o
nt
r
a
e
l
de
sg
ast
e
y
las
manc
has.
U
sa
só
lo
allu
re
®
S
ing
le S
tep pa
ra
des
g
a
s
te fuerte,
cuand
o
s
e ha
ya
p
erdido
alg
o de
la
apa
riencia orig
ina
l
con
el
tiemp
o. Tu p
is
o
T
rafficMAS
T
ER
allu
re
®
es
tá
hecho pa
ra facilitar
en
g
ra
n
med
ida
s
u
mantenimiento,
pero
en
oca
s
iones
p
uedes
a
p
licar
una
ca
p
a
de
allu
re
®
S
ing
le S
tep pa
ra
renov
a
r y p
roteg
er tu
p
is
o.
6.
Si
tu
p
i
so
h
a
si
d
o
ex
p
u
esto
a
c
a
n
ti
d
a
d
es
ex
c
esi
va
s
de
a
g
ua,
d
eb
id
o a
una
inunda
ción, no te
as
us
tes
,
¡las
los
a
s
entralaz
a
bles
Traf
f
icM
ASTER
allu
re
®
ULTR
A es
impermeab
le!
S
imp
lemente s
eca
el a
g
ua
lo
má
s
p
ronto
p
os
ib
le con
una
as
p
ira
dora para
us
o en
moja
do
u
otro
d
is
pos
itiv
o,
y v
entila
la hab
ita
ción.
U
n
d
es
humidifica
d
or
deb
e
us
ars
e inmediatamente
en
la
ha
bita
ción
para
q
ue los
niv
eles
d
e
humed
ad
v
uelv
a
n
a
s
u punto
norma
l.
No
s
eques
la ha
bita
ción por debajo
d
el
niv
el
d
e
humeda
d
q
ue ha
bía
a
nteriormente.
7. Si aparecen accidentalmente rayones profundos
en el piso, es posible que debas reemplazar las
losas dañadas
8. Si los rayones son finos, y son el resultado del uso
normal doméstico, se recomienda sólo rellenarlos
con una o dos capas de TrafficMASTER para
pisos de acabado mate.
9. Si el problema continúa, contacta a un representante
de The Home Depot o a la línea de Servicio al
Cliente de Halstead al 1-866-843-8453.
ENGLISH
11
ESPAÑOL

Fi
rs
t
a
i
d
f
o
r
yo
u
r
allu
re
®
f
l
o
o
r
1
. Y
o
u
m
a
y
re
m
o
v
e
c
h
e
w
i
n
g
g
u
m
,
a
d
h
e
s
i
v
e
,
c
ra
yo
n
,
c
a
n
d
l
e
w
a
x,
a
n
d
s
i
m
i
l
a
r
t
yp
e
s
u
b
s
t
a
n
c
e
s
b
y
a
p
p
l
yi
n
g
i
c
e
u
n
t
i
l
i
t
b
e
c
o
m
e
s
b
ri
t
t
l
e
e
n
o
u
g
h
t
o
c
ru
m
b
l
e
o
ff.
T
h
e
re
s
i
d
u
e
m
a
y
b
e
re
m
o
v
e
d
w
i
t
h
m
i
n
e
ra
l
s
p
i
ri
t
s
.
2
. E
xt
ra
d
e
e
p
h
e
e
l
m
a
rks
,
c
a
s
t
e
r
m
a
rks
e
t
c
.
:
ru
b
w
i
t
h
g
re
e
n
S
c
o
t
c
h
B
ri
t
e
p
a
d
d
a
m
p
e
n
e
d
w
i
t
h
allure
®
S
i
n
g
l
e
S
t
e
p
.
3
. Fo
r
m
o
d
e
ra
t
e
t
o
h
e
a
v
y
s
t
a
i
n
s
c
a
u
s
e
d
b
y
l
o
n
g
s
t
a
n
d
i
n
g
w
a
t
e
r
o
r
o
t
h
e
r
n
o
n
-
d
ye
l
i
q
u
i
d
s
:
R
u
b
w
i
t
h
allure
®
S
i
n
g
l
e
S
t
e
p
.
4.
For
d
a
rk
s
p
ot
s
c
a
us
ed
b
y
ink
or
ot
her
c
hem
ic
a
l
s
,
c
l
ea
n
s
p
ot
a
s
p
er
#2
a
b
ove.
If
not
s
uc
c
es
s
ful
,
t
hen
t
he
a
ffec
t
ed
t
il
e
s
houl
d
b
e
rep
l
a
c
ed
.
5.
Anim
a
l
a
nd
d
ia
p
er
s
t
a
ins
s
houl
d
b
e
t
rea
t
ed
s
a
m
e
a
s
#3
a
b
ove.
6.
Ciga
ret
t
e
b
urns
if
not
d
eep
,
t
hen
p
roc
ed
ure
#2
a
b
ove
s
houl
d
work.
If,
however,
t
hey
a
re
ver
y
d
eep
t
hen
t
he
a
ffec
t
ed
t
il
e
s
houl
d
b
e
rep
l
a
c
ed
.
If
you
ha
ve
a
ny
q
ues
t
ions
or
c
onc
erns
a
b
out
c
a
ring
for
your
Tra
ffic
MASTER
allure
®
fl
oor
p
l
ea
s
e
c
ont
a
c
t
H
om
e
D
ep
ot
or
H
a
l
s
t
ea
d
a
t
1
-
8
6
6
-
8
4
3
-
8
4
5
3
,
or
c
hec
k
out
our
web
s
it
e
a
t
myDIYgenius.c
om
.
Y
ou
c
a
n
a
l
s
o
e-
m
a
il
us
d
irec
t
l
y
a
t
:
T
raf
ficMA
S
TER
@
hal
steadintl
.c
om
To watc
h a video, visit:
www
.homedepot.com/al
l
ure
Pr
i
m
e
r
o
s
au
x
i
l
i
o
s
par
a t
u
pi
s
o
al
l
u
re
1.
P
u
ed
es
elim
ina
r go
m
a
d
e m
a
s
ca
r, a
d
hes
ivo
s
,
crey
ó
n, cera
d
e vela
, y
s
u
s
ta
ncia
s
s
im
ila
res
,
a
p
lica
nd
o
hielo
ha
s
ta
q
u
e la
s
u
s
ta
ncia
s
e
vu
elva
q
u
eb
ra
d
iz
a
y
s
e d
es
m
o
ro
ne. E
l res
id
u
o
p
u
ed
e rem
o
vers
e co
n a
lco
ho
les
m
inera
les
.
2.
Ma
rca
s p
ro
f
u
n
d
a
s d
e ta
co
n
es, ru
ed
a
s etc.:
f
ro
ta
co
n
u
n
a
esp
o
n
ja
verd
e Sco
tch
Bri
te
m
o
j
a
d
a
en
allur
e
®
Si
n
g
le Step
.
3
.
Par
a
man
c
h
as
mode
r
adas
a
di
fí
c
i
l
e
s
c
aus
adas
por
ag
ua
e
s
t
an
c
ada
por
l
ar
g
o
t
i
e
mpo
u
ot
r
os
l
í
qui
dos
que
n
o
man
c
h
e
n
:
F
r
ot
a
c
on
a
l
l
u
re
®
S
i
n
g
l
e
S
t
e
p.
4. Para manchas
o
s
curas
de tinta u o
tro
s
químico
s
,
limpia s
egún lo
indicado
en el méto
do
núm. 2,
arriba. Si no
tienes
éxito
, s
e debe reemplaz
ar
la lo
s
a afectada.
5. Manchas
caus
adas
po
r animales
o
pañales
deben tratars
e co
n el méto
do
núm. 3, arriba.
6. En el cas
o
de quemaduras
de cigarrillo
, no
pro
fundas
, el pro
cedimiento
núm. 2. arriba,
debería funcio
nar. Si la quemadura es
pro
funda, s
e debe reemplaz
ar la lo
s
a
afectada.
Si tienes
preguntas
o
dudas
s
o
bre có
mo
cuidar
de tu pis
o
TrafficMA
STE
R
a
llu
re
®
co
ntacta a The
Ho
me D
epo
t o
a Hals
tead al
1-866-843-8453,
o
vi
si
ta n
uestr
o si
ti
o en
In
tern
et
myDIYge
niu
s.
co
m
.
También puedes
enviar
no
s
un email, directamente
a:
T
raf
f
ic
MASTER@halste
adintl.c
om
Para ver el video, visita:
www.homedepot.com/allure
ENGLISH
12
ESPAÑOL

10
Life
t
ime
R
esiden
t
ial
Limit
e
d Warran
t
y
10-
Y
ear Ful
l
Co
mmercial
Limit
e
d Warran
t
y
Hal
s
t
e
ad N
e
w
E
n
g
l
an
d w
il
l
f
u
r
n
is
h
r
e
pl
ac
e
m
e
n
t
fl
o
o
rin
g
fre
e o
f ch
arg
e
if t
h
ere
is a l
o
ss o
f o
rig
in
al
pat
t
e
r
n
o
r co
l
o
r un
de
r n
o
r
mal
re
side
n
t
ial
use
o
f
allure
®
fo
r as l
o
n
g
as t
h
e purch
aser co
n
t
in
ues t
o
re
main
in
t
h
e
reside
n
ce
o
f t
h
e
o
rig
in
al
in
st
al
l
at
io
n
pro
vided t
h
e
fl
o
o
rin
g
is in
st
al
l
e
d an
d main
t
ain
ed
acco
rdin
g
t
o
t
h
e in
st
ruct
io
n
s in
cl
ude
d. T
h
is w
arran
t
y
is n
o
n
t
ran
sferabl
e an
d pro
-
rat
ed.
T
h
is w
arran
t
y
do
es n
o
t
in
cl
ude l
abo
r o
r t
h
e co
st
o
f
l
abo
r fo
r in
st
al
l
at
io
n
o
f t
h
e
repl
acemen
t
fl
o
o
rin
g
n
o
r
do
es it
in
cl
ude
damag
e due t
o
impro
per in
st
al
l
at
io
n
o
r main
t
en
an
ce, al
kal
is in
t
h
e
subfl
o
o
r o
r co
n
dit
io
n
s
arisin
g
fro
m h
y
dro
st
at
ic pre
ssure, bur
n
s, t
ears,
in
den
t
at
io
n
s, st
ain
s, o
r reduct
io
n
in
g
l
o
ss due t
o
n
o
r
mal
use an
d o
r ext
erio
r appl
icat
io
n
s.
T
h
is w
arran
t
y
sh
al
l
n
o
t
in
cl
ude
l
o
ss o
f t
ime,
in
co
n
ven
ie
n
ce, in
ciden
t
al
e
xpe
n
ses (such
as
t
el
eph
o
n
e cal
l
s) in
cl
uded in
t
h
e
remo
val
o
r
rein
st
al
l
at
io
n
o
f t
h
e affect
ed mat
e
rial
, an
d an
y
o
t
h
er in
ciden
t
al
o
r co
n
se
que
n
t
ial
damag
es.
Some s
tates do not allow the ex
clu
s
ion of or
limitations
if incidental or cons
eq
u
entia
l dama
ges
so that above
limitation a
nd exc
lusion may not ap
ply to you.
This
wa
r
r
a
nty giv
es you
s
pec
if
ic
lega
l r
ights and you
may ha
v
e other legal rights
, whic
h varies
f
r
om state
to state.
This
wa
r
r
a
nty is
in lieu of a
ny other
wa
r
ranties
ex
press
ed
or
imp
lied.
This warranty service is available only by notice to
Halstead New England through the dealer from
whom the purchase was made. Notification must be
accompanied by a copy of the original invoice and
can only be authorized by Halstead.
Halstead N.E. Corp.
15 Oakwood Avenue, Norwalk, CT 06850
ENGLISH
14
with SimpleFit™ Locking Technology
/