Trane BAYCONV Series Horizontal Conversion Kit Installation guide

Type
Installation guide

Trane BAYCONV Series Horizontal Conversion Kit allows you to convert your dedicated upflow or downflow coil to horizontal left or right. It includes a horizontal drain pan, side-pull plugs, splash guard, channel for splash guard, coil support bracket, and heat shield (for specific models). Compatible with 4PXC coils, it ensures proper airflow direction and prevents water blow-off. The kit is easy to install and comes with all necessary components.

Trane BAYCONV Series Horizontal Conversion Kit allows you to convert your dedicated upflow or downflow coil to horizontal left or right. It includes a horizontal drain pan, side-pull plugs, splash guard, channel for splash guard, coil support bracket, and heat shield (for specific models). Compatible with 4PXC coils, it ensures proper airflow direction and prevents water blow-off. The kit is easy to install and comes with all necessary components.

A. GENERAL
These kits are designed for use in combination with a 4PXC coil
to convert the coil for horizontal use. Dedicated upow coils may
be converted to either horizontal left or horizontal right. Dedicated
downow coils may only be converted to horizontal right.
The 4PXC equipment has been evaluated in accordance with
the Code of Federal Regulations, Chapter XX, Part 3280 or the
equivalent. “Suitable for Mobile Home use” The height of the
Furnace, Coil and discharge duct work must be 7 ft. or less.
Inspect the kit components for shipping damage. Notify the
transportation company immediately if the coil is damaged.
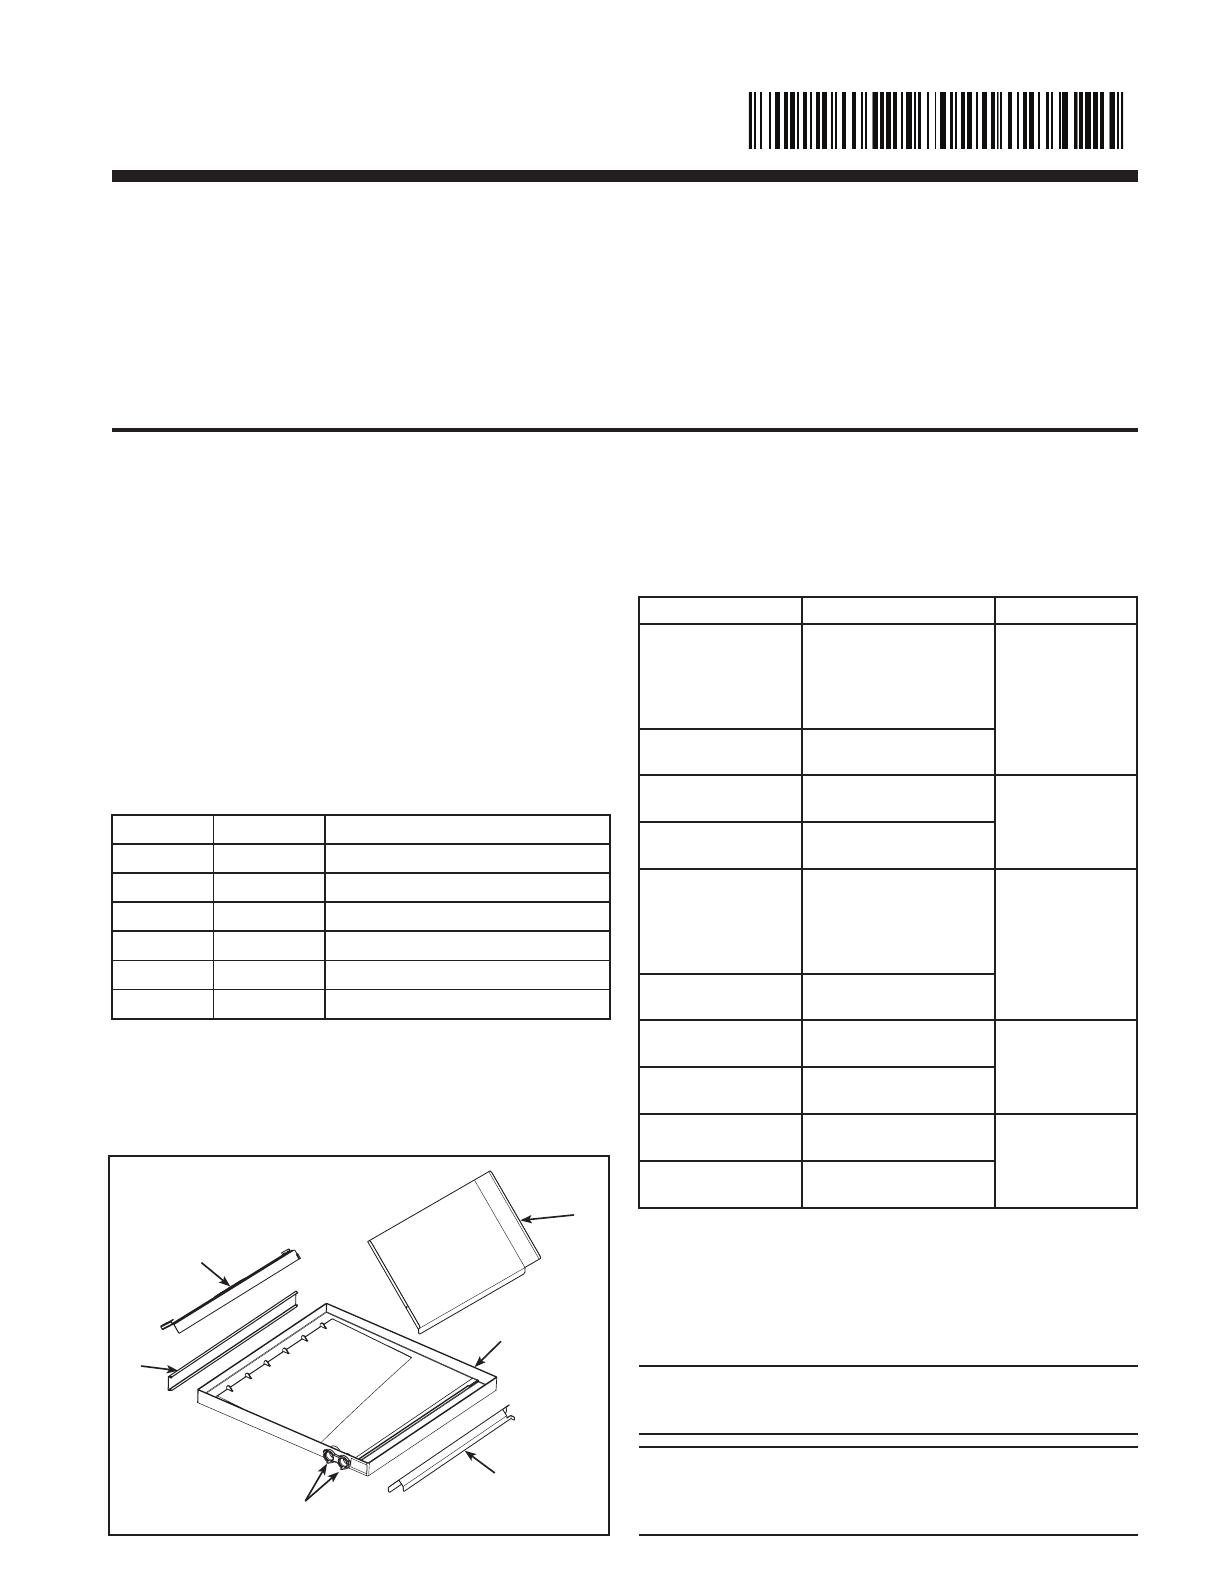
B. KIT COMPONENTS
NOTE: All items are used for horizontal left conversion. Part 3
not required for horizontal right conversion.
* Part 6 only included with kits having Horizontal Drain Pans
with part numbers D346112P01 through P04. Refer to part
number embossed on rear of pan.
Installers Guide
ALL phases of this installation must comply with NATIONAL, STATE AND LOCAL CODES
IMPORTANT — This Document is customer property and is to remain with this unit. Please return to service information pack
upon completion of work.
BAYCONV18B
BAYCONV23B
BAYCONV27B
BAYCONV30B
BAYCONV30C
Horizontal Conversion Kit
Kits used to convert 4PXC*U dedicated Upow coil to Horizontal Left or Horizontal Right
or convert 4PXC*D dedicated Downow coil to Horizontal Right.
Figure 1
18-AH74D1-1B-EN
Item Qty Description
1 1 Horizontal Drain Pan
2 2 Side-Pull Plugs
3 1 Splash Guard
4 1 Channel for Splash Guard
5 1 Coil Support Bracket
6 1 Heat Shield*
C. APPLICATION INFORMATION
See the table below to verify the coil and kit match. The
application specic sections will show what changes are
needed for the coils.
Model Number Allowable Installations Horizontal Kit No.
4PXCAU24BS3HA*
4PXCAU32BS3HA*
4PXCBU24BS3HA*
4PXCBU30BS3HA*
4PXCCU30BS3HA*
Upow, Horizontal Left
or Horizontal Right BAYCONV18B
4PXCBD30BS3HD* Downow or Horizontal
Right Only
4PXCBU36BS3HA*
4PXCCU36BS3HA*
Upow, Horizontal Left
or Horizontal Right BAYCONV23B
4PXCBD36BS3HD*
4PXCCD36BS3HD*
Downow or Horizontal
Right Only
4PXCBU42BS3HA*
4PXCCU42BS3HA*
4PXCBU48BS3HA*
4PXCCU48BS3HA*
4PXCDU48BS3HA*
Upow, Horizontal Left
or Horizontal Right BAYCONV27B
4PXCBD42BS3HD*
4PXCCD42BS3HD*
Downow or Horizontal
Right Only
4PXCCU60BS3HAA
4PXCDU60BS3HAA
Upow, Horizontal Left
or Horizontal Right BAYCONV30B
4PXCCD60BS3HDA
4PXCDD60BS3HDA
Downow or Horizontal
Right Only
4PXCCU60BS3HAB
4PXCDU60BS3HAB
Upow, Horizontal Left
or Horizontal Right BAYCONV30C
4PXCCD60BS3HDB
4PXCDD60BS3HDB
Downow or Horizontal
Right Only
D. RECOMMENDATION
Use the Installer’s Guide packaged with the coil for the physical
installation of the coil.
IMPORTANT:
To ensure proper operation, make sure the airow direction
arrow marked on the coil cabinet matches the furnace airow.
NOTE: Water blow-o could occur in certain installation
position if the airow setting exceeds the maximum
values listed. Please refer to "maximum airow setting"
label or literature shipped with unit.
If a coil is part of the total system installation, use the Installer’s
Guide packaged with the furnace, outdoor section, and thermostat
for physically installing those components.
2 18-AH74D1-1B-EN
Installer’s Guide
ssCAUTION
!
Dedicated downow coils may NOT be installed in the
horizontal left position.
Figure 6
SPLASH
GUARD
SCREW
LOCA
TION
Figure 5
E. COIL
CONVERSION PROCEDURE
Figure 2
1. Remove coil front panels and slide out coil assembly.
2. Modify coil and cabinet as shown in Figure 2, Figure 3,
and Figure 4.
3. REQUIRED FOR HORIZONTAL LEFT COIL
CONVERSION ONLY. Splash Guard installation is
required to prevent water blowo.
a. Place Channel for Splash Guard into Horizontal Drain
Pan as shown in Figure 5.
b. Slide Horizontal Drain Pan and coil assembly into
cabinet. Refer to Step 4 and Figure 7 below.
c. Wedge ange of Splash Guard between Channel for
Splash Guard and Horizontal Drain Pan as shown in
Figure 6.
d. Drive one eld-supplied sheet metal screw into Splash
Guard through factory-provided clearance hole in the
front duct ange on the coil case. Refer to Figures 6
and 8.
Figure 3
CABINETS WITH COIL RETAINER BRACKET
Remove and discard coil retainer bracket
Remove rear left screw
and keep aside
Swing out coil support
bracket to remove
and discard
If present, remove and
discard water diverter
brackets.
Install coil support
bracket from kit
CABINETS WITH FASTENED COIL SUPPORT BRACKET
Figure 4
18-AH74D1-1B-EN 3
Installer’s Guide
Figure 7
Figure 8
CASED
COIL
FURNACE
4. If supplied with kit, ensure Heat Shield is installed on
Horizontal Drain Pan. Slide the new Horizontal Drain Pan
onto the coil and slide back into the coil cabinet. See
Figure 7.
NOTE:
Heat Shield only required for Horizontal Drain Pans
having part numbers D346112P01 through P04. Refer to
part number embossed on rear of pan. See Figure 7.
5. Remove the insulation and cap blocking the Horizontal
Drain Pan condensate ports on the front panel of the coil
case.
6. Remove the Side-Pull Plugs from the Horizontal Drain
Pan and install into downow drain pan as shown in
Figure 8. Put front panels back on.
7. Attach the coil to the furnace as shown in Figure 9 and
Figure 10.
ssCAUTION
!
When supplied with kit, Heat Shield MUST be installed on
Horizontal Drain Pan.
AIRFLOW
FURNACE DUCT
Figure 9
Figure 10
HORIZONTAL LEFT COIL INSTALLATION
HORIZONTAL RIGHT COIL INSTALLATION
AIRFLOW
FURNACE
DUCT
SPLASH
GUARD
CASED COIL
FURNACE
APEX OF COIL POINTS
AWAY FROM FURNACE
CASED COIL
APEX OF COIL POINTS
TOWARDS FURNACE
FOR S-SERIES FURNACES
FOR LEGACY UPFLOW FURNACES
IN HORIZONTAL RIGHT
Attached furnace and coil using eld-supplied self-drilling scews
not longer than 1.5".
Fit the top coil anges
inside furnace anges
Bend anges on
inward or outward
as applicable
Coil and furnace
will nest together
18-AH74D1-1B-EN 04 Aug 2022
Supersedes 18-AH74D1-1A-EN (February 2021)
About Trane and American Standard Heating and Air Conditioning
Trane and American Standard create comfortable, energy efficient indoor environments for residential applications.
For more information, please visit www.trane.com or www.americanstandardair.com
The manufacturer has a policy of continuous data improvement and it reserves the right to change design and specifications without notice. We are
committed to using environmentally conscious print practices.
© 2022
  • Page 1 1
  • Page 2 2
  • Page 3 3
  • Page 4 4

Trane BAYCONV Series Horizontal Conversion Kit Installation guide

Type
Installation guide

Trane BAYCONV Series Horizontal Conversion Kit allows you to convert your dedicated upflow or downflow coil to horizontal left or right. It includes a horizontal drain pan, side-pull plugs, splash guard, channel for splash guard, coil support bracket, and heat shield (for specific models). Compatible with 4PXC coils, it ensures proper airflow direction and prevents water blow-off. The kit is easy to install and comes with all necessary components.

Ask a question and I''ll find the answer in the document

Finding information in a document is now easier with AI