Extech Instruments RE300 User manual

Type
User manual

This manual is also suitable for

User Guide
ExStik
TM
Model RE300
Waterproof ORP Meter
RE300-en-GB_V4.5 8/16
2
ExStik
TM
Description
Front Panel Controls
1. Battery compartment cap
2. LCD Display
3. MODE button
4. CAL button (unused on RE300)
5. ON/OFF button
6. Electrode collar
7. Electrode
(Electrode cap is not shown)
Display Description
1. Reading
2. Units
3. Bargraph
4. Data Hold
5. Scale
6. Low Battery
3
6
2
1
4
5
1
2
3
4
5
6
7
mV
RE300-en-GB_V4.5 8/16
3
Operation
Getting Started
Battery Activation: An insulating tab is located in the battery compartment and prevents battery drain
during storage. It must be removed before use.
White KCL crystals may be present on the electrode. These crystals will dissolve in a distilled water
soak or they can be simply rinsed with tap water.
Do NOT wipe the end of the RE300 electrode as it may damage the sensor.
When the RE300 is turned on, it enters the Automatic Calibration mode. ‘SELF’ and ‘CAL’ will appear
on the LCD while calibration is in progress. After the calibration is complete, ‘SELF’ and ‘CAL’ will
extinguish and both the main display and bargraph will read ORP in mV units. The bargraph will read
0mV (far left), 500mV (center), and 1000mV (far right).
ORP Testing
1. Remove cap from the electrode and soak the electrode in distilled or tap water for 10 minutes.
2. Press the ON/OFF button to switch the RE300 on.
3. Dip the electrode1/2” to 1” into the test solution. Stir once and let the reading stabilize for 1 to 3
minutes.
4. Note the ORP or press MODE to freeze the reading The HOLD display icon will appear along
with the held reading. The held reading will be stored in the next 15-reading storage location
(see below). Press the MODE key to return to normal operation.
5. Press the ON/OFF button to turn the RE300 off. If you do not press a button for 10 minutes the
RE300 shuts off automatically.
15-Reading Measurement Storage
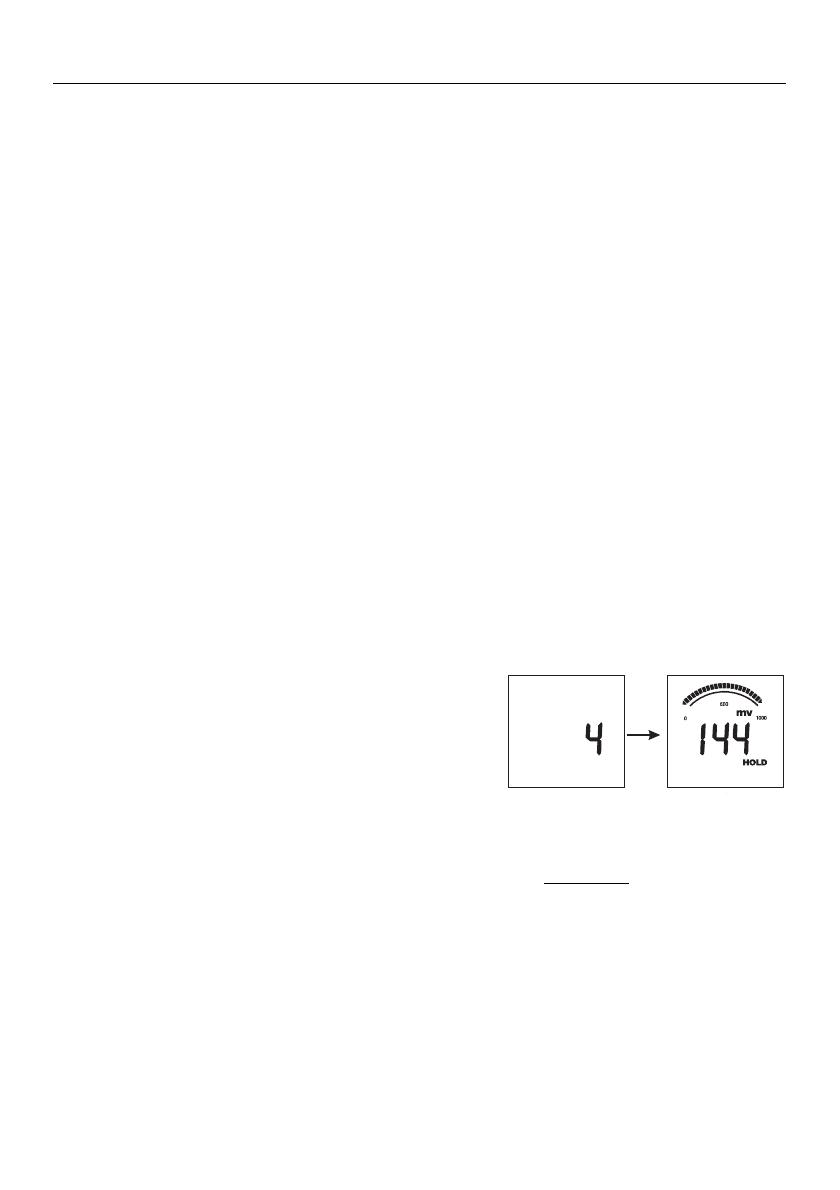
1. Press the MODE button to store a reading. The LCD will briefly display the memory location
number and then the value stored (Data Hold will activate).
2. Press MODE again to return to normal operation.
Repeat step 1 above to store the next reading and so
on.
3. If an attempt is made to store more than 15 readings,
the stored readings (starting with the first reading) will
be overwritten.
Recalling Stored Readings
Note: First ensure that the HOLD symbol is not displayed. If it is, exit the HOLD function by pressing
the MODE button.
1. Press the CAL button once and then press the MODE button immediately after CAL is
displayed; the location number (1 through 15) will flash. If the CAL mode is accidentally
accessed (display flashing), press the CAL button again to exit.
2. The last stored reading taken will be displayed first. To advance through the stored readings,
press the MODE button. The location number is displayed first, followed by the reading stored
in that location.
3. To exit the storage mode, press the CAL button and the ExStik
TM
will return to normal
operation.
RE300-en-GB_V4.5 8/16
4
Measurement and Display Considerations
If the unit appears to be locked (display frozen). It is possible that the Data Hold mode has
been inadvertently accessed by pressing the MODE button. Simply press the MODE button
again or turn the meter off and restart if the display appears frozen.
If the meter does latch up and no button presses revive it, remove the batteries and restart.
Note that if the batteries are removed, any stored readings will be discarded. Factory
calibration data for all models will be retained, however.
Replacing the Electrode
To preserve Electrode life, keep the sponge in the protective cap soaked with
distilled or tap water when not in use (store vertically).
DO NOT USE DE-IONIZED WATER.
1. To remove an electrode, unscrew and completely remove the electrode collar (turn the collar
counter-clockwise to remove).
2. Gently rock the electrode from side to side, pulling it downwards, until it disconnects from the
meter.
3. To attach an electrode, carefully plug the electrode into the meter socket (note that the
electrode connector is keyed, ensuring proper connection).
4. Tighten the electrode collar firmly enough to make a good seal (a rubber gasket seals the
electrode with the meter).
Powering the ExStik™
The ExStikTM uses four (4) CR2032 batteries (included). If the batteries are weak, the ‘BAT’
indicator appears on the LCD. Press the ON/OFF key to turn the ExStikTM on or off. The auto
power off feature shuts the ExStikTM off automatically after 10 minutes of inactivity to preserve
battery life.
Accuracy check of the RE300 electrode
1. Remove cap from the electrode and press the ON/OFF button to switch the RE300 on.
2. Dip the electrode1/2” to 1” into the ORP Standard test solution. Stir once and let the reading
stabilize for 1 to 3 minutes.
3. The measurement should be within +/- 4mV of the ORP Standard.
RE300-en-GB_V4.5 8/16
5
Battery Replacement
1. Twist off the battery compartment cap
2. Replace the four (4) 2032 batteries observing polarity.
3. Replace the battery compartment cap
Neverdisposeofusedbatteriesorrechargeablebatteriesinhouseholdwaste.
Asconsumers,usersarelegallyrequiredtotakeusedbatteriestoappropriate
collectionsites,theretailstorewhere thebatterieswerepurchased,orwherever
batteriesaresold.
Disposal:Donotdisposeofthisinstrumentinhouseholdwaste.Theuser
isobligatedtotakeend
oflifedevicestoadesignatedcollectionpointforthedisposalof electricalandelectronic
equipment.
Optional Accessories
Replacement ORP electrode (Part Number: RE305)
Specifications
Display Multifunction LCD with Bargraph
Operating conditions 0 to 50
o
C (32 to 122
o
F) / < 80% RH
RP Range / Accuracy ± 999mV / ± 4mV
Electrode Platinum with silver wire in KCL
Electrode Compensation 204.6mV
Measurement storage 15 tagged (numbered) readings
Power Four (4) CR2032 button batteries
Low battery indication ‘BAT’ appears on the LCD
Auto power off After 10 minutes of inactivity
Dimensions 35,6x172,7x40,6mm (1,4x6,8x1,6”); 110g (3,85oz)
Copyright©20142016FLIRSystems,Inc.
Allrightsreservedincludingtherightofreproductioninwholeorinpartinanyform
ISO9001Certified
www.extech.com
  • Page 1 1
  • Page 2 2
  • Page 3 3
  • Page 4 4
  • Page 5 5

Extech Instruments RE300 User manual

Type
User manual
This manual is also suitable for

Ask a question and I''ll find the answer in the document

Finding information in a document is now easier with AI