Page is loading ...

Item # 1001-977-412
Model # 7043-207SS
USE AND CARE GUIDE
PUSH BUTTON OPERATED SINK STRAINER
Questions, problems, missing parts? Before returning to the store,
call Glacier Bay Customer Service
8 a.m. -7 p.m., EST, Monday-Friday, 9 a.m. - 6 p.m., EST, Saturday
1-855-HD-GLACIER
HOMEDEPOT.COM/GLACIERBAY
THANK YOU
We appreciate the trust and confidence you have placed in Glacier Bay through the purchase of this sink strainer. We strive to continually create
quality products designed to enhance your home. Visit us online to see our full line of products available for your home improvement needs. Thank you
for choosing Glacier Bay!

2
HOMEDEPOT.COM/GLACIERBAY
Please contact 1-855-HD-GLACIER for further assistance.
Table of Contents
Table of Contents ........................................................... 2
Safety Information .......................................................... 2
Warranty .......................................................................... 2
Limited Lifetime Warranty ....................................................... 2
What is Covered......................................................................2
What is Not Covered ...............................................................2
Care and Cleaning .......................................................... 3
Pre-installation................................................................ 3
Planning Installation ................................................................3
Tools Required ........................................................................ 3
Package Contents ...................................................................3
Installation ....................................................................... 4
Operation ........................................................................ 5
Safety Information
Please read and understand this entire manual
before attempting to assemble, operate or install
the product.
Warranty
LIMITED LIFETIME WARRANTY
WHAT IS COVERED
The distributor warrants to the original consumer purchaser this product to be free from defects in material and workmanship under normal use in
residential applications. At its option, the Company will provide repair parts or replace defective product when the product is used in accordance with
the manufacturer’s specications.
The distributor provides a limited 5-year warranty on the nish of this product to the original purchaser. At its option, the distributor will provide repair
parts or replace defective product when the product is used in accordance with the manufacturer’s specications. Use of mild abrasive, abrasive
or chemical cleaners may damage the nish of the faucet. We recommend cleaning your faucet with a soft cloth, moistened with water. Damage
resulting from the use of abrasive or chemical cleaners SHALL VOID THIS WARRANTY.
WHAT IS NOT COVERED
This warranty is not applicable to any products or parts of products where damage is caused by use of non-genuine parts; is due to installation error,
product misuse, negligence or faulty maintenance; or where the product is not installed according to local building codes.
This warranty excludes labor charges or damage incurred during installation, repair or replacement, and any indirect, incidental or consequential
damages, losses, injury or costs of any nature. This warranty is in lieu of and excludes all other warranties, conditions and guarantees, whether
expressed or implied, including without restriction those of merchantability or tness of use.
Liability under this warranty will not exceed the purchase price for the product claimed to be defective by the original consumer purchaser. Some states
or provinces do not allow the exclusion or limitation of consequential damages so the above limitations or exclusions may not apply. This warranty gives
you specic legal rights and you may also have other rights which vary from state to state, or province to province.
Contact the Customer Service Team at 1-855-HD-GLACIER or visit www.HomeDepot.com/GlacierBay.

3
HOMEDEPOT.COM/GLACIERBAY
Please contact 1-855-HD-GLACIER for further assistance.
Pre-installation
PLANNING INSTALLATION
Before beginning assembly of product, make sure all parts are present. Compare parts with package contents list and hardware contents. If
any part is missing or damaged, do not attempt to assemble the product. Contact customer service for replacement parts.
Estimated Assembly Time: 30 minutes
Installations may vary depending on how the previous sink strainer was installed. Supplies necessary for the installation of the sink
strainer are not all included; however, they are available wherever plumbing supplies are sold.
TOOLS REQUIRED (not included)
Safety
glasses
Flat head
screwdriver
Plumer's
putty
PACKAGE CONTENTS
A
Part Description Quantity
A Push button strainer assembly 1
Care and Cleaning
Clean periodically with a soft cloth. Avoid abrasive cleaners,
steel wool, and harsh chemicals as these will dull the nish
and void your warranty.

4
HOMEDEPOT.COM/GLACIERBAY
Please contact 1-855-HD-GLACIER for further assistance.
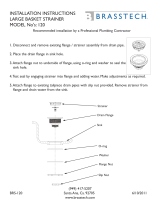
1
Preparing for installation
Flange
Push
button
White
threaded
piece
Black
cable
Remove the old sink strainer and thoroughly clean off old putty
from around the sink opening (top and bottom).
Holding the metal ange, unscrew the long white threaded piece
from under the ange and let it slide down the cable.
Holding the black cable connected to the metal ange and push
button, unscrew the metal push button assembly and set aside.
Make sure the long white thread piece in the step above does not
get lost or broken.
NOTE: If not already supplied in sink or counter top, suggested hole
diameter for push button mounted assembly is 1 inch.
2
Installing the basket strainer
Foam
washer
Rubber
Strainer
basket
Strainer
cup
washer
Remove the strainer basket from the strainer cup and set aside.
Separate the strainer cup from the strainer body by unscrewing
the bolt in the center of the cup. A screwdriver may need to be
used to loosen up the bolt if assembled too tight.
Apply a bead of plumer's putty around the underside of the
strainer cup ange.
Position the strainer cup in the sink opening and press down
rmly on all sides to compress putty.
From beneath the sink, slip the rubber and foam washers over
the strainer cup.
Align the strainer body with the strainer cup and re-connect the
cup to the body by threading the bolt into the center of the cup.
(This step may require two people.)
Tighten the center bolt with a screwdriver for a secure seal.
3
Installing the push button control
Rubbe
Push button
assembly
Mounting
nut
White
threaded
piece
Black
cable
r
washer
Choose the desired metal push button nish (chrome or stainless
steel). From underneath the sink, slide the black cable through
the opening and re-thread the metal push button assembly onto
the black cable. Make sure the rubber washer is on the underside
of the push button assembly (as shown in diagram).
From underneath the sink, connect the long white threaded
piece up through the opening and screw onto the push button
assembly.
Place the push button assembly and the white threaded piece
into the sink opening and screw the mounting nut from under-
neath the sink until the push button assembly is secured. Hand
tighten, plus 1/4 turn.
NOTE: Do not use a wrench for the step above to avoid overtightening
and/or damage to the plasic pieces.
Installation

HOMEDEPOT.COM/GLACIERBAY
Please contact 1-855-HD-GLACIER for further assistance.
4
Connecting to the tailpiece
Reattach the strainer to the drain pipe tailpiece (not included)
with a slip nut and washer (not included).
5
Adjusting the strainer basket
The strainer basket may need to be adjusted to maximize water
drainage.
Place the strainer basket into the drain body and open the drain
by clicking the push button assembly.
Check the gap between the basket and the strainer cup.
Remove the strainer basket from the strainer cup. Thread the
adjustment screw out of the basket strainer to maximize water
drainage.
If necessary, repeat the process until the stopper is properly
adjusted.
Once the correct height is set for the adjustment screw, move
the locking nut up to the base of the strainer cup to lock the
adjustment screw into place.
Operation
Uniquely designed push button open/close funciton lets you empty
the sink without reaching in with your hands.
Open – Push once to release and drain
Close – Push again to seal and ll
Installation (continued)

6
Questions, problems, missing parts? Before returning to the store,
call Glacier Bay Customer Service
8 a.m. -7 p.m., EST, Monday-Friday, 9 a.m. - 6 p.m., EST, Saturday
1-855-HD-GLACIER
HOMEDEPOT.COM/GLACIERBAY
Retain this manual for future use.
July 15, 2016

Núm. de artículo 1001-977-412
Núm. de modelo 7043-207SS
GUÍA DE USO Y CUIDADO
COLADOR DE LAVABO OPERADO POR BOTÓN DE PRESIÓN
¿Tiene preguntas, problemas, o faltan piezas? Antes de regresar a la tienda,
llame a Servicio al Cliente de Glacier Bay
de lunes a viernes de 8 a.m. a 7 p.m., sábado de 9 a.m. a 6 p.m., hora local del Este.
1-855-HD-GLACIER
HOMEDEPOT.COM/GLACIERBAY
GRACIAS
Apreciamos la confianza que ha depositado en Glacier Bay por la compra de este colador de lavabo. Nos esforzamos por crear continuamente
productos de calidad diseñados para mejorar su hogar. Visítenos en Internet para ver nuestra línea completa de productos disponibles para sus
necesidades de mejorar su hogar. ¡Gracias por elegir a Glacier Bay!

2
HOMEDEPOT.COM/GLACIERBAY
Para obtener asistencia, por favor, póngase en contacto llamando al 1-855-HD-GLACIER.
Índice
Índice ............................................................................... 2
Información de seguridad.............................................. 2
Garantía ........................................................................... 2
Garantía de por vida limitada ..................................................2
Lo que está cubierto ...............................................................2
Lo que no está cubierto ..........................................................2
Cuidado y limpieza ......................................................... 3
Pre-instalación ................................................................ 3
Planicación de la instalación ................................................. 3
Herramientas requeridas.........................................................3
Contenido del paquete ............................................................ 3
Instalación ....................................................................... 4
Funcionamiento .............................................................. 5
Información de seguridad
Por favor, lea y comprenda este manual completo
antes de intentar ensamblar, operar o instalar
el producto.
Garantía
GARANTÍA DE POR VIDA LIMITADA
LO QUE ESTÁ CUBIERTO
El distribuidor garantiza al comprador consumidor original que este producto está libre de defectos en materiales y mano de obra bajo uso normal
en aplicaciones residenciales. A su opción, la Compañía proporcionará piezas de repuesto o reemplazará el producto defectuoso cuando este es
usado de acuerdo con las especicaciones del fabricante.
El distribuidor proporciona una garantía limitada de 5 años sobre el acabado de este producto al comprador original. A su opción, el distribuidor
proporcionará piezas de repuesto o reemplazará el producto defectuoso cuando este es usado de acuerdo con las especicaciones del fabricante.
El uso de abrasivos suaves, limpiadores abrasivos o químicos puede dañar el acabado del grifo. Recomendamos que limpie su grifo con un paño
suave, humedecido con agua. El daño resultante del uso de abrasivos o limpiadores químicos ANULARÁ ESTA GARANTÍA.
LO QUE NO ESTÁ CUBIERTO
Esta garantía no aplica a cualquier producto o partes del producto donde el daño sea causado por el uso de piezas no genuinas; se deba a error en
la instalación, mal uso del producto, negligencia o mantenimiento defectuoso; o donde el producto no sea instalado de acuerdo a los códigos de
construcción locales.
Esta garantía excluye cargos de mano de obra o daños ocasionados durante la instalación, reparación o reemplazo, y cualquier daño indirecto, incidental
o consecuente, pérdidas, lesión o costos de cualquier naturaleza. Esta garantía sustituye y excluye a todas las otras garantías, condiciones y promesas,
sean expresas o implícitas, incluyendo sin restricción las de comercialización o idoneidad de uso.
La responsabilidad bajo esta garantía no excederá del precio de compra para el producto que se reclama como defectuoso por parte del comprador
consumidor original. Algunos estados o provincias no permiten la exclusión o la limitación de los daños consecuentes, por lo tanto, es posible que las
exclusiones o las limitaciones antes indicadas no correspondan a usted. Esta garantía le otorga derechos legales especícos y también puede tener
otros derechos que varían de un estado a otro, o de una provincia a otra.
Póngase en contacto con el Equipo de Servicio al Cliente llamando al 1-855-HD-GLACIER o visite www.HomeDepot.com/GlacierBay.

3
HOMEDEPOT.COM/GLACIERBAY
Para obtener asistencia, por favor, póngase en contacto llamando al 1-855-HD-GLACIER.
Pre-instalación
PLANIFICACIÓN DE LA INSTALACIÓN
Antes de comenzar a ensamblar este producto, asegúrese de que todas las piezas estén presentes. Compare las piezas con la lista de
contenido del paquete y la lista de herraje incluido. Si hace falta alguna pieza o se encuentra dañada, no intente ensamblar el producto.
Póngase en contacto con servicio al cliente para las piezas de reemplazo.
Tiempo estimado de ensamblado: 30 minutos
Las instalaciones pueden variar dependiendo de cómo se instaló el colador de lavabo anterior. Los suministros necesarios para la instalación
del colador de lavabo no están incluidos; sin embargo, están disponibles en cualquier lugar que se vendan suministros de fontanería.
HERRAMIENTAS REQUERIDAS (no incluidas)
Anteojos de
seguridad
Destornillador de
punta plana
Masilla de
fontanero
CONTENIDO DEL PAQUETE
A
Pieza Descripción Cantidad
A Ensamblaje del colador de botón de presión 1
Cuidado y limpieza
Límpielo periódicamente con un paño suave. Evite usar
limpiadores abrasivos, lana de acero y químicos fuertes
ya que opacarán el acabado y anularán su garantía.

4
HOMEDEPOT.COM/GLACIERBAY
Para obtener asistencia, por favor, póngase en contacto llamando al 1-855-HD-GLACIER.
1
Preparación para la instalación
Flange
Push
button
White
threaded
piece
Black
cable
Retire el colador de lavabo viejo y limpie completamente la masilla
vieja alrededor de la abertura del lavabo (parte superior e inferior).
Sosteniendo la brida de metal, extraiga la pieza roscada blanca larga
desde abajo de la brida y deje que deslice hacia abajo del cable .
Sosteniendo el cable negro conectado a la brida de metal y al
botón de presión, extraiga el ensamblaje del botón de presión
de metal y colóquelo a un lado.
Asegúrese de que la pieza roscada blanca larga en el paso
anterior no se pierda ni se rompa.
NOTA: Si no está ya suministrado en el lavabo o el mostrador, el
diámetro sugerido del agujero para el ensamblaje del montaje del
botón de presión es de 1 pulgada.
2
Instalación del colador de la cesta
Foam
washer
Rubber
Strainer
basket
Strainer
cup
washer
Retire la cesta del colador de la copa del colador y colóquela
a un lado.
Separe la copa del colador del cuerpo del colador desatornillando
el perno en el centro de la copa. Es posible que necesite un
destornillador para aojar el perno si este está muy apretado.
Aplique un cordón de masilla de fontanero alrededor de la parte
de abajo de la brida de la copa del colador.
Coloque la copa del colador en la abertura del lavabo y presione
rmemente en todos los lados para comprimir la masilla.
Desde abajo del lavabo, deslice las arandelas de goma y espuma
sobre la copa del colador.
Alinee el cuerpo del colador con la copa del colador y vuelva
a conectar la copa en el cuerpo insertando el perno en el
centro de la copa. (Este paso puede requerir dos personas.)
Apriete el perno central con un destornillador para obtener
un sello seguro.
3
Instalación del control del botón de presión
Rubbe
Push button
assembly
Mounting
nut
White
threaded
piece
Black
cable
r
washer
Elija el acabado metálico deseado del botón de presión (cromo
o acero inoxidable). Desde abajo del lavabo, deslice al cable
negro a través de la abertura y vuelva a enroscar el ensamblaje
del botón de presión de metal sobre el cable negro. Asegúrese
de que la arandela de goma está en la parte de abajo del ensamblaje
del botón de presión (como se muestra en el diagrama).
Desde abajo del lavabo, conecte la pieza roscada blanca larga
hacia arriba a través de la abertura y atornille sobre el ensamblaje
del botón de presión.
Coloque el ensamblaje del botón de presión y la pieza roscada
blanca en la abertura del lavabo y atornille la tuerca de montaje
desde abajo del lavabo hasta que esté seguro el ensamblaje del
botón de presión. Apriete a mano, más 1/4 de vuelta.
NOTA: No use una llave para el paso anterior para evitar apretar
demasiado y/o dañar las piezas plásticas.
Instalación
Brida
Cable
negro
Botón de
presión
Pieza
roscada
blanca
Junta del
colador
Arandela
de espuma
Arandela
de goma
Copa del
colador
Ensamblaje del
botón de presión
Arandela
de goma
Tuerca de
montaje
Pieza
roscada
blanca
Cable
negro

HOMEDEPOT.COM/GLACIERBAY
Para obtener asistencia, por favor, póngase en contacto llamando al 1-855-HD-GLACIER.
4
Conexión a la cola
Vuelva a instalar el colador a la cola de la tubería del desagüe
(no incluida) con una tuerca deslizantey arandela (no incluida).
5
Ajuste de la cesta del colador
Es posible que se necesite ajustar la cesta del colador para
maximizar el drenaje del agua.
Coloque la cesta del colador en el cuerpo del desagüe yabra el
desagüe haciendo clic en el ensamblaje del botón de presión.
Revise el espacio entre la cesta y la copa del colador.
Retire la cesta del colador de la copa del colador. Enrosque el
tornillo de ajuste hacia afuera del colador de cesta para
maximizar el drenaje del agua.
Si es necesario, repita el proceso hasta que el tapón esté
ajustado adecuadamente.
Una vez esté ajustada la altura correcta para el tornillo de ajuste,
mueva la tuerca de seguridad hacia arriba a la base de la copa
del colador para bloquear el tornillo de ajuste en su lugar.
Funcionamiento
La función de abrir/cerrar del botón de presión exclusivamente diseñado
le permite vaciar el lavabo sin tener que alcanzarlo con sus manos.
Abrir: presione una vez para liberar y drenar
Cerrar: presione de nuevo para sellar y llenar
Instalación (continuación)
Junta del
colador
Tuerca de seguridad
Tornillo
de ajuste
Tapón

6
¿Tiene preguntas, problemas, o faltan piezas? Antes de regresar a la tienda,
llame a Servicio al Cliente de Glacier Bay
de lunes a viernes de 8 a.m. a 7 p.m., sábado de 9 a.m. a 6 p.m., hora local del Este.
1-855-HD-GLACIER
HOMEDEPOT.COM/GLACIERBAY
Conserve este manual para uso futuro.
15 de julio de 2016
/