Page is loading ...

Evolution
Owner’s
Manual
&
Setup
Guide

1. READ INSTRUCTIONS - All safety and operating instructions should be read before the appliance is operated.
2. RETAIN INSTRUCTIONS - Safety and operating instructions should be retained for future reference.
3. HEED WARNINGS - All warnings on the appliance and in operating instructions should be adhered to.
4. FOLLOW INSTRUCTIONS - All operating and use instructions should be followed.
5. WATER AND MOISTURE- The appliance should not be used near water - near bathtub, washbowl, kitchen sink, laundry tub; in a wet base-
ment near a swimming pool, etc.
6. CARTS AND STANDS - Do not place this product on an unstable cart, stand, tripod, bracket, or table. The appliance
should be used only with a cart or stand that is recommended by the manufacturer.
7. VENTILATION - The appliance should be situated so that its location and position do not interfere with proper ventila-
tion. The appliance should not be situated on a bed, sofa, rug, or any surface that may obstruct cabinet openings.
8. HEAT - The appliance should be situated away from heat sources such as radiators, heat registers, stoves, or other
devices (including amplifiers) that produce heat.
9. POWER SOURCES - This product should be operated only from the type of power source indicated on the marking label.
If you are not sure of the type power supply in your home, consult your product dealer or local power company. For products intended to oper-
ate from battery power or other sources, refer to the operating instructions.
10. POWER CORD PROTECTION - Power supply cords should be routed so that they are not likely to be walked upon or pinched by items
placed upon or against them, paying attention to cords and plugs, convenience receptacles, and the point where they exit from the appliance.
11. POLARIZED PLUG - This appliance is equipped with a polarized line plug (a plug having one blade wider than the other). This plug will fit
into the power outlet only one way. This is a safety feature. If you are unable to insert the plug fully into the outlet, try reversing the plug. If the
plug still fails to fit, contact your electrician to replace your obsolete outlet. Do not attempt to defeat this safety feature.
12. LIGHTNING - For added protection for this product during a lightning storm, or when it is left unattended and unused for long periods of time,
unplug it from the wall outlet and disconnect the antenna or cable system. This will prevent damage to the product due to lightning and power
line surges.
13. OVERLOADING - Do not overload wall outlets, extension cords, or integral convenience receptacles, as this can result in a risk of fire or
electric shock.
14. CLEANING - Unplug this product from the wall outlet before cleaning. Do not use liquid cleaners or aerosol cleaners. Use a damp cloth for
cleaning.
15. NON-USE PERIODS - This amplifier should be unplugged from the outlet when the appliance is left unused for a long period of time.
16. OBJECT AND LIQUID ENTRY - Never push objects of any kind into this product through openings, as they may touch dangerous voltage
points or short-out parts that could result in a fire or electric shock. Never spill liquid of any kind on this product.
17. DAMAGE REQUIRING SERVICE - The appliance should be serviced by qualified personnel when:
a. The power supply cord or plug has been damaged; or
b. Objects have fallen on or liquid has been spilled into the appliance; or
c. The appliance has been exposed to rain; or
d. The appliance does not appear to operate normally or exhibits a marked change in performance; or
e. The appliance has been dropped or the enclosure is damaged.
18. SERVICING - Do not attempt to service this product yourself, as opening or removing covers may expose you to dangerous voltage or other
hazards. Refer all servicing to qualified service personnel. For service warranty information call the NHT Hotline number: 1-800-NHT-9993.
19. REPLACEMENT PARTS - When replacement parts are required, be sure the service technician has used replacement parts specified by
the manufacturer or that have the same characteristics as the original part. Unauthorized substitution may result in fire, electric shock, or other
hazards.
20. SAFETY CHECK - Upon completion of any service or repairs to this product, ask the service technician to perform safety checks to deter-
mine that the product is in proper operating condition.
IMPORTANT SAFETY INSTRUCTIONS
The lightning flash with the arrowhead symbol, within an equilateral triangle, is intended to alert the user to the presence of uninsulated
“dangerous voltage” within the product’s enclosure that may be of sufficient magnitude to constitute a risk of electric shock to persons.
The exclamation point within an equilateral triangle is intended to alert the user to the presence of important operating and maintenance
(servicing) instructions in the literature accompanying the appliance.
WARNING: TO REDUCE THE RISK OF FIRE OR ELECTRIC SHOCK, DO NOT EXPOSE THIS APPLIANCE TO RAIN OR MOISTURE.
THE APPARATUS SHALL NOT BE EXPOSED TO DRIPPING OR SPLASHING AND THAT NO OBJECTS FILLED WITH LIQUIDS, SUCH
AS VASES, SHALL BE PLACED ON THE APPARATUS
CAUTION
RISK OF ELECTRIC SHOCK
DO NOT OPEN
CAUTION: TO REDUCE RISK OF ELECTRICAL SHOCK, DO NOT REMOVE COVER (OR BACK). NO
USER SERVICEABLE PARTS INSIDE. REFER TO QUALIFIED SERVICE PERSONNEL.
CAUTION
TO PREVENT ELECTRIC SHOCK, DO NOT USE THIS (POLARIZED) PLUG WITH AN EXTENSION CORD, RECEP-
TACLE OR OTHER OUTLET UNLESS THE BLADES CAN BE FULLY INSERTED TO PREVENT BLADE EXPOSURE.

Evolution User Guide - Contents
1.0 Intro
1.1 Introduction, About This
Owner's Manual
1.2 Description By Model
1.3 Identifying Your System
2.0 Getting Organized
2.1 Unpacking
2.2 Parts List
3.0 Speaker Placement
3.1 Setting the Boundary Switch
3.2 2 Channel
3.3 5.1 Digital Surround Sound
3.4 Enhanced Digital Surround Formats
3.5 Center Channel
3.6 Subwoofers
3.7 Electronics
4.0 System Assembly
4.1 Supplies and Tools
4.2 Monitor Parts Assembly
4.3 T5 and T6 Tower Assembly
4.4 Assembling Monitors to Pedistals
5.0 Wiring Your Speakers
5.1 General Guides to Wire Layout
5.2 Speaker Phase
5.3 Connecting Speaker Wire
5.4 T5 and T6 Tower Wiring
5.5 Wiring For Monaural Bass
5.6 System Wiring Diagrams
6.0 Connecting Evolution Electronics to Your System
6.1 Signal Connections
6.2 Power Connections
7.0 Basic Settings for the X1 Active Crossover
8.0 X1 Bass Manager/ Active Crossover
8.1 Design
8.2 Placement
8.3 Explanation of Features
8.4 System Status Indicators
8.5 Fine Tuning
9.0 A1 Monaural Amplifier
9.1 Design
9.2 Placement
9.3 Rack Mounting the X1 and or A1
9.4 Power/Standby Mode
9.5 Courtesy Lights
9.6 System Status Indicators
9.7 Replacing the Fuse
9.8 Changing the Line Voltage Setting
10.0 Maintaining Your System
11.0 Evolution Technology
11.1 Monitor Technology
11.2 What is Virtual F.I.G.?
11.3 Boundary Switch
11.4 High Dynamic Range/Low Power
Compression
11.5 Orientation Independent Dispersion
12.0 Glossary of Terms
13.0 Trouble Shooting The A1 / X1
14.0 Specifications

1.1 Introduction, About this Owner's Manual
Congratulations on your purchase of an
Evolution System. We believe Evolution to be
the most flexible, high performance loudspeaker
collection available. Along with this manual, we
have included the following tools to assist you
with the setup of your Evolution system:
NHT Combination #2/#3 Phillips Screwdriver
NHT Binding Post Wrench with Bonus Bottle
Opener
Black Cotton Gloves
This Owner’s Manual will provide instructions for
initial assembly and connection of your system
and serve as an ongoing reference tool. The
assembly required is very simple and not time
consuming. The Manual is organized in logical
steps that will quickly take you from unpacking
to sitting back and enjoying the amazing sound
of Evolution.
If you require assistance at any time during the
assembly or installation of your Evolution sys-
tem, contact your authorized NHT dealer or call
our Customer Hotline at 1-800-NHT-9993 (648-
9993).
1.2 Description by Model
Monitors
M5 - Designed for small to
medium sized rooms. The
compact M5 is a 3-way,
acoustic suspension, magnetically shielded
monitor employing (2) 5.25" woofers, a 3"
midrange and a 1" aluminum dome tweeter.
M6 - Designed for medi-
um to large rooms. The
high output M6 is a 3-way,
acoustic suspension,
magnetically shielded monitor employing (2)
6.5" woofers, a 4" midrange and a 1" aluminum
dome tweeter.
Free Standing Subwoofers
W1 - The cabinet portion of
the U1 Powered Subwoofer
system. The W1 subwoofer
module employs dual, oppos-
ing 12" aluminum cone
woofers in a surprisingly compact enclosure.
W2 - The cabinet portion of
the U2 Powered
Subwoofer system. The
W2 subwoofer is only
available and used in
pairs. Each cabinet contains a 12" front firing,
aluminum cone woofer. This system is ideal for
in-cabinet or built in applications.
Tower Subwoofers
B5 - The B5 subwoofer bass mod-
ule, when mated with M5 Monitor,

becomes the Evolution T5 tower. It employs the
Evolution 12” aluminum cone woofer. The B5
cabinets are mirror imaged to allow for proper
woofer orientation.
B6 - The B6 subwoofer bass
module mates with the M6 to
form the T6 tower system.
Designed for larger rooms,
the mirror imaged B6 mod-
ules each contain two 12”
aluminum cone woofers.
Pedestals
P5 - The pedestal matched to the
M5. Allows the monitor to be
used free standing with separate
subwoofers or placed as a rear
channel speaker.
P6 - The pedestal matched to
the M6. Allows the monitor to
be used free standing with
separate subwoofers or
placed as a rear channel
speaker.
Electronics
A1 - A full range
(20Hz-20kHz), 250
watt (@ 6ohms), monaural class G amplifier for
use with all Evolution subwoofers and tower
bass modules, or to power an Evolution Monitor.
X1 - A dedicated,
active crossover for
use with all Evolution subwoofer and tower sys-
tems.
K5 / K6 - Parts kit needed to assemble one T5
or T6 tower.

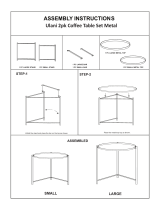
1.3 Identifying Your System
To the right is a chart by model, indicating the
various components and accessory kits includ-
ed with your purchase of either the T5/T6 tower
or U1/U2 subwoofer system. The M5/M6 and
P5/P6 are packaged individually with their
required hardware and accessories.
T5
Towers
T6
Towers
M5
M6
B5
Left
B6
Left
B5
Right
B6
Right
K5
Tow er
Kit
K6
Tow er
Kit
W1
Subwoofer
Cabinet
W2
Subwoofer
Cabinet
X1
Bass
Management/
Active
Crossover
A1
Amplifier
OK
Owners
Kit
1
2
1
1
2
1
1
1
2
1
1
2
1
2
1
1
1
1
1
2
1
1
U1
Subwoofer
U2
Subwoofer
T5
Towers
1
2
1
1
2
1
1
T6
Towers
1
2
1
1
2
1
2
1
1
1
1
U1
Subwoofer
1
2
1
1
U2
Subwoofer

2.0 Getting Organized.
CAUTION: Some of the
Evolution product is
heavy. We recommend
you enlist help in
unpacking, assembling
and moving the larger
speaker components.
The cartons for all tower speaker components
and assembly kits are color coded. The print on
the 5 series cartons (M5, B5, K5, P5) is red; the
print on the 6 series cartons (M6, B6, K6, P6) is
blue. All other Evolution product cartons use
black print.
2.1 Unpacking
We suggest you use an open area to unpack
and assemble your system, particularly if you
purchased a tower system. Remember, all
Evolution speaker components are finished in
fine lacquer. To avoid damage, assemble the
speakers on a soft surface, e.g. a carpet or blan-
ket.
Take care in unpacking your NHT products to
avoid marring the cabinets. It's best to use grav-
ity to your advantage. Open each carton as
shown, gently turning it upside down and pulling
the carton up and off of the speaker. Remove
the protective end caps, plastic bag and the
micro-foam. Avoid putting your hands directly
on the speaker drivers as they can be damaged
if handled roughly.
Once you have everything unpacked, inspect
and familiarize yourself with the contents. There
is a complete parts list for each product carton in
the next section.
Note: If possible, we recommend that you store
the shipping cartons and packing material in
case the system needs to be moved in the
future.
open flaps
flip over
slip carton
upwards

2.2 Parts List
M5 or M6 Monitor Carton:
M5 or M6 monitor
Grille carton:
Grille
Logo
Third foot
(2) Thumbscrews
(2) Plastic washers
(4) Rubber feet
Warranty card
W1 Carton:
Subwoofer cabinet for the U1 System
(4) Rubber feet
Warranty card
W2 Carton:
Subwoofer cabinet for the U2 System
(4) Rubber feet
Warranty card
X1 Carton:
X1 Active crossover
Power supply
Warranty card
A1 Carton:
A1 Amplifier
Power cord
Dual Subwoofer Adapter
Warranty card
K5 or K6 (tower assembly kit) Carton:
Mounting buttress
Monitor connection harness
(2) Aluminum stabilizer bars (for B5 or B6)
(4) ¼ - 20 spikes with lock nuts
(4) Metal cups
(4) ¼ - 20 machine screws
(7) 10-24 machine screws
(6) Rubber feet
B5 or B6 (left or right) Bass Module Carton:
Tower Base enclosure
Warranty card
P5 or P6 Carton:
P5 or P6 Pedestal
Metal mounting plate
Stabilizer bar carton:
(4) ¼ - 20 spikes with lock nuts
(4) ¼ - 20 machine screws
(5) 10-24 machine screws
(2) Wire channel brackets
(1) Wire channel
(4) 6 - ¾ flathead screws
(2) Aluminum stabilizer bars (for
P5 or P6)
(4) Metal cups
(8) Rubber feet
Warranty card

3.0 Speaker Placement
Now is a good time to finalize your plans for
speaker placement. This section outlines the
important issues to consider in configuring your
system for optimum performance.
The M5 and M6 monitors are designed to per-
form almost identically whether placed horizon-
tally or vertically. Below are some fundamental
guidelines on Monitor orientation:
1) You do not need to “toe-in” the monitors
toward the listening area; position them facing
straight ahead into the room, perpendicular to
the wall behind the speaker.
2) When oriented vertically, the tweeters
should be placed inward as shown below.
3) When using the M5 or M6 monitor for a
center channel, it should be placed horizontally.
4) When Evolution monitors are placed hor-
izontally in a cabinet, the tweeter orientation (top
or bottom) depends on the placement height. If
the monitor is placed above the listener’s ear,
the tweeter should be below the midrange driver
as shown in the photo. If the monitor is placed
below the listener’s ear, the tweeter should be
above the midrange driver.
3.1 Setting the Boundary Switch
Once you have determined how you will orient
your monitors, examine the terminal plate on the
back of your Evolution Monitor. You will find a
Boundary Switch on the plate that is used to
adjust the speaker’s response based on its
placement. If you intend to place the monitor in
a cabinet, on a shelf, on top of a television set or
against a wall, move the boundary switch to the
“1” position. If the monitor is two feet or more
from any surface described above, the switch
should be in the “0” position. If the Monitor is
used as part of a T5 or T6 Tower system, the
Boundary Switch should generally be in the “0”
position. If the Tower system is placed very
close to a corner, set the switch to the “1” posi-
tion.
Note: The terminal plate comes from the facto-
ry oriented for horizontal placement. This allows
speaker wire to hang down neatly from the
speaker. The terminal plate should be rotated
for vertical use. Instructions for rotating the cup
can be found in section 4.2.
An explanation of the technology behind the
guidelines described above can be found in sec-
tion 11 of this manual.

3.2 Two Channel
The diagram below illustrates the desired moni-
tor and subwoofer placement for two channel
(stereo) listening. If you are not using an
Evolution tower or pedestal and are orienting
the monitors vertically, try to place the M5 or M6
so the tweeters are at or near ear level.
3.3 5.1 Digital Surround
The diagrams below illustrate two options for
positioning your speakers in a 5.1 surround sys-
tem. The first option is ideal, assuming you
have sufficient space to place the front and rear
channel speakers equidistant from the listening
position.
If you are primarily listening from a position near
or against a rear wall as shown in the next illus-
tration, you can place the rear channel monitors
to the sides. Surround processors and
receivers have adjustable delay settings that
allow you to equalize the arrival times for the
rear channels. Refer to your Surround
Processor/AV Receiver manual to find the cor-
rect delay setting.
We realize it may be impossible to arrange your
room to accommodate the ideal surround setup.
Because every home is unique, we suggest you
consult your authorized NHT dealer for alterna-
tive placement advice or call our Customer
Hotline at 1-800-NHT-9993 (648-9993).
1.5 D
D
Front
Left
Front
Right
Subwoofer
=
5.1
==
=
=
Front
Left
Surround
Left
Front
Right
Surround
Right
Center Channel
Subwoofer

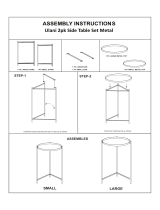
3.4 Enhanced Digital Surround Formats
Different surround formats use different num-
bers of surround speakers. 5.1 systems use two
surround speakers, 6.1 systems use three and
7.1 systems use four. Some AV receivers and
separate Surround Processors are equipped
with 6.1 or 7.1 surround formats. 6.1 refers to
the Dolby Digital Surround EX ™ or DTS
Surround ES ™ standard. The diagrams below
illustrate the suggested positions for 6.1 and 7.1
systems.
Note: Pay attention to the orientation of the
monitors (horizontal or vertical) and tweeters
(top/bottom or inside/outside) in your installation
for correct system performance.
Be aware that there are other surround formats
that are not covered in this setup guide. Consult
your authorized NHT dealer if you are unsure
about your particular system configuration.
=
6.1
=
=
=
Front
Left
Front
Right
Surround
Back
Center
Center Channel
Subwoofer
=
=
Surround
Left
Surround
Right
=
7.1
=
=
=
=
Front
Left
Surround
Back
Left
Front
Right
Surround
Back
Right
Center Channel
Subwoofer
==
Surround
Left
Surround
Right

3.5 Center Channel
The M5 and M6 monitors can be placed in a
home entertainment center or directly on top of
a TV as shown below. Remember, for proper
center channel sound dispersion, the Monitor
should be placed horizontally.
If you intend to place your center channel on a
television with a shallow top so that the Monitor
overhangs the television as illustrated below,
you will need to attach the included Third Foot
for proper support (see Section 4.2 for detailed
instructions).
3.6 Subwoofers
Subwoofers produce low frequencies that have
long wavelengths. These wavelengths are sim-
ilar to the dimensions of the room, so the sound
energy strongly interacts with the room bound-
aries. Fortunately, Evolution’s flexible sub-
woofer options, combined with the X1 active
crossover, solve most of the acoustic problems
caused by room interaction with bass frequen-
cies. Experimenting with subwoofer location is
the key to finding the best performance in your
listening environment. Position a subwoofer
cabinet so that its driver(s) are not directly
against a wall or piece of furniture. If you are
using two subwoofers, some improvement in
low frequency response can be achieved by
placing the second subwoofer asymmetrically in
the room.
Note: Because of the massive motor structure
used in the Evolution subwoofer driver, it is not
possible to magnetically shield it. Make sure
you place the subwoofer at least 18” from any
television to avoid discoloration.
Television
Third Foot
Boundary Switch
Set to the '1' position
W2W2

Evolution freestanding subwoofers offer tremen-
dous flexibility in placement. The following sug-
gestions illustrate a few of the possibilities avail-
able to you. If you have a unique placement
requirement or intend to use multiple subwoofer
systems, consult your authorized NHT dealer or
call our Customer Service Hotline at 1-800-
NHT-9993 for advice.
U1 Subwoofer System: The U1 subwoofer
enclosure is a dual, side-firing design. If the U1
is going to be located in a corner or against a
wall, we recommend that you keep the face with
the grille at least 4” from any boundary to obtain
optimum performance.
U2 Subwoofer System: The compact, front-fir-
ing, dual cabinets in the U2 system can be con-
veniently placed near corners , or placed in cab-
inets as illustrated below.
3.7 Electronics
Evolution electronics should be placed with the
rest of your electronic components. Both the A1
amplifier and the X1 Active Crossover can be
rack mounted if desired. Instructions for rack
mounting can be found in section 9.3 of this
manual.
Note: Due to the placement of the
A1's power switch on the rear panel,
do not install the A1 in a wooden box
or similar enclosure where access to
the power switch is blocked or inconvenient.
W1
>4"

4.0 System Assembly
This section covers the assembly required for
specific Evolution product configurations. The
operations are simple and easy to accomplish
quickly.
4.1 Supplies and tools
The tools you will need are:
- Combination #2/#3 Phillips screwdriver (pro-
vided in your Owner’s Kit)
- NHT binding post wrench (provided)
- Wire strippers
- Speaker wire (10 to 14 gauge)
- Tape measure or ruler
CAUTION: Some of the Evolution components
are heavy. If possible, have someone available
to assist you during assembly and placement of
the tower and/or subwoofer modules.
4.2 Monitor Parts Assembly
Step 1: Terminal Plate Orientation
The M5 and M6 are delivered with the Terminal
Plate oriented for horizontal monitor placement.
For vertical monitor placement, the Terminals
should be rotated so that the speaker wire
hangs straight down the rear of the speaker.
Place the monitor on a soft surface in the
desired orientation. See section 3.0 for illustra-
tion of proper tweeter orientation. DO NOT lay
the front baffle of the Monitor down on any sur-
face, as this will damage the drivers.
Remove the four screws from the Terminal Plate
on the back of the Monitor with the supplied #2
screwdriver. Gently pull the Terminal Plate
away from the cabinet and rotate it 90 degrees
so that the Boundary Switch is at the top.
Reinstall the screws in the pilot holes as shown.
Make sure the screws are snug, but be careful
not to over tighten them.
Remove Screws
Rotate Terminal Plate
Reinstall Screws

Step 2: NHT Third Foot for Center Channel Use
The M5 and M6 cartons include a “Third Foot”,
a support that stabilizes the monitor when it is
mounted on a television. If the top of the televi-
sion is shallower than the Monitor is deep, the
rear of the Monitor will not be fully supported.
The Third Foot will provide the necessary sup-
port in this case. The Third Foot can also be
used to aim the Monitor down towards the lis-
tening area if the television is significantly above
eye level.
There are two parts supplied with the Third Foot
for assembly: (2) plastic washers and (2) thumb-
screws. The plastic washers go between the
Third Foot and the cabinet to protect the cabi-
net’s lacquer finish. Assemble these parts as
shown and screw the two thumbscrews partially
into the two threaded holes next to the terminal
plate.
Attach two rubber feet about an inch from the
bottom front edge of the monitor. Set the moni-
tor on the television and adjust the length of the
third foot so that it rests on the TV set as shown.
Hand tighten the thumbscrews.
Note: if the center channel is to rest flat on the
TV or shelf, use all four rubber feet (on in each
corner of the bottom surface of the speaker)
Step 3: Logo Placement
The M5 and M6 are supplied with a metal NHT
logo that can be attached to the grilles when the
speakers are placed in the vertical position only.
The logo should be attached at the bottom of the
grille. To attach the logo, hold the grille up to a
light to locate the two holes in the frame through
the cloth. Line up the two posts on the back of
the logo with the holes and press the logo firmly
through the cloth and into the grille frame until it
is fully seated against the grille.
Note: The logo badge is not to be attached
when the speaker is placed horizontally.
Television

Step5: Attaching Monitor Grilles
The M5 and M6 are designed to sound best
when the grilles are used (they may sound
slightly bright if played without the grilles). To
install them, line up the four pins on the back of
the grille with the four rubber cups located in the
corners of the Monitor’s front baffle. Firmly press
all four corners of the grille until the pins seat
against the rubber cups.
Note: The M5 and M6 grilles are intentionally
curved. The grille curve is a design element that
completes a larger curve when a Monitor is
attached to a B5/B6 subwoofer module or either
pedestal stand. The curve is shallow enough
that it may go unnoticed when the monitors are
placed on shelves. The illustration to the right
shows how an Evolution tower looks when the
grille is installed.

4.3 T5 and T6 Tower Assembly
Depending on which model you purchased, you
will now need the parts contained in either the
K5 or K6 assembly kit.
Step 1: Installing the Stabilizer Bars
The aluminum bars attach to the bottom of the
bass module to provide stability for the tower
system. Carefully turn the B5 or B6 bass mod-
ule upside down on a soft surface. There are
four threaded holes on the bottom of the cabi-
net. Gently place the stabilizer bars over the
threaded holes. Start the four large (1/4-20)
screws by hand. Once all the bolts are started,
tighten them with the supplied #3 Phillips screw-
driver.
Note: If you intend to use spikes with the stabi-
lizers, do not install them at this time. The tow-
ers are difficult to move once the spikes are in
place. Spike installation is covered in Step 9.
Step 2: Adhering the Rubber Feet
Once the stabilizers are mounted, carefully turn
the bass module upright. Peel the paper cover
off the back of the two round rubber feet and
attach them to the top front of the B5 or B6.
There are slight indentations on the cabinet to
help you position the rubber feet properly.
.

Step 3: Attaching the Monitor Connection
Harness
The Monitor Connection Harness connects the
Monitor’s speaker terminals to the terminal cup
on top of the subwoofer module. This terminal
cup is internally wired to the uppermost of the
two terminal cups at the bottom rear of the sub-
woofer module. Remove the two gold-plated
screws from the terminal cup on the top of the
B5 or B6 with the #2 screwdriver. Insert the ring
terminal ends of the cable onto the screws and
fasten them into the terminal cup. Check that
the wire is oriented vertically and that you have
connected the red ring terminal to the bass mod-
ule terminal marked in red (and the black ring
terminal to the bass module terminal marked
with black).
Step 4: Installing the Mounting Buttress
The mounting buttress secures the monitor to
the bass module. Place the buttress over the
four threaded holes on the top of the bass mod-
ule. Start four of the smaller screws (10-24) with
the #2 screwdriver. Center the buttress by mea-
suring the distance between the base of the but-
tress and the speakers’ edge in a few places as
illustrated. Once you have checked alignment
you may tighten the screws, making sure they
are snug, but do not over tighten them.
Step 5: Route Monitor Connection Harness
Route the harness through the channel inside
the buttress as shown below.

Step 6: Bass Module Orientation
At this point you need to decide in which orien-
tation to place the subwoofers. There are two
options, woofers facing inwards or outwards as
shown in the illustration.
If there is going to be a large object located
between the towers (a television or large piece
of furniture), place the subwoofer modules so
that the woofers face to the outside (away from
the television). If there are no large objects
between the towers, orient the subwoofers so
that the woofers face to the inside (towards each
other). Remember that the subwoofer modules
should be at least 18” from the sides of a televi-
sion to prevent discoloration of the screen.
Step 7: Mounting a Monitor to the Bass Module
Place the monitor on the buttress as shown.
Verify orientation. The front of the monitor
should be resting on the round rubber feet. Line
up the threaded holes in the back of the monitor
with the holes in the buttress. Fasten the moni-
tor to the buttress with three small (10-24)
screws using the #2 screwdriver. Start the cen-
ter screw first, and then start the outer screws.
Make sure that the Monitor Connection Harness
extends from the top of the buttress as illustrat-
ed below.
18"

Step 8: Connecting the Monitor Connection
Harness to the Monitor
Loosen the nuts on the binding post terminals
enough to allow the spade terminals on the
Harness to fit under them. Make sure you
match wire colors for proper polarity, (red to red,
black to black). The cable should lay flat against
the back of the monitor. Tighten the terminal
nuts using the NHT wrench.
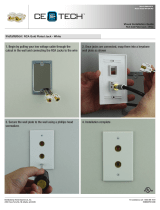
Step 9: Install spikes (optional)
Spikes couple the speaker to the floor, improv-
ing the performance of the system.
Note: Position the speakers in their permanent
location before installing the spikes. It is very dif-
ficult to move the
assembled speakers
once the spikes are in
place. We suggest
two people for this
operation, one to hold
the speaker and the
other to install and
adjust the spikes.
Install the locking nuts
on the threaded
spikes and screw
them all the way down
the shaft until they
stop. Carefully tilt the tower speaker to one side
and screw the metal spikes into the bottom of
the front and rear aluminum stabilizer bars (at
least 3/8”) to the desired height. Hand tighten
the nut to lock it in position. When both sides
are installed, check to ensure that the speaker
does not rock. If necessary, tilt the speaker,
loosen the nut and adjust the height until the
speaker rests firmly on all four spikes. You can
use a small wrench to further tighten the nuts.
Be aware that wood or tile floors can be dam-
aged by the spike’s sharp tip. Four small metal
cups are included with the tower assembly kit to
fit under each spike and protect your floors.
Once the spikes have been mounted to the sta-
bilizer bar, slip a cup under each spike as you
gently lower the tower to the floor.
/