Page is loading ...

H-32 User Guide
WINDOWS EMBEDDED COMPACT 7
Version 1.02
Opticon Sensors Europe B.V.

USER GUIDE
H-32 User Guide
ii
All the information in this document is subject to change without notice.
2015 copyright Opticon. All rights reserved.
This manual may not, in whole or in part, be copied, photocopied, reproduced, translated or converted to any
electronic or machine readable form without prior written consent of Opticon.
Limited Warranty and Disclaimers
PLEASE READ this manual CAREFULLY before installing or using the product.
Serial Number
A serial number appears on all Opticon products. This official registration number is directly related to the device
purchased. Do not remove the serial number from your Opticon device. Removing the serial number voids the
warranty.
Warranty
Unless otherwise agreed in a written contract, all Opticon products are warranted against defects in materials and
workmanship for two years after purchase excluding batteries. Opticon will repair or, at its option, replace
products that are defective in materials or workmanship with proper use during the warranty period. Opticon is
not liable for damages caused by modifications made by a customer. In such cases, standard repair charges will
apply. If a product is returned under warranty and no defect is found, standard repair charges will apply. Opticon
assumes no liability for any direct, indirect, consequential or incidental damages arising out of use or inability to
use both the hardware and software, even if Opticon has been informed about the possibility of such damages.
Packaging
The packing materials are recyclable. We recommend that you save all packing material to use should you need
to transport your scanner or send it for service. Damage caused by improper packaging during shipment is not
covered by the warranty.
Trademarks
Trademarks used are the property of their respective owners.
Opticon, Inc. and Opticon Sensors Europe B.V. are wholly owned subsidiaries of
OPTOELECTRONICS Co., Ltd., 12-17, Tsukagoshi 4-chome, Warabi-shi, Saitama, Japan
335-0002. TEL +81-(0) 48-446-1183; FAX +81-(0) 48-446-1184

USER GUIDE
H-32 User Guide
iii
Federal Communications Commission (FCC) Statement
This equipment has been tested and found to comply with the limits for a Class B digital device, pursuant to part
15 of the FCC rules.
Rule 15.21: You are cautioned that changes or modifications not expressly approved by the part responsible for
compliance could void the user’s authority to operate the equipment.
These limits are designed to provide reasonable protection against harmful interference in a residential
installation. This equipment generates uses and can radiate radio frequency energy and, if not installed and used
in accordance with the instructions, may cause harmful interference to radio communications. However, there is
no guarantee that interference will not occur in a particular installation. If this equipment does cause harmful
interference to radio or television reception, which can be determined by turning the equipment off and on, the
user is encouraged to try to correct the interference by one or more of the following measures:
Reorient or relocate the receiving antenna.
Increase the separation between the equipment and receiver.
Connect the equipment into an outlet on a circuit different from that to which the receiver is connected.
Consult the dealer or an experienced radio/TV technician for help.
This device complies with Part 15 of the FCC Rules. Operation is subject to the following two conditions:
1. This device may not cause harmful interference and
2. This device must accept any interference received, including interference that may cause undesired
operation of the device.
FCC RF Radiation Exposure Statement:
For body worn operation, this phone has been tested and meets FCC RF exposure guidelines when used with an
accessory that contains no metal and that positions the handset a minimum of 0.5 cm (0.20 in.) from the body.
Use of other accessories may not ensure compliance with FCC RF exposure guidelines.

USER GUIDE
H-32 User Guide
iv
Declaration of Conformity (DOC)
with Regards to Essential Requirements of EU Directives and FCC
requirements
Brand name: Opticon
Model: H32, H32-2D
Product: Windows Mobile PDA
Is in Conformity with the following:
EMC Directive: 2004/108/EC
EN 55022: 2010/AC:2011
EN 55024: 2010
EN 301 489-1 V1.9.2: 2011
EN 301 489-17 V2.2.1: 2012
R&TTE Directive: 1999/5/EC
EN 300 328 V1.7.1: 2006
EN 301 893 V1.6.1: 2011
FCC Part 15 Subpart B, Class B
FCC Part 15 Subpart C
This Device complies with Part 15 of the FCC rules.
Operation is subject to the following two conditions:
1. This device may not cause harmful interference and,
2. This device must accept any interference received, including interference that may cause undesired
operation.
Safety:
Laser safety: IEC 60825-1: 2007 (2nd Edition)
Photo biological safety of
lamps and lamp systems: IEC62471:2006-07 (1stEdition) / EN62471:2008-09
LVD: IEC 60950-1:2005 (2nd Edition) / Am 1:2009
EN 60950-1: 2006+A11: 2009+A1: 2010+A12:2011
SAR: EN62209-2:2010/ EN 50566:2013/ EN 62479:2010
OET 65
Environmental:
RoHS Directive: EN 50581:2012
2011/65/EU
REACH Directive: Does not contain any of the Substances
1907/2006/EC of Very High Concern (144 SVHC)
WEEE Directive: EN 50419:2006
2012/19/EU
2002/96/EC
2003/108/EC

USER GUIDE
H-32 User Guide
v
Safety Information
General
Please read the following information carefully before you start using this device to avoid any damages caused
by improper usage:
The device is not charged when you take it out of the box. Charge the battery for at least eight hours
before first use. Do not remove the battery while charging.
Do not use batteries which have not been specified by the manufacturer and not qualified with the
system per the standard of IEEE-Std-1725 -2006, as this may present a risk of fire, explosion, leakage
or other hazard.
Do not charge the battery with an unspecified AC Adapter, as this may cause damage to both the device
and the battery.
When discarding the batteries, dispose of them in a proper manner, according to your local laws.
Do not open the device housing or tamper with the device, as it will void your warranty.
Do not apply excessive force on this product, as it may cause damage to the screen or the internal
component.
Do not use the device at gas or refueling stations, chemical plants, and places containing explosives or
flammable materials. Observe local guidelines.
Use only manufacturer specified stylus. Do not scratch the screen with sharp objects.
Do not clean the screen with chemical detergents. Only use cloths specifically designed for cleaning
liquid displays or a soft cloth moisturized with water drops, to wipe the device screen.
Do not expose the device to direct sunlight or leave the device in a humid environment for extended
periods of time as this may cause damage to the device and battery.
Do not immerse the device in water.
The device may interfere with the navigation and/or communication systems on aircraft. The laws of
most countries prohibit using this device while on an aircraft. Observe local guidelines.
This product may cause medical equipment to malfunction. The use of this device is forbidden in most
hospitals and medical clinics. Observe local guidelines.

USER GUIDE
H-32 User Guide
vi
Additional Battery Information
Please read the following information carefully to understand battery safety.
Do not disassemble or open, crush, bend or deform, puncture, or shred the battery.
Do not modify or remanufacture, attempt to insert foreign objects into the battery, immerse or expose to
water or other liquids, or expose to fire, explosion, or other hazard.
Only use the battery for the system for which it was specified.
Only use the battery with charging system that has been qualified with the system per this standard. Use
of an unqualified battery or charger may present a risk of fire, explosion, leakage, or other hazard.
Do not short circuit a battery or allow metallic or conductive objects to contact the battery terminals.
Battery usage by children should be supervised.
Avoid dropping the H-32 or battery. If the H-32 or battery is dropped, especially on hard surface, and the
user suspect damage, take it to service center for inspection.
Improper battery use may result in a fire, explosion, or other hazard.
Seek medical advice immediately if a battery has been swallowed.
Do not leave the battery where the temperature is 60°C (140°F) or more.
Do not solder lead directly to the battery body.
Do not heat nor solder the terminals of the battery.
Do not charge beyond the condition which described on the delivery specification.
Do not inverse charge the battery.
In the event the Battery Pack leaks and the fluid gets into one's eye, do not rub the eye. Rinse well with
water and immediately seek medical care. If left untreated, the battery fluid could cause damage to the
eye.
Charge the battery at least every six months. An excessive over-discharge may cause an abnormal
chemical reaction, which may result in acid leakage or fire of the battery.
Despite being rechargeable, the battery has a limited life span. Replace it when usage time becomes
short.
Safety of Laser Products: International Standards Laser Class 2
This product complies with JIS C6802: 2005 Class 2, IEC60825 -1+A2: 2001 Class 2 and 21CFR 1040.10 and
1040.11 except for deviations pursuant to Laser Notice No.50, dated June 24, 2007.
Class 2 Laser devices are not considered to be hazardous when used for their intended purpose.
Use of controls, adjustment of procedures other than those specified herein may result in hazardous laser light
exposure. Do not look directly into the light beam with optical instruments; it may pose an eye hazard.

USER GUIDE
H-32 User Guide
vii
Document Revisions
Date
Version
Number
Document Changes
24-04-2015
1.00
Initial Draft
09-11-2015
1.01
Factory reset update, troubleshooting update.
17-03-2016
1.02
Multi language OS, barcode firmware update tool, keypad table

USER GUIDE
H-32 User Guide
viii
Table of Contents
1 Introduction ............................................................................................................................................................. 11
1.1 .... Scope and Purpose .......................................................................................................................................................... 11
1.1.1 Configuration ............................................................................................................................................................................. 11
1.1.2 Software version ...................................................................................................................................................................... 11
1.1.3 Service Information ................................................................................................................................................................ 11
2 Getting Started ........................................................................................................................................................ 12
2.1 .... Overview .............................................................................................................................................................................. 12
2.2 .... Unpacking ........................................................................................................................................................................... 12
2.3 .... H-32 Detailed View ......................................................................................................................................................... 13
2.4 .... Initial setup ........................................................................................................................................................................ 14
2.4.1 Enable backup battery ........................................................................................................................................................... 14
2.4.2 Installing main battery .......................................................................................................................................................... 14
2.4.3 Charging the battery ............................................................................................................................................................... 14
2.4.4 Charging temperature ............................................................................................................................................................ 15
2.4.5 Power on the H-32 ................................................................................................................................................................... 15
3 Using the H-32......................................................................................................................................................... 16
3.1 .... Tapping touch screen with the H-32 stylus ......................................................................................................... 16
3.2 .... Calibrating the touch screen ...................................................................................................................................... 16
3.3 .... Backlight ............................................................................................................................................................................. 16
3.3.1 Adjust display backlight timer ........................................................................................................................................... 16
3.3.2 Adjust display backlight brightness ................................................................................................................................. 17
3.4 .... Date time ............................................................................................................................................................................. 17
3.4.1 Set Date and Time zone ......................................................................................................................................................... 17
3.4.2 Change Time sync settings ................................................................................................................................................... 17
3.5 .... Power scheme ................................................................................................................................................................... 18
3.6 .... Input Panel / Virtual keyboard ................................................................................................................................ 19
3.7 .... Language ............................................................................................................................................................................ 20
3.8 .... Reboot / Reset ................................................................................................................................................................... 21
3.8.1 Reboot ........................................................................................................................................................................................... 21
3.8.2 Factory Reset ............................................................................................................................................................................. 22
4 Power modes and batteries ............................................................................................................................... 23

USER GUIDE
H-32 User Guide
ix
4.1 .... Power modes ..................................................................................................................................................................... 23
4.1.1 On .................................................................................................................................................................................................... 23
4.1.2 User Idle ....................................................................................................................................................................................... 23
4.1.3 System Idle .................................................................................................................................................................................. 23
4.1.4 Suspend state ............................................................................................................................................................................. 23
4.1.5 Off .................................................................................................................................................................................................... 23
4.2 .... Batteries .............................................................................................................................................................................. 24
4.2.1 Checking battery status ......................................................................................................................................................... 24
4.2.2 Main battery pack .................................................................................................................................................................... 24
4.2.3 Backup battery .......................................................................................................................................................................... 24
4.2.4 Battery hot swap ...................................................................................................................................................................... 24
4.2.5 Charging the main battery ................................................................................................................................................... 25
5 Barcode data capture ........................................................................................................................................... 26
5.1 .... Introduction ....................................................................................................................................................................... 26
5.1.1 1D laser scanner ....................................................................................................................................................................... 26
5.1.2 2D imager .................................................................................................................................................................................... 26
5.2 .... Scanning consideration ................................................................................................................................................ 26
5.2.1 Range ............................................................................................................................................................................................. 26
5.2.2 Angle .............................................................................................................................................................................................. 26
5.3 .... Laser scanning .................................................................................................................................................................. 27
5.4 .... Imager scanning .............................................................................................................................................................. 27
5.5 .... Setup barcode module .................................................................................................................................................. 27
5.5.1 Basic Settings ............................................................................................................................................................................. 27
5.5.2 Code Options .............................................................................................................................................................................. 29
5.5.3 Read Options .............................................................................................................................................................................. 30
5.5.4 Additional Settings .................................................................................................................................................................. 31
5.5.5 Barcode Registry settings ..................................................................................................................................................... 31
5.6 .... Tray Icons ........................................................................................................................................................................... 32
5.7 .... Barcode Software SDK .................................................................................................................................................. 32
5.8 .... Updating Barcode Module Firmware .................................................................................................................... 32
6 Wi-Fi and Bluetooth .............................................................................................................................................. 34
6.1 .... Accessing the Laird Connection Manager ........................................................................................................... 34
6.1.1 Status tab ..................................................................................................................................................................................... 34
6.1.2 Configuration tab ..................................................................................................................................................................... 36
6.1.3 Configuration – Bluetooth .................................................................................................................................................... 38

USER GUIDE
H-32 User Guide
x
6.1.4 Diagnostic tab ............................................................................................................................................................................ 40
6.1.5 Using the Laird system tray ................................................................................................................................................. 42
6.1.6 LCM Bluetooth Tray Icon ...................................................................................................................................................... 43
7 Keypad ........................................................................................................................................................................ 44
7.1 .... Keypad table ...................................................................................................................................................................... 45
8 Update OS image .................................................................................................................................................... 46
8.1 .... Update by RESCUE DISK .............................................................................................................................................. 46
8.2 .... Update by NAND IMAGE .............................................................................................................................................. 46
8.3 .... Update by UPDATE OS IMAGE .................................................................................................................................. 47
8.3.1 Command line options ........................................................................................................................................................... 48
8.4 .... Switching from non MUI to a MUI OS version .................................................................................................... 48
8.4.1 Update table ............................................................................................................................................................................... 49
9 Troubleshooting the H-32 .................................................................................................................................. 51

Introduction
H-32 User Guide
11
1 Introduction
1.1 Scope and Purpose
The H-32 user guide provides some basic information on setting up and operating the H-
32 Windows Embedded Compact 7 terminal.
1.1.1 Configuration
The H-32 will be available in two different setups. The difference between the two
terminals is the scan module. The H-32 with 1D option uses the Opticon MDL-2001 laser
module and the H-32 with 2D option uses the Opticon MDI-3100 imager.
1.1.2 Software version
The H-32 runs a Windows Embedded Compact 7 operating system. To determine the
current software version build for the H-32 tap -> Control Panel -> Version ->
button.
1.1.3 Service Information
In case there is problem with the H-32 or more information is needed, contact Opticon
Support.
When contacting the Opticon support please have the following information available:
Model name H-32 1D or 2D
Serial number
Hardware revision
O/S version
In case the H-32 was purchased through one of Opticons business partners, contact the
Opticon business partner for support.

Getting Started
H-32 User Guide
12
2 Getting Started
2.1 Overview
The H-32 is a ruggedized handheld barcode scanner. It has a Windows Embedded
Compact 7 operating system several wireless connections options. The H-32 has an
integrated numeric keyboard for easy data entry. The H-32 is powered by a main battery
that can be removed and replaced without the need for special tools.
Wireless network and Bluetooth connections are handled by a Laird communication
module. The WLAN has an 802.11 a/b/g/n radio working at 2.4 and 5GHz. The
Bluetooth support 2.1 + EDR and support SPP, HID, file transfer, OBEX object push and
PAN.
For the H-32 there are several accessories available including a single slot charging
cradle a five slot multi cradle and a special holster.
2.2 Unpacking
The H-32 is supplied in a white carton and should contain the following items.
H-32 terminal including stylus
Wrist strap
Stylus connection cord
USB cable
Quick start guide
Note: The battery of the H-32 is an item that is sold separately.

Getting Started
H-32 User Guide
13
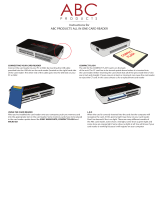
2.3 H-32 Detailed View
No.
Part
Function
1
LCD Display
2
Charging status LED
3
Barcode scanning status LED
4
Optical scan window
5
Barcode trigger keys
6
Micro USB connector
7
Speaker
8
Battery lid
9
System connector
10
Eyelet for wrist strap and stylus cord
11
Power button

Getting Started
H-32 User Guide
14
2.4 Initial setup
To use the H-32 for the first time:
Connect accessories
Enable the backup battery
Insert main battery
Connect power source
Power on H-32
Configure H-32
2.4.1 Enable backup battery
To enable the backup battery in the H-32 the battery lid needs to be removed.
When the dip switch slide is in the ON position the backup battery is
enabled.
When the backup battery is in the off position then the backup
battery is disabled
Note: Set dip switch slide to the off position when H-32 is not going to be used
for a long time to prevent deep discharge.
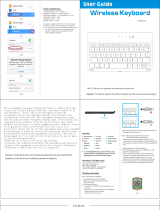
2.4.2 Installing main battery
Step 1
Step 2
Step 3
Remove battery cover by
moving the two slides to
each other.
Insert the battery with the
contacts first then align the
battery contacts to the
spring contacts in the H-32
and push in the battery.
Put the battery cover back
and move the slides to the
outside.
2.4.3 Charging the battery
Before using the H-32 for the first time, charge the main battery until the charging
indicator turns green.
To charge the H-32 use either the supplied USB cable or the single slot or five slot multi
cradle. The backup battery is automatically charged when the dip switch has been set to

Getting Started
H-32 User Guide
15
the ON position. Charging of this backup battery can take more than 24 hours to fully
charge. The backup battery is only used for swapping main battery.
Source
Charging time
USB Cable
Approximately 8 hours
Single slot cradle
Approximately 4 hours 30 minutes
5 slot multi cradle
Approximately 4 hours 30 minutes
H-32 Charging LED indicator
Charge status LED
Description
Off
H-32 is not charging; H-32 is not correctly inserted in the cradle
or charger is not powered.
RED
Charging; Battery status very low.
ORANGE
Charging; Battery status between low and fully charged.
GREEN
Charging complete battery fully charged.
Note: Charge state status LED update can take up to 5 seconds to show the
correct state.
2.4.4 Charging temperature
Charge batteries in temperatures from 0°C to 40°C (32°F to 104°F). The charging of the
main battery is controlled by the intelligent H-32 power management system. When
temperatures exceed the 40°C the power management system will stop charging and
continue when an acceptable temperature is reached. This will help for safe operation
and longer battery life.
2.4.5 Power on the H-32
To power on the H-32 press the H-32 red power button. When turning on the H-32for
the first time or after a reset the Opticon splash screen appears for 50 seconds. If the H-
32 detects that screen calibration is not correct the screen calibration will appear. This
calibration will always appear after a factory reset.
Note: When H-32 powers up after inserting battery for the first time, the device
boots up and powers on automatically.
2.4.5.1 Calibrate the display
Calibrate the touch screen to have the cursor match the tip of the stylus. Remove the
stylus from the H-32. Carefully press and hold the tip of the stylus on the center of every
target. Repeat the same steps while the target moves around the screen, then tap the
screen to continue.

Using the H-32
H-32 User Guide
16
3 Using the H-32
This chapter explains the buttons, status icons, and controls on the H-32, and provides
basic instructions for using the H-32.
3.1 Tapping touch screen with the H-32 stylus
Note: Always use the supplied H-32 stylus for tapping the touch screen. Never
use a pencil, pen or other sharp or abrasive object on the touch screen.
Hold the stylus as if it were a pen or pencil. Touch an element on the screen with the tip
of the stylus from the screen. When the stylus is not used place it back in the stylus
holder.
The use of the stylus similar as the use of a mouse with a difference that a right-click of
the mouse can be simulated by tap and holding the touch screen. When a stylus is lost a
replacement can be ordered.
Note: The stylus is meant to use with the touch screen. Never use the stylus on
the power or keypad buttons, use a finger to operate these buttons.
3.2 Calibrating the touch screen
If the touch screen is not responding properly to the stylus tap it might be needed to
recalibrate the touch screen.
Recalibration involves tapping the center of the target. If the center is missed keep the
stylus on the screen and move the tip of the styles to the targets center and the lift the
stylus.
To recalibrate the display, tap -> Control Panel -> Stylus -> Calibration tab. To
begin recalibration, tap the Recalibrate button. Carefully press and hold the tip of the
stylus on the center of every target. Repeat the same steps while the target moves
around the screen, then tap the screen to continue.
3.3 Backlight
The backlight of the H-32 is high current consumer in the H-32. Setting the backlight
brightness and backlight timer can have a big effect on operation time.
3.3.1 Adjust display backlight timer
To get to the backlight timer tap -> Control Panel -> Display -> Backlight tab. There
are two options for the backlight timer. Option one is when the H-32 is running on
battery power. Option two is when the H-32 is being charged by either cradle or USB
cable. The H-32 default settings are for battery power 30 seconds and for external
power 10 minutes. After the time has expired the backlight is turned off. When both
checkboxes for battery and external power are unchecked the backlight will never turn
off while the H-32 is on.

Using the H-32
H-32 User Guide
17
3.3.2 Adjust display backlight brightness
To get to the backlight brightness dialog tap -> Control Panel -> Display ->
Backlight tab and tap the Advanced button. The default brightness is set to 30%. The
brightness can be changed by moving the slider to the left or right. Changing the slider
setting will show immediately the slider backlight brightness. The new settings are
applied when the button is tapped. Tapping the button will ignore the slider
settings and use the previous brightness setting.
3.4 Date time
The H-32 has in internal real time clock. When the H-32 is started for the first time the
default date is 1-1-2015. The default time zone is Pacific Time. Default a date/time
synchronizing service is running in the H-32. Time sync happens automatically when
there is a Wi-Fi connection and the set time server can be reached.
3.4.1 Set Date and Time zone
To get to the Date/Time properties dialog there are two options, double tap the clock in
the Taskbar or tap -> Control Panel -> Date/Time. In the Date/Time properties
dialog the date, time and Time zone can be set a checkbox is available for enabling
automatic adjustment for daylight saving time. After making changes tap the apply
button or tap the button.
3.4.2 Change Time sync settings
Time synchronization settings can be changed but only from the registry. To have the
registry changes to take effect then either programmatically a new sync is requested or
a reboot of the H-32 is needed.
Time service registry setting
[HKEY_LOCAL_MACHINE\Services\TIMESVC]
"server"=hex(7):\
74,6F,63,6B,2E,75,73,6E,6F,2E,6E,61,76,79,2E,6D,69,6C,00,\
74,69,6D,65,2E,77,69,6E,64,6F,77,73,2E,63,6F,6D,00,00
"refresh"=dword:0036EE80
"recoveryrefresh"=dword:000493E0

Using the H-32
H-32 User Guide
18
Value: type
Description
Server
REG_SZ or
REG_MULTI_SZ
Default 2 time servers have been set in the H-32. The above settings
match.
tock.usno.navy.mil
time.windows.com
Refresh
DWORD
Specifies the period, in milliseconds, between synchronizations
with the SNTP server. This value needs to be higher the
recoveryrefresh value minimum value is 300000 (0x000493E0)
milliseconds. Default refresh time 1 hour.
Recoveryrefresh
DWORD
Specifies the time, in milliseconds, until next synchronization if the
previous attempt failed. Default recovery refresh time is 5 minutes.
Note: Both SNTP and NTP are clients of the User Datagram Protocol (UDP). The
UDP port number assigned to NTP is 123.
3.5 Power scheme
The power scheme is used for power control. There are three different states that the
power scheme supports. The settings for the power scheme can be set for AC powered
(charging) or battery powered operation. To get to the power scheme tap -> Control
Panel -> Power -> Schemes tab.
State
Description
User Idle
After the user idle timer has expired the H-32 will shut down a number
of services e.g. the backlight.
System Idle
After the System idle time has expired more services will be shut down.
Suspend
When the suspend timer has expired the H-32 will be turned off. This
has the same effect as if the user pressed the power button for a short
time.
The power scheme timers work cumulative. This means that the system idle timer can
only expire after the user timer has expired. When all three idle states are set to one
minute the H-32 power scheme operate like this:
User Idle – after 1 minute inactivity
System idle – after 2 minutes of inactivity
Suspend – after 3 minutes of inactivity

Using the H-32
H-32 User Guide
19
3.6 Input Panel / Virtual keyboard
The input panel or also called virtual keyboard can be used to input data. The input
panel will not come up automatically when the cursor is placed into an edit field. The
keyboard can be controlled from the taskbar. If the automatic mode of the input panel is
wanted a registry key needs to be changed.
Input panel registry setting
[HKEY_CURRENT_USER\ControlPanel\Sip]
"TurnOffAutoDeploy"=dword:00000000
Value: type
Description
TurnOffAutoDeploy
REG_DWORD
The default value for this key is 0.
If this value is set to 0, the auto deploy is turned on.
If this value is set to 1, the auto deploy feature is permanently
turned off.
When the multiple language OS is used then there will be additional keyboards
available.
Keyboard
Description
Chajei IM Name keyboard. To use this
keyboard also the Microsoft Chan Jei pIME
needs to be set from the -> Control Panel -
> Regional Settings -> Input tab.
French AZERTY keyboard layout
German QWERTZ keyboard layout

Using the H-32
H-32 User Guide
20
International keyboard can also input Korean.
To be able to input Korean the Microsoft
Korean IME97 needs to be set from the ->
Control Panel -> Regional Settings -> Input
tab.
Phonetic IM Name keyboard. To be able to
input Traditional Chinese with this keyboard
the Microsoft Bopomofo pIME input method
need to be selected from the -> Control
Panel -> Regional Settings -> Input tab.
Portuguese keyboard layout.
Russian keyboard layout.
Default QWERTY US keyboard layout
Note: For some keyboards to get the correct values on the display of the H-32
also the correct language needs to be set from the Regional control panel.
3.7 Language
/