Page is loading ...

*TH6320WF2003 shown. Other models may vary.
M37764
PM
Menu FanMode
Fan
Auto
Mode
Heat
Wake Away HomeSleep
Following Schedule
33-00410EFS-03
T6 Pro Smart
Programmable Thermostat
User Guide
TH6320WF2003,
TH6220WF2006
This user guide is designed to help you get acquainted with your new T6 Pro Smart
thermostat. Check out the table of contents on page 2 to browse by topic.
Welcome
Web: honeywellhome.com
Phone: 18006333991
Social: Twitter: @HoneywellHome, Facebook: Honeywell Home
Need help? Get in touch.

2
Table of contents
Thermostat Features ...............................................................................................................3
Thermostat overview ............................................................................................................... 4
Resideo App overview ............................................................................................................. 5
Basic thermostat operation
Adjusting the temperature ....................................................................................................................5
Schedule overrides ....................................................................................................................................6
Adjusting the temperature in Auto mode ......................................................................................7
Selecting system mode ........................................................................................................................... 8
Built-in compressor protection ...........................................................................................................9
Setting the fan .............................................................................................................................................9
WiFi connectivity
Connecting to a WiFi network .............................................................................................................10
Disconnecting and reconnecting to a WiFi network................................................................11
Main menu settings
Main menu overview ................................................................................................................................. 12
Scheduling options ...................................................................................................................................13
Setting location-based temperature control and smart scheduling
in the Resideo App ...........................................................................................................................13
Time-based scheduling ................................................................................................................. 15
Turning off scheduling ................................................................................................................... 18
Screen lock settings ..................................................................................................................................19
Ventilation settings ...................................................................................................................................20
WiFi settings .................................................................................................................................................21
WAC setting .........................................................................................................................................21
Turning thermostat WiFi on and off ........................................................................................21
Adjusting backlight brightness ...........................................................................................................22
Enabling/disabling Adaptive Intelligent Recovery .................................................................... 22
Setting the time and date ......................................................................................................................23
Cleaning the thermostat screen ......................................................................................................... 24
Choosing Fahrenheit or Celsius .........................................................................................................24
Reset options ................................................................................................................................................ 25
Viewing equipment status .....................................................................................................................25
Viewing thermostat information ......................................................................................................... 26
Alerts and maintenance reminders ...................................................................................27
Appendices
General system information .................................................................................................................29
Troubleshooting .......................................................................................................................................... 30
Frequently asked questions (FAQs) .................................................................................................. 31
Regulatory information ...........................................................................................................................33
Warranty information ...............................................................................................................................34

3
Thermostat Features
Flexible scheduling: You can choose to use location-based temperature control
(geofence technology), program a set schedule or use a combination of both to make
sure your home is always comfortable.
• Location-based temperature control: Using geofence technology, the T6 Pro
Smart thermostat will automatically use your smartphone’s location, which
can save energy when you leave and make your home comfortable by the time
you return. See page 13 for more.
• Smart scheduling: Adds a Sleep period to location-based temperature
control. See page 13 for more.
• Time-based scheduling: You can program a schedule where every day
is different, a schedule where weekdays and weekends are different or a
schedule where every day is the same. There are four adjustable periods per
day: Wake, Away, Home and Sleep. See page 15 for more.
• No schedule: You can also choose not to set a schedule and adjust the
thermostat manually. See page 18 for more.
Tip: The Resideo App can be used to manage multiple thermostats and multiple users
in a household.
Smart Alerts: The T6 Pro Smart thermostat will send alerts for things like extreme
indoor temperatures and reminders for things like filter changes.
Auto change from heat to cool: When Auto mode is selected, the T6 Pro Smart
thermostat can automatically determine whether your home needs heating or
cooling to reach the desired temperature.
Adaptive Intelligent Recovery: The T6 Pro Smart thermostat learns your heating
and cooling cycle times to make sure the system delivers the temperature you
want, when you want it.
!

4
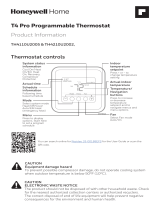
Mode
Touch to select
system mode:
• Auto (if enabled)
• Heat
• Cool
• Off
• Em Heat
(Emergency Heat)
Menu
Touch to program
a schedule and see
other customizable
options.
Fan
Touch to select fan
mode:
• Auto
• On
• Circulate
Desired temperature
Shows desired
indoor temperature.
Indoor Temperature
Shows current
indoor temperature.
Adjust temperature
Touch + or - to
set your desired
temperature.
Idle mode
The thermostat will enter idle mode 45 seconds after the last
button touch. The screen may dim to save power depending on
the brightness setting. See page 22 to learn how to adjust
the screen’s brightness.
PM
Menu FanMode
Fan
Auto
Mode
Heat
Thermostat overview

5
Resideo App overview
To see all the products connected by the Resideo App, visit
honeywellhome.com.
The Resideo App is regularly enhanced and may change.
Adjusting the temperature
To adjust the desired temperature up or down,
touch or on the thermostat home screen.
If you’re using location-based temperature
control or a time-based schedule, adjusting the
temperature will override the current set point
until the next schedule period or geofence event,
unless you want to use one of the schedule
overrides below.
AM
Menu FanMode
Fan
Auto
Mode
Heat
Wake AwayHomeSleep
Following Schedule
SCHEDULEFANMODE
72
72˚
MY HOME
Thermostat
FOLLOWING SCHEDULE
Access the
menu
Set desired
temperature
Schedule your home
comfort
Select System
mode Auto/Heat/
Cool/Off
Select Fan mode
Auto/On/Circulate.

6
Schedule overrides
Hold Until (temporary hold): Overrides the current temperature set point for a
maximum of 12 hours. You might use this feature to hold a temperature until a
specific time.
Permanent hold: Overrides the current temperature set point permanently until you
manually change it or reactivate a schedule.
Vacation hold: Overrides the current temperature set point for a longer period of time.
You might use this feature when you know you’ll be gone for awhile. (Note: Vacation
hold can only be activated using the Resideo App.)
Setting temporary hold (for use with time-based schedules only)
1 Touch or on the thermostat home
screen to set your desired temperature. Hold
Until will appear together with the time the
hold will end.
2 To change when the hold will end, touch the
time and wait until the time starts blinking.
Then, touch or to set when you want
the hold to end. Touch Hold Until once more
to confirm changes and return to the home
screen.
After the hold period ends, the thermostat will
automatically return to the program schedule. If
you want to cancel the hold, touch Hold Until and
then touch Run Schedule.
Setting permanent hold
1 Touch or on the thermostat home
screen to reach your desired temperature.
Hold Until will appear together with the time
you want the hold to end.
2 Touch Hold Until. Permanent Hold will appear
on screen. Touch Permanent Hold to hold this
temperature until you manually change it.
To end permanent hold and return to the
program schedule, touch Permanent Hold and then
touch Run Schedule.
AM
AM
Heat On
Hold Until
Menu FanMode
Fan
Auto
Mode
Heat
AM
AM
Hold UntilPermanent Hold
Run Schedule
Back
AM
AM
Heat On
Hold Until
Menu FanMode
Fan
Auto
Mode
Heat
AM
AM
Hold UntilPermanent Hold
Run Schedule
Back

7
Setting vacation hold (must be set using the Resideo App)
1 Open the Resideo App. Tap the Menu icon
in the upper-left corner of the screen, then
tap Vacation.
2 Turn Vacation Settings on, then choose a From
date/time and a To date/time.
3 Review the settings for each device listed.
Tap each device to change its settings. When
you’re done, tap the back arrow to save your
changes.
You can manually adjust the temperature set
point during vacation hold using the Resideo
App or by touching or on the thermostat.
This new set point will remain in effect until the
end of vacation hold. To cancel vacation hold,
touch Run Schedule on the thermostat screen to
return to the program schedule, or tap Vacation
Until in the app and then tap End Vacation.
Auto mode (when the thermostat automatically chooses heating or cooling to
reach your desired temperature) is disabled by default. If your heating or cooling
professional enabled it, you’ll see Auto appear as an option under Mode on the
thermostat home screen.
To choose your preferred temperatures for both heating and cooling in Auto mode,
follow the steps below.
Adjusting the temperature in Auto mode
AM
Heat On
Menu FanMode
Fan
Auto
Mode
Heat
Wake AwayHomeSleep
Following Schedule
Auto Chg. On
AM
Heat On
Menu FanMode
Fan
Auto
Mode
Heat
Wake AwayHomeSleep
Following Schedule
Auto Chg. On
AM
Menu FanMode
Fan
Auto
Mode
Heat
Wake AwayHomeSleep
Following Schedule
Auto Chg. On
AM
Heat On
Menu FanMode
Fan
Auto
Mode
Heat
Wake AwayHomeSleep
Following Schedule
1 Touch Mode on the thermostat home screen
until Auto appears. Then touch or to
choose your preferred temperature for the
mode that’s currently active (heating or
cooling).
2 Next, touch the text area where the active
mode is displayed to switch to the inactive
mode.
3 Touch or to choose your preferred
temperature in the other mode. After
5 seconds of inactivity, your setting will take
effect, and the thermostat screen will show
the set point of the active mode.
My Home
Thermostat
INDOOR
72
ermosta
R
ermosta
R

8
Current system mode (Heat, Cool, Off, Em
Heat) is displayed to the left of current indoor
temperature on the thermostat home screen.
The mode that’s currently running (Heat On, Cool
On, Em Heat On) is displayed in the upper-left
corner of the thermostat home screen.
To cycle through the available modes, touch Mode
on the thermostat home screen and select the
appropriate mode for your desired temperature.
• Heat: Controls the heating system.
• Cool: Controls the cooling system.
• Off: Turns the heating and cooling systems
off.
• Auto: When enabled, the thermostat will
automatically use heating or cooling to reach
the desired temperature.
• Em Heat: Controls auxiliary or emergency
heat; only available on systems with a heat
pump.
Notes:
• Em Heat and Auto modes may not appear
on the thermostat screen or in the app
depending on your equipment and how your
thermostat was installed.
• Em Heat is only available for heat pump
systems. The thermostat must also be
configured to control a heat pump and an
auxiliary/emergency heat stage.
• When Auto mode is selected, Auto Chg. On
will appear in the upper-right corner of the
thermostat home screen, and the active mode
(Heat or Cool) will display under Mode. To set
your temperature preferences in Auto mode,
see page 7.
Selecting system mode
Auto Chg. On
AM
MenuFanMode
Fan
Auto
Mode
Wake AwayHomeSleep
Following Schedule
AM
MenuFanMode
Fan
Auto
Mode
Cool
Wake AwayHomeSleep
Following Schedule
AM
Menu FanMode
Fan
Auto
Mode
Heat
Wake AwayHomeSleep
Following Schedule
Auto Chg. On
AM
MenuFanMode
Fan
Auto
Mode
Wake AwayHomeSleep
Following Schedule
AM
MenuFanMode
Fan
Auto
Mode
Cool
Wake AwayHomeSleep
Following Schedule
AM
Menu FanMode
Fan
Auto
Mode
Heat
Wake AwayHomeSleep
Following Schedule
Auto Chg. On
AM
MenuFanMode
Fan
Auto
Mode
Wake AwayHomeSleep
Following Schedule
AM
MenuFanMode
Fan
Auto
Mode
Cool
Wake AwayHomeSleep
Following Schedule
AM
Menu FanMode
Fan
Auto
Mode
Heat
Wake AwayHomeSleep
Following Schedule

9
If the compressor is restarted too soon after
a shutdown, system damage can occur. The
built-in compressor protection feature forces
the compressor to wait a few minutes before
restarting, helping to prevent damage to the
heating or cooling system.
During the brief wait period, the thermostat will
flash Cool On (or Heat On if you have a heat
pump) until the wait period is over, at which point
the compressor will turn back on.
Note: The flashing Cool On or Heat On message
is also used for startup delay protection if AC
power loss occurs.
Built-in compressor protection
Setting the fan
Touch Fan on the thermostat home screen to
cycle through available fan modes until the
desired mode is displayed. Your changes will
save automatically.
Available fan modes:
• On: The fan will run continuously.
• Auto: The fan will run only when the heating
or cooling system is on.
• Circ: The fan will run at random intervals at
least 35% of the time to keep air circulating
throughout your home.
AM
Menu FanMode
Fan
Circ
Mode
Heat
Wake AwayHomeSleep
Following Schedule
AM
Menu FanMode
Fan
On
Mode
Heat
Wake AwayHomeSleep
Following Schedule
AM
Menu FanMode
Fan
Auto
Mode
Heat
Wake AwayHomeSleep
Following Schedule
AM
Menu FanMode
Fan
Circ
Mode
Heat
Wake AwayHomeSleep
Following Schedule
AM
Menu FanMode
Fan
On
Mode
Heat
Wake AwayHomeSleep
Following Schedule
AM
Menu FanMode
Fan
Auto
Mode
Heat
Wake AwayHomeSleep
Following Schedule
AM
Cool On
Menu FanMode
Fan
Auto
Mode
Cool
Wake AwayHomeSleep
Following Schedule
AM
Menu FanMode
Fan
Circ
Mode
Heat
Wake AwayHomeSleep
Following Schedule

10
To configure and control your T6 Pro Smart
thermostat remotely, the thermostat needs to
be connected to the Resideo App through your
home’s WiFi network. Follow the simple steps
below to get connected.
1 Make sure your smartphone or tablet is
connected to a 2.4 GHz WiFi signal. (Many
WiFi routers broadcast both a 2.4 GHz signal
and a 5.0 GHz signal. If given the option,
choose the 2.4 GHz signal.)
2 Download the Resideo App from the App
Store or Google Play if you haven’t already.
3 Open the Resideo App. Log in to your account,
if needed create an account. Tap Add Device
and follow the prompts in the App.
WiFi connection status
The thermostat’s WiFi connection status is
located in the upper-right corner of the screen.
To troubleshoot WiFi connectivity issues, see the
FAQs on page 31.
• WiFi is connected
MCR36326
AM
Menu FanMode
Fan
Auto
Mode
Heat
Wake AwayHomeSleep
Following Schedule
WiFi is connected
Wifi is on and
connected
Wifi is disconnected
or wifi is not setup
Wifi is off
• WiFi is disconnected or WiFi isn’t set up
MCR36326
AM
Menu FanMode
Fan
Auto
Mode
Heat
Wake AwayHomeSleep
Following Schedule
WiFi is connected
Wifi is on and
connected
Wifi is disconnected
or wifi is not setup
Wifi is off
• WiFi is turned off
MCR36326
AM
Menu FanMode
Fan
Auto
Mode
Heat
Wake AwayHomeSleep
Following Schedule
WiFi is connected
Wifi is on and
connected
Wifi is disconnected
or wifi is not setup
Wifi is off
Connecting to a WiFi network
MCR36326
AM
Menu FanMode
Fan
Auto
Mode
Heat
Wake AwayHomeSleep
Following Schedule
WiFi is connected
Wifi is on and
connected
Wifi is disconnected
or wifi is not setup
Wifi is off

11
If you need to disconnect the thermostat from
one WiFi network and reconnect it to another
(because you’re replacing your WiFi router, for
example), follow the steps below.
1 Select the device to disconnect from the
network.
2 Tap the settings button at the top-right,
and then tap Thermostat Configuration.
3 Tap Delete Thermostat.
4 Tap Add Device and follow the prompts in the
Resideo App.
Disconnecting and reconnecting to a WiFi network

12
Touch Menu on the thermostat home screen and then use the or arrows to page
through the following options.
Main menu overview
CLEAN SCREEN
Disable the touchscreen for
30 seconds so you can clean it.
TEMP SCALE
Choose Fahrenheit or Celsius.
RESET
Schedule: Resets to the default
MondayFriday, SaturdaySunday
schedule.
HomeKit: Clears your Apple® HomeKit™
credentials (provided HomeKit was
previously configured).
WiFi: Clears your WiFi router
credentials (provided a WiFi router was
previously configured).
EQMP STATUS
View current status of your heating or
cooling equipment.
DEVICE INFO
View your thermostat’s device
information, such as MAC ID, model
number and firmware version.
ALERTS
View, snooze or dismiss active alerts
and reminders (available only when you
see the active alert symbol on the
thermostat home screen).
Navigating the menus
Menu: Touch to access all options and sub-menus.
or : Touch to page through options and sub-menus.
or : Touch to adjust things such as temperature, time and date.
Back or Cancel: Touch to discard changes or go back to the previous menu.
Select: Touch to access a sub-menu.
Done: Touch to confirm selection.
Tip: You can touch Select to access a sub-menu, or you can touch the text in the
message area (the word SCHEDULE, for example).
SCHEDULE
Create and edit a schedule for your
thermostat to follow.
SCREEN LOCK
Lock the screen to limit access to
thermostat settings.
VENTILATION
Set ventilation preferences. (Not
available on all thermostats.)
WIFI
Configure or change the thermostat’s
WiFi settings.
BRIGHTNESS
Set the brightness of the thermostat
display.
RECOVERY
Enable or disable the Adaptive
Intelligent Recovery feature.
CLOCK / DATE
Manually set the clock, clock format
and daylight saving time in the
CLOCK sub-menu, and date in the
DATE sub-menu. (The thermostat will
automatically display this information
and the CLOCK and DATE sub-menus
won’t be available when connected to
WiFi.)

13
The T6 Pro Smart thermostat offers flexible scheduling options that include:
• Location-based temperature control
• Smart scheduling
• Time-based schedule
• No scheduling
On the thermostat home screen, you’ll be able to see what kind of schedule is
currently running, as well as which schedule period you’re currently in.
Scheduling options
Location-based temperature control and smart scheduling
Location-based temperature control uses geofence technology and your
smartphone’s GPS location to automatically adjust your thermostat as you come
and go. When you leave the geofence boundary, the thermostat will change to
your preferred Away temperature, and when you enter the geofence boundary, the
thermostat will change to your preferred Home temperature.
Setting location-based temperature
control and smart scheduling in the
Resideo App
These two options can only be activated using
the Resideo App. To enable location-based
temperature control and/or set a smart schedule,
follow the steps below.
1 Open the Resideo App and tap the Schedule
(calendar) icon .
2 Tap Options in the upper-right corner.
3 Tap Switch to geofencing and then Use Geofencing.
AM
Menu FanMode
Fan
Auto
Mode
Heat
Following Schedule
AM
Menu FanMode
Fan
Auto
Mode
Heat
Following Schedule
Schedule status
Indicates if the thermostat is using location-
based temperature control or following a time-
based schedule.
Schedule period
Shows current schedule period (Wake, Away,
Home or Sleep).
AM
Menu FanMode
Fan
Auto
Mode
Heat
Wake AwayHomeSleep
Following Schedule
Schedule
70º
MY HOME Options
Grouped Days Single Day
WEEKDAYS COOL TO HEAT
70º
Wake 6:00 AM
T
º
T
º
Create New Time Schedule
Switch to Geofencing
Cancel

14
4 Choose the temperatures you prefer when
you’re home (one for cooling and one for
heating). Use the up and down arrows to
select your preferred temperatures, then tap
NEXT.
5 Choose the temperatures you prefer when
you’re away, then tap NEXT.
6 You’ll then be asked if you want to set a
time and temperature for sleep. (Adding a
Sleep period to location-based temperature
control is what we call a smart schedule.) To
change the Sleep Start and Sleep End times,
tap the time next to each setting. To change
your preferred temperatures for sleeping, tap
the up or down arrows for each temperature
setting. Tap NEXT to continue.
7 Review your preferences. If you need to make
edits, tap the period you want to edit, then
tap Done when finished.
When location-based temperature control
is active, you’ll see a symbol in the upper-
left corner of the thermostat screen, along
with Home or Away status and your preferred
temperature. If you set an additional Sleep period
in the Resideo App, you’ll also see Following
Schedule in the upper-left corner of the
thermostat screen.
If you manually change the temperature when
location-based temperature control is active, the
new temperature will remain in effect until you
cross the geofence.
To adjust the geofence boundary, follow the
steps below.
1 Open the Resideo App, tap the menu icon
in the upper-left corner and then tap
Geofence.
2 Tap Geofence Radius, and when the map and
current geofence appear, touch, hold and
drag the black dot to adjust the geofence
boundary.
3 Tap SAVE to finish.
AM
Menu FanMode
Fan
Auto
Mode
Heat
Away Home Sleep
Following Schedule
70º
Done
WHEN I’M AWAY COOL TO
70º
Use My Away Settings
HEAT TO

15
Editing location-based temperature control and smart scheduling on the
thermostat
With time-based scheduling, you can program your thermostat to follow a predictable
schedule based on time of day or day of the week. Here are the programming options:
• Everyday: Every day (MonSun) has the same schedule
• Weekday & Weekend: Weekdays (MonFri) have the same schedule and weekends
(SatSun) have the same schedule
• Individual Days: Each day has a different schedule.
There are also four adjustable periods per day: Wake, Away, Home and Sleep.
Your T6 Pro Smart thermostat comes with the following default Weekday & Weekend
schedule that can help reduce your heating and cooling expenses. To change
schedule types (from Weekday & Weekend to a different option) you must use the
Resideo App. See page 13 for instructions.
Period Start Time Heat
(MonFri) Cool
(MonFri) Heat
(SatSun) Cool
(SatSun)
Wake 6:00 am 70 ° 78 ° 70 ° 78 °
Away 8:00 am 62 ° 85 ° 62 ° 85 °
Return 6:00 Pm 70 ° 78 ° 70 ° 78 °
Sleep 10:00 Pm 62 ° 82 ° 62 ° 82 °
Time-based scheduling
To edit your preferred Home, Away and Sleep
temperatures or your Wake and Sleep times while
location-based temperature control is active,
follow the steps below. You can also make edits
in the Resideo App.
1 Touch Menu on the thermostat home screen.
2 Touch the or arrows until you see
SCHEDULE, then touch Select.
3 Touch the or arrows until you see the
period you want to view or edit, then touch
Select. Touch the time or temperature you
want to edit and use the or buttons to
adjust up or down. Touch Select to confirm.
4 Touch the or arrows to edit additional
periods, then touch Back twice to return to
the thermostat home screen.
To learn more about location-based temperature
control, check out these FAQs.
Back Select Back Select Sched.
On/Off
HeatTo
Done
HeatTo
Back Select
HeatTo
Back Select

16
Setting a time-based schedule in the Resideo App
Back Select Back Select Sched.
On/Off
To select a schedule type and set a time-based
schedule in the Resideo App, follow the steps
below.
1 Tap the Schedule (calendar) icon , tap
OPTIONS in the upper-right corner and then
tap Create new time schedule.
2 Choose the schedule type that best matches
your weekly routine.
3 A default schedule will appear. Tap the period
you want to edit (Wake, for example), then
choose the time you want the period to start
and your preferred temperatures for cooling
and heating. Tap SAVE to finish and move on
to other periods.
4 After you’re done editing your schedule, tap
DONE.
Setting a time-based schedule on the thermostat
To edit a time-based schedule on the thermostat,
follow the steps below.
1 Touch Menu on the thermostat home screen.
2 Touch the or arrows until you see
SCHEDULE, then touch Select.
3 Touch the or arrows to select a period in
a day or set of days, then touch Select on the
period you want to edit. (You can only edit
a period of days according to the schedule
type selected. To change schedule type, use
the Resideo App.)
4 Touch the time area, then touch or to
adjust when the period starts. Touch Select to
confirm.
AM
HeatTo
Back Select
SCHEDULEFANMODE
FOLLOWING SCHEDULE

17
5 Touch the temperature area, then touch
or to adjust your preferred temperature
for the mode that’s currently active (either
heating or cooling). Touch Select to confirm.
Then touch or to adjust your preferred
temperature for the inactive mode. Touch
Select to confirm.
6 Edit the next period or use the until you
see DONE, then press Select to save changes
and go to the home screen.
Note: To temporarily cancel a schedule period
(such as SaturdaySunday Away, for example,
because you’ll be home), go to the SCHEDULE
option and touch the or arrows to select
a period. Touch Select on the period you want
to cancel, then touch Cancel Period. To reactive
the period you cancelled, touch Cancel Period
again to select period start time and preferred
temperature.
Back Select Sched.
On/Off
AM
HeatTo
Back Select
Changing schedule type on the Resideo App
To change from a Weekday & Weekend schedule
to an Everyday or Individual Days schedule (for
example), follow the steps below. You must use
the Resideo App to change schedule types.
1 Open the Resideo App and tap the Schedule
(calendar) icon .
2 Tap OPTIONS in the upper-right corner.
Then tap Create new time schedule and choose
a schedule type (Everyday Schedule or
Weekday & Weekend).
3 Preferences are changed through Grouped
Days by default (Monday - Friday and
Saturday - Sunday or every day). If you want
to edit individual days, tap SINGLE DAY. Set
your time and temperature preferences for
the new schedule type. Touch DONE to finish.
Back Select Back Select Sched.
On/Off
AM
HeatTo
Cancel Period
Done
SCHEDULEFANMODE
FOLLOWING SCHEDULE
Schedule
70º
MY HOME Options
Grouped Days Single Day
WEEKDAYS COOL TO HEAT
70º
Wake 6:00 AM
T
º
T
º

18
Resetting the thermostat to the default schedule
Back Select
Back Sched.
On/Off
Back Select
Back Select
No
Yes
To reset your thermostat to the default Monday-
Friday, SaturdaySunday schedule, follow the
steps below.
1 Touch Menu on the thermostat screen.
2 Touch the or arrows until you see
RESET, then touch Select.
3 Touch the or arrows until you see
SCHEDULE, then touch Select.
4 Touch Yes to confirm.
Turning off scheduling
To turn off scheduling and control the
temperature manually, follow the steps below.
1 Touch Menu on the thermostat screen.
2 Touch the or arrows until you see
SCHEDULE, then touch Select.
3 Touch Sched. On/Off to toggle between
Schedule On and Schedule Off. (It may take
a few seconds for your selection to become
active.)
4 Then, touch Back twice to return to the
thermostat home screen.

19
To prevent unauthorized access to the thermostat, or to limit changes to the system
settings, there are two screen lock settings you can apply.
• Partial lock: Only the temperature can be changed.
• Full lock: No access is allowed without a PIN number.
Screen lock settings
Back Select
Back Select
No
Yes
Back Select
Back Select
AM
Fan
Auto
Mode
Heat
Wake AwayHomeSleep
Following Schedule
Applying a screen lock setting
1 Touch Menu on the thermostat home screen.
2 Touch the or arrows until you see
SCREEN LOCK, then touch Select.
3 Touch the or arrows to select your
desired screen lock setting, then touch Select.
4 A PIN number will appear on screen. Write it
down and keep it in a safe place.
5 Touch Select, and confirm your screen lock
setting by touching Yes.
A partially or fully locked screen will be indicated
by a lock symbol at the bottom of the thermostat
screen.
Unlocking the screen
1 Touch the lock symbol on the thermostat
home screen.
2 When prompted to enter a PIN number,
touch or to select the first number of
the PIN code. Touch Select to confirm, and
repeat for the remaining numbers.
When you enter the correct PIN, you’ll return
to the thermostat home screen. To re-lock the
screen after you’re done making changes, follow
the steps above to apply a lock setting.

20
Depending on your thermostat model number
and how your system was configured, the
following ventilation settings may be available:
• Vent mode: Turns ventilation on and off.
–Auto: Ventilation will run as programmed
by the installer.
–On: Ventilation is always on.
–Off: Ventilation will remain off unless
turned on using the timer.
• Boost: Provides temporary ventilation (for
20180 minutes) for situations such as strong
cooking smells or when you’d like a little more
fresh air.
• Lockout: Prevents ventilation from running
during the Sleep period.
To change your ventilation settings, follow the
steps below.
1 Touch Menu on the thermostat home screen.
2 Touch the or arrows until you see
VENTILATION, then touch Select.
3 Touch the or arrows to choose VENT
MODE, BOOST or LOCKOUT, then touch
Select.
• Vent mode: Touch the or arrows to
select AUTO, ON or OFF, then touch Done
to confirm.
• Boost: Touch or to choose how
many minutes ventilation will run,
then touch Done to confirm. To cancel
temporary boost, go into the Boost menu
again, where you’ll be asked if you want
to enter a new value in minutes. Touch
Yes to enter a new value, then touch the
button to set the value to 0. Touch
Done to confirm.
• Lockout: In the lockout menu, you’ll be
prompted to confirm whether you want
to prevent ventilation from running
during the Sleep period. Touch Yes or No
to confirm.
Ventilation settings
Back Select
Back Select
Back Select
Done Cancel
Back Select
/