Page is loading ...

1
Powered by
User Manual
English
This manual covers all the details and explanations of the TEASI CORE.
VERSION 13-20-04-2017_F01

2
Table of Contents
The use and operation of navigation systems .................................................................................. 3
Teasi Core ......................................................................................................................................... 3
1. Getting to know your Core ....................................................................................................... 4
2. Charging the Teasi Core ............................................................................................................ 5
3. Speed/Cadence Sensor ............................................................................................................. 5
4. Using Bluetooth Sensors ........................................................................................................... 5
4.1 Speed/Cadence Sensor ........................................................................................................ 5
5. Installation of Teasi Core on your bicycle ................................................................................. 6
6. Installation of speed/cadence sensor ....................................................................................... 6
7. Teasi Core has 2 working modes .............................................................................................. 8
7.1 App working mode .............................................................................................................. 8
7.1.1 Connect to Tahuna .......................................................................................................... 8
7.1.2 Speedometer Display of Teasi Core .............................................................................. 10
7.1.3 Page Display of Teasi Core ............................................................................................ 11
7.2 Bike Computer Mode ........................................................................................................ 12
7.2.1 Manual pairing method for sensors and Teasi Core ..................................................... 13
7.2.2 Start and stop of riding ................................................................................................. 14
7.3 Settings menu .................................................................................................................... 14
7.3.1 Basic settings ................................................................................................................. 14
7.3.2 Wheel size setting ......................................................................................................... 15
8. Connect the Teasi Core to the Tahuna App ............................................................................ 16
9. Connection .............................................................................................................................. 20
10. Computer layout and selection change .................................................................................. 23
11. Navigation (turn instructions to Teasi Core) ........................................................................... 24
12. Troubleshooting ...................................................................................................................... 25
13. Specifications .......................................................................................................................... 25
14. Appendix ................................................................................................................................. 26
14.1 Data Fields ..................................................................................................................... 26
User information/Contact .............................................................................................................. 27
Declaration of Conformity .............................................................................................................. 27
Guarantee ....................................................................................................................................... 27

3
The use and operation of navigation systems
Attention! Don’t operate with the device while driving. Even the smallest and shortest distractions
from road or traffic for you and other road users - even at slow speeds – may have devastating
consequences.
Type in the destination before starting your journey and start the navigation system before you
start driving.
If you have to change the route or the settings while driving, you should better stop for it.
Teasi Core
Teasi Core is an intelligent bike computer which can be connected via Bluetooth® with your
smartphone (free TAHUNA App for Android and iOS) or external fitness sensors and displays basic
values as well as navigation instructions, training data and incoming calls.
This product is provided with a built-in battery that can be charged with a charger above DC 5V, 500
mA or PC USB interface when the battery is too low to supply power to Teasi Core.
This product is provided with a monochrome display screen, its backlight can be turned on
manually at night for better vision, and turned off at day to save power. You can also set backlight
into auto on/off mode in the settings menu.
Delivery contents:
- Device Teasi Core
- Speed- & cadence sensor
- 4 nylon straps and 1 rubber band for the sensor
- Wheel and pedal magnet
- HR mounting bracket with 2 cable ties and adhesive label
- USB cable
- Quick Start Guide
- Note for connecting Teasi Core to Tahuna app

4
1. Getting to know your Core
1. USB charging interface/USB rubber
stopper
2. Long press: power on/off
short press: backlight on/off
3. Reset
4. Buzzer
5. Auto backlight on/off induction window
6. Mounting for HR bracket
A/B/C shown in the figure above are only the functional buttons of this product, please see
the table below for their specific functions:
Buttons
Normal mode
Setting mode
Short press: change display mode
Long press 1 sec: go into settings
picture
Short press: change option,
backward/left direction
Long press 1 sec: exit the settings picture
Long press 1 sec: change to App
working mode
Long press 2 sec: go into pair
sensor mode
Short press: Change digit/confirm
(Yes/No)
Short press: start/pause recording
Long press: stop recording
Short press: select next digit or
option/right direction
Buttons
Pairing sensors mode
Connect with APP mode
Long press 1 sec: exit pair sensor
picture
Short press: exit smartphone search
Short press: start search
sensors/search next
sensor/exit if both
sensors are connected
Short press: start/pause recording
Long press 1 sec: stop recording
A
B
C
1
3
5
4
2
6

5
2. Charging the Teasi Core
1. Pull up the USB rubber stopper from the USB charging interface (1).
2. Plug the small end of the USB cable in the USB charging interface.
3. Connect the large end of the USB cable to a 5V AC adaptor or a USB port on a computer.
4. Charge the Teasi Core for the first time completely, around 4 hours. The average charging
time is 1.5 hours. When the battery is completely discharged, the device may only turn on
after the battery has been charged for some time. When the device is turned off, a progress
bar on the display indicates the charging progress during charging.
3. Speed/Cadence Sensor
Wireless speed/cadence sensor Wheel magnet Pedal magnet
Bluetooth name: Teasi SPC
4. Using Bluetooth Sensors
4.1 Speed/Cadence Sensor
a) There is a CR2032 button cell inside the product to provide power and its service life is 4
months in general. Teasi Core or Tahuna will fail to detect sensors when sensor cell is
dead or sensor is damaged. Sensor cell can be replaced according to the figure below.
Please note: when you use this product for the first time, please remove the battery
hatch to remove the insulation film.
b) This product can be connected to any equipment conforming to BLE 4.0 standard protocol
and transmit data to it.
c) This product will get into sleep mode after wheels stop spinning for 5 min in order to save
power; it will also get into sleep mode when Tahuna or Teasi Core disconnects from
sensor. When it is used again, bike wheels shall be made spun to activate sensor, so that
the product can be searched by Tahuna or Teasi Core.

6
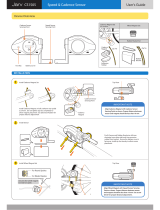
5. Installation of Teasi Core on your bicycle
Fix the Teasi Core on the bracket as shown in the figure below.
6. Installation of speed/cadence sensor
Install pedals magnet (RPM) and wheel magnet (speed) in corresponding positions as shown in
the figure below:
Tear the 3M adhesive on the back of pedal magnet off and stick pedals magnet inside the
pedal connecting arm, and then tie up the 2 nylon straps to fix it, and cut unnecessary part
down.
Install the wheel magnet on wheel spoke and tighten it, so as to ensure that it will not slide
when the wheel is spinning at a high speed.

7
Fix speed/cadence sensor on corresponding position of bike as shown in the figure, and then
tighten it with 2 nylon straps.
Then, fix it again with a rubber band.
Please note: the centers of pedal magnet and wheel magnet shall be aligned with corresponding
induction part of sensor and shall not be deviated from it too far; the magnets shall not be more
than 2 cm from the induction part, since distance larger than 2 cm will make it fail to receive the
wheel spinning signal. Screws can be loosened with screwdriver to adjust the distance between the
extendible arm of inductor and spoke magnet.

8
7. Teasi Core has 2 working modes
a) App working mode:
Teasi Core is only a display equipment that needs to pair and connect to app, and all its
data is from app push; in this mode, speed/cadence sensor and heart rate monitor shall
pair with Teasi Core and connect to it.
b) Bike computer working mode:
Teasi Core is only a bike computer that is not connected to app; in this mode, speed/
cadence sensor and heart rate monitor shall pair with Teasi Core and connect to it.
7.1 App working mode
7.1.1 Connect to Tahuna
You can scan the QR code displayed on this equipment when it is started first time or the QR
code printed on the package to enter the website, and download and install the Tahuna app.
This product will search to connect with Tahuna automatically after it is started, as shown in
the left of the following figure. If you do not need to connect to Tahuna or Tahuna has
stopped working, you can press the far left button to EXIT:
Teasi Core starts to connect to Tahuna
When the app detects a new version of Teasi Core to update to, there will be a dialogue box
of update prompt given on the app. You can click the update button on the app to make
Teasi Core update automatically. The following update progress bar will be shown.

9
Notice:
Please make sure your phone and Teasi Core have enough power before updating, keep
Bluetooth connection smooth in updating process, and do not take your phone away from
Teasi Core. If update does not progress for a long time or power fails, or Bluetooth signal is
lost in updating process, Teasi Core will return to its old version and will update again when it
is connected to the app next time.
You need to turn the Bluetooth of your smartphone and the connect switch of Tahuna on, so
that Tahuna can seek to connect with Teasi Core. The main interface will be entered after the
successful connection and the successful connection symbol as shown in the figure below will
be shown; at the same time, you need to connect Tahuna with speed/cadence sensor and
heart rate sensor.
When all connections are finished, Teasi Core can start to work.
Successful connection of Teasi Core and Tahuna
Please note: You need to make sure that Teasi Core or sensors are not connected to other
Bluetooth equipment and can be effectively connected to Tahuna.

10
7.1.2 Speedometer Display of Teasi Core
Speedometer
Successful connection to Tahuna
Smartphone battery
Smartphone GPS on
Current time
Equipment battery
Maximum speed
Current speed
Accumulative mileage
After the equipment is connected to Tahuna, the 2
data types can be changed on the app in the
speedometer view.

11
7.1.3 Page Display of Teasi Core
Display page of Teasi Core is divided into: Speedometer, 2-4-6 segment display interface,
navigation display interface.
Users can change the data type they want to display on the corresponding page of the app for
the two data fields below (speedometer and navigation picture), and the data on 2-4-6
interface. Data fields with red dots in this document can be changed.
Users can select corresponding 2-4-6 segment display mode on app computer page according
to their habits.
Navigation page will only be displayed after users set their destination on the app and enable
navigation feature.
2-segment Display Page 4-segment Display Page
6-segment Display Page Navigation Display Page
This product also has notification feature, for example, phone and SMS notifications which
you can set on the app. However, this feature can only be used when Teasi Core is used
together with app. Examples are shown below:
Phone SMS

12
This product will enter standby mode automatically after riding is stopped for 3 min, as shown
in the figure below. It will return to the previous interface automatically after riding starts
again.
Standby Mode
7.2 Bike Computer Mode
This product will seek to connect with Tahuna after it is started, as shown in the figure below;
if you do not want to connect with Tahuna or Tahuna has stopped working, you can press the
far left button to EXIT and enter bike computer mode.
If Teasi Core has connected to Tahuna successfully and is in app working mode currently, users
can disconnect the sensors in the sensors page of Tahuna to return to the searching mode;
then select EXIT to exit and enter the independent working mode of the bike computer.
At this moment, it is needed to pair speed/cadence sensors and heart rate monitor and
connect them. The sensors connect automatically when they are activated and found. The
sensors connect automatically when they are ready for operation and active.
Speed & Cadence Sensor: The magnets must pass the sensor surfaces to activate the sensor.
Heart rate sensor: Must have secure skin contact with lightly moistened contact surfaces.
Connection for speed/cadence sensors or heart rate will be shown on the upper right symbol
on the display:
S
Speed/cadence sensor is connected
H
Heart rate sensor is connected

13
7.2.1 Manual pairing method for sensors and Teasi Core
If sensors won’t connect automatically, you can connect them manually.
Make sure that the sensors have been activated for operation.
Speed & Cadence Sensor: The magnets must pass the sensor surfaces to activate the
sensor.
Heart rate sensor: Must have secure skin contact with lightly moistened contact surfaces.
Long press for 2 sec and then release it after hearing the buzzer sounds twice, then the
Teasi Core will enter the mode to pair and connect with sensor; after the following
interface is shown, short press to search sensor; when one sensor is searched, its name
will be displayed and the equipment will connect to it automatically. Short press at this
time to start searching the next sensor. After the 2 sensors are searched, short press to
exit sensor searching mode; if it only needs to connect to one sensor, long press for 1
sec after searching, and then exit sensor pairing interface after hearing the buzzer sounds
once. Then, this following connection status symbol will be shown on the screen, showing
that Teasi Core has been successfully connected to sensors, and the bike computer can
start to work independently. However, the wheel size shall be set. See settings for wheel
size setup.
Teasi Core and sensors pairing interface Working interface entered after pairing is completed
In bike computer working mode, some data may not be displayed, for example, data is
displayed ——, the reason is that:
1. These data are all from the app, and the app is not connected when Teasi Core is working
independently, so there is no data source.
2. Speed/cadence sensor and heart rate monitor are not paired and connected to each
other, so there is no data source.

14
When bike computer is working, users can record and store sports data selectively. Short press
to start record and short press again to suspend recording; long press for 1 sec,
and then release it after hearing the buzzer sounds once to stop recording; a new entry of
record is generated. When the equipment is connected to Tahuna again, Tahuna will acquire
this data and calculate it.
7.2.2 Start and stop of riding
When Teasi Core is prepared for work, the prompt box as shown in the left figure will be
displayed on the screen; when riding is suspended, the prompt box as shown in the right figure
will be displayed on the screen.
7.3 Settings menu
In normal working state, long press for 1 sec (release the button after hearing Buzzer
sounds once) to enter settings menu where corresponding parameters can be set; refer to
button function list for button operation mode and function list. Exit settings menu: long press
for 1 sec (release the button after hearing buzzer sounds once) to exit settings menu.
7.3.1 Basic settings
24-Hours time: 24-hour time notation (ON) or 12-hour time notation (OFF).
Clock: Current time can be changed in bike computer mode.
Date: Current date can be changed in bike computer mode.
Language: Teasi Core supports 5 languages: English, German, French, Dutch and Czech.
Sound: Steering notification tone and warning tone can be turned off.
Auto backlight: Auto backlight control can be selected in settings menu. When auto backlight
is selected, the backlight will be turned off automatically at day and be turned on at night.
Units: Choose between metric and imperial system in bike computer mode.

15
Perimeter: Wheel perimeter, see table in 7.3.2 Wheel size setting.
Clear pair info: Eliminate Bluetooth pairing information.
Clear sport data: Eliminate all sports data except for ODO data.
Reset to default: Reset to factory defaults, settings data will be cleared after resetting to
default.
7.3.2 Wheel size setting
In the table below, you can find the wheel size (L) of your tire, or the actually measured wheel
size (L) of your bike.
How to measure wheel size (L): in order to obtain accurate measurement, you can make a tire
roller. Place the valve stem of the tire in normal pressure down, and mark on the ground. With
the pedaling load of rider applied, make the tire roll one circle (until the valve steam returns
down on the ground) in a straight line. Then mark the position of valve stem and measure the
distance in millimeter dimension.
* The following table is for your reference.
Please note: No matter which working mode is in, bike computer or app mode, it is needed to set
wheel size on bike computer or app; otherwise, the data will not be accurate.

16
8. Connect the Teasi Core to the Tahuna App
Open the Tahuna application.
Please make sure first that you have logged in and you have a stable internet connection.
Enter into the Shop menu by tapping on the plus sign button ( ) at the bottom right side of
the screen. Always follow the plus sign in the next steps.
In the Shop menu, tap on the plus sign, next to Hardware Packages to see what kind of extra
hardware options are there.

17
In Hardware Packages, you can choose Bike Computer Package by tapping on the plus sign
next to them. In this case, choose Bike Computer.
At the next screen, details about the product are shown. Tap on the plus sign to install Bike
Computer Package.

18
In order to connect Bike Computer with the Tahuna Application, Bluetooth must be turned on
on your phone. Tap on ‘Next’ when Bluetooth is ready.
The App will search for devices.
The App will search for devices.

19
Two outcomes are possible:
Bluetooth connection failed. In this case, you should check, if Bluetooth connection is really
turned on or not.
Connecting devices have been successful.
New features have been unlocked with this step:
- Navigation package,
- Fitness/Sensor package,
- Gadget package.

20
9. Connection
The starting screen of the application is a map. If you would like to get to the main menu, tap
the button with 3 lines at the top left side of the screen.
The application’s Main menu will appear. Tap on the gear wheel at the bottom left side of the
screen to open the Settings menu.
/