Page is loading ...

Technical Support
If you need any assistance to get your unit functioning properly, please have your
product information ready and contact Addonics Technical Support at:
Hours: 8:30 am - 6:00 pm PST
Phone: 408-453-6212
Email: http://www.addonics.com/support/query/
v3.1.11
T E C H N O L O G I E S
www.addonics.com
User Guide
1:11 Duplicator
(HDU11SAS)
ENT
ESC

www.addonics.com Technical Support (M-F 8:30am - 6:00pm PST) Phone: 408-453-6212 Email: www.addonics.com/support/query/
Diagram
ENT
ESC
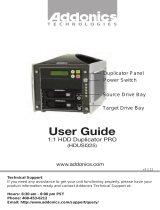
Duplicator Panel
LCD
Scroll Up
Scroll Down
Executes Function
Cancels Function
ENT
ESC
11 Destination
SATA Ports
Source
SATA Port
(top port)
15-pin SATA
Power Connector
Mounting Holes
(2 on each side)

www.addonics.com Technical Support (M-F 8:30am - 6:00pm PST) Phone: 408-453-6212 Email: www.addonics.com/support/query/
Quick Guide
Installing the 1:11 duplicator
Step 1
Insert the 1:11 duplicator into standard 5.25” drive bay.
Step 2
Connect the SATA power cable from you system to the 15-pin SATA power
connector.
Step 3
Connect the source drive(s) to the source SATA port(s) via SATA cable(s) and the
target drives to the destination SATA ports via SATA cables.
Step 4
Screw the duplicator into the drive bay with 4 screws (2 on each side).
Duplicating drive(s)
Make sure the source and target drives are connected to the proper ports.
When the duplicator is on, it will go through the steps below.
Step 1
Duplicator LED will light up and the device will beep.
Step 2
LCD will display initial steps:
1. Duplicator Ver: - Displays duplicator version
2. Initializing SDRAM
3. Detect Source/Target - Will detect the type of source/targets
4. Copy - Defaults to the first function which is to copy
Step 3
Once the duplicator gets to the copy menu, press ENT to begin copying. The
duplicator will auto-detect the drive and display its information on the LCD. Make
sure that the power LEDs of the flash reader are blinking, the blinking indicates
drive activity.
You can find the complete user manual of the 1:11 Duplicator panel on the driver
disk under user guides. You can also download it from our website at
www.addonics.com/support/user_guides/

www.addonics.com Technical Support (M-F 8:30am - 6:00pm PST) Phone: 408-453-6212 Email: www.addonics.com/support/query/
1. Copy HDD
Make sure that the capacity of the target is equal or larger than the source.
Copies data directly from the source to the target.
Choose option 1 from the menu and press ENT to begin copying. The system will
auto detect the source/target and display info about the copying process. Once
the copying process is complete, the LCD will display Copy OK.
2. Async Copy HDD
Copy HDD copies data directly from the source hard disk to the target hard disks.
While duplication process is on-going, allows you to plug-in additional target drives
and duplication will automatically start for the added target drive.
Choose option 2 and press ENT to begin copying. The duplicator will auto detect
the drive and the LCD will display copying information. If the duplicator detects
that the drive does not have enough capacity, the LCD will display it.
Panel Functions
ENT
ESC
Duplicator Panel
LCD
Scroll Up
Scroll Down
Executes Function
Cancels Function
The Duplicator has 8 functions to choose from:
1. Copy HDD
2. Async Copy HDD
3. Compare HDD
4. Async Compare
5. PreScan Source
6. ReScan BUS
7. Source Size
8. Setup
8-1. Language
8-2. Copy Size
8-3. Startup Menu
8-4. Auto Compare
8-5. Button Sound
8-6. Device Info
8-7. System Info
8-8. Fast Copy
8-9. Auto Start Drive
8-10. Auto Start Timer
8-11. Tolerance Size
8-12. Boot Time Delay

www.addonics.com Technical Support (M-F 8:30am - 6:00pm PST) Phone: 408-453-6212 Email: www.addonics.com/support/query/
3. Compare HDD
Compare HDD is used to see if the data on a source hard disk is identical to the
target hard disk after the Copy HDD operation.
Choose option 3 and press ENT to begin comparing.
4. Async Compare
Compare HDD is used to see if the data on a source hard disk is identical to the
target hard disk after the Copy HDD operation. While compare process is
on-going, allows you to plug-in additional target drives and comparison will
automatically start for the added target drive.
Choose option 4 and press ENT to begin comparing.
5. PreScan Source
PreScan HDD is used to check if the source hard disk can be accessed properly.
It also tests the read speed.
Choose option 5 and press ENT. The LCD will display prescan information.
6. ReScan BUS
ReScan Bus allows swapping the source or target in and out without having to
reboot the system.
Choose option 6 and press ENT to begin rescanning. The system will rescan the
source without the need to reboot.
7. Source Size
Source Size is used to show the capacity of the source.
Choose option 7 and press ENT. The LCD will display the capacity of the source.
8. Setup
Setup allows various system settings to be changed. There are 12 sub-options:
Language, Copy Size, Startup Menu, Auto Compare, Button Sound, Device Info,
System Info, Fast Copy, Auto Start Drive, Auto Start Timer, Tolerance Size and
Boot Time Delay.
Choose option 8 and the LCD will display the first option of the subfunctions.

www.addonics.com Technical Support (M-F 8:30am - 6:00pm PST) Phone: 408-453-6212 Email: www.addonics.com/support/query/
Setup Functions
8-1. Language
Use this option to select the language of the system, by default it’s set at English.
8-2. Copy Size
This option is used to specify the size of the source for simplifying further copying
operations.
Press ENT on this option and the LCD will display Copy Size ALL. Use the up
and down arrow keys to change the copy size. The system will offer
corresponding percentages so the user can specify the amount to copy from the
source.
8-3. Startup Menu
This option allows the user to change the first option they see when they boot up
the system. By default, the first option is Copy.
To change this, press ENT and use the up and down arrows to choose other
options.
8-4. Auto Compare
This option toggles the systems ability to automatically compare the source and
target after a copy is complete.
By default it is set to OFF, use the up and down arrows to toggle between ON
and OFF.
8-5. Button Sound
This option toggles the button sound of the system.
By default it is set to ON, use the up and down arrows to toggle between ON and
OFF.
8-6. Device Info
This option will diplay the details of everything connected to the controller.
8-7. System Info
This option will display the system information.
8-8. Fast Copy
This option displays Fast Copy. Fast Copy only copies data on the source drive
to the target drives. Currently only supports FAT, FAT32, NTFS, HFS, Ext2 and
Ext3 partitions.

www.addonics.com Technical Support (M-F 8:30am - 6:00pm PST) Phone: 408-453-6212 Email: www.addonics.com/support/query/
8-9. Auto Start Drive
This option is used to copy automatically once you inserted a HDD on target port.
Default is set at OFF, use the arrows to toggle.
8-10. Auto Start Timer
This option is used to set the period of time when the duplicator starts copying
automatically once you insert HDD on target port. Default is set at OFF, use the
arrows to choose time.
8-11. Tolerance Size
This option is used to set the tolerance in terms of percentage difference between
the source and target capacity. This is to ensure that when the target drive is
smaller than the source drive, the duplication process will not start.
8-12. BootTime Delay
This option is used to set boot delay time.
Troubleshooting
LCD
If the LCD display is blank after the device is turned on, check if the power
cable is properly connected and that the power supply is on.
Error Message
If an operation is manually terminated by pressing ESC while the system is running
a copy operation or hardware diagnostics, an error message will show up on the
LCD. This may lead to an illegal operation and cause the device to stop reminding.
If this happens, restart the device.
Source/Target
If the duplicator is unable to read the source or target please check that the data
and power cables are properly connected. When making a copy please make sure
that you set the source correctly.
Keys
If pressing the keys on the front panel produces no response from the system,
the keys may have malfunctioned.
Startup/Shutdown
Do not suddenly turn off the power while the system is performing an operation.
After shutting down normally, wait a moment (usually around 2 seconds) before
restarting the system so it can run self-diagnostics.

www.addonics.com
Phone: 408-573-8580
Fax: 408-573-8588
Email: http://www.addonics.com/sales/query/
CONTACT US
LCD Messages
Connecting with a HDD:
All data will be lost, format?
All data will be lost. Confirm formatting.
Delete Image in Partition xx?
Confirm the deleting of data image in partition xx.
Format?
Ask if you want to format.
Format OK!
The formatting has been completed.
HDD not Format!
The hard disk hasn’t been formatted yet.
HDD too small
The capacity of hard disk is too small.
HDD too small to handle image!
The hard disk hasn’t enough capacity to store the
data image (at least 5Gbytes).
Image Exists Overwrite?
There is a data image in the current partition.
Confirm the overwriting of data.
Image load Fail
The image isn’t successfully loaded from DVD to
the hard disk.
Image load OK
The image is successfully loaded from DVD to
the hard disk
No Image in Partition xx
There is no data image in partition xx.
No Valid HDD!
The system cannot find a hard disk.
Partition Damage
The partition is damaged.
Select HD First!
Select a formatted hard disk at first.
Verify Disk or Partition?
Do you want to verify the hard disk or just a
partition?
Verify Hard Disk Fail!
The hard disk is not verified successfully.
Firmware Update:
Check Sum Error!
The updated firmware has errors.
Flash ROM fail!
Data cannot be written into Flash ROM.
Invalid firmware
The disc doesn’t contain a valid firmware.
Last update F/W Fail!
The firmware is not updated successfully.
Last update F/W OK!
The firmware is updated successfully.
Searching F/W
The system is searching for a valid firmware.
Source can’t be Hard Disk!
During comparison the source cannot be hard
disk.
/