Page is loading ...


INTRODUCTION Page 1
IMPORTANT SAFETY INSTRUCTIONS
Specified by ITS Testing Services for Swimming Pools and Spas
1. READ AND FOLLOW ALL INSTRUCTIONS
2. WARNING - To reduce the risk of injury, do not permit children to use this product unless they are closely
supervised at all times.
3. A wire connector is provided on this unit to connect a minimum No. 8 AWG solid copper conductor between
this unit and any metal equipment, metal enclosures or electrical equipment, metal water pipe or conduit within 5
feet of this unit.
4. DANGER - Risk of injury.
a) Replace damaged cord immediately.
b) Do not bury cord.
c) Connect to a grounded, grounding type receptacle only.
5. WARNING - This product must be connected to a power source equipped with a ground-fault circuit interrupter
(GFCI). The GFCI must be tested before each use. With the product operating, open the service door. If the
product stops operating, this merely indicates that the door is equipped with an electrical interlock. Next, push the
test button on the GFCI and close the service door. The product should not operate. Now open the service door,
push the reset button on the GFCI and close the service door. The product should now operate normally. If the
product fails to operate in this manner, there is a ground current flowing indicating the possibility of an electric
shock. Disconnect the power until the fault has been identified and corrected.
6. DANGER - Risk of electric shock. Install at least 5 feet (1.5 m) from inside wall of tub or spa using nonmetallic
plumbing.
7. DANGER - Risk of electric shock. Do not permit any electric appliance, such as a light, telephone, radio, or
television, within 5 feet (1.5 m) of a spa or hot tub.
8. When handling hydrochloric (muriatic) acid, always follow the manufacturer’s handling precautions and
guidelines. Use only as directed.
9. WARNING - To reduce the risk of injury:
a) The water in a spa should never exceed 40
º
C (104
º
F). Water temperatures between 38
º
C (100
º
F) and
40
º
C (104
º
F) are considered safe for a healthy adult. Lower water temperatures are recommended for
young children and when spa use exceeds 10 minutes.
b) Since excessive water temperatures have a high potential for causing fetal damage during early months of
pregnancy, pregnant or possibly pregnant women should limit spa water temperatures to 38
º
C (100
º
F).
c) Before entering a spa or hot tub, the user should measure the water temperature with an accurate
thermometer since the tolerance of water temperature-regulating devices varies.
d) The use of alcohol, drugs or medication before or during spa or hot tub use may lead to unconsciousness
with the possibility of drowning.
e) Persons suffering from obesity or with a medical history of heart disease, low or high blood pressure,
circulatory system problems or diabetes should consult a physician before using a spa.
f) Persons using medication should consult a physician before using a spa or hot tub since some medication
may induce drowsiness while other medications may affect heart rate, blood pressures and circulation.
10.
SAVE THESE INSTRUCTIONS

INTRODUCTION Page 2
TABLE OF CONTENTS
IMPORTANT SAFETY INSTRUCTIONS..................................1
TABLE OF CONTENTS ...........................................................2
CHAPTER I - INTRODUCTION................................................4
Water Maintenance...........................................................4
CONTROLLER FEATURES.................................................5
Integrated Water Treatment..............................................5
Control Functions..............................................................5
Probe Failure Analysis ......................................................5
Remote Communications..................................................5
Remote Operation.............................................................5
CONTROL PANEL ...............................................................6
LCD Display Screen..........................................................6
Display Readings ..............................................................6
Data Entry Keyboard.........................................................6
PROGRAM MENUS .............................................................7
Welcome Screen...............................................................7
Display Screens ................................................................7
Main Menus and Submenus..............................................7
Alarm Displays..................................................................7
CHAPTER II – INSTALLATION................................................9
UNPACKING ........................................................................9
INSTALLATION REPORT ....................................................9
TECHNICAL SUPPORT.......................................................9
OVERVIEW ..........................................................................9
CONTROLLER CABINET.....................................................9
LOCATION ...........................................................................9
ELECTRICAL......................................................................12
Electrical Codes ..............................................................12
Grounding (GFI)..............................................................12
AC Power Input...............................................................12
Main Power Interlock.......................................................12
Panel Interlock ................................................................12
PC Boards.......................................................................12
Power Board ...................................................................12
115V/230V Power Transformer.......................................12
Relays and Fuses............................................................15
Fuses for CDCN13 Power Board ....................................15
Fuses for CDCN12 Power Board ....................................15
Remote Alarm .................................................................15
Mother Board ..................................................................15
Sensor Connections........................................................15
Backup Battery................................................................16
Remote Communications................................................16
Multiple Serial Connections.............................................16
4-20 mA Converter Boards..............................................17
PLUMBING.........................................................................18
Installation of Sensors.....................................................18
In-line Installation (2" Pipe)..............................................18
Bypass Line Installation...................................................18
Sensor Cell Cabinet ........................................................19
Water Flow......................................................................19
On/Off Flow Switch..........................................................19
WATER CHEMISTRY SENSORS ......................................20
Sensor Design.................................................................20
pH Sensor.......................................................................20
ORP Sensor....................................................................20
Sensor Installation...........................................................20
Sensor Cables.................................................................20
Electrical Interference......................................................20
Storage and Winterizing..................................................21
Sensor Warranty .............................................................21
TEMPERATURE SENSOR.................................................21
CONDUCTIVITY SENSOR.................................................21
ELECTRONIC FLOW SENSOR.........................................21
Hall effect sensor.............................................................21
Reed switch sensor.........................................................21
PRESSURE TRANSDUCERS............................................21
WATER LEVEL SENSOR ..................................................21
CHEMICAL FEEDERS.......................................................22
Operation........................................................................22
Chemical Feed Pumps....................................................22
Carbonic Acid Valve........................................................22
Erosion Feeder ...............................................................22
CHAPTER III - CONTROLLER OPERATION ........................23
Access ............................................................................23
Default Setup..................................................................23
8 - CONFIGURATION MAIN MENU...................................23
Access ............................................................................23
8.1 - INITIAL SETUP SUBMENU....................................24
8.2 - OPERATIONS SUBMENU .....................................26
8.3 - COMMUNICATIONS SUBMENU ...........................29
1 - CONDUCTIVITY MAIN MENU......................................30
Conductivity and TDS.....................................................30
Conductivity or TDS Display ...........................................30
1.1- Control Mode...........................................................30
1.2 - Display and Calibration...........................................30
1.3 - Setpoint...................................................................30
1.4 - Low Alarm...............................................................31
1.5 - High Alarm..............................................................31
1.6 - Time Limit...............................................................31
1.7 - Run Time................................................................31
1.8. - Select Scale...........................................................31
2 - pH MAIN MENU............................................................32
Operation........................................................................32
2.1- Control Mode...........................................................32
2.2 - Display and Calibration...........................................32
2.3 - Setpoint...................................................................32
2.4 - Alarm Low...............................................................33
2.5 - Alarm High..............................................................33
2.6 - Time Limit...............................................................33
2.7 - Run Time................................................................33
2.8 - Probe Clean............................................................33
3 - ORP MAIN MENU.........................................................34
Operation........................................................................34
3.1 - Control Mode..........................................................34
3.2 - Display and Calibration...........................................34
3.3 - Setpoint...................................................................34
3.4 - Low Alarm...............................................................35
3.5 - High Alarm..............................................................35
3.6 - Time Limit...............................................................35
3.7 - Run Time................................................................35
3.8 - Last Shock..............................................................35
4 - TEMPERATURE MAIN MENU......................................36
Operation........................................................................36
4.1 - Display and Calibration...........................................36
4.2 - Low Alarm...............................................................36
4.3 - High Alarm..............................................................36
5 - FLOW MAIN MENU ......................................................37
5.1 - Water Level Control Mode......................................37
5.2 - Fill Flow Rate..........................................................38
5.3 - Cumulative Fill........................................................38
5.4 - Bleed Flow Rate .....................................................38
5.5 - Cumulative Bleed....................................................38
5.6 - Influent Pressure.....................................................39
5.7 - Effluent Pressure ....................................................39
5.8 - Main Pump Control.................................................40
6 - ADDITIVES MAIN MENU..............................................41
Operation........................................................................41
6.1.1 - Control Mode.......................................................41
6.1.2 - Time Limit............................................................42
6.1.3 - Run Time.............................................................42
6.1.4 - Booster/Single Shot.............................................42

INTRODUCTION Page 3
CONTROL SUBMENUS.....................................................43
X.1 - Control Type...........................................................43
X.Y.1 - Deadband............................................................43
X.Y.2 - Progressive Zone................................................43
X.1.3 - Automatic Sensor Control .......................................44
X.1.4 - Cycle Timer..........................................................44
X.1.4.2 - Percent of Flow.................................................45
X.1.4.2.3 Bleed Lockout..................................................45
X.1.5 - Daily Schedule Control........................................45
CALIBRATION SUBMENUS...............................................46
X.2 - Calibration Options.................................................46
X.2.1 - One-Point Calibration ..........................................46
X.2.2 - Two-Point Calibration ..........................................46
X.2.3 - Three-Point Calibration........................................46
SHOCK AND SAVINGS SUBMENUS ................................47
3.8 - Treatment Selection................................................47
3.8.1 - ORP Shock Program............................................47
3.8.2 - ORP Deshock Program........................................47
3.8.3 - ORP Booster........................................................47
CHAPTER IV - COMMUNICATIONS .....................................48
COMMUNICATION OPTIONS............................................48
REMOTE OPERATION OPTIONS .....................................48
Direct Connection............................................................48
Modem Connection.........................................................48
Computer Software Installation.......................................48
Communication Software Program..................................48
Automatic Scanning ........................................................49
Log Display .....................................................................50
Graphic Data Display ......................................................50
TELEPHONE (OPTION TEL) .............................................51
Voice Status Reports.......................................................51
4-20 mA SIGNAL (OPTION -A) ..........................................51
CHAPTER V - STARTUP.......................................................52
CONTROLLER STARTUP..................................................52
Configuration Menu.........................................................52
Alarm Buzzer...................................................................52
Bypass Line.....................................................................52
Battery Check..................................................................52
BLEED AND CHEMICAL CONTROL.................................52
Initial Activation of Sensors.............................................52
Bypass Line Test ............................................................52
Conductivity and Chemistry Adjustment .........................52
Water Sampling ..............................................................52
Conductivity Calibration ..................................................52
pH Calibration.................................................................52
pH Feed (Acid or Base) ..................................................53
pH Setpoint.....................................................................53
ORP Calibration..............................................................53
ORP Setpoint..................................................................53
ADDITIVES Feed............................................................53
Time Limits......................................................................53
Shock Treatment.............................................................53
SATURATION INDEX ........................................................53
CHAPTER VI - MAINTENANCE ............................................54
CONTROLLER MAINTENANCE........................................54
Regular Maintenance......................................................54
The Acid Test..................................................................54
Sensor Cleaning .............................................................54
Winterizing......................................................................54
Battery Replacement ......................................................54
Software Upgrade...........................................................54
CHEMICAL MAINTENANCE..............................................55
Overview.........................................................................55
pH Control.......................................................................55
ORP Control....................................................................55
Limit Timers (Overfeed Safety).......................................56
Timer Settings.................................................................56
PERIODIC MAINTENANCE...............................................56
Water Testing..................................................................56
Shock Treatment.............................................................57
Deshock (Dechlorination)................................................57
TROUBLESHOOTING .......................................................58
Problems.........................................................................58
Solutions.........................................................................58
PARTS AND ACCESSORIES............................................59

INTRODUCTION Page 4
CHAPTER I - INTRODUCTION
AUTOMATION
Congratulations on your selection of an OMEGA CDCN
Programmable Controller for your water treatment facility.
OMEGA CDCN Automation uses the most advanced electronic
sensing technology to monitor and control the critical
parameters for water treatment, i.e. conductivity, pH,
Oxidation-Reduction Potential (ORP) and temperature. Also
available is monitoring of flow rates for make-up and bleed
water and influent/effluent filter pressures.
This Instruction Manual covers the following models:
- CDCN12 with Conductivity control, pH control, Temperature
monitoring, and two (or three) additives programs,
- CDCN13 with Conductivity control, pH control, optional ORP
control, Temperature monitoring, fill and bleed water flow
programs, and four additives programs.
Data logging and remote operation (with an internal modem
and software) are available on all models.
Use the appropriate sections in the manual for each model.
Water Maintenance
The primary purpose of water treatment is protection of the
equipment from the aggressiveness of water and prevention of
bacteriological growth.
The guidelines for cooling towers include the following:
- Conductivity typically below 5,000 S/cm - corresponding to
Total Dissolved Solids (TDS) of less than 2,500 ppm (mg/l) -
to prevent precipitation of dissolved salts and corrosion
products,
- pH between 7.0 and 9.0, depending on chemical treatment,
to prevent scaling or corrosion,
- Oxidation-Reduction Potential (ORP) above 650 mV to
prevent algae growth and growth of bacteria, such as
Pseudomonas, E. Coli, etc.,
- proper water balance with Langelier Saturation Index values
between 0 and 0.3 for untreated waters, or up to 2.0 - for
waters treated with phosphonates and/or polyacrylates,
- adequate filtration with a maximum turnover rate of six
hours.
Table I - TYPICAL TREATMENT VALUES
TYPICAL WATER TREATMENT
FOR COOLING TOWERS
TEST MIN IDEAL MAX
CONDUCTIVITY,
S/cm
5,000
TDS, ppm 2,500
pH 7.0 8.5 9.0
ORP, mV 650 750
LANGELIER
SATURATION INDEX
0.0 2.0

INTRODUCTION Page 5
CONTROLLER FEATURES
Integrated Water Treatment
Professional water treatment for cooling towers, boilers, and
other industrial applications requires the use of separate
chemical and physical processes to remove undesirable and
harmful components. Until recently, all these different
processes were controlled individually, very often resulting in
operational conflicts and costly treatment problems.
The OMEGA CDCN is an advanced controller that integrates
all the different processes for complete water treatment.
Designed around a sophisticated microprocessor with a large
computer-like LCD (Liquid Crystal Display) screen, it displays
full-size menus and submenus, making it easy to use even for
people with little or no computer experience. All displays and
adjustments are accessible from menu screens that are laid
out in a logical and intuitive order. They can in fact be used
without reference to the instruction manual.
All sensing devices are connected to the control module. This
makes it possible to monitor the status of all operational
parameters at a glance. Also, in case of malfunction or alarm,
the operator is immediately alerted.
All control outputs are also connected to the single control
panel which makes installation and maintenance much easier
than with separate control units.
The central microprocessor manages all monitoring and control
functions, including control of the recirculation pump, chemical
additions, water balance, filter backwash and heater control.
Control Functions
The following display and control functions are available on the
Omega CDCN Controllers:
- Conductivity in microsiemens/cm or as Total Dissolved
Solids (TDS) in ppm or mg/l with programmable bleed,
- Temperature display in degrees Fahrenheit or Celsius,
- pH from 0 to 14 with capability for programmable acid and
base feed,
- Oxidation-Reduction Potential (ORP or Redox) in
millivolts with programmable oxidizer feed, superoxidation
and chemical savings program,
- Water Recirculation with display of the flowrates for make-
up/fill and bleed water in gallons per minute (gpm) or liters
per minute (l/m), cumulative flows in gallons (ga) or liters (l),
- Filtration with display of inlet and outlet pressures and
programmable filter backwashing based on choice of time,
inlet pressure, pressure differential or combinations of the
above.
- Additive Feed for inhibitors, biocides, descalers, etc. - with
choice of feed programs: manual, automatic (bleed & feed or
bleed-then-feed), cycle timer, percent of flow, or daily
schedule controls with bleed and feed lockout, pre-bleed and
pre-pH functions.
- Water Balance and Saturation Condition derived from the
Langelier Saturation Index and showing water balance
conditions as either OK, corrosive or scaling.
In addition, a 24-hour clock/calendar shows the date and time
on the main screen. For other models that do not include all
the functions listed above, only the applicable screens and
menus are displayed.
Probe Failure Analysis
The CDCN introduces a new proprietary technology (US
Patent No. 6,657,546) called Probe Failure Analysis.
Conventional controllers detect probe failure by waiting for an
alarm condition to develop. The CDCN features dynamic
testing of the response of the ORP and pH sensors.
This makes it possible for the controller to detect a probe
failure very soon after the sensor fails to respond properly,
therefore avoiding dangerous out-of-range conditions.
Remote Communications
The CDCN features complete communication remote access
by telephone or by IBM PC-compatible computer under
Windows®. It provides the following capabilities:
- remote operation of controller with exact duplication of the
LCD screen display and full access to all the menus and
submenus,
- voice telephone report of test data,
- remote operational control by touch-tone phone,
- alarm callouts to up to six different pre-selected telephone
numbers,
- automatic scanning of multiple facilities with programmable
download and storage of test data on remote computer.
Remote Operation
Unlike controllers that provide only a simulated representation
of the display screen, the CDCN features true remote
duplication of the controller screen.
This means that any change on the CDCN screen is
immediately reproduced on the remote computer screen. And
vice versa, any operation that is performed on the remote
computer is reproduced immediately on the controller.
The same commands are available on both units. This allows
instant verification and adjustment of all control parameters.
Changes in parameter settings are subject to password
verification to prevent unauthorized access.

INTRODUCTION Page 6
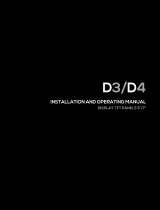
Figure 1 - Control Panel of CDCN13
CONTROL PANEL
LCD Display Screen
The operator operates the controller with the control panel, as
shown in Figure 1 for the CDCN13. It features an LCD display
screen with eight lines of text for menus and submenus and a
16-key data entry keyboard.
NOTE: The CDCN12 display shows only four lines
of text at a time. It can be scrolled with the UP and
DOWN ARROW keys to show all the lines.
The LCD display shows "normal" characters (black on white),
reverse characters (white on black) to highlight selected
options, or flashing characters for alarm conditions.
The brightness of the LCD display screen can be adjusted with
the potentiometer inside the cabinet on the Mother Board. It is
located near the center of the board (R39 for the CDCN13) or
upper right side (R36 for the CDCN12). See the schematics in
Chapter IV - Installation.
The LCD display screen features backlight illumination for
better viewing at night and in dark areas. The backlight stays
on as long as the unit is on.
Display Readings
The Display Screen for the CDCN13 (Figure 1) shows all the
operating features at a glance.
Line 1 shows a Conductivity reading of 2000 S/cm with the
bleed valve in Automatic (A) mode and currently
activated (>).
Line 2 shows a pH reading of 8.5 with the Acid feed mode in
Automatic (A) and not running (no >).
Line 3 shows an ORP reading of 750 mV with the feed pump
in the OFF mode (X).
Line 4 shows a Temperature reading of 72 F.
Line 5 shows the Flow Rates for make-up/fill and bleed
waters at 15 and 10 gpm respectively, and the fill valve
in Automatic mode (A) and not running (no >).
Line 6 shows the Influent and Effluent Pressures at 25 and
20 psi respectively and the backwash program in the
Manual mode (M).
Line 7 shows control modes of the four Additives: Timer (T)
for additive 1, Daily Schedule (S) for additives 2 and 3,
Off (X) for additive 4.
Line 8 shows the Date and Time and an indication that the
Langelier Saturation Index (LSI) as OK. The line is
highlighted to give access to the Configuration Menu.
Data Entry Keyboard
The data entry keyboard replaces the knobs and switches of
conventional controllers. All operational entries such as choice
of operational mode, calibration, control setpoints, alarms and
programming are performed with the 16 keys of the keyboard.
The keyboard consists of a full 16-key numeric keypad. There
are ten digits from “0" to “9" plus the decimal point “.” for data
entry.
The operator navigates through all the menus and submenus
with the four directional arrow keys: UP, DOWN, LEFT, and
RIGHT.
The UP and DOWN ARROW keys move the cursor up and
down each screen - with looping capability at both the top and
the bottom of the screen. The RIGHT ARROW key is used to
enter a submenu. The LEFT ARROW key is used to exit a
submenu and return to the previous menu. The LEFT key can
be pressed repeatedly from any submenu to return to the main
display screen.
The “OK” key is used to confirm numerical data entry.

INTRODUCTION Page 7
PROGRAM MENUS
Welcome Screen
When power is applied to the controller, the CDCN displays the
Welcome Screen shown to the right. It shows the version of
operating software installed on the controller and the numbers
for Technical Support from the factory by phone 800-872-9436.
Display Screens
The Welcome Screen is followed by one of the display
screens, as shown on the right. The CDCN13 shows 8 lines of
display. The CDCN12 shows 4 lines with additional lines
available with the DOWN ARROW key.
The Display Screen is the normal monitoring screen. It
displays several lines of information, one for each operating
function and one for system conditions.
Each line displays operational information on five columns,
from left to right:
1. operational status (ON or OFF) with a small arrow
indicating outlet activation,
2. function identification: CONDUCTIVITY, pH, ORP,
TEMPERATURE, FLOWS, FILTER, and ADDITIVES,
3. Sensor readings,
4. units of measurement (US or metric),
5. operational mode, represented by a single letter:
A for automatic control,
M for manual operation,
T for cycle timer,
F for percent of flow,
S for daily schedule,
X for OFF.
Main Menus and Submenus
As shown on the Menu Tree next page, there are several Main
Menus that are accessed directly from the Display Screen, one
for each operating function and one for system configuration.
The Submenus are additional menus that are accessed from
the main menus or other submenus.
The four arrow keys located on the front panel keypad are
used to navigate through the menus. To access a submenu,
use the UP and DOWN ARROW keys to highlight the desired
line and press the RIGHT ARROW key. To exit from a
submenu, press the LEFT ARROW key.
In this chapter, menus and submenus are identified by their
line numbers that provide a road map for quick location.
Alarm Displays
Probe failure, out-of-range, overfeed and simulated low
chemical level conditions are indicated on the Display Screen
and on the Main Menus with flashing characters. For probe
failure, the display flashes “Probe” on the corresponding line.
Welcome Screen
CDCN13 Main Display
CDCN12 Main Display
The display flashes for out-of-range, overfeed or simulated low
chemical level alarm conditions. To determine the cause of
alarm, move down with the DOWN ARROW key and enter the
submenu with the RIGHT ARROW key.
PROGRAMMABLE
CONTROLLER
Version 1.7
TECHNICAL SUPPORT
OMEGA Phone 800-872-9436
COND 2000 uS A
pH 8.5 pH A
ORP 750 mV X
TEMP 72 F X
FLOW 15/10 gpm A
FILTER N.A.
ADDITIVES TSFS
06/31/04 19:06 LSI OK
COND 2000 uS A
pH 8.5 pH A
TEMP 72 F X
ADDITIVES TSFS
06/31/04 19:06 LSI OK

INTRODUCTION Page 8
Table II - Program Overview
MAIN
CONDUCTIVITY
Calibrate
Setpoint
Alarm Low
Alarm High
Time Limit
Run Time
Select Scale
pH
Calibrate
Setpoint
Alarm Low
Alarm High
Time Limit
Run Time
Last Shock
ORP
Calibrate
Setpoint
Alarm Low
Alarm High
Time Limit
Run Time
Probe Clean
TEMPERATURE
Calibrate
Alarm Low
Alarm High
MENUS
WATER LEVEL
Fill flow
Total
Bleed flow
Total
P influent
P effluent
Main Pump
BACKWASH
Start Date
Start Time
Filter Time
Advance Time
Number of Filters
Limit Timer
Pump Override
ADDITIVES
Inhibitor
Descaler
Biocide
Flocculant
CONTROLS
CONTROL TYPE
OFF
Manual
AutomaticCycle Timer
% of Flow
Daily Schedule
BLEED AND FEED
Feed %
Max Time
Daily Schedule
BLEED LOCKOUT
Lockout %
Lock memory
Pre-bleed
Pre-bleed
Pre-pH
DAILY SCHEDULE
Next date
Cycle (days)
Start time
Run time
Bleed lockout
Last date
CALIBRATION OPTIONS
1 Point (zero)
2 Point (slope)
3 Point (curve)
CONFIGURATION
Initial Setup
Operations
Communications
INITIAL SETUP
Language
Units
Code No.
Clock
Readings
Data Logging
Model Options
OPERATIONS
Audio Alarms
Bypass Line
Saturation Index
Print Reports
Reset
Battery
Probe Monitor
COMMUNICATIONS
Phone Numbers
Unit I.D.
Alarm Calling
CONDUCTIVITY
ACID / BASE
ORP
TEMPERATURE
FLOW RATES
FILTER
ADDITIVES
CONFIGURATION

INSTALLATION Page 9
CHAPTER II – INSTALLATION
See important safety information on the first page of the
manual.
UNPACKING
Immediately upon receipt of your shipment, check the shipping
carton carefully for damage and report any damage directly to
the shipping company. Please report any shortage
immediately to the factory.
Before opening the carton, check the outside label and verify
the model number and options. Unpack the carton carefully,
taking care not to lose any of the smaller parts, such PVC
fittings.
The controller carton should include the following:
- Controller Cabinet,
- Sensors as required for selected model,
- Instruction Manual and Warranty Card,
- Installation Report to be mailed back to the
factory upon completion of installation,
- PVC fittings and Tees, or optional assemblies.
INSTALLATION REPORT
The Installation Report is a triplicate form designed to assure
warranty coverage, technical updates and factory support.
1. White copy: to mail back to factory.
2. Pink copy: to Facilities Manager.
3. Yellow copy: to Qualified Dealer.
It must be filled out and signed by the Qualified Dealer and the
facilities manager upon completion of installation.
TECHNICAL SUPPORT
Please take the time to read this detailed Instruction Manual to
insure proper installation and operation. If you need further
technical assistance, you can Omega Engineering Inc. at 800-
872-9436.
OVERVIEW
The CDCN constitutes an integrated command center for
complete monitoring and control of all water treatment
operations, including chemistry and filtration.
All information provided by the sensors is processed by the
microprocessor on the Mother Board and displayed on the
Main Display screen. Command signals are then sent to the
different control outputs on the Power Board (see
ELECTRICAL below).
The schematic of installation in Figure 2 shows the principle of
installation for the CDCN13.
The schematic of installation in Figure 3 shows the principle of
installation for the CDCN12.
CONTROLLER CABINET
The CDCN controllers are contained in rain proof and splash
proof NEMA Type 4X cabinets. All electronic and electrical
components are mounted inside the cabinet on two separate
PC Boards. Outlets are provided on the bottom of the cabinet
for ½" conduit connectors.
The external dimensions of the cabinets and the positioning of
the mounting holes are shown in Error! Reference source not
found., Figure and Error! Reference source not found.. To
deter unauthorized removal, the mounting holes are accessible
only from the inside of the cabinet. To facilitate installation
however, external mounting ears are also included.
LOCATION
The cabinet should be mounted on a wall in a secure location:
- meeting electrical code requirements,
- within 10' (3 m) of the main recirculation line or of the bypass
line - unless special extension cables are used for the
sensors,
- not exposed to direct sunlight as the LCD display screen will
darken at high temperature,
- easily accessible to maintenance personnel,
- if possible, in a separate room, or in a well- ventilated room
as far away as possible from corrosive chemicals and
storage tanks,
- away from power transformers, pump motors or high voltage
power lines,
- safe from unauthorized access or vandalism.

INSTALLATION Page 10

INSTALLATION Page 11
INSTALLATION MUST FOLLOW
ALL APPLICABLE ELECTRICAL CODES.
Figure 2 – CDCN13 Controller Cabinet
Figure 3 – CDCN12 Controller Cabinet
RS232
Latch
On/Off
Latch
On/Off
RS232

INSTALLATION Page 12
ELECTRICAL
Electrical Codes
The controller is available in either hard-wiring or plug-in
configurations. Make sure to use the proper type of wiring
according to the local electrical code, usually the same as for
the chemical feeders.
The internal wiring of the controller is standard US, i.e.:
BLACK HOT
WHITE COMMON
GREEN GROUND
Grounding (GFI)
A grounding lug is provided on the left side of the cabinet. It is
important to connect it to a proper earth ground to prevent
dangerous current leakage and electrical shock. Ground Fault
Interruption (GFI) protection is also strongly recommended for
all installations.
AC Power Input
The CDCN is a dual-voltage controller with a voltage selector
switch located inside the cabinet on the Power Board (see next
page). Before connecting the unit to an external power supply,
make sure that the voltage selector switch is set to the proper
AC power input: 115 V or 230 V.
CAUTION: Damage resulting from improper voltage
selection is not covered by manufacturer
warranty.
Main Power Interlock
To prevent accidental chemical feeding, the controller and the
chemical feeders should always be interlocked - i.e. wired in
parallel - with the manual switch for the main pump so that
there is no danger of feeding the chemicals if there is no water
flow in the recirculation line.
Panel Interlock
For safety of operation, a panel interlock switch is mounted
inside the cabinet to shut off all internal power when the control
panel is open.
DO NOT ATTEMPT TO DEFEAT ITS PURPOSE !!!
PC Boards
There are two PC boards inside each controller cabinet: a
Power Board (Figure 4 or Figure 6) and a Mother Board
(Figure 5 or Figure 7). They contain all the electrical and
electronic components for the controller. The two boards are
connected together with a flexible ribbon connector.
The schematics for the two boards show the location of the key
components. In addition, all components are also labeled on
the PC boards themselves.
The PC boards are protected with a 1 A fuse that is mounted
on the upper right of the Power Board. If the fuse has to be
replaced, make sure to use a one (1) Amp fuse only. The use
of a larger fuse may cause irreparable damage to the
electronic boards.
Power Board
The Power Board (Figure 4 or Figure 6) is mounted on the
back panel of the controller cabinet. As shown on the
schematic, it contains all the high voltage (115 or 230 V)
circuits and components for inputs and outputs.
115V/230V Power Transformer
The CDCN is equipped with a switchable, dual voltage power
transformer that is mounted on the Power Board inside the
cabinet.
The voltage selector switch is located near the upper right of
the board. Always verify that the switch is set to the correct
voltage, either 115 or 230V. Connecting the controller to
higher voltage may cause damage to the electronics that is not
covered by the manufacturer’s warranty.

INSTALLATION Page 13
Figure 4 – CDCN13 Power Board
Figure 5 – CDCN13 Mother Board
RS232
RS485
A/B
Fuses
F2 Power Supply
AGC14 Fast Blow
F1 & F3 Main Pump
F4 & F5 Bleed, Additives 2,3,4
Oxi/De-Oxi, Filters
F6 & F7 Remote Alarm
All 5A Slow Blow
F8 & F9 Acid/Base
5A Slow Blow
F10 & F11 Additive 1
5A Slow Blow

INSTALLATION Page 14
Figure 6 – CDCN12 Power Board
Figure 7 – CDCN12 Mother Board

INSTALLATION Page 15
Relays and Fuses
The relays for the chemical feeders and other outputs are all
rated and fused at 5 A Slow Blow. Other signal relays are 2 A
at 30 V.
NOTE: The fuses for the Power Supply to the PC boards are
AGC-1 Fast fuses.
Make sure not to overload these relays. Chemical feed pumps
normally draw less than 5 A. However, if a pump draws more
than 5 A, it will need a motor starter or a magnetic switch.
NOTE: Depending on options selected, not all relays may be
included on the Power Board.
Fuses for CDCN13 Power Board
F2 Power Supply AGC 1 A Fast
F1 & 3 Main Pump 5A Slow Blow
F4 & 5 Bleed / Additives1/2/3
Oxidizer / Probe rinse
Water level / Filters 5A Slow Blow
F6 & 7 Alarm 5A Slow Blow
F8 & 9 Acid / Base 5A Slow Blow
F10 & 11 Additive 4 5A Slow Blow
Fuses for CDCN12 Power Board
F1 Power Supply AGC 1 A Fast
F2 & 3 Additive 1 5A Slow Blow
F4 & 5 Acid / Base 5A Slow Blow
F6 & 7 Additive 2 5A Slow Blow
F8 & 9 Bleed Valve 5A Slow Blow
Remote Alarm
On the CDCN13, the remote alarm is a 5A DPDT relay located
on the upper right corner of the Power Board. The remote
alarm relay can be set for dry or hot contacts, or for any
external signal.
To avoid damaging the Power Board, make sure to use the
right type of contacts. Call your dealer or the factory if you
are not sure.
With hot contacts, the controller powers the alarm with 110 or
230V, depending on the setting of the input voltage selector
switch (see preceding page). Connect the leads to the alarm
to the Normally Open contacts (NO1 and NO2) on the terminal
strip located next to the alarm relay.
With dry contacts, remove the shunts from J4 and J5 located
below fuses marked F7 and F6. Wire the remote alarm to NO1
and C1.
For an external power source, wire the input power to the
terminals marked NC1 and NC2. Wire the remote alarm to the
normally open contact (NO1 and NO2). The alarm voltage will
be the same as the external power source
Mother Board
The Mother Board (Figure 5 or Figure 7) is mounted directly
behind the face panel of the controller and contains all the low
voltage circuitry including the microprocessor and program
chips, the LCD display and the keyboard pad. It is also used
to connect all the sensors inputs.
The key electronic components are the microprocessor and the
programmable chips for Program, Display, Memory plus the
two voice option chips, Voice 0 and Voice 1. The program
chips are located in the center at the very top of the board.
They can be replaced for upgrading of the software program
but this should be done only by an experienced electronic
technician.
Sensor Connections
The pH and ORP sensors are connected to the outside of the
cabinet with bulkhead BNC connectors. The other sensors are
connected directly to the Terminal Barrier strips marked TB1 to
TB5 on the Mother Board, as shown on Figure 5. The
following list applies to the CDCN13
TB1 - Level control sensor and on/off flow switch
5= LOW White wire from level sensor
4=GND Black wire from level sensor
3= Flow Flow switch wire
2= GND Flow switch wire
1= +5 VDCRed wire from level sensor
TB2 - Pressure transducer
4=In White wire from influent transducer
3= Out White wire from effluent transducer
2=GND Black wire
1=24vdc Red wire from transducers
TB3 - Bleed water flow pulser
Hall-effect Reed switch
3=+5vdc Red wire to TB4 +24vdc N/A
2=Bypass White wire Red wire
1=GND Black wire Black wire
TB4 - Fill water flow pulser
Hall-effect Reed switch
3=+24vdc Red wire N/A
2= Main White wire Red wire
1= GND Black wire Black wire
TB5 - Temp & Conductivity, pH, ORP
8 = TDS red
7 = TDS black
6 = TEMP green & GND
5 = TEMP white
4 = pH shield
3 = pH signal
2 = ORP shield
1 = ORP signal
TB6 – RS485 Communications
TB7 - RS232 Communications
5 = Green
4 = Brown
3 = Black
2 = White
1 = Red

INSTALLATION Page 16
MODEM SPECIFICATIONS
FCC Registration Number
B46USA-22429-MN-E
Ring Equivalency Number
(REN)
0.2 A
Backup Battery
The 3V Backup Battery is located on the upper left of the
Mother Board. It is used to maintain the memory settings in
case of loss of AC power. This battery is designed to last for
several years in normal operation and for up to six months if
the AC power is shut off.
Under normal conditions, the controller will operate without
battery power. However the clock and other memory settings
will have to be restored in case of complete power shutdown.
The battery should be replaced if the voltage falls below 2.6 V.
This can be verified at any time in the Configuration Menu
using the Battery Submenu.
Remote Communications
The Remote Communications option connects the modem with
a standard US-type, 6-position RJ12 phone jack located on the
lower right of the Mother Board.
If possible, the controller should be connected to a direct
outside phone line dedicated for remote operation. If the
phone line is also used for voice communications, users should
wait for at least three rings to allow the modem to answer
before picking up the phone.
The modem is a combination Data/Fax/Voice multimedia
device registered by the Federal Communications Commission
(FCC), Number B46USA-22429-MN-E.
The Ring Equivalency Number (REN) is 0.2 A. Most telephone
companies require that the sum of all devices connected to a
telephone line do not exceed 5. If a problem arises as a result
of operating this equipment, you may have to provide
information about this modem to the telephone company or to
the FCC. If the equipment causes disruption to the telephone
network, the telephone company may disconnect your service.
Multiple Serial Connections
Up to thirty (30) CDCN controllers can be connected to a single
phone line or a single computer line by using a network
consisting of one host and many slaves through RS485 Serial
Connections (Option RS485).
Different models of CDCN controllers can be mixed and
matched in a network. Each controller is identified by an I.D.
number that is set up through software in the Communications
Submenu 8.3.2.
As shown in Figure 8, the host controller includes a modem
and an RS485 connection (Option REM). It is connected to the
phone line by modem or to a computer equipped with an
RS485 communication card. The slave units need only the
RS485 connection.
Any controller can be set up at any time as either host or slave
using the set of jumpers marked on the motherboard:
- Jumper J9 for CDCN13 controllers
(effective Rev. 7), or
- Jumper JP3 for CDCN12 controllers
(effective Rev. 2).
All slave units must be located within 3,000 feet of the host
controller and connected with two Category 5 wires (one pair).
The RS485 terminal has four terminals of which only the ones
marked A and B are used. Each unit must be wired A to A and
B to B for proper communications. The slave units can be
connected directly to the host unit or through any other slave
units.
CAUTION: Do not wire the connections marked 24 VDC or
GND on the RS485 terminal. This could cause serious
damage to the terminal.
Figure 8 - Multiple Controllers Connections

INSTALLATION Page 17
4-20 mA Converter Boards
The 4-20 mA Converter Boards are two optional boards, one
for sensor readings and one for control outputs. They convert
the digital outputs of the controller into analog signals that can
be used by analog monitoring and control equipment.
The two boards are identical and are normally installed at the
factory on the motherboard, as shown in Figure 9. The
location on the motherboard determines the function, i.e.
sensor signal or control outputs. Either board or both can be
installed, depending on requirements.
If the boards are installed properly, the controller software
automatically shows the 4-20 mA menu line in the Submenu
8.3 - Communications.
Field Installation
For field installation, turn off all power to the controller.
Position the converter board on top of the motherboard as
shown on Figure 9. Press the electrical connector J21 into the
socket of the motherboard marked JP1 (or JP2 depending on
option) and the three plastic standoffs fittings into the three
corresponding holes on the motherboard.
4-20 mA Connections
Figure shows the connections for each Converter Board.
Determine the type of signal required by the host system.
There are two types of signals used in 4-20mA
communications, Internal source or external sink. Each
communication channel has four sets of jumpers that must be
shunted to the proper setting. (Please note that the factory
settings are generally for internal source).
The 4-20mA output signals from the board are located on the
terminal boards marked TB1 and TB2. Each channel has a +
and - indication corresponding to the markings on the board.
The 4-20mA Signal Board has five communication channels for
pH, ORP, TDS, temperature and PPM readouts. Each analog
signal requires two wires for connection to the central
monitoring system.
The 4-20mA Control Board also has five pump control
channels for acid, sanitizer, oxidizer, de-oxidizer and base
feed. Each analog control signal requires two wires for
connection to the corresponding pump.
Figure 9 - Installing 4-20 mA Converter Boards
Figure 10 - 4-20 mA Converter Boards

INSTALLATION Page 18
PLUMBING
Plumbing includes installation of the sensors and connection of
the chemical feeders or control valves.
Installation of Sensors
The CDCN controller uses up to eight sensors for
measurement of water chemistry, temperature, flow rate,
pressure and water level:
- conductivity sensor for Total Dissolved Solids,
- potentiometric sensors for pH and ORP,
- thermistor for temperature,
- Hall effect pulse generator for flow rate,
- piezoelectric sensors for influent and effluent pressures,
- electro-optical water level sensor.
On small recirculation lines (2-inch pipe), the water chemistry
sensors (conductivity, pH, ORP and temperature) can be
installed directly on the main line using PVC reducing tees
(Figure 11).
On larger lines, the sensors should be mounted on a bypass
line, using either a Bypass Line Assembly (Figure 12) or a
Sensor Cell Cabinet (Figure 13).
In-line Installation (2" Pipe)
Use only 2x2x3/4 in. SST reducing tees without reducers. Do
not install the sensors near an elbow or a constriction where
there might be excessive turbulence.
Install the tees on the suction side of the pump and make sure
that the tip of the sensor is oriented downward - as shown in
Figure 11 - to avoid formation of air pockets near the tip. The
sensors should be readily accessible for servicing but not
exposed to physical damage.
After inserting the sensor, be careful not to overtighten the
compression fitting as it can crush the small glass tube inside
the sensor. Make it finger tight (no wrench).
Figure 11 - Sensor Tee
Bypass Line Installation
The CDCN Bypass Line Assembly (P/N BPL-0.5) shown in
Figure is recommended for installation of the sensors. It is
designed to assure a smooth and reliable flow of water. It
includes:
- PVC tees (3/4" SST),
- Fast & Tite fittings (3/4" MPT),
- In-line Y-filter (3/4" MPT),
- In-line visual flowmeter (3/4" FPT),
- On/off flow switch (3/4" FPT),
- Two (2) ball valves (3/4" SxS) for flow adjustment and for
isolating the bypass line during backwashing of the filter and
other maintenance operations,
- Ball valve for water sampling and testing.
The Bypass Line Assembly should be installed exactly as
shown on Figure . In particular, make sure to install the
flowmeter in a vertical position and to install the flow switch
downstream of (after) the sensors to assure a smooth flow of
water near the sensors.
Figure 12- Bypass Line Assembly
/