Page is loading ...

PLASMA CUTTING GUIDE
INSTRUCTIONS
Part #13689

2 Eastwood Technical Assistance: 800.544.5118 >> techelp@eastwood.com To order parts and supplies: 800.345.1178 >> eastwood.com 3
The EASTWOOD PLASMA CUTTING GUIDE was specifi cally designed to fi t the Eastwood Versa Cut
Plasma Cutter. This cutting guide will also work on other torches with a 0.95” (24mm) Nozzle.
It allows for easy cutting of straight lines, curves, radii, and circles.
WARNINGS
• Read Plasma Cutter’s Instruction Manual before attempting to use.
• DO NOT use without protective gloves, and long sleeve shirt or jacket.
• Protect lower legs and feet when using plasma cutter from heavy slag and sparks.
• Always use a minimum Shade 5 lens for eye protection.
SET-UP AND OPERATION
ATTACHMENT TO TORCH
1. Turn OFF and unplug
Plasma Cutter before
proceeding.
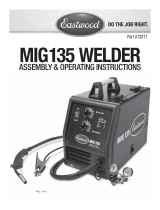
2. Determine the top and
bottom of the plasma
cutter guide by referring
to Fig. 1.
3. Insert the torch into the
cutting guide and tighten
the 2.5mm set screw to
secure the cutting guide to
the torch.
STRAIGHT LINE CUTTING
1. To confi gure the Eastwood
Plasma Cutting Guide
for Straight Line cutting,
remove the rod assembly
from the Cutting Guide.
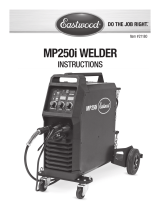
2. Install the cutting guide
onto the torch as shown
in Fig. 2.
NOTE: If the nozzle of the
torch is hitting the work
piece, the cutting guide is
installed upside down.
3. Align the wheels and torch
in the direction you would
like to make the cut and
lock the Cutting Guide from
rotating by tightening the set screw with a 2mm Allen wrench.
Fig. 1
Fig. 1
Fig. 3
Fig. 3
Fig. 2
Fig. 2
4. Measure and mark your material with a permanent or metal marker. This should be easy to see
so that it can be followed during the cutting process.
5. Line up your nozzle on the torch with your markings and begin cutting by rolling the cutting
guide across the surface. It is best to look where you’re heading while cutting rather than
directly in front of the cutting guide to achieve the straightest line possible.
CIRCLES AND RADII
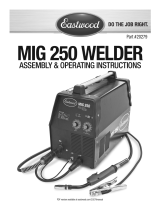
1. To confi gure the Eastwood Plasma Cutting Guide for Circles and radii cutting, install the rod
along with the center point mount (Fig. 3). Tighten the rod by threading into the cutting guide
and then secure by tightening the jam nut.
2. Determine the center point of your arc or circle and mark the piece of metal.
3. There are 2 ways to mount the cutting guide to the center point:
a. Use a center punch and mark the center point of the arc and place the tapered point of the
center point mount into the punch mark.
b. Drill a 3/16” hole at the center point. Remove the thumb screw in the center point mount
and install through the metal being cut. Make sure to put the spring on the underside of the
piece being cut to keep tension on the center point mount.
4. Once the cutting guide is centered, make a practice pass with the torch to determine the best
starting point of the cut. It is ideal to make the cut in one smooth motion without stopping the
cut; determine the best starting point to achieve this.
5. Once a starting point has been determined, the cut can be made; your speed of travel will
depend on your output Amp setting as well as your material thickness.
6. When fi nished making the cut of the arc or circle the piece will either fall out or still be attached
to the cutting guide depending on the center mounting method used.
2.5mm
torch
set screw
2mm cutting guide set screw
Direction
of cut
Plasma torch
installed
Smaller diameter ring faces up
Jam nut
Thumb screw
Rod assembly
Center point mount

© Copyright 2012 Easthill Group, Inc. Instruction part #13689Q Rev. 1/12
If you have any questions about the use of this product, please contact
The Eastwood Technical Assistance Service Department:
800.544.5118 >> email: techelp@eastwood.com
The Eastwood Company 263 Shoemaker Road, Pottstown, PA 19464, USA
US and Canada: 800.345.1178 outside US: 610.718.8335
Fax: 610.323.6268 eastwood.com
TROUBLESHOOTING
• Nozzle on torch contacts surface prohibiting the wheels on the guide from touching the surface
°
Remove the cutting guide and fl ip the guide over and reinstall.
• Torch does not completely cut through metal
°
Increase Amp output.
°
Increase Air Pressure but do not exceed 60psi.
°
Decrease travel speed of torch.
/